

ubuntu14.04 LEMP(linux+nginx+mysql+php5)构建环境,

ubuntu14.04 LEMP(linux+nginx+mysql+php5)构建环境,
Install LEMP (Linux, Nginx, MySQL and PHP) Stack on Ubuntu Linux 14.04 LTS
by VIVEK GITE on DECEMBER 2, 2014I'm a new Ubuntu Linux user. How do I install the LEMP stack on an Ubuntu Linux 14.04 LTS server using command line options to serve dynamic web apps?
What is new in Ubuntu 14.04 (Trusty Tahr) version?
You may see it on cyberciti.biz or visit the Ubuntu home page at ubuntu.com.
Nginx Installation
Nginx is one of the robust web server in Linux world. Nginx is a free, open source, high performance HTTP server and reverse proxy, as weell as an IMAP/POP3 proxy server. Now, we are going to install Nginx web server.
First, make sure system is upto date:
$ sudo apt-get update
#1 - Download and Install Nginx
The easiest way to download and install Nginx is using apt-get command. Here is the command:
$ sudo apt-get install nginx
Fig.01: Download and Install Nginx on Ubuntu Linux
#2 - Test Nginx
Once it get done, you can open your browser and type url http://localhost or http://your_ip_address to test it. If everything goes normal, you will see Nginx welcome page:
Fig.02: Welcome nginx page on Ubuntu Linux
MySQL Installation On Ubuntu
MySQL is one of the most powerful database management system in Linux world. Next, we are going to install it with PHP support.
#1 - Install MySQL and PHP support
Type the following command:
$ sudo apt-get install mysql-server php5-mysql
Fig.03: Ubuntu Linux Install MySQL to Manage Site Data with PHP
#2 - Test MySQL
Once mysql installation finished, we can test it. Open your console and type the following command:
$ mysql -u root -p
Fig.04: Ubuntu test Mysql installation
#3 - Securing access to MySQL
If we are going to use MySQL as a production database, we may want to secure it. MySQL provides a shell script to help us securing it. Just type the following command on your console:
$ sudo mysql_secure_installation
1. Enter your root password
Enter your current root password to continue to the next step.
Fig.05: MySQL enter your root db password
2.Change the root password
If you want to change it, press Y. Otherwise, press N.
Fig.06: MySQL security
3.Remove anonymous user
It is recommended to remove anonymous user to mitigate risk who can log in into your database.
Fig.07: MySQL security
4.Disallow root login remotely
To make sure that no one remote your database as root from another machines, we need to disallow root login remotely.
Fig.08: MySQL security
5.Remove test database
Sometimes some MySQL installation will create a database named ëtestí for testing purpose. We can remove it if we donít use it.
Fig.09: MySQL security
6.Reload privilege tables
Then we need to reloading the privilege tables to ensure all changes made so far will take effect immediately.
Fig.10: MySQL security
7.Done
Fig.11: MySQL securityPHP Installation For Server Side Scripting
Since PHP is popular, a lot of websites is built using PHP language. As of January 2013, PHP was installed on more than 240 millions websites. Now we are going to install PHP on Ubuntu 14.04
#1 - Download and install PHP
As usual, we can download and install PHP using apt-get command. Just type the following command on your Ubuntu console or over the ssh based session:
$ sudo apt-get install php5-fpm
Fig.12: Install PHP for Server Side Processing on Ubuntu
Configure Nginx to work with PHP and MySQL Server on Ubuntu
Now we have all components installed. The next step is we need to configure Nginx with PHP and MySQL. Let's start to configure them.
#1 - Configure PHP5-FPM
PHP5-FPM configuration file is located at /etc/php5/fpm/php.ini. Open it with your text editor
$ sudo vi /etc/php5/fpm/php.ini
cgi.fix_pathinfo=1
cgi.fix_pathinfo=0
$ sudo service php5-fpm restart
#2 - Configure Nginx
Nginx configuration file is located at /etc/nginx/nginx.conf. But basically, we don't need to touch it. The configuration of nginx website is located in /etc/nginx/sites-available/default file.
location ~ \.php$ {
fastcgi_split_path_info ^(.+\.php)(/.+)$;
# # NOTE: You should have "cgi.fix_pathinfo = 0;" in php.ini
#
# # With php5-cgi alone:
# fastcgi_pass 127.0.0.1:9000;
# # With php5-fpm:
fastcgi_pass unix:/var/run/php5-fpm.sock;
fastcgi_index index.php;
include fastcgi_params;
}
Then restart the services.
$ sudo service nginx restart
$ tail /var/log/nginx/error.log
fastcgi_pass unix:/var/run/php5-fpm.sock
location ~ \.php$ {
#3 - Configure MySQL
After the configuration section is done, now we need to test them to make sure that our configuration is working as required. On Ubuntu 14.04 the root document folder is located in /usr/share/nginx/html. So create a file called /usr/share/nginx/html/phpinfo.php with the following code:
[php] view plaincopyAfter restarting PHP-FPM and Nginx, open the browser and browse to the php file, we got only a blank screen. No error message on the screen. No error message on PHP-FPM and Nginx log file.
And then open the browser again and type url http://your_ip_address/phpinfo.php
To enable short php tag, we need to change the value of short_open_tag parameter on php.ini file:
sudo service php5-fpm restart
Then try again to test your phpinfo file. Next, we will see if the MySQL support is enabled or not. Scroll down the php configuration screen on your browser, if you see MySQL block there, then MySQL support already enabled.
You are now ready to use Nginx, PHP5 and MySQL on Ubuntu server. I hope this quick article help anyone who wish to install Linux, Nginx, PHP and MySQL on Ubuntu 14.04.

ホットAIツール

Undresser.AI Undress
リアルなヌード写真を作成する AI 搭載アプリ

AI Clothes Remover
写真から衣服を削除するオンライン AI ツール。

Undress AI Tool
脱衣画像を無料で

Clothoff.io
AI衣類リムーバー

Video Face Swap
完全無料の AI 顔交換ツールを使用して、あらゆるビデオの顔を簡単に交換できます。

人気の記事
ホットツール

メモ帳++7.3.1
使いやすく無料のコードエディター

SublimeText3 中国語版
中国語版、とても使いやすい

ゼンドスタジオ 13.0.1
強力な PHP 統合開発環境

ドリームウィーバー CS6
ビジュアル Web 開発ツール

SublimeText3 Mac版
神レベルのコード編集ソフト(SublimeText3)
ホットトピック
 7733
7733
 15
1643
14
1397
52
1290
25
1233
29
15
1643
14
1397
52
1290
25
1233
29

 Windows 回復環境を起動できない
Feb 19, 2024 pm 11:12 PM
Windows 回復環境を起動できない
Feb 19, 2024 pm 11:12 PM
Windows 回復環境 (WinRE) は、Windows オペレーティング システムのエラーを修復するために使用される環境です。 WinRE に入ると、システムの復元、出荷時設定へのリセット、アップデートのアンインストールなどを実行できます。 WinRE を起動できない場合、この記事では問題を解決するための修正方法を説明します。 Windows 回復環境を起動できない Windows 回復環境を起動できない場合は、以下の修正プログラムを使用してください。 Windows 回復環境のステータスを確認する 他の方法を使用して Windows 回復環境に入る Windows 回復パーティションを誤って削除しましたか?以下の Windows のインプレース アップグレードまたはクリーン インストールを実行します。これらすべての修正については詳しく説明しています。 1]Wiをチェックする
 Python と Anaconda の違いは何ですか?
Sep 06, 2023 pm 08:37 PM
Python と Anaconda の違いは何ですか?
Sep 06, 2023 pm 08:37 PM
この記事では、Python と Anaconda の違いについて学びます。パイソンとは何ですか? Python は、行をインデントし空白を入れることでコードを読みやすく理解しやすくすることに重点を置いたオープンソース言語です。 Python は柔軟性と使いやすさを備えているため、オンライン アプリケーションの作成や開発だけでなく、科学コンピューティング、人工知能、データ サイエンスなどのさまざまなアプリケーションに最適です。 Python はインタープリタ言語であるため、テストされるとすぐに機械語に翻訳されます。 C++ などの一部の言語は、理解するためにコンパイルが必要です。 Python は理解、開発、実行、読み取りが非常に簡単であるため、Python の習熟度は重要な利点となります。これにより Python が作成されます
 カスタム WordPress ユーザー フローの構築、パート 3: パスワードのリセット
Sep 03, 2023 pm 11:05 PM
カスタム WordPress ユーザー フローの構築、パート 3: パスワードのリセット
Sep 03, 2023 pm 11:05 PM
このシリーズの最初の 2 つのチュートリアルでは、新しいユーザーのログインと登録のためのカスタム ページを作成しました。さて、ログイン フローのうち調査して置き換える部分は 1 つだけ残っています。ユーザーがパスワードを忘れて WordPress パスワードをリセットしたい場合はどうなりますか?このチュートリアルでは、最後のステップに取り組み、シリーズ全体で構築してきたパーソナライズされたログイン プラグインを完成させます。 WordPress のパスワード リセット機能は、今日の Web サイトの標準的な方法にほぼ準拠しています。ユーザーは、ユーザー名または電子メール アドレスを入力し、WordPress にパスワードのリセットを要求することによってリセットを開始します。一時的なパスワード リセット トークンを作成し、ユーザー データに保存します。このトークンを含むリンクがユーザーの電子メール アドレスに送信されます。ユーザーがリンクをクリックします。重い中で
 ChatGPT Java: インテリジェントな音楽推奨システムを構築する方法
Oct 27, 2023 pm 01:55 PM
ChatGPT Java: インテリジェントな音楽推奨システムを構築する方法
Oct 27, 2023 pm 01:55 PM
ChatGPTJava: インテリジェントな音楽推奨システムを構築する方法、具体的なコード例が必要です はじめに: インターネットの急速な発展に伴い、音楽は人々の日常生活に欠かせないものになりました。音楽プラットフォームが出現し続けるにつれて、ユーザーはしばしば共通の問題に直面します。それは、自分の好みに合った音楽をどうやって見つけるかということです。この問題を解決するために、インテリジェント音楽推薦システムが登場しました。この記事では、ChatGPTJava を使用してインテリジェントな音楽推奨システムを構築する方法を紹介し、具体的なコード例を示します。いいえ。
 スムーズなビルド: Maven イメージ アドレスを正しく構成する方法
Feb 20, 2024 pm 08:48 PM
スムーズなビルド: Maven イメージ アドレスを正しく構成する方法
Feb 20, 2024 pm 08:48 PM
スムーズなビルド: Maven イメージ アドレスを正しく構成する方法 Maven を使用してプロジェクトをビルドする場合、正しいイメージ アドレスを構成することが非常に重要です。ミラー アドレスを適切に構成すると、プロジェクトの構築を迅速化し、ネットワークの遅延などの問題を回避できます。この記事では、Maven ミラー アドレスを正しく構成する方法と、具体的なコード例を紹介します。 Maven イメージ アドレスを構成する必要があるのはなぜですか? Maven は、プロジェクトの自動構築、依存関係の管理、レポートの生成などを行うことができるプロジェクト管理ツールです。 Maven でプロジェクトをビルドする場合、通常は
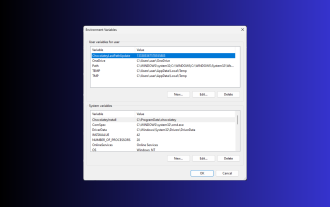 Windows 3 で環境変数を設定する 11 の方法
Sep 15, 2023 pm 12:21 PM
Windows 3 で環境変数を設定する 11 の方法
Sep 15, 2023 pm 12:21 PM
Windows 11 で環境変数を設定すると、システムのカスタマイズ、スクリプトの実行、アプリケーションの構成に役立ちます。このガイドでは、好みに合わせてシステムを構成できるように、3 つの方法と段階的な手順について説明します。環境変数には 3 つのタイプがあります。 システム環境変数 – グローバル変数は優先順位が最も低く、Windows 上のすべてのユーザーとアプリケーションがアクセスでき、通常はシステム全体の設定を定義するために使用されます。ユーザー環境変数 – 優先度が高く、これらの変数は現在のユーザーとそのアカウントで実行されているプロセスにのみ適用され、そのアカウントで実行されているユーザーまたはアプリケーションによって設定されます。プロセス環境変数 – 最も高い優先順位があり、一時的なもので、現在のプロセスとそのサブプロセスに適用され、プログラムを提供します。
 Maven プロジェクトのパッケージ化プロセスを最適化し、開発効率を向上させます。
Feb 24, 2024 pm 02:15 PM
Maven プロジェクトのパッケージ化プロセスを最適化し、開発効率を向上させます。
Feb 24, 2024 pm 02:15 PM
Maven プロジェクトのパッケージ化ステップ ガイド: ビルド プロセスを最適化し、開発効率を向上させる ソフトウェア開発プロジェクトがますます複雑になるにつれて、プロジェクト構築の効率と速度は開発プロセスにおいて無視できない重要な要素になっています。人気のあるプロジェクト管理ツールとして、Maven はプロジェクトの構築において重要な役割を果たします。このガイドでは、Maven プロジェクトのパッケージ化手順を最適化することで開発効率を向上させる方法を検討し、具体的なコード例を示します。 1. プロジェクトの構造を確認する Maven プロジェクトのパッケージ化ステップの最適化を開始する前に、まず確認する必要があります。
 Python を使用してインテリジェントな音声アシスタントを構築する方法
Sep 09, 2023 pm 04:04 PM
Python を使用してインテリジェントな音声アシスタントを構築する方法
Sep 09, 2023 pm 04:04 PM
Python を使用してインテリジェントな音声アシスタントを構築する方法 はじめに: 現代テクノロジーの急速な発展の時代において、インテリジェントなアシスタントに対する人々の需要はますます高まっています。その形態の一つとして、スマート音声アシスタントは、携帯電話、パソコン、スマートスピーカーなど、さまざまなデバイスで広く利用されています。この記事では、Python プログラミング言語を使用してシンプルなインテリジェント音声アシスタントを構築し、独自のパーソナライズされたインテリジェント アシスタントを最初から実装する方法を紹介します。準備 音声アシスタントの構築を始める前に、まず必要なツールをいくつか準備する必要があります。
