…言い換えれば、組み込みシステムに侵入する最も愚かな方法です。
ここで実際の動作をご覧ください!
目標は単純でした。 C または C++ でコードを作成し、Scratch で実行できるようにします。正直に言うと、私はこのアイデアがとても面白いと思いました。最も遅いプログラミング言語の 1 つで、最も速いプログラミング言語の 1 つを使用するということです。可能性はあると感じていましたが、どうやって実現するのかはよく分かりませんでした。その過程で、私はアセンブリ言語、プロセス メモリ、実行可能ファイルについて予想よりも多くのことを学びました。私のこれまでの道のりを語るとともに、皆さんも何か新しいことを学んでいただければ幸いです。
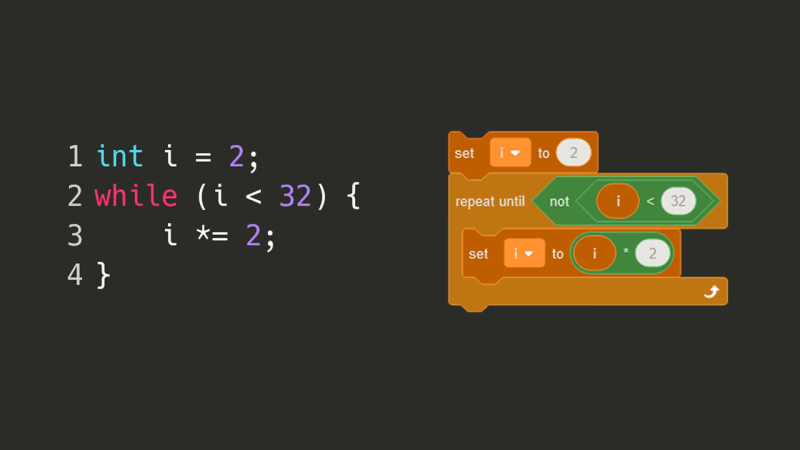
私の最初のアイデアは、C で書いたコードをいくつかの部分に分割し、Scratch を使用してそれらの部分を元に戻すというものでした。たとえば、C の while ループは、Scratch のブロックまでの繰り返しになる可能性があります:
C コンパイラーがコードを理解するには、まず AST (抽象構文ツリー) を生成する必要があります。AST (抽象構文ツリー) は、ソース コード内の各重要なシンボルをツリー表現したものです。たとえば、開き括弧、変数の名前、または return キーワードは、それぞれ別個のノードに変換される場合があります。しかし、簡単なフィボナッチ数プログラムの AST を調べてみると…
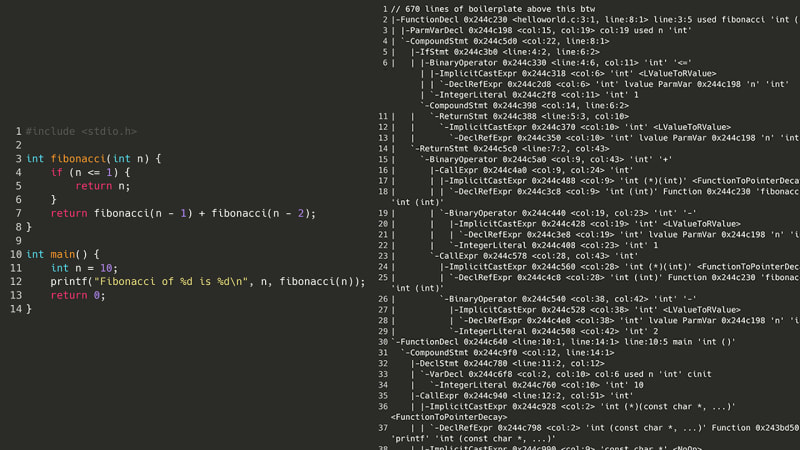
なるほど、それは問題外でした。しかし、ソース コードを再コンパイルする代わりに、はしごを 1 つ下に進んで、アセンブリを実行したらどうなるでしょうか?プログラムを実行するには、まずプログラムをアセンブリにコンパイルする必要があります。私のコンピュータでは、それは x86-64asm です。アセンブリには複雑な入れ子構造、クラス、さらには変数がないため、アセンブリ命令のリストを解析することは、上記のような AST のスパゲッティ モンスターを解析するよりも (理論上は) 簡単です。これは同じフィボナッチ プログラムですが、x86 アセンブリでのものです。
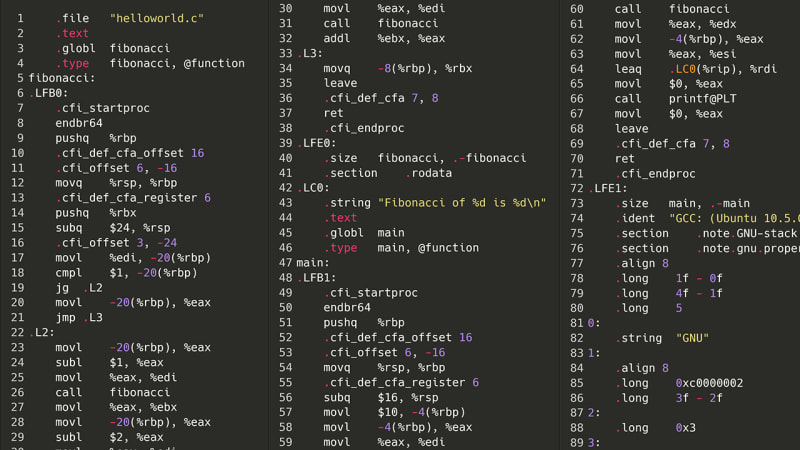
ああ、兄弟。まあ、それはそれほど悪くないかもしれません。命令は合計でいくつありますか?
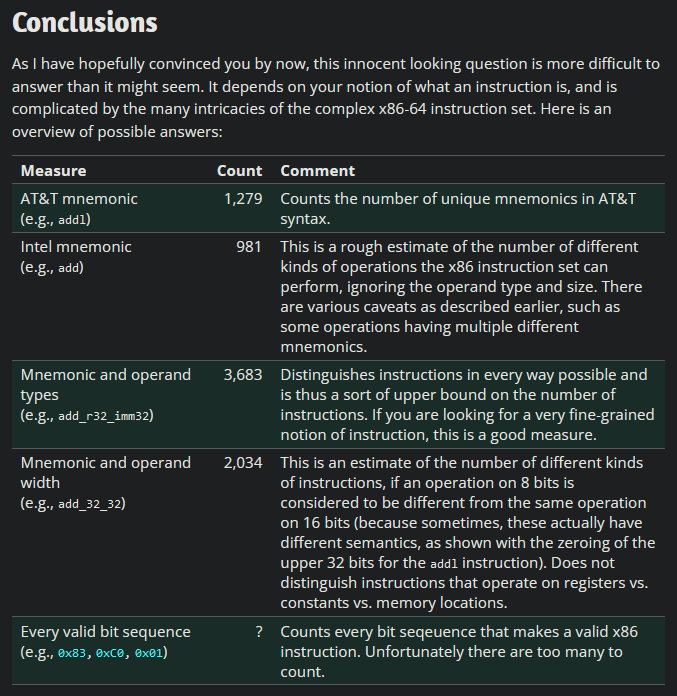
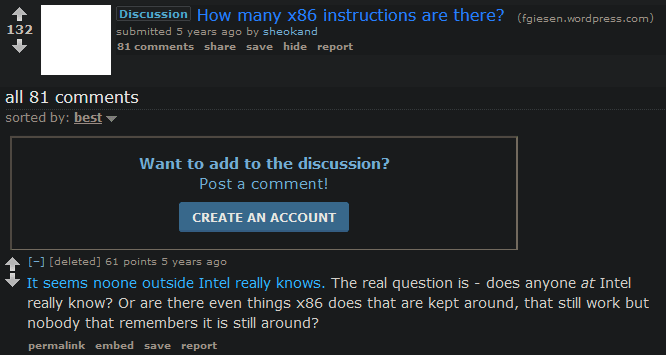
ありがたいことに、世の中に存在するアセンブリ言語は x86 だけではありません。大学の授業の一環として、私は MIPS について学びました。MIPS は、90 年代から 2000 年代初頭にかけて一部のビデオ ゲーム機やスーパーコンピューターで使用されていた (過度に単純化された) アセンブリ言語の一種で、現在でも多少の用途が見られます。 x86 から MIPS に切り替えると、命令数が *不明 * から約 50 に減少します。
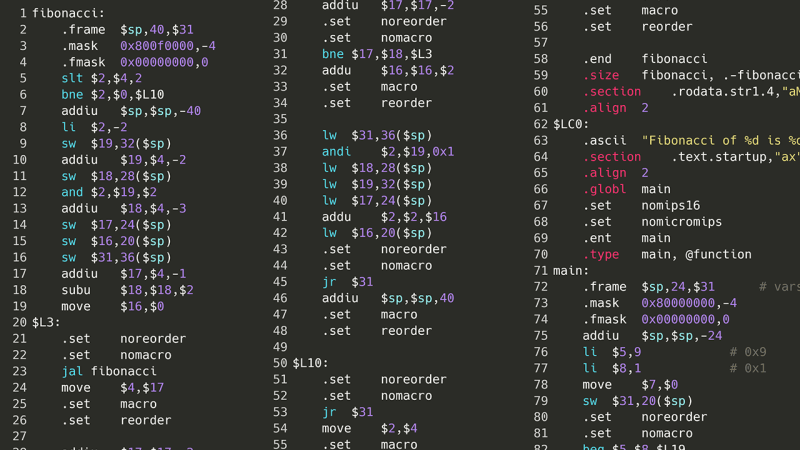
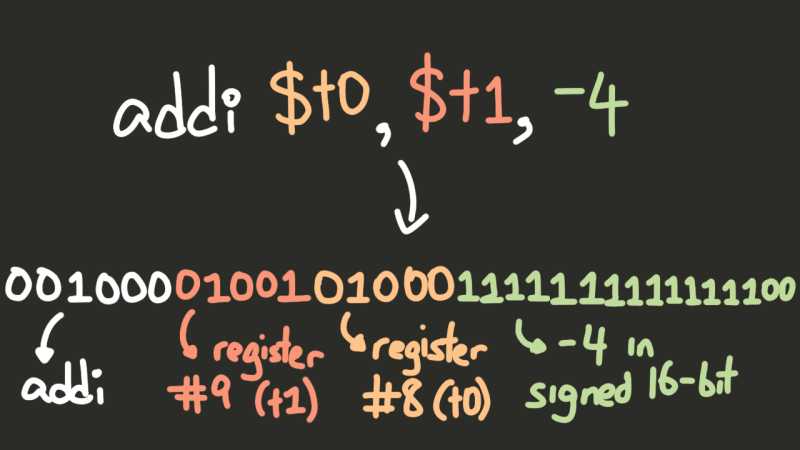
MIPS の 32 ビット バージョンを使用すると、このアセンブリ コードはマシン コードに変換され、プロセッサのアーキテクチャによって設定されたガイドラインに基づいて、各命令がプロセッサが理解できる 32 ビット整数に変換されます。 MIPS 命令セット アーキテクチャに関する本はオンラインで入手できるので、マシン コードを取得して、MIPS プロセッサの動作を正確にエミュレートすれば、Scratch で C コードを実行できるはずです!
これで邪魔にならないので、始めましょう。
そうですね、すでに問題が発生しています。通常、整数があり、そこから一連のビットを取り出したい場合は、num とマスクを計算します。マスクは、重要な各ビットが 1、重要でない各ビットが 0 である整数です。
   001000 01001 01000 1111111111111100
 & 000000 00000 00000 1111111111111111
--------------------------------------
   000000 0000 000000 1111111111111100
問題は? Scratch には & 演算子はありません。
ここで、*単純に両方の数値を少しずつ調べて、2 ビットの 4 つの可能な組み合わせをそれぞれチェックすることもできますが、それは無駄に時間がかかります。結局のところ、これは *命令ごとに複数回実行する必要があります。代わりに、もっと良い計画を思いつきました。
まず、0 から 255 までのすべての x とすべての y について x と y を計算する簡単な Python スクリプトを作成しました。
for x in range(256):
    for y in range(256):
        print(x & y)

0      (0 & 0 == 0)
0      (0 & 1 == 0)
0      (0 & 2 == 0)
...
0      (0 & 255 == 0)
0      (1 & 0 == 0)
1      (1 & 1 == 1)
0      (1 & 2 == 0)
...
254    (255 & 254 == 254)
255    (255 & 255 == 255)
ここで、たとえば 2 つの 32 ビット整数の x と y を計算するには、次のようにすることができます:
Split x and y into four 8-bit integers (or bytes).
Check what first_byte_in_x & first_byte_in_y is by looking in the table generated from the Python script.
Similarly, look up what second_byte_in_x & second_byte_in_y is, and the third bytes, and the fourth bytes.
Take the results of each of these calculations, and put them together to get the result of x & y .
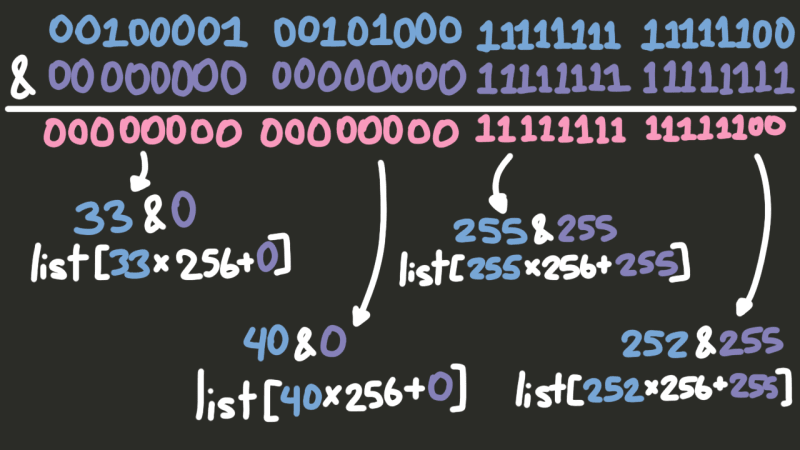
However, once a MIPS instruction has been cut up into four bytes, we’ll only & the bytes we need. For example, if we only need data from the first byte, we won’t even look at the bottom three. But how do we know which bytes we need? Based on the opcode (i.e. the “type”) of an instruction, MIPS will try to split up the bits of an instruction in one of three ways.
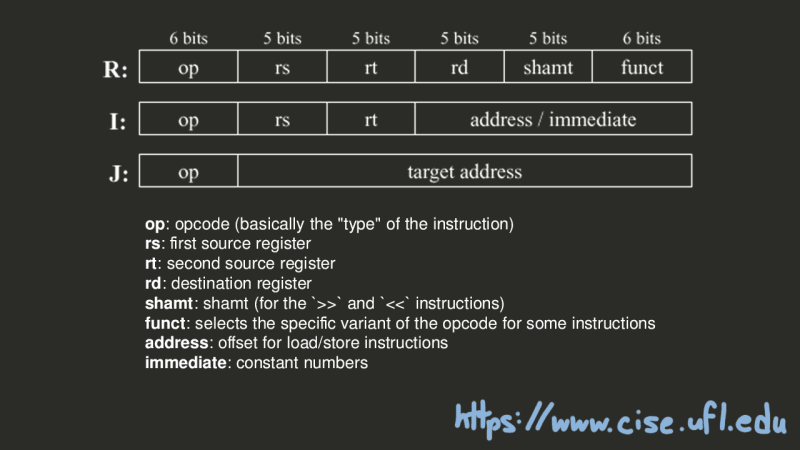
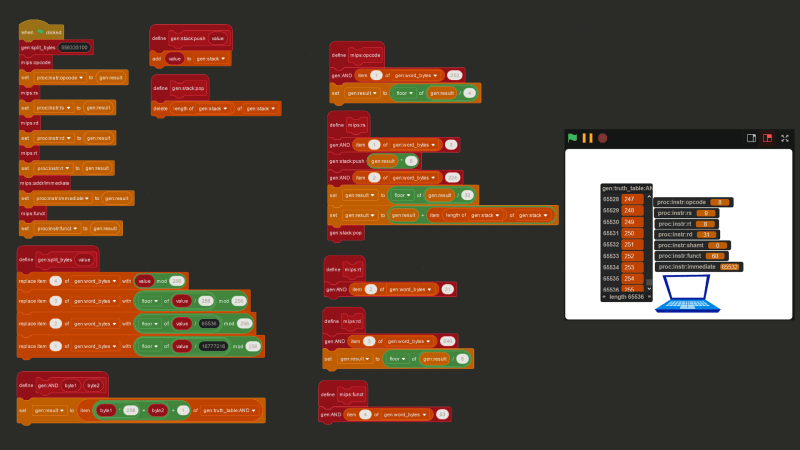
Putting everything together, below is the Scratch code to extract opcode, $rs, $rt, $rd, shamt, funct, and immediate for any instruction.
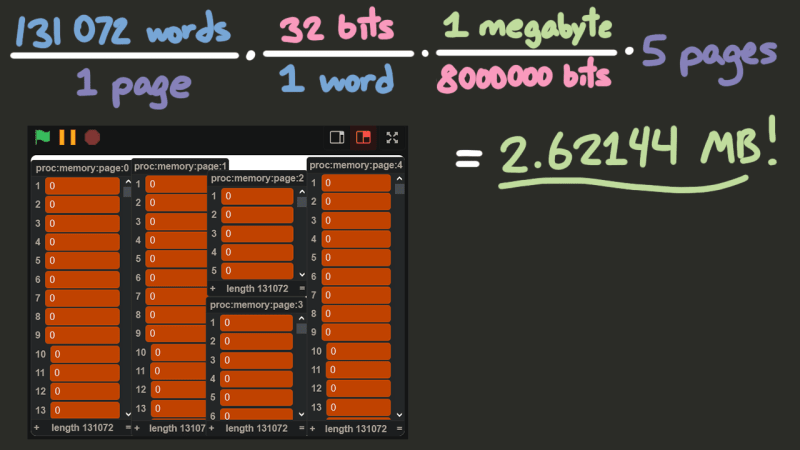
So, how much memory should our processor actually have? And how should we store it? Well, minimum, MIPS processors have 31 general-purpose registers, and one $zero register that is meant to store the number 0 at all times. A register is a location in memory that a processor can access quickly. We can represent these 32 registers as a list with 32 items in Scratch. As for the rest of the memory, simulating a processor moving chunks of data in and out of its cache in Scratch would be pretty pointless and would actually slow things down, rather than speed them up. So instead, the physical memory will be represented as five lists containing 131,072 elements each, where each element will be a 32-bit integer, giving us about 2.6MB of memory. A contiguous block of memory like these lists is usually called a “page”, and the size of the data that the instruction set works with (in this case 32 bits) is usually called a “word”.
So, how do we get machine code in here? We can’t just import a file into Scratch. But we *can *import text! So, I wrote a program in C to take a binary executable file, and convert every 32 bytes of the file into an integer. C, by default, was reading each byte in little-endian, so I had to introduce a function to flip the endianness. Then, I can save the machine code of a program as a text file (a list of integers), and then import it into my proc:memory:program variable.
#include <stdio.h>

unsigned int flip_endian(unsigned int value) {
    return ((value >> 24) & 0xff) | ((value >> 8) & 0xff00) | ((value << 8) & 0xff0000) | ((value << 24) & 0xff000000);
}

int main(int argc, char* argv[]) {
    if (argc != 3 && argc != 2) {
        printf("Usage: %s <input file> <output file?>\n", argv[0]);
        return 1;
    }

    FILE* in = fopen(argv[1], "r");
    if (!in) {
        perror("fopen");
        return 1;
    }

    unsigned int value;

    FILE* out = argc == 3 ? fopen(argv[2], "w") : stdout;
    if (!out) {
        perror("fopen");
        return 1;
    }

    while (fread(&value, sizeof(value), 1, in) == 1) {
        fprintf(out, "%u\n", flip_endian(value));
    }

    fclose(in);
    if (out != stdout) {
        fclose(out);
    }
    return 0;
}
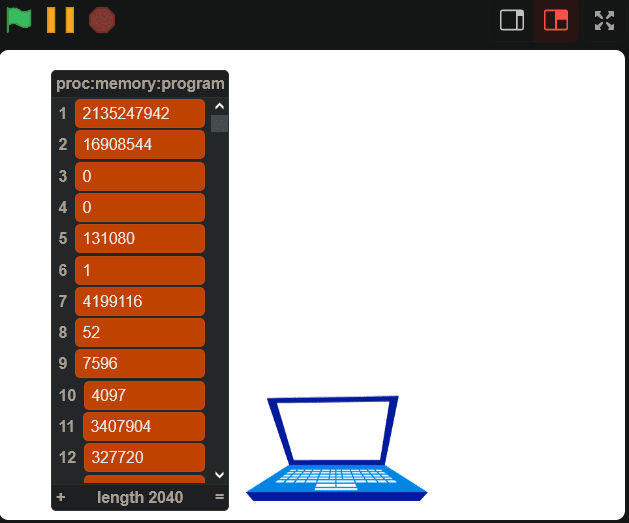
Okay, so now that we can import the data into Scratch, we can just set the program counter (the integer keeping track of the current instruction) to the top of the list, and start executing instructions, right?
Wrong.
I didn’t realize this going into this project, but the first several bytes of an executable file *aren’t *instructions, but a header identifying what type of executable file it is. On Windows, it’ll usually be the PE, or Portable Executable, format, and on UNIX-based systems (the version we’ll be using) it’ll be the ELF format. So, how do we actually know where the code starts? On Linux, we can use the builtin readelf utility to actually see what’s in the ELF header, and the Linux Foundation has a page detailing the ELF header standard. So, we can use the LF page to figure out which bytes mean what, and the readelf command to “check our work”.
 $ readelf -h fibonacci
ELF Header:
  Magic:   7f 45 4c 46 01 02 01 00 00 00 00 00 00 00 00 00
  Class:                             ELF32
  Data:                              2's complement, big endian
  Version:                           1 (current)
  OS/ABI:                            UNIX - System V
  ABI Version:                       0
  Type:                              EXEC (Executable file)
  Machine:                           MIPS R3000
  Version:                           0x1
  Entry point address:               0x4012cc
  Start of program headers:          52 (bytes into file)
  Start of section headers:          7596 (bytes into file)
  Flags:                             0x1001, noreorder, o32, mips1
  Size of this header:               52 (bytes)
  Size of program headers:           32 (bytes)
  Number of program headers:         5
  Size of section headers:           40 (bytes)
  Number of section headers:         14
  Section header string table index: 13
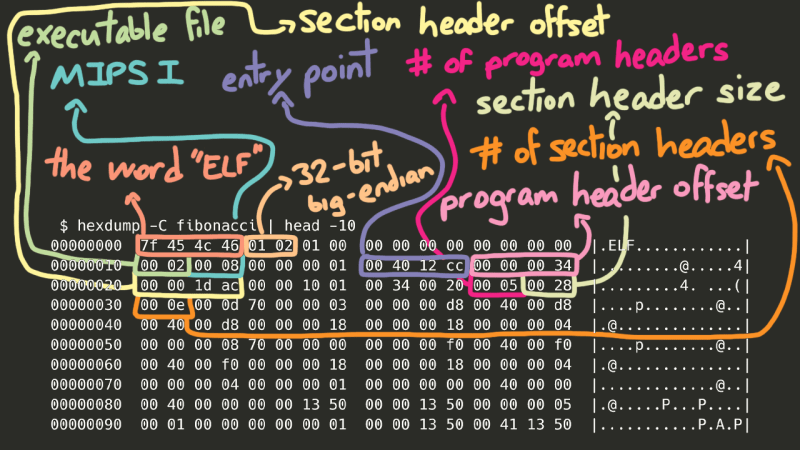
Now, there’s a lot of really interesting stuff here, but to save some time, the *really *important data here (besides the entry point, of course) are the section headers. Oversimplifying greatly, in order for our program to run correctly, we need to take certain chunks of the file and place them in certain parts of memory so our code can access them.
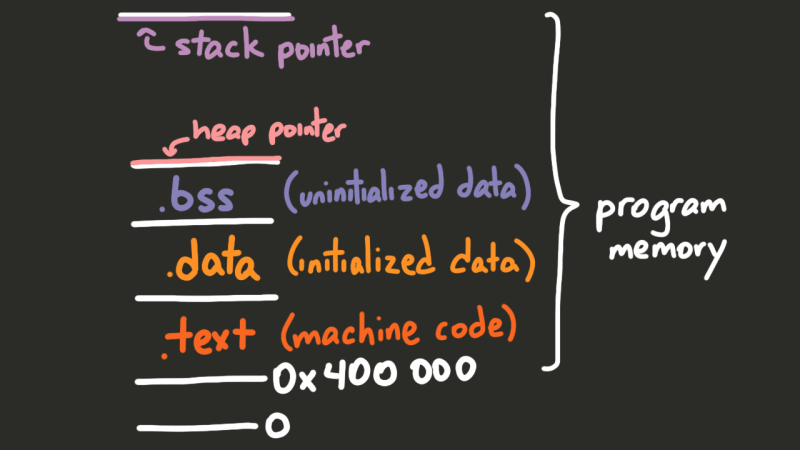
Using the readelf utility, we can actually see all of the sections in the file:
 $ readelf -S fibonacci
There are 14 section headers, starting at offset 0x1dac:

Section Headers:
  [Nr] Name              Type            Addr     Off    Size   ES Flg Lk Inf Al
  [ 0]                   NULL            00000000 000000 000000 00      0   0  0
  [ 1] .MIPS.abiflags    MIPS_ABIFLAGS   004000d8 0000d8 000018 18   A  0   0  8
  [ 2] .reginfo          MIPS_REGINFO    004000f0 0000f0 000018 18   A  0   0  4
  [ 3] .note.gnu.build-i NOTE            00400108 000108 000024 00   A  0   0  4
  [ 4] .text             PROGBITS        00400130 000130 001200 00  AX  0   0 16
  [ 5] .rodata           PROGBITS        00401330 001330 000020 00   A  0   0 16
  [ 6] .bss              NOBITS          00411350 001350 000010 00  WA  0   0 16
  [ 7] .comment          PROGBITS        00000000 001350 000029 01  MS  0   0  1
  [ 8] .pdr              PROGBITS        00000000 00137c 000440 00      0   0  4
  [ 9] .gnu.attributes   GNU_ATTRIBUTES  00000000 0017bc 000010 00      0   0  1
  [10] .mdebug.abi32     PROGBITS        00000000 0017cc 000000 00      0   0  1
  [11] .symtab           SYMTAB          00000000 0017cc 000380 10     12  14  4
  [12] .strtab           STRTAB          00000000 001b4c 0001db 00      0   0  1
  [13] .shstrtab         STRTAB          00000000 001d27 000085 00      0   0  1
Key to Flags:
  W (write), A (alloc), X (execute), M (merge), S (strings), I (info),
  L (link order), O (extra OS processing required), G (group), T (TLS),
  C (compressed), x (unknown), o (OS specific), E (exclude),
  p (processor specific)
Going through all the details of the ELF format could be its own multi-part write-up, but using the Linux Foundation page on section headers, I was able to decipher the section header bytes of the program, and copy all the important bytes from the proc:memory:program variable to the correct places in memory, by checking whether or not the section header had the ALLOCATE flag set.
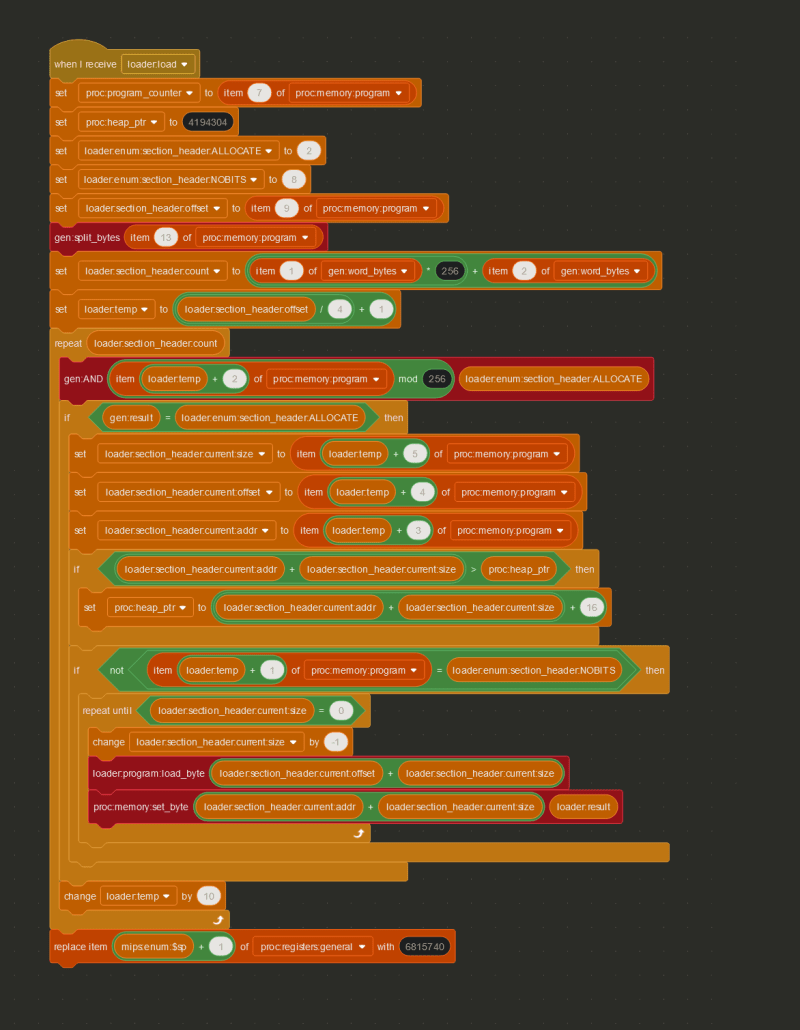
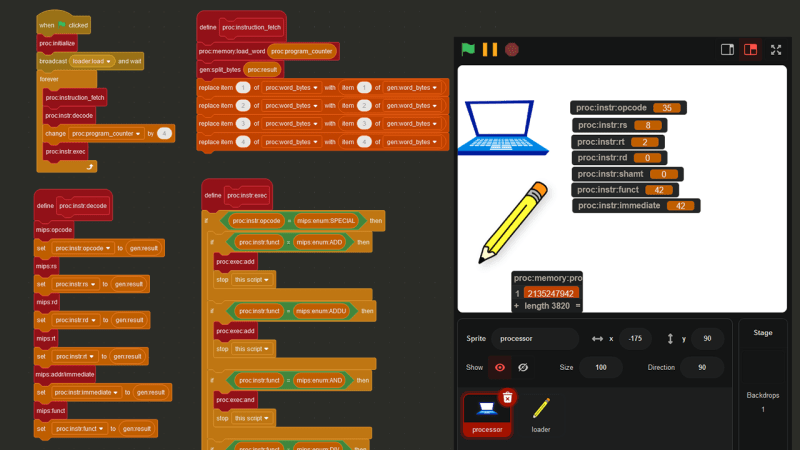
Fast-forwarding about a week to the point where all of the important instructions have been implemented, let’s take a look at the steps the processor (or really, any processor) needs to take in order to understand just one instruction, using 0x8D02002A (2365718570) as an example.
The first step is called **INSTRUCTION FETCH. **The current instruction is retrieved from the address stored in the proc:program_counter variable.
The next step is INSTRUCTION DECODE, where the instruction is decoded into its separate parts (see Step 1).
Finally, we reach EXECUTE, which, in my Scratch processor, is pretty much just a big if statement.
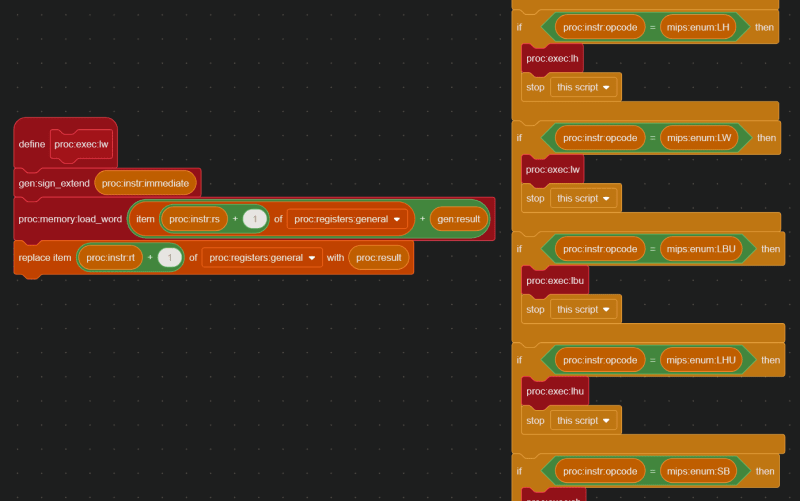
In this case, the INSTRUCTION DECODE step revealed that the opcode is 35, which means 0x8D02002A is a lw (load word) instruction. Therefore, based off the values in proc:instr:rs, proc:instr:rt, and proc:instr:immediate, the instruction 0x8D02002A actually means lw $2, 0x2a($8) , or in other words, lw $v0, 42($t0).
And here is the code that handles the lw instruction:
Okay, home stretch. Now, we just need to be able to do the bare minimum and create a “Hello, World” program in C, and run it in Scratch, and the last two weeks of my life will have been validated.
So, will this work?
#include <stdio.h>

int main() {
  printf("Hello, world!");
  return 0;
}
Three changes. First of all, the MIPS linker uses start to find the entry point of the program, much the same way you use main in C, or "main__" in Python. So, that’s an easy fix.
#include <stdio.h>

int __start() {
  printf("Hello, world!");
  return 0;
}
Next, we need some way to actually see this output in Scratch. We *could *make some intricate array of text sprites, but the simpler solution is just to use a list.
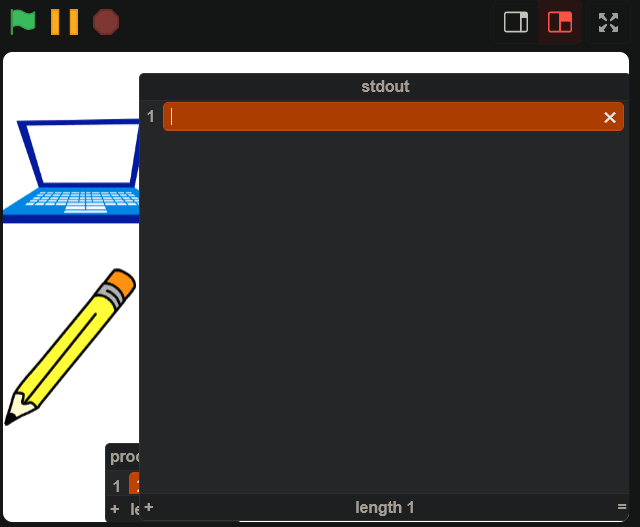
Finally, we can’t use stdio.h.
Yeah, basically, implementing floating point registers and multiprocessor instructions would have been more trouble than it was worth, so I skipped it, but the standard library kind of expects all that to be there. So, we need to make printf ourselves.
Putting the complications of variadic arguments and text formatting aside, how can you actually print a string using MIPS? The TL;DR is you put the address of the string in a certain register, and then a special “print string” value in another register, and then execute the syscall (“system call”) instruction, and let the OS/CPU handle the rest.
The exact special values and registers to use are implementation-dependent, and can be implemented pretty much any way you see fit, but I chose to replicate MARS’ (a very popular MIPS simulator) implementation. With MARS, the address of the string goes in $a0, and the value 4 goes in $v0 to say “hey, I want to print a string!”
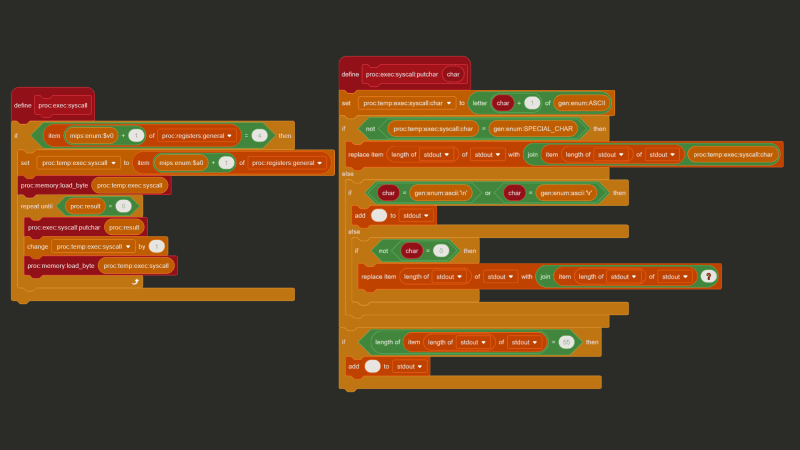
And with C, we can use a feature called “inline assembly” to inject assembly code directly into our compiled output. Putting it all together we get this:
#define puts _puts

void _puts(const char *s) {
 __asm__(
  "li $v0, 4\n"
  "syscall\n"
  :
  : "a"(s)
 );
}

int __start() {
 puts("Hello, World!\n");
 return 0;
}
And when we run it, we get this:
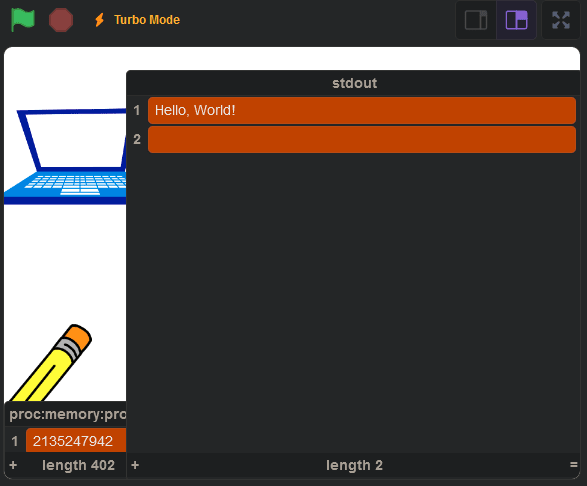
You can view the final product here: https://scratch.mit.edu/projects/1000840481/.
I wanted to keep this read under 15 minutes, so I had to skip over **a lot **of details. Some parts of the Scratch code had to be cut out of the screenshots for simplicity’s sake and I ran into a lot of silly and not-so-silly mistakes. If you’re curious how I was able to get Connect Four working (with minimax and alpha-beta pruning), the source code is on my Github. Here’s a quick list of some of the other problems I ran into in development:
 * The fact that my computer is little-endian, but MIPS is big-endian caused more issues than I'd like to admit
 * The `mult` instruction in MIPS is 32-bit multiplication, and multiplying two 32-bit integers can result in a 64-bit integer.
   Javascript (and as a result, Scratch) is incapable of storing a 64-bit integer without losing precision.
 * The `u` in the `addu` instruction and the `u` in the `sltu` instruction both stand for "unsigned", but mean completely different things.
 * As you may have noticed, functions in Scratch don't have return values. This was quite annoying.
 * Any branch instruction (like "jump", "jump register", "branch on equals") in MIPS will also execute the instruction immediately after it, **regardless** of if the branch was taken or not.
   So, instead of updating the program count directly, the next address needs to be put in the "branch delay slot" and the program counter should only be updated after the *next* instruction.
 * Lists in Scratch are one-indexed.
 * All of a sudden, Scratch stopped letting me save the project to the cloud. It took awhile before I realized that lists filled with over 100,000 items wasn't something Scratch's servers were particularly excited to store.
 * I had to design my own `malloc` in C, which was fun, but also very difficult to debug in Scratch.
 * When I tried making syscalls that asked the user for input, all of the letters ended up capitalized. It turns out that in Scratch a lowercase `"a"` and a capital `"A"` are considered equal.
   I thought this was an unsolvable problem for awhile, before I realized that the names of sprites' costumes in Scratch are actually case-sensitive.
   So every time I try to convert a character to its ASCII value, I tell the processor sprite to switch to, for example, the `"a"` costume or the `"A"` costume, and then retrieve the costume number.
 * I made another syscall to print emojis to the `stdout`, but some emojis are considered two characters long and other emojis are considered one character long.
 * Compiling any code that calls `malloc` with -O1 crashes the CPU. I still have no idea why this is the case.
 * Endianness is really hard to get right. I know I said this in the beginning of the list, but it's worth repeating.
With all that said, I’m really happy with the way this project turned out. If you found this interesting, please check out sharc, my graphics engine built completely in Typescript: https://www.sharcjs.org. Because clearly, if there’s one thing I know how to make, it’s questionable decisions.
以上が子供向けのプログラミング言語でコンピューターを組み立てるの詳細内容です。詳細については、PHP 中国語 Web サイトの他の関連記事を参照してください。