
この投稿をウェブノートでチェックしてください!
最後に、興味深いことに、UI が終了したら、主要な機能の実装に進むことができます。そこでこの記事では、サーバーからデータを取得して Pinia ストレージに保存する方法について説明します。また、ショップ リストと商品ページを動的にレンダリングします。いつものように、実行する必要がある作業計画を定義することから始めます。
明確な計画が立てられたので、いよいよ仕事に取り掛かります。まず、サーバーからデータを取得するためのバックボーンとして機能する Axios モジュールを構成します。
以前の投稿「Nuxt.js を使用した E コマース ストアの構築: プロジェクト設定のステップバイステップ ガイド」の 1 つで axios をすでにインストールしたので、これを設定して使用の準備をすることができます。
ルート ディレクトリ内に「http」フォルダーを作成し、http フォルダー内に http-client.js ファイルを作成しましょう。これはメインの Axios 設定と必要に応じてインターセプターのファイルになりますが、今のところは Axios をベース URL に登録するだけです。
import axios from "axios";

export const HTTP = axios.create({
    baseURL: "http://localhost:3005",
});
「http」フォルダー内に、個別のアプリ機能用の axios サービスを保存する「services」フォルダーを作成します。 「services」ディレクトリ内に最初のサービス products.service.js を作成します。これには、製品の REST API サービスが保存されます。
axios を使用して最初の 2 つの get 関数を追加できます。そのためには、HTTP をインポートし、リクエストからデータを返すアロー関数を作成するだけです。
import { HTTP } from '../http-client';

export const getAllProducts = () =>
    HTTP.get('/products').then(({data}) => data )

export const getProductById = (id) =>
    HTTP.get(`/products/${id}`).then(({data}) => data )
覚えているとおり、バックエンド サーバーを模倣するために「json-server」もインストールし、製品配列を事前に設定しました。これにより、次のように製品データを更新し、さらに製品を作成できます。
{
    "id": "1",
    "name": "Product 1",
    "instagram": "https://instagram.com",
    "pinterest": "https://pinterest.com",
    "image": "https://images.pexels.com/photos/2081332/pexels-photo-2081332.jpeg?auto=compress&cs=tinysrgb&w=600",
    "description": "Lorem ipsum dolor sit amet, consectetur adipiscing elit, sed do eiusmod tempor incididunt ut labore et dolore magna aliqua. Ut enim ad minim veniam, quis nostrud exercitation ullamco laboris nisi ut aliquip ex ea commodo consequat. Duis aute irure dolor in reprehenderit in voluptate velit esse cillum dolore eu fugiat nulla pariatur. Excepteur sint occaecat cupidatat non proident, sunt in culpa qui officia deserunt mollit anim id est laborum.",
    "price": 100
},
これで、製品データとそのサーバー API を呼び出す関数を備えた、すぐに使用できる開発サーバーが完成しました。次のステップは、このデータ取得を製品ページに実装することです。
新しい products.js ストアを作成し、サーバーから受信した製品のリストを格納する「productsList」変数と、製品ページの個別の製品を格納する「product」変数を追加します。次に、Axios サービスを使用してサーバーからデータを取得し、それを状態に設定する 2 つのアクションを追加します。ゲッターを追加することを忘れないでください。
import { defineStore } from 'pinia';
import {
    getAllProducts,
    getProductById
} from '@/http/services/products.services';

export const useProductsStore = defineStore({
    id: 'products',
    state: () => ({
        productsList: [],
        product: null
    }),
    actions: {
        async aGetAllProducts() {
            await getAllProducts()
            .then((data) => {
                this.productsList = data;
            })
            .catch((error) => {
                console.log(error);
            })
        },
        async aGetProductById(id) {
            await getProductById(id)
            .then((data) => {
                this.product = JSON.parse(JSON.stringify(data));
            })
            .catch((error) => {
                console.log(error);
            })
        }
    },
    getters: {
        gProductsList: (state) => state.productsList,
        gProduct: (state) => state.product
    }
})
素敵ですね。コンポーネント内でこのストアの使用を開始できます。
ショップ ページを開き、商品ストアをインポートし、作成されたライフサイクル フック内で (ページ全体をレンダリングする前にデータを取得します)、「aGetAllProducts」アクションを呼び出します。
created() {
    const productsStore = useProductsStore();
    productsStore.aGetAllProducts();
}
その後、ゲッターを使用して製品リストを取得してレンダリングできます。製品リスト データを製品カード リストに送信する必要があります。
<div class="products__content">
    <ProductCard v-for="product in productsStore.gProductsList" :key="product.name" :product="product" />
</div>
次に、コマンド「json-server --watch db/db.json --port 3005」を使用して json-server を起動する必要があります。そして、「npm run dev」コマンドを使用して、別の PowerShell で Nuxt 開発サーバーを起動します。
ショップ ページにアクセスするか更新した後、商品データのリクエストを json サーバーに送信し、そのデータをページにレンダリングします。

すごいですね。しかし、問題は、製品カードをクリックすると、静的データを含む製品ページにリダイレクトされることです。各ページには同じ情報と画像が表示されます。これを解決するには、次のステップに進みましょう。
製品ページを構築していたとき、そのページを動的にするためにフォルダーに角かっこを付けた名前を付けました。製品カードをクリックすると、URL に製品 ID が含まれるショップ ページにリダイレクトされます。これは、Nuxt がフォルダー名内の「製品」をその ID に置き換えているためですが、ページはまだ静的です。これを変更するには、URL から製品 ID を取得し、その ID を使用してサーバーから製品データを取得する必要があります。
サーバーからデータを取得する機能はすでに作成しました。ここで、製品ページを更新する必要があります。そのためには、[product] フォルダー内のindex.vue ファイルを開いて製品ストアをインポートし、作成したフックをコンポーネント内に追加します。そこでルーター パラメーターを取得し、それを別のパラメーターとして「aGetProductById」アクションに送信します。
created() {
    const productId = this.$route.params.product;
    this.productsStore.aGetProductById(productId);
}
また、サーバーから受信したデータをレンダリングするためだけに、テンプレート (タイトル、価格、説明、画像など) を更新する必要があります。
画像:
<div class="product-info__image--main">
    <img :src="productsStore.gProduct?.image" alt="product image">
</div>
Product Description:
<h1 class="product-info__content--title">{{ productsStore.gProduct?.name }}</h1>
<p class="product-info__content--price">{{ productsStore.gProduct?.price }} $</p>
<p class="product-info__content--description">{{ productsStore.gProduct?.description }}</p>
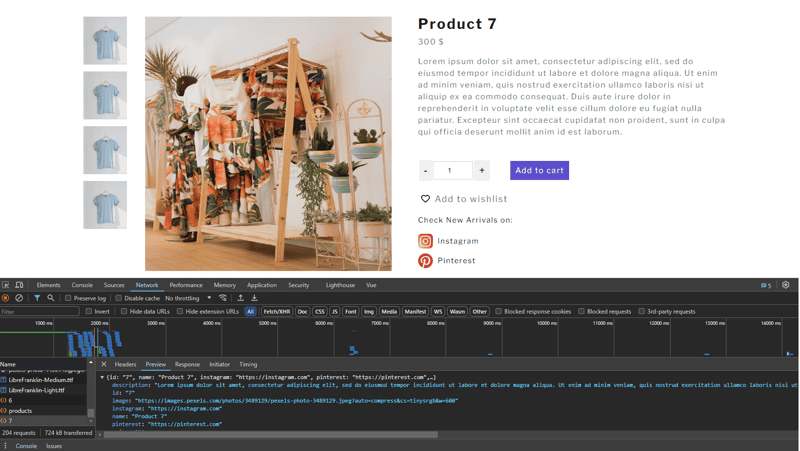
Now, let's restart the Nuxt dev server and check the result by clicking on different product cards. We should see another product each time.

In this article, we explored the process of fetching and presenting products in a Nuxt.js e-commerce application. We started by configuring the Axios module, which served as the backbone for making API requests to our server.
Keep in mind that these code examples are only the top of the iceberg. Feel free to experiment with advanced approaches, add new features, and optimize your codebase as you improve your e-commerce application to better suit the demands of your customers and company.
If you would need a source code for this tutorial you can get it here.
以上がEC ストア用に Nuxt.js で商品を取得して表示するの詳細内容です。詳細については、PHP 中国語 Web サイトの他の関連記事を参照してください。