Windows 11を工場出荷時設定にリセットした後にファイルを復元する方法?
Windows 11 を工場出荷時設定にリセットした後、ファイルを回復しようとしていますか?あなたは工場に行くことができます パスワードを忘れた、またはパスワードを忘れたなど、さまざまな理由で Windows 11 コンピューターをリセットします。 パフォーマンスが低下し、予期しないエラーが発生した場合は、次の方法で PC をリセットする必要がある場合もあります。 画面上の指示に従ってください。これにより、ほとんどの問題が解決されます。ただし、この操作は データが失われる可能性があるため、危険です。
そこで、この記事では、ファイルを復元する方法について説明します。 Windows 11 で出荷時設定にリセットします。

- パート 1: 工場出荷時設定にリセットした後にファイルを復元することは可能ですか?
- パート 2: Windows 11 を工場出荷時設定にリセットした後にファイルを復元する方法?
- 解決策 1: TestDisk を使用してファイルを回復する Windows 11 を出荷時設定にリセットする (コマンドライン ツール)
- 解決策 2: 工場出荷時設定にリセットした後にファイルを復元する Windows 11 と iSumsoft Data Refixer (数回のクリック)
- 結論
はい、Windows 11 を工場出荷時設定にリセットした後にファイルを復元することは可能です。ウィンドウズ 工場出荷時設定にリセットするには、「ファイルを保持する」と「すべてを削除する」という 2 つのオプションがあります。を選択すると、 「ファイルを保持する」オプションでは、ドキュメント、写真、音楽、ビデオなどの個人ファイルが保存されます。 C ドライブやその他の内部および外部ドライブは削除されません。ただし、すべてインストールされている プログラムと設定は削除されます。一方、「すべて削除」を選択した場合は、 オプションを選択すると、コンピューター上のすべてのデータが消去されます。

パート 2: Windows 11 を工場出荷時設定にリセットした後にファイルを復元する方法?
- 1.削除されたファイルを保存しているハードドライブが書き換えられた場合、どのソフトウェアも保証できません
完全なデータ
回復。リセット後、コンピュータを長く使用するほど、ファイルが破損する可能性は低くなります。
回復されます。
- 2.回復ツール間の唯一の違いは、回復の成功率です。
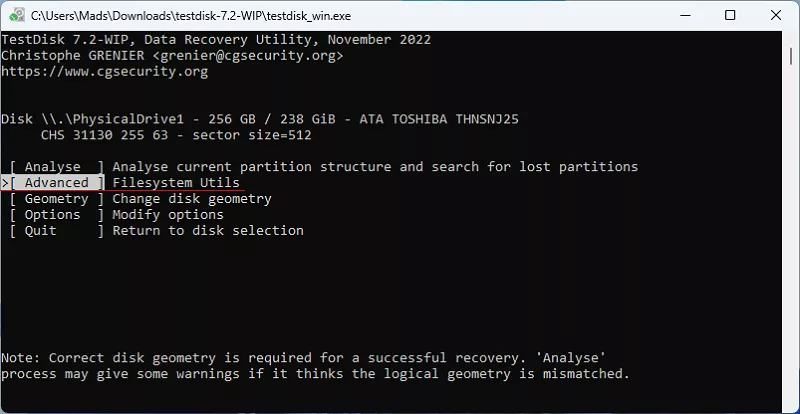
Solution 1: Use TestDisk to Recover Files After Factory Resetting Windows 11
A common use case for TestDisk is recovering files from formatted drives. In contrast to Windows file recovery software, which only works with NTFS file systems, it supports multiple types, including NTFS, FAT32, FAT16, exFAT, and so on. Learn how to use TestDisk:
Step 1: Download TestDisk and then extract it to the C drive or other location.

Step 2: Locate the extracted file, then launch the application by double-clicking on the .exe file.

Step 3: Click Yes.

Step 4: Use arrow keys to select Create.

Step 5: Use Up and Down keys to select a drive from which you want to recover files. Then use Left and Right keys to select Proceed and hit Enter.

Step 6: The program will automatically detect the partition table style of the drive you selected. Enter the prompted table type.

Step 7: Select Advanced by using Up and Down keys, then hit Enter.

Step 8: Choose the Basic data partition with Up and Down keys, then select Undelete by using Left and Right keys and press Enter

Step 9: Select the file you want to recover and press the lowercase c key.

Step 10: Press the uppercase C key to save the recovery file. (Here you can see the storage path shown on the Directory.)

Step 11: Navigate to the storage folder.

Step 12: You will see the selected file has been recovered successfully.

Solution 2: Recover Files After a Factory Reset Windows 11 with iSumsoft Data Refixer
If you prefer software with a Graphical User Interface (GUI), iSumsoft Data Refixer, a professional data recovery tool, will be the right choice for you. With just a few clicks, it allows you to recover files after Windows 11 reset factory settings.

Here is how to use iSumsoft Data Refixer:
Step 1: Download and install the software. Then launch it.
Step 2: The software will detect all the partitions on the computer. Select a hard drive or partition where data was lost and click Start.

Step 3: The program will then start deeply scanning all the lost and deleted files previously stored on the drive. The scanning time depends on the storage space of the disk. The larger the disk, the longer the time.

Step 4: After scanning, all files are categorized on the left side. Select the file (s) you want to recover and click Recover.

Step 5: Select a folder to save the recovery file (s).
Note:
- The recovery file (s) cannot be saved on the drive from which it is recovered. For instance, if the file (s) is recovered from the D drive, it cannot be stored on the D drive.

Step 6: Once complete, you are asked whether to open the recovery folder. Based on your needs, click Yes or No.

Conclusion
In addition to the above-mentioned software, Microsoft has developed a command-line tool called Windows File Recovery, which allows you to recover files from formatted partitions or drives. However, it is crucial to back up your data as a precautionary measure in case any issues arise.
以上がWindows 11を工場出荷時設定にリセットした後にファイルを復元する方法?の詳細内容です。詳細については、PHP 中国語 Web サイトの他の関連記事を参照してください。

ホットAIツール

Undresser.AI Undress
リアルなヌード写真を作成する AI 搭載アプリ

AI Clothes Remover
写真から衣服を削除するオンライン AI ツール。

Undress AI Tool
脱衣画像を無料で

Clothoff.io
AI衣類リムーバー

Video Face Swap
完全無料の AI 顔交換ツールを使用して、あらゆるビデオの顔を簡単に交換できます。

人気の記事

ホットツール

メモ帳++7.3.1
使いやすく無料のコードエディター

SublimeText3 中国語版
中国語版、とても使いやすい

ゼンドスタジオ 13.0.1
強力な PHP 統合開発環境

ドリームウィーバー CS6
ビジュアル Web 開発ツール

SublimeText3 Mac版
神レベルのコード編集ソフト(SublimeText3)

ホットトピック
 1666
1666
 14
14
 1425
1425
 52
52
 1328
1328
 25
25
 1273
1273
 29
29
 1253
1253
 24
24
 Windows KB5054979更新情報の更新コンテンツリスト
Apr 15, 2025 pm 05:36 PM
KB5054979は、Windows 11バージョン24H2のために、2025年3月27日にリリースされた累積セキュリティアップデートです。 .NETフレームワークバージョン3.5および4.8.1をターゲットにし、セキュリティと全体的な安定性を高めます。特に、更新はファイルと直接の問題に対処します
 Nanoleafは、技術の充電方法を変更したいと考えています
Apr 17, 2025 am 01:03 AM
Nanoleafのペグボードデスクドック:スタイリッシュで機能的なデスクオーガナイザー 同じ古い充電セットアップにうんざりしていませんか? Nanoleafの新しいPegboard Desk Dockは、スタイリッシュで機能的な代替品を提供しています。 この多機能デスクアクセサリーは、32のフルカラーRGBを誇っています
 Asus' Rog Zephyrus G14 OLEDゲームラップトップは300ドルです
Apr 16, 2025 am 03:01 AM
Asus Rog Zephyrus G14 Esportsラップトップ特別オファー! Asus Rog Zephyrus G14 Esportsラップトップを今すぐ購入して、300ドルのオファーをお楽しみください!元の価格は1999ドル、現在の価格はわずか1699ドルです!いつでもどこでも没入型ゲーム体験をお楽しみください。または、信頼できるポータブルワークステーションとして使用してください。 Best Buyは現在、この2024年14インチのAsus Rog Zephyrus G14 E-Sportsラップトップでオファーを提供しています。その強力な構成とパフォーマンスは印象的です。 このASUS ROG Zephyrus G14 E-Sportsラップトップはベストバイで16かかります
 Windows11をBluetoothオーディオレシーバーとして使用する方法
Apr 15, 2025 am 03:01 AM
Windows 11 PCをBluetoothスピーカーに変え、お気に入りの音楽をお使いのお気に入りの音楽をお楽しみください!このガイドは、iPhoneまたはAndroidデバイスをコンピューターに簡単に接続してオーディオ再生を示します。 ステップ1:Bluetoothデバイスをペアリングします まず、PA
 使用する必要がある5つの隠されたWindows機能
Apr 16, 2025 am 12:57 AM
よりスムーズな体験のために、隠されたWindows機能のロックを解除してください! コンピューティングエクスペリエンスを大幅に向上させることができる驚くほど便利なWindows機能を発見してください。ベテランのWindowsユーザーでさえ、ここでいくつかの新しいトリックを見つけるかもしれません。 ダイナミックロック:自動
 Windows 11の通知をカスタマイズする方法
Apr 14, 2025 am 04:05 AM
Windows11通知設定の詳細な説明:パーソナライズされた通知エクスペリエンスを作成する Windows 11は通知センターをカレンダーに統合し、適応するのに時間がかかりますが、通知の頻度は変更されていません。システムの更新と役に立たないアプリケーション通知に絶えずポップアップすることにうんざりしている場合、この記事では、Windows 11の通知をカスタマイズし、ワークフローを最適化するように導きます。 グローバル通知設定 ほとんどすべての通知関連オプションは、Windows 11の設定にあります。 ステップ1:[[開始]メニューをクリックして[設定]を選択します(または「Windows I」を押します)。 ステップ2:左サイドバーのシステムを選択します。 ステップ3:「通知」をクリックして、すべての通知オプションにアクセスします。
 Windows11でマウスの加速をオフにする方法(そしてなぜ)
Apr 15, 2025 am 06:06 AM
マウスの精度の向上:Windows 11マウスの加速機能を無効にします マウスを数センチで移動する場合でも、マウスカーソルは画面上で速すぎますか?これがマウス加速関数です。この記事では、マウスの動きをよりよく制御するためにこの機能を無効にする方法について説明します。 マウスの加速を無効にするのは賢明ですか? Windowsシステムには、直接的な「マウス加速」オプションはありません。代わりに、それは「強化されたポインター精度」設定であり、マイクロソフトはマウス加速機能と見なしています。 この機能を有効にすると、マウスのDPI(インチあたりのドット)設定が有効になります。マウスの物理的な移動速度と、カーソルが画面上で移動する距離との関係を制御します。マウスをゆっくりと移動すると、Windowsは有効なDPIを減らし、カーソルの動きが短くなります
 キーボードには大きなol&#039が必要です。ボリュームノブ
Apr 18, 2025 am 03:04 AM
今日のタッチスクリーンの世界では、物理的なコントロールの満足のいく触覚フィードバックは歓迎すべき変化です。 そのため、大きなボリュームノブを備えたキーボードが驚くほど魅力的です。私は最近、これを直接経験しましたが、それは啓示でした。 のために


