MySQL でカウンターを定義する方法
データベース内のオブジェクトを識別する最も簡単な方法は、注文番号の場合と同様に、オブジェクトに一意の整数を割り当てることです。当然のことながら、ほとんどのデータベースは自動増分値の定義をサポートしています。基本的に、増分値は、テーブル内のエントリを一意に識別するために使用される単なるカウンターです。 MySQL でカウンターを定義するにはいくつかの方法があります!
この記事では、カウンターとは何か、データベース内でカウンターが役立つ場所、MySQL でカウンターを実装する方法について理解します。
飛び込んでみましょう!
カウンターとは何ですか?
プログラミングにおいて、カウンターは、特定のイベントまたはアクションの発生回数を追跡するために使用される変数です。ほとんどの場合、数値を自動的に増加させ、反復回数を追跡するためにループ内で使用されます。これが、カウンターが一般に自動増分数値の概念と関連付けられる理由です。
データベースでは、主キーの連続番号やイベントの追跡番号など、レコードの一意の識別子を生成するためにカウンターがよく使用されます。
MySQL は、新しいレコードごとにカラム値を自動的に 1 つ増やす AUTO_INCREMENT 属性を提供します。ただし、この属性は値を一度に 1 単位だけ増分します。動作をさらにカスタマイズするには、MySQL カウンターを手動で定義する必要がある場合があります。
MySQL でカウンターを使用する理由
MySQL でカウンターを使用する理由のトップ 5 は次のとおりです:
一意の識別子の作成: データの整合性と一貫性を確保するには、主キーとして連続した値が最適です。
強化されたデータ管理: 自動的に増加するカウンターは、レコードの並べ替えと識別に役立ちます。
簡素化されたデータ入力: 一意の ID が自動生成されるため、手動入力エラーが減り、データ挿入プロセスが簡素化されます。
効率的な記録追跡: カウンターを使用すると、記録の追跡と管理が簡単になります。これは、注文処理や在庫管理など、連続した番号付けまたは一意の番号付けが重要なアプリケーションに特に当てはまります。
カスタマイズ可能な形式: カスタム形式のカウンターを使用すると、データにコンテキストと構成を提供する意味のある識別子を作成できます。
MySQL でのカウンターの定義
MySQL でカウンターを定義するための 2 つの最も一般的なアプローチを確認します。
注: 以下の MySQL サンプル クエリは、市場で最もユーザー満足度の高いデータベース クライアントである DbVisualizer で実行されます。これらは他の SQL クライアントでも実行できることに注意してください。
AUTO_INCREMENT の使用
カラムを AUTO_INCREMENT 属性でマークすると、MySQL は新しいレコードを挿入するときに自動的に増分値を与えます。これにより、各エントリが一意の連続した識別子を持つことが保証されます。
次の例を考えてみましょう:
CREATE TABLE employees (
    id INT AUTO_INCREMENT PRIMARY KEY,
    name VARCHAR(50),
    surname VARCHAR(50),
    email VARCHAR(100),
    role VARCHAR(50)
);
上記のクエリは、AUTO_INCREMENT 主キー ID を持つ従業員テーブルを作成します。
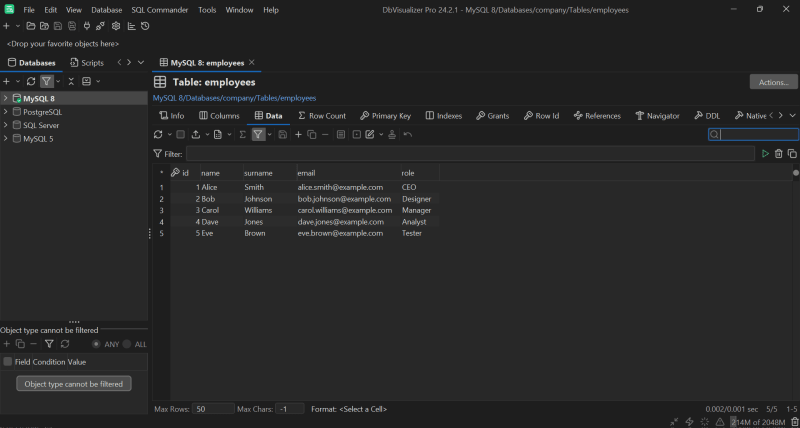
ここで、employees テーブルに次の 5 つのレコードが既に含まれているとします。

さらに 3 つのレコードを追加するには、次の INSERT クエリを使用します。
INSERT INTO employees (name, surname, email, role) VALUES
('Frank', 'Miller', 'frank.miller@example.com', 'Developer'),
('Grace', 'Davis', 'grace.davis@example.com', 'Manager'),
('Hank', 'Wilson', 'hank.wilson@example.com', 'Designer');
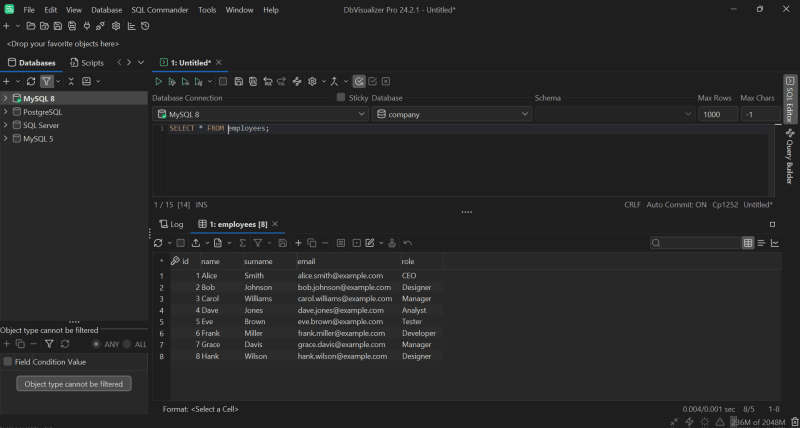
従業員には以下が含まれるようになります:

新しいレコードの ID 列にはデフォルトで増分値が入力されていることに注意してください。特に、INSERT ステートメントの AUTO_INCREMENT 列は、MySQL によって自動的に設定されるため、省略する (または NULL に設定する) ことができます。
AUTO_INCREMENT 属性は整数の PRIMARY KEY に対してのみ機能することに注意してください。さらに、AUTO_INCREMENT 値は常に一度に 1 単位ずつ増加します。 MySQL の数値データ型について詳しくは、このガイドをご覧ください。
AUTO_INCREMENT の動作をカスタマイズするには、次の変数を使用できます:
auto_increment_increment: AUTO_INCREMENT 値の増分ステップを定義します。デフォルト値は 1 です。
auto_increment_offset: AUTO_INCREMENT 値の開始点を設定します。たとえば、5 に設定すると、最初の AUTO_INCREMENT 値は 5 から始まります。
同時に、これらの変数はデータベース内のすべての AUTO_INCREMENT カラムに適用され、グローバルまたはセッションのスコープを持ちます。つまり、個々のテーブルに適用することはできません。
次のアプローチにより、MySQL でカウンターを定義する際の柔軟性が高まります。
変数の使用
MySQL でカスタム カウンターを作成する簡単な方法は、ユーザー定義変数を使用することです。
Now, suppose you want each employee to have an internal auto-incremental ID in the following format:
Roogler#<incremental_number>
Add an internal_id column to employees:
ALTER TABLE employees
ADD COLUMN internal_id VARCHAR(50);
Then, you can achieve the desired result with the following query:
-- initialize the counter
SET @counter = 0;

-- update the internal_id column with the formatted incremental values
UPDATE employees
SET internal_id = CONCAT('Roogler#', @counter := @counter + 1);
This uses a variable to implement the counter and the CONCAT function to produce the internal ID in the desired format.
Note that the starting value and the way you increment the counter are totally customizable. This time, there are no restrictions.
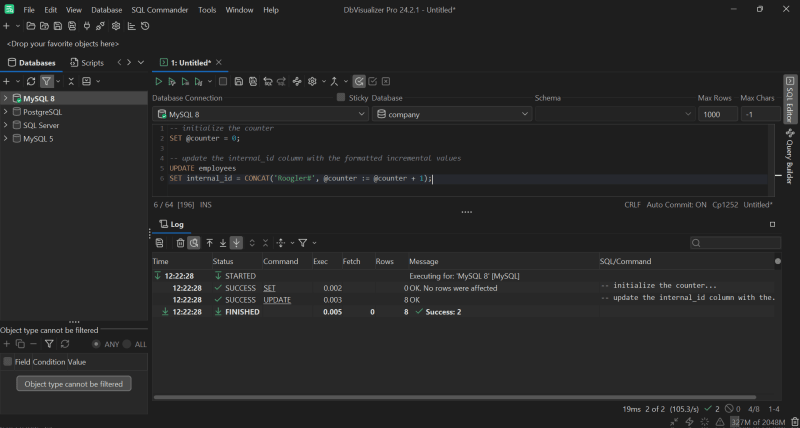
Execute the query in your MySQL database client:

Note that DbVisualizer comes with full support from MySQL variables.
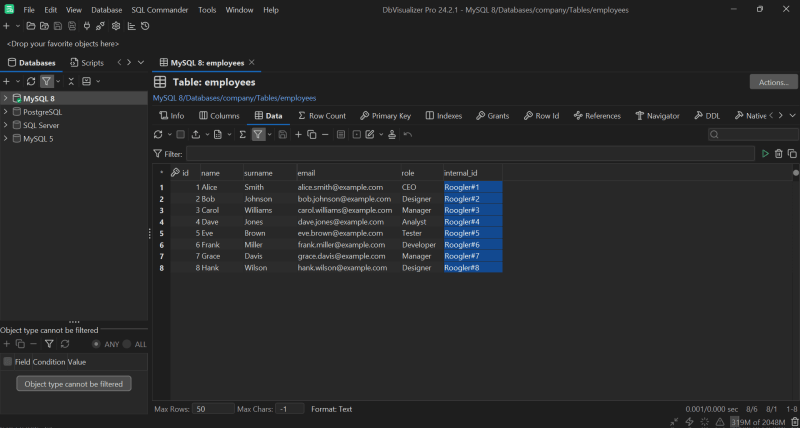
If you inspect the data in the employees table, you will now see:

Wonderful! Mission complete.
The main drawback of this solution is that user-defined variables in MySQL are session-specific. This means that their values are only retained for the duration of the current session. So, they are not persistent across different sessions or connections.
For a more persistent solution, you could use a stored procedure along with an SQL trigger to automatically update the internal_id every time a new employee is inserted. For detailed instructions, see this article on how to use stored procedures in SQL.
Conclusion
In this guide, you saw what a counter is, why it is useful, and how to implement it in MySQL. You now know that MySQL provides the AUTO_INCREMENT keyword to define incremental integer primary keys and also supports custom counter definition.
As learned here, dealing with auto-incremental values becomes easier with a powerful client tool like DbVisualizer. This comprehensive database client supports several DBMS technologies, has advanced query optimization capabilities, and can generate ERD-type schemas with a single click. Try DbVisualizer for free!
FAQ
How to count records in MySQL?
To count records in MySQL, use the COUNT aggregate function as in the sample query below:
SELECT COUNT(*) FROM table_name;
This returns the total number of rows in the specified table. When applied to a column, COUNT(column_name) counts all non-NULL values in the specified column.
What is the difference between COUNT and a counter in MySQL?
In MySQL, COUNT is an aggregate function to calculate the number of rows in a result set. Instead, a counter is a mechanism used to generate sequential numbers. COUNT is used for aggregation and reporting, whereas a counter is employed to assign a unique identifier or track the order of records as they are inserted into a table.
Should I use AUTO_INCREMENT or define a custom counter in MySQL?
Use AUTO_INCREMENT when you need an automatic way to generate sequential IDs for a primary key. On the other hand, if you require custom behavior—like specific formatting, starting values, or incrementing patterns—a custom counter implemented using a variable might be more appropriate.
How to define a variable in MySQL?
To define a variable in MySQL in a session, you must use the SET statement as follows:
SET @variable_name = value;
In this case, @variable_name is the variable and value is its initial value. This variable can be used within the session for calculations, conditions, or as part of queries. For local variables within stored procedures or functions, you need instead the DECLARE statement followed by SET:
DECLARE variable_name datatype;
SET variable_name = value;
Does DbVisualizer support database variables?
Yes, DbVisualizer natively supports more than 50 database technologies, with full support for over 30 of them. The full support includes database variables and many other features. Check out the list of supported databases.
The post "How to Define a Counter in MySQL" appeared first on Writech.
以上がMySQL でカウンターを定義する方法の詳細内容です。詳細については、PHP 中国語 Web サイトの他の関連記事を参照してください。

ホットAIツール

Undresser.AI Undress
リアルなヌード写真を作成する AI 搭載アプリ

AI Clothes Remover
写真から衣服を削除するオンライン AI ツール。

Undress AI Tool
脱衣画像を無料で

Clothoff.io
AI衣類リムーバー

Video Face Swap
完全無料の AI 顔交換ツールを使用して、あらゆるビデオの顔を簡単に交換できます。

人気の記事

ホットツール

メモ帳++7.3.1
使いやすく無料のコードエディター

SublimeText3 中国語版
中国語版、とても使いやすい

ゼンドスタジオ 13.0.1
強力な PHP 統合開発環境

ドリームウィーバー CS6
ビジュアル Web 開発ツール

SublimeText3 Mac版
神レベルのコード編集ソフト(SublimeText3)

ホットトピック
 1670
1670
 14
14
 1428
1428
 52
52
 1329
1329
 25
25
 1276
1276
 29
29
 1256
1256
 24
24
 MySQLの役割:Webアプリケーションのデータベース
Apr 17, 2025 am 12:23 AM
WebアプリケーションにおけるMySQLの主な役割は、データを保存および管理することです。 1.MYSQLは、ユーザー情報、製品カタログ、トランザクションレコード、その他のデータを効率的に処理します。 2。SQLクエリを介して、開発者はデータベースから情報を抽出して動的なコンテンツを生成できます。 3.MYSQLは、クライアントサーバーモデルに基づいて機能し、許容可能なクエリ速度を確保します。
 Innodb Redoログの役割を説明し、ログを元に戻します。
Apr 15, 2025 am 12:16 AM
INNODBは、レドログと非論的なものを使用して、データの一貫性と信頼性を確保しています。 1.レドログは、クラッシュの回復とトランザクションの持続性を確保するために、データページの変更を記録します。 2.Undologsは、元のデータ値を記録し、トランザクションロールバックとMVCCをサポートします。
 MySQL対その他のプログラミング言語:比較
Apr 19, 2025 am 12:22 AM
他のプログラミング言語と比較して、MySQLは主にデータの保存と管理に使用されますが、Python、Java、Cなどの他の言語は論理処理とアプリケーション開発に使用されます。 MySQLは、データ管理のニーズに適した高性能、スケーラビリティ、およびクロスプラットフォームサポートで知られていますが、他の言語は、データ分析、エンタープライズアプリケーション、システムプログラミングなどのそれぞれの分野で利点があります。
 MySQL Index Cardinalityはクエリパフォーマンスにどのように影響しますか?
Apr 14, 2025 am 12:18 AM
MySQLインデックスのカーディナリティは、クエリパフォーマンスに大きな影響を及ぼします。1。高いカーディナリティインデックスは、データ範囲をより効果的に狭め、クエリ効率を向上させることができます。 2。低カーディナリティインデックスは、完全なテーブルスキャンにつながり、クエリのパフォーマンスを削減する可能性があります。 3。ジョイントインデックスでは、クエリを最適化するために、高いカーディナリティシーケンスを前に配置する必要があります。
 初心者向けのMySQL:データベース管理を開始します
Apr 18, 2025 am 12:10 AM
MySQLの基本操作には、データベース、テーブルの作成、およびSQLを使用してデータのCRUD操作を実行することが含まれます。 1.データベースの作成:createdatabasemy_first_db; 2。テーブルの作成:createTableBooks(idintauto_incrementprimarykey、titlevarchary(100)notnull、authorvarchar(100)notnull、published_yearint); 3.データの挿入:InsertIntoBooks(タイトル、著者、公開_year)VA
 MySQL対その他のデータベース:オプションの比較
Apr 15, 2025 am 12:08 AM
MySQLは、Webアプリケーションやコンテンツ管理システムに適しており、オープンソース、高性能、使いやすさに人気があります。 1)PostgreSQLと比較して、MySQLは簡単なクエリと高い同時読み取り操作でパフォーマンスが向上します。 2)Oracleと比較して、MySQLは、オープンソースと低コストのため、中小企業の間でより一般的です。 3)Microsoft SQL Serverと比較して、MySQLはクロスプラットフォームアプリケーションにより適しています。 4)MongoDBとは異なり、MySQLは構造化されたデータおよびトランザクション処理により適しています。
 InnoDBバッファープールとそのパフォーマンスの重要性を説明してください。
Apr 19, 2025 am 12:24 AM
Innodbbufferpoolは、データをキャッシュしてページをインデックス作成することにより、ディスクI/Oを削減し、データベースのパフォーマンスを改善します。その作業原則には次のものが含まれます。1。データ読み取り:Bufferpoolのデータを読む。 2。データの書き込み:データを変更した後、bufferpoolに書き込み、定期的にディスクに更新します。 3.キャッシュ管理:LRUアルゴリズムを使用して、キャッシュページを管理します。 4.読みメカニズム:隣接するデータページを事前にロードします。 BufferPoolのサイジングと複数のインスタンスを使用することにより、データベースのパフォーマンスを最適化できます。
 MySQL:構造化データとリレーショナルデータベース
Apr 18, 2025 am 12:22 AM
MySQLは、テーブル構造とSQLクエリを介して構造化されたデータを効率的に管理し、外部キーを介してテーブル間関係を実装します。 1.テーブルを作成するときにデータ形式と入力を定義します。 2。外部キーを使用して、テーブル間の関係を確立します。 3。インデックス作成とクエリの最適化により、パフォーマンスを改善します。 4.データベースを定期的にバックアップおよび監視して、データのセキュリティとパフォーマンスの最適化を確保します。


