
このブログ投稿では、FACEIO アカウントの設定からコードベース内での統合の実装まで、FACEIO の顔認証を Next.js アプリケーションに組み込む手順を段階的に説明します。
前提条件
本題に入る前に、次のものが整っていることを確認してください:
Node.js と npm: 開発マシンに Node.js と npm がインストールされていることを確認します。最新バージョンは、Node.js の公式 Web サイトからダウンロードできます。
Next.js: Next.js プロジェクトを設定する必要があります。お持ちでない場合は、新しいものを作成できます:
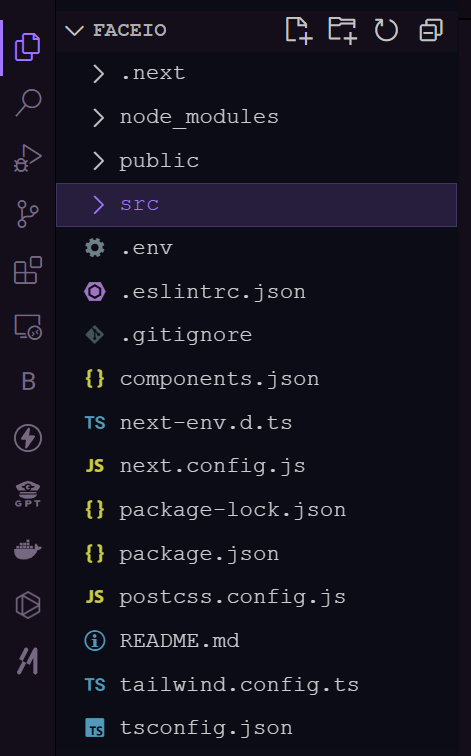
FACEIO アプリケーションのセットアップ
1.新しい FACEIO アプリケーションを作成します: FACEIO コンソールにログインし、[新しいアプリの作成] ボタンをクリックします。
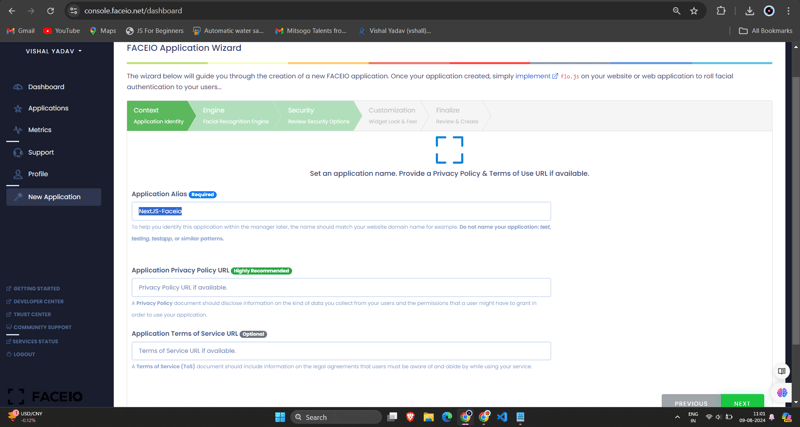
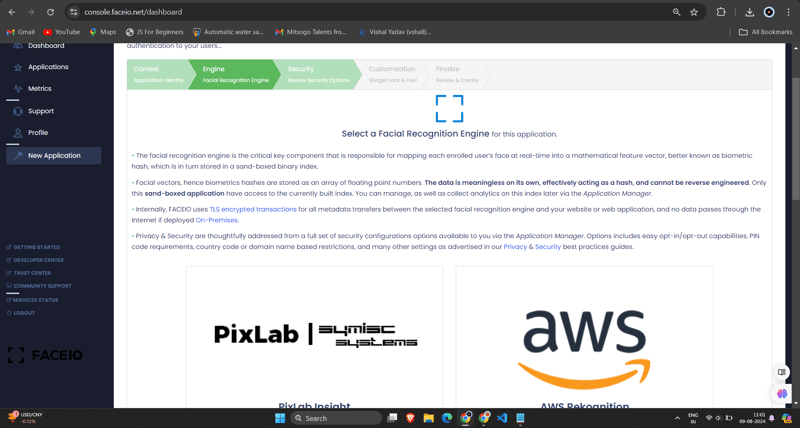
2.アプリケーションの構成: アプリケーション名、説明、コールバック URL (Next.js アプリケーションの URL) などの必要な情報を入力します。フォームに記入したら、[アプリを作成] をクリックします。
3.FACEIO_APP_ID を取得します: アプリケーションを作成すると、一意の FACEIO_APP_ID が提供されます。これは、FACEIO を Next.js アプリケーションに統合するために使用する識別子です。
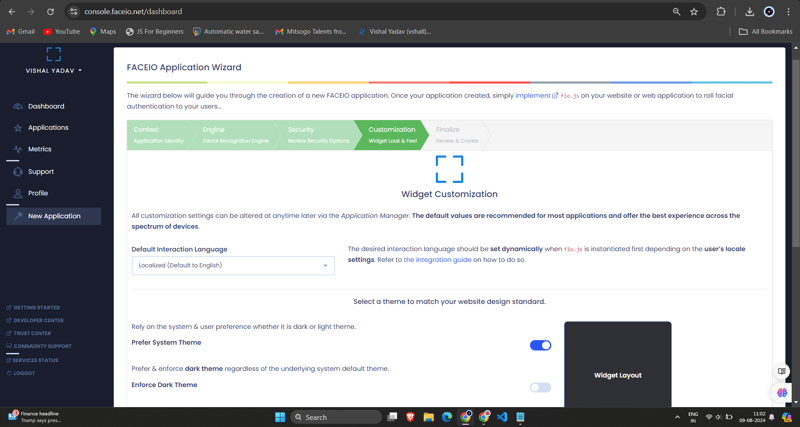
FACEIO を Next.js アプリケーションに統合する
1.FACEIO NPM パッケージをインストールします: Next.js プロジェクトで、npm または Yarn を使用して faceio-npm パッケージをインストールします:

2.顔認証コンポーネントを作成する: Next.js プロジェクトで、次のコードを含む Components/Dashboard.tsx (または他の任意の名前) という名前の新しいファイルを作成します。
// Dashboard.tsx
import React from "react";
import { Card, CardHeader, CardTitle, CardContent } from "@/components/ui/card";
import { Button } from "@/components/ui/button";
import { FaUserCircle, FaLock, FaCode, FaChartBar, FaSignOutAlt } from 'react-icons/fa';

interface DashboardProps {
  userEmail: string;
  onLogout: () => void;
}

const Dashboard: React.FC<DashboardProps> = ({ userEmail, onLogout }) => {
  return (
    <div className="max-w-7xl mx-auto p-4 md:p-6 space-y-6">
      <Card className="w-full bg-black text-white">
        <CardHeader className="flex flex-col sm:flex-row items-start sm:items-center justify-between space-y-4 sm:space-y-0">
          <div>
            <CardTitle className="text-2xl sm:text-3xl font-bold">Welcome to FaceIO</CardTitle>
            <p className="text-base sm:text-lg mt-2">Email: {userEmail}</p>
          </div>
          <Button
            variant="secondary"
            size="sm"
            onClick={onLogout}
            className="flex items-center w-full sm:w-auto justify-center mt-8"
          >
            <FaSignOutAlt className="mr-2" /> Logout
          </Button>
        </CardHeader>
        <CardContent>
          <p className="text-lg sm:text-xl mb-4">You have successfully logged in.</p>
        </CardContent>
      </Card>

      <h2 className="text-xl sm:text-2xl font-bold text-center my-6">Facial Authentication for the Web</h2>

      <div className="grid grid-cols-1 sm:grid-cols-2 gap-4 sm:gap-6">
        <Card>
          <CardHeader>
            <CardTitle className="flex items-center text-base sm:text-lg">
              <FaUserCircle className="mr-2" /> Secure & Easy
            </CardTitle>
          </CardHeader>
          <CardContent>
            <p className="text-sm sm:text-base">Cross-browser, secure & easy to implement. Passwordless Authentication SDKs powered by Face Recognition for Web Sites & Apps.</p>
          </CardContent>
        </Card>

        <Card>
          <CardHeader>
            <CardTitle className="flex items-center text-base sm:text-lg">
              <FaLock className="mr-2" /> Privacy-Focused
            </CardTitle>
          </CardHeader>
          <CardContent>
            <p className="text-sm sm:text-base">Your facial data is encrypted and securely stored. We prioritize user privacy and data protection.</p>
          </CardContent>
        </Card>

        <Card>
          <CardHeader>
            <CardTitle className="flex items-center text-base sm:text-lg">
              <FaCode className="mr-2" /> Developer-Friendly
            </CardTitle>
          </CardHeader>
          <CardContent>
            <p className="text-sm sm:text-base">Easy integration with clear documentation. Get started quickly and implement facial authentication in your projects.</p>
          </CardContent>
        </Card>

        <Card>
          <CardHeader>
            <CardTitle className="flex items-center text-base sm:text-lg">
              <FaChartBar className="mr-2" /> Analytics & Insights
            </CardTitle>
          </CardHeader>
          <CardContent>
            <p className="text-sm sm:text-base">Gain valuable insights into user authentication patterns and improve your applications security.</p>
          </CardContent>
        </Card>
      </div>

      <div className="flex flex-col sm:flex-row justify-center items-center space-y-4 sm:space-y-0 sm:space-x-4 mt-8">
        <Button variant="default" size="lg" className="w-full sm:w-auto">
          Get Started →
        </Button>
        <Button variant="outline" size="lg" className="w-full sm:w-auto">
          Integration Guide →
        </Button>
        <Button variant="secondary" size="lg" className="w-full sm:w-auto">
          FACEIO Console →
        </Button>
      </div>

      <Card className="mt-8 bg-gray-100">
        <CardContent className="text-center py-6">
          <p className="text-base sm:text-lg font-semibold">Ready to implement facial authentication in your project?</p>
          <p className="mt-2 text-sm sm:text-base">Check out our documentation and start securing your application today!</p>
        </CardContent>
      </Card>
    </div>
  );
};

export default Dashboard;
3.Dashboard.tsx コンポーネントを Login.tsx コンポーネントにインポートします:
/* eslint-disable react-hooks/exhaustive-deps */
"use client";
import {
  Card,
  CardContent,
  CardDescription,
  CardFooter,
  CardHeader,
  CardTitle,
} from "@/components/ui/card";
import { Terminal } from "lucide-react";
import { MailIcon, CheckCircleIcon } from "lucide-react";
import { Alert, AlertDescription, AlertTitle } from "@/components/ui/alert";
import { Input } from "@/components/ui/input";
import { Label } from "@/components/ui/label";
import { Button } from "./ui/button";
import faceIO from "@faceio/fiojs";
import { useEffect, useRef, useState } from "react";
import Link from "next/link";
import { toast } from "sonner";
import Dashboard from "./Dashboard";

type Props = {};

const Login: React.FC<Props> = ({}) => {
  const faceioRef = useRef<faceIO | null>(null);
  const [email, setEmail] = useState("");
  const [userLogin, setUserLogin] = useState("");
  const [isLoggedIn, setIsLoggedIn] = useState(false);

  const publicKey = process.env.NEXT_PUBLIC_FACEIO_PUBLIC_ID as string;

  const initialiseFaceio = async () => {
    try {
      faceioRef.current = new faceIO(publicKey);
      console.log("FaceIO initialized successfully");
    } catch (error) {
      console.log(error);
      handleError(error);
    }
  };

  useEffect(() => {
    initialiseFaceio();
  }, []);

  const handleRegister = async () => {
    try {
      if (!faceioRef.current) {
        console.error("FaceIO instance is not initialized");
        return;
      }

      await faceioRef.current?.enroll({
        userConsent: false,
        locale: "auto",
        payload: { email: `${email}` },
      });
      toast.success("Successfully Registered user.");
    } catch (error) {
      handleError(error);
      faceioRef.current?.restartSession();
    }
  };

  const handleLogin = async () => {
    try {
      const authenticate = await faceioRef.current?.authenticate();
      console.log("User authenticated successfully:", authenticate);
      setUserLogin(authenticate.payload.email);
      setIsLoggedIn(true);
      toast.success("Successfully logged in.");
    } catch (error) {
      console.log(error);
      handleError(error);
    }
  };

  const handleLogout = () => {
    setIsLoggedIn(false);
    setUserLogin("");
    toast.success("Successfully logged out.");
  };

  function handleError(errCode: any) {
    const fioErrs = faceioRef.current?.fetchAllErrorCodes()!;
    switch (errCode) {
      case fioErrs.PERMISSION_REFUSED:
        toast.info("Access to the Camera stream was denied by the end user");
        break;
      case fioErrs.NO_FACES_DETECTED:
        toast.info(
          "No faces were detected during the enroll or authentication process"
        );
        break;
      case fioErrs.UNRECOGNIZED_FACE:
        toast.info("Unrecognized face on this application's Facial Index");
        break;
      case fioErrs.MANY_FACES:
        toast.info("Two or more faces were detected during the scan process");
        break;
      case fioErrs.FACE_DUPLICATION:
        toast.info(
          "User enrolled previously (facial features already recorded). Cannot enroll again!"
        );
        break;
      case fioErrs.MINORS_NOT_ALLOWED:
        toast.info("Minors are not allowed to enroll on this application!");
        break;
      case fioErrs.PAD_ATTACK:
        toast.info(
          "Presentation (Spoof) Attack (PAD) detected during the scan process"
        );
        break;
      case fioErrs.FACE_MISMATCH:
        toast.info(
          "Calculated Facial Vectors of the user being enrolled do not matches"
        );
        break;
      case fioErrs.WRONG_PIN_CODE:
        toast.info("Wrong PIN code supplied by the user being authenticated");
        break;
      case fioErrs.PROCESSING_ERR:
        toast.info("Server side error");
        break;
      case fioErrs.UNAUTHORIZED:
        toast.info(
          "Your application is not allowed to perform the requested operation (eg. Invalid ID, Blocked, Paused, etc.). Refer to the FACEIO Console for additional information"
        );
        break;
      case fioErrs.TERMS_NOT_ACCEPTED:
        toast.info(
          "Terms & Conditions set out by FACEIO/host application rejected by the end user"
        );
        break;
      case fioErrs.UI_NOT_READY:
        toast.info(
          "The FACEIO Widget could not be (or is being) injected onto the client DOM"
        );
        break;
      case fioErrs.SESSION_EXPIRED:
        toast.info(
          "Client session expired. The first promise was already fulfilled but the host application failed to act accordingly"
        );
        break;
      case fioErrs.TIMEOUT:
        toast.info(
          "Ongoing operation timed out (eg, Camera access permission, ToS accept delay, Face not yet detected, Server Reply, etc.)"
        );
        break;
      case fioErrs.TOO_MANY_REQUESTS:
        toast.info(
          "Widget instantiation requests exceeded for freemium applications. Does not apply for upgraded applications"
        );
        break;
      case fioErrs.EMPTY_ORIGIN:
        toast.info("Origin or Referer HTTP request header is empty or missing");
        break;
      case fioErrs.FORBIDDDEN_ORIGIN:
        toast.info("Domain origin is forbidden from instantiating fio.js");
        break;
      case fioErrs.FORBIDDDEN_COUNTRY:
        toast.info(
          "Country ISO-3166-1 Code is forbidden from instantiating fio.js"
        );
        break;
      case fioErrs.SESSION_IN_PROGRESS:
        toast.info(
          "Another authentication or enrollment session is in progress"
        );
        break;
      case fioErrs.NETWORK_IO:
      default:
        toast.info(
          "Error while establishing network connection with the target FACEIO processing node"
        );
        break;
    }
  }

  if (isLoggedIn) {
    return <Dashboard userEmail={userLogin} onLogout={handleLogout} />;
  }

  return (
    <div className="min-h-screen bg-gradient-to-r from-cyan-500 to-blue-500 flex items-center justify-center p-4 w-full">
      <Card className="w-[400px] bg-white shadow-xl rounded-xl overflow-hidden">
        <CardHeader className="bg-gray-50 border-b p-6">
          <CardTitle className="text-2xl font-bold text-gray-800">
            Secure Workspace
          </CardTitle>
          <CardDescription className="text-sm text-gray-600">
            Authenticate to access your personalized work environment
          </CardDescription>
        </CardHeader>
        <CardContent className="p-6 space-y-4">
          <div className="space-y-2">
            <Label
              htmlFor="email"
              className="text-sm font-medium text-gray-700"
            >
              Work Email
            </Label>
            <Input
              id="email"
              type="email"
              placeholder="you@company.com"
              className="w-full px-3 py-2 border rounded-md"
              onChange={(e) => setEmail(e.target.value)}
            />
          </div>
          <div className="space-y-4">
            <Button
              className="w-full bg-blue-600 hover:bg-blue-700 text-white font-medium py-2 rounded-md transition duration-300 ease-in-out"
              onClick={handleLogin}
            >
              Access Workspace
            </Button>
            <Button
              className="w-full bg-gray-100 hover:bg-gray-200 text-gray-800 font-medium py-2 rounded-md transition duration-300 ease-in-out"
              onClick={handleRegister}
              disabled={!email.includes("@")}
            >
              Register New Account
            </Button>
          </div>
        </CardContent>
        <CardFooter className="bg-gray-50 border-t p-4">
          <div className="w-full text-center text-xs text-gray-500">
            Protected by FaceIO™ Technology.
            <Link
              href="https://faceio.net/security-policy"
              className="text-blue-600 hover:underline ml-1"
            >
              Learn about our security measures
            </Link>
          </div>
        </CardFooter>
      </Card>

      {userLogin && !isLoggedIn && (
        <div className="fixed bottom-4 right-4 bg-green-100 border-l-4 border-green-500 text-green-700 p-4 rounded-md shadow-lg">
          <div className="flex">
            <div className="flex-shrink-0">
              <CheckCircleIcon className="h-5 w-5 text-green-500" />
            </div>
            <div className="ml-3">
              <p className="text-sm font-medium">Workspace Access Granted</p>
              <p className="text-xs mt-1">Logged in as: {userLogin}</p>
            </div>
          </div>
        </div>
      )}
    </div>
  );
};

export default Login;
「NEXT_PUBLIC_FACEIO_PUBLIC_ID」を、FACEIO コンソールから取得した実際の FACEIO_APP_ID に忘れずに置き換えてください。

import { buttonVariants } from "@/components/ui/button";
import { cn } from "@/lib/utils";
import Link from "next/link";
import { FaUserShield, FaImage, FaCode, FaRobot } from 'react-icons/fa';

export default function Home() {
  const demos = [
    { title: "FACIO Web Authentication", href: "/faceio", icon: FaUserShield },
    { title: "Image Processing", href: "/imageprocessing", icon: FaImage },
    { title: "Code Generation", href: "/codegeneration", icon: FaCode },
    { title: "AI Assistant", href: "/aiassistant", icon: FaRobot },
  ];

  return (
    <div className="max-h-screen  bg-gradient-to-br from-purple-700 via-blue-600 to-teal-500 text-white p-8 w-full">
      <div className="max-w-6xl mx-auto">
        <h1 className="text-5xl md:text-7xl font-bold text-center mb-8 animate-fade-in-down">
          PixLab Faceio
        </h1>
        <p className="text-xl text-center mb-12 animate-fade-in-up">
          Explore cutting-edge technologies and innovative solutions
        </p>

        <div className="grid grid-cols-1 md:grid-cols-2 gap-8">
          {demos.map((demo, index) => (
            <Link
              key={demo.href}
              href={demo.href}
              className={cn(
                buttonVariants({ variant: "outline" }),
                "h-40 text-lg font-semibold flex flex-col items-center justify-center space-y-4 bg-white bg-opacity-10 backdrop-filter backdrop-blur-lg rounded-xl hover:bg-opacity-20 transition-all duration-300 animate-fade-in",
                { 'animate-delay-100': index % 2 === 1 }
              )}
            >
              <demo.icon className="text-4xl" />
              {demo.title}
            </Link>
          ))}
        </div>

        <div className="mt-16 text-center animate-fade-in-up animate-delay-300">
          <h2 className="text-3xl font-bold mb-4">Why Choose PixLab?</h2>
          <ul className="text-lg space-y-2">
            <li>✨ Cutting-edge technologies</li>
            <li>? High-performance solutions</li>
            <li>? Advanced security features</li>
            <li>? Seamless integrations</li>
          </ul>
        </div>

        <footer className="mt-16 text-center text-sm opacity-75 animate-fade-in-up animate-delay-500">
          © 2024 PixLab. All rights reserved. Empowering innovation through technology.
        </footer>
      </div>
    </div>
  );
}
それだけです!これで、FACEIO の顔認証が Next.js アプリケーションに統合されました。ユーザーが「顔認証」ボタンをクリックすると、FACEIO ウィジェットが表示され、認証プロセスをガイドします。
FACEIO ウィジェットの動作をキャプチャ - 登録
FACEIO ウィジェットの機能を示すために、登録プロセスの GIF をキャプチャしてみましょう:

この GIF は、Next.js アプリケーション内での FACEIO 顔登録プロセスのユーザー エクスペリエンスを示しています。ユーザーは自分の顔を簡単に登録でき、今後のログインでシームレスな認証に使用されます。
FACEIO ウィジェットの動作をキャプチャする
FACEIO ウィジェットの機能を示すために、認証プロセスの GIF をキャプチャしてみましょう:
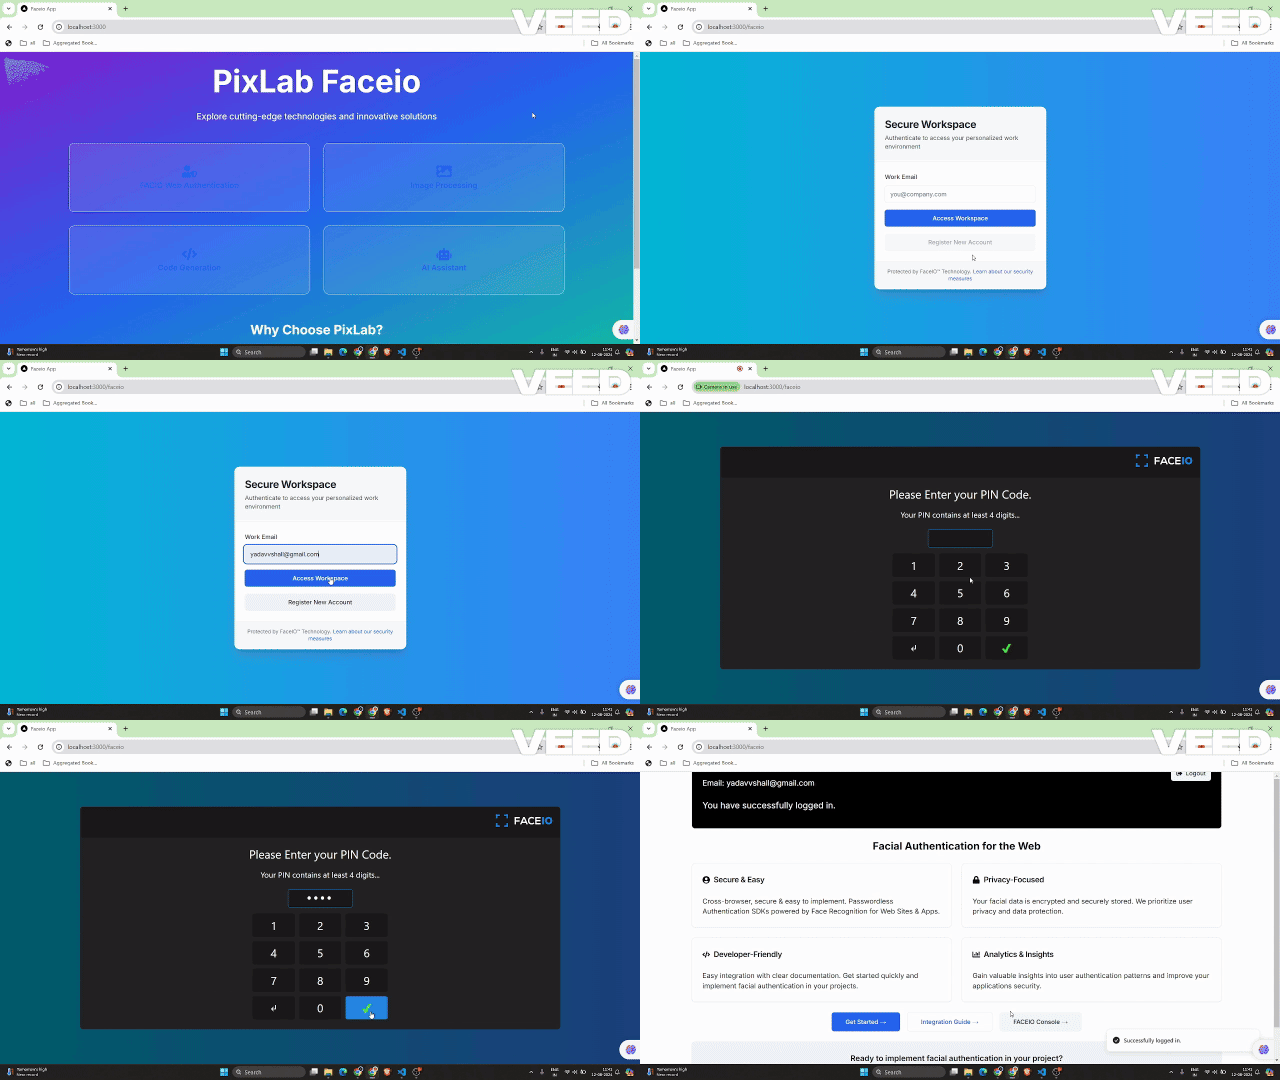
この GIF は、Next.js アプリケーション内での FACEIO 顔認証プロセスのユーザー エクスペリエンスを示しています。
FACEIO アプリケーションの主要なセキュリティのベスト プラクティス
重複登録の排除: 同じユーザーが複数回登録できないように設定を有効にし、競合や悪用の可能性を回避します。
なりすまし対策の強化: 顔のなりすましの試みを検出してブロックする機能を有効にして、システムが実際のライブ ユーザーとのみ対話できるようにします。
PIN の一意性の保証: 不正アクセスを防ぐために、各ユーザーの PIN がアプリケーション内で一意であることを確認します。
地域制限の実装: セキュリティ制御を追加するために、FACEIO ウィジェットのインスタンス化を承認されたドメイン名と国に制限します。
Next.js アプリで FACEIO を使用する利点
FACEIO を Next.js アプリケーションに統合すると、いくつかの利点があります。
ユーザー エクスペリエンスの向上: FACEIO ウィジェットはシームレスで直感的な認証フローを提供し、ユーザーがアプリケーションに簡単にログインできるようにします。
クロスプラットフォーム互換性: FACEIO はさまざまなデバイスやブラウザーで動作し、一貫したユーザー エクスペリエンスを保証します。
簡単な統合: faceio-npm パッケージは統合プロセスを簡素化し、Next.js アプリケーションに顔認証をすばやく追加できるようにします。
FACEIO コミュニティ フォーラム: FACEIO コミュニティから問題の解決策を得ることができます。
結論
このブログ投稿では、FACEIO の顔認証サービスを Next.js アプリケーションに統合する方法を学びました。ここで説明する手順に従うことで、安全でユーザーフレンドリーな認証エクスペリエンスをユーザーに提供し、Web アプリケーションの全体的な品質を向上させることができます。
さらにご質問がある場合、または追加のサポートが必要な場合は、お気軽に FACEIO サポート チームにお問い合わせいただくか、包括的な FACEIO ドキュメントを参照してください。
コーディングを楽しんでください!
この実装の完全なソース コードについては、GitHub リポジトリにアクセスしてプロジェクトを詳しく調べることができます。
以上がFACEIO を使用した Next.js アプリでのシームレスな顔認証の詳細内容です。詳細については、PHP 中国語 Web サイトの他の関連記事を参照してください。