発音評価アプリを作成する (パート 1)
このチュートリアルの目的は、ユーザーの発音を制御するアプリケーションを作成することです。
これに従うには、JavaScript、より理想的には Vue.js 3 の知識が必要です。
アイデア
私は最近ドイツ語に戻ることにしました。この言語で私が直面する主な困難は、それを正しく発音することです。通常、私は例を聞き、それを繰り返している自分を録音し、もう一度自分の声を聞きます。それは複雑なプロセスであり、私があまり良い耳を持っていないことを認めなければなりません。
この観察に基づいて、私がドイツ語で単語や文を正しく発音しているかどうかを教えてくれるアプリや API はあるのかと疑問に思いました。いくつかの調査と素晴らしい発見の後、問題を解決するために独自のアプリをコーディングしたいと思いました。
これが私がやった方法です!
利用可能なAPI
いくつか調査した結果、問題を解決するアプリを見つけることができました。しかし全体として、発音の検証は有料アプリケーション (またはサブスクリプションで動作するアプリケーション) の追加機能にすぎないことがよくありました。そこで API を探すことにしました。
この仕事を行う API のリストは次のとおりです:
- Google Cloud Speech-to-Text API
- Microsoft Azure 音声サービス
- iSpeech の発音
- スピーチマティクス
- スピーチ
- エルサの現在
- スピーチスーパー
これらの API は有料ですが、通常、テストと実験に 2 週間アクセスできます。
ドイツ語の発音をチェックしたかったので、ドイツ語を含むいくつかの言語をサポートしている SpeechSuper API を使用してテストすることにしました。チュートリアルの後半では、Speechace API を試して、ニーズに応じてある API から別の API にいかに簡単に切り替えることができるかを実証します。
アプリケーションの人間工学の定義
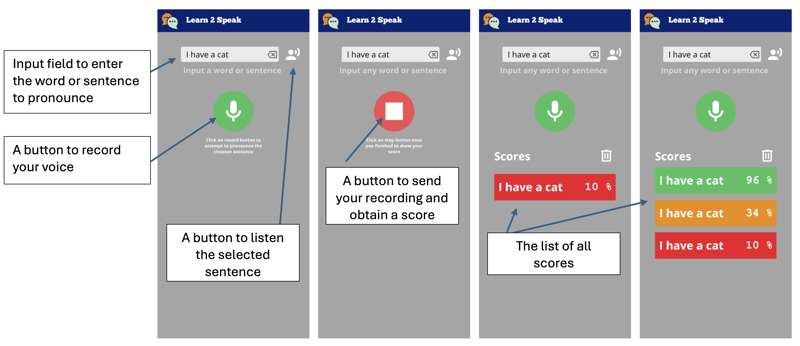
目標は、単語の入力、音声の録音、API への音声録音の送信、スコアの表示を可能にするシンプルなアプリを実装することです。
アプリケーションは次のようになります:

そこで、単語や文を入力できるテキストフィールドを表示するアプリケーションを作成します。ボタンを押すと聴くことができます。
次に、音声を録音するためのボタンがあります。このボタンは、録音モードになるとスタイルが変わります。クリックするだけで停止し、API に送信して発音スコアを取得します。
スコアが取得されると、赤から緑、オレンジまでスコアを表す色のタイルとして表示されます。
アプリケーションの初期化
理想は、アプリを Web アプリとしてだけでなく、ネイティブ Android アプリケーションとしてもデプロイできることです。このため、Quasar を使用します。
クエーサーフレームワーク
Quasar は、単一のコードベースでアプリケーションを開発するためのオープンソース Vue.js フレームワークです。これらは、Web (SPA、PWA、SSR)、モバイル アプリケーション (Android、iOS)、またはデスクトップ アプリケーション (MacOs、Windows、Linux) として展開できます。
準備
まだインストールされていない場合は、NodeJS をインストールする必要があります。 volta を使用すると、プロジェクトに応じて異なるバージョンの NodeJ を使用できるため、より良い方法です。
まず、Quasar スキャフォールディング ツールを使用してプロジェクトを初期化します。
npm i -g @quasar/cli
npm init quasar
CLI はいくつかの質問をします。次のオプションを選択してください:
オプションリスト
コマンドが実行されたら、ディレクトリに入り、アプリケーションをローカルで提供できます。
cd learn2speak
npm run dev
デフォルトのブラウザでは、次のアドレスでページが開きます http://localhost:9000

目標とする人間工学を得るために提案されたスケルトンを修正する
サンプル アプリケーションが利用可能です。必要のない要素は削除します。これを行うには、VSCode でソース コードを開きます (もちろん、別のエディターを使用することもできます)
code .
Layout modification
Quasar provides us with the notion of Layout and then of page included in the latter. The pages and the layout are chosen via the router. For this tutorial, we do not need to know these notions, but you can learn them here: Quasar layout
We do not need drawer, at least not for now so we will delete it from the src/layouts/MainLayout.vue file. To do this, delete the section of the included between the
<template>
  <q-layout view="lHh Lpr lFf">
    <q-header elevated>
      <q-toolbar>
        <q-icon name="interpreter_mode" size="md" />
        <q-toolbar-title>
          Learn2Speak
        </q-toolbar-title>
      </q-toolbar>
    </q-header>

    <q-page-container>
      <router-view />
    </q-page-container>
  </q-layout>
</template>
We can then remove the entire script part and replace it with the following code:
<script>
import { defineComponent } from 'vue'

export default defineComponent({
  name: 'MainLayout',
  setup () {
  }
})
</script>
We don't need more for the layout part because our application will define only one page.
The main page
The implementation of the main page is in the file: src/pages/IndexPage.vue
this is the main page where we will position our text field and the save button.
For this file, we simply remove the Quasar logo from the template (the tag) and modify the script part to use the vueJS 3 composition api, so that the source looks like the following file:
<template>
  <q-page class="flex flex-center">

  </q-page>
</template>

<script setup>

</script>
We will now add the text field using the Quasar component QInput
To do this we add the q-input component to the page template:
<template>
  <q-page class="flex flex-center">
    <q-input
      type="textarea"
      :lines="2"
      autogrow
      hint="Input a word or a sentence"
      clearable
    />
  </q-page>
</template>
You can see that the text field is displayed in the center of the screen, this is due to the Quasar flex and flex-center classes. These classes are defined by Quasar: Flexbox. We will fix this by placing the text field at the top of the screen, we will also take advantage of this to style the component.
Quasar even provides us with a Flex Playground to experiment and find the classes to put.
<template>
  <q-page class="column wrap content-center items-center">
    <q-input
      class="input-text"
      v-model="sentence"
      type="textarea"
      :lines="2"
      autogrow
      hint="Input a word or a sentence"
      clearable
    />
  </q-page>
</template>

<script setup>
import { ref } from 'vue'

// Reference on the word or sentence to be pronounced
const sentence = ref('')

</script>

<style scoped>
.input-text {
  width: 80vw;
  max-width: 400px;
}
</style>
As you can see, we have defined a sentence reference in the script part to store the value entered by the user. It is associated via the v-model directive to the q-input component
We will finish this first part by adding the button allowing the recording of our pronunciation of the word or sentence. For this we will simply use the q-button component of Quasar and position it after our text field.
<template>
  <q-page class="column wrap content-center items-center">
    <q-input
      class="input-text q-mt-lg"
      v-model="sentence"
      type="textarea"
      :lines="2"
      autogrow
      hint="Input a word or a sentence"
      clearable
    />
    <div>
    <q-btn
      class="q-mt-lg"
      icon="mic"
      color="primary"
      round
      size="30px"
      @click="record"
    />
    </div>
  </q-page>
</template>

<script setup>
import { ref } from 'vue'

// Reference on the word or sentence to be pronounced
const sentence = ref('')

function record () {
  console.log('Record')
}
</script>

<style scoped>
.input-text {
  width: 80vw;
  max-width: 400px;
}
</style>
Note that we added the q-mt-lg class to air out the interface a bit by leaving some space above each component. You can refer to the Quasar documentation on spacing.
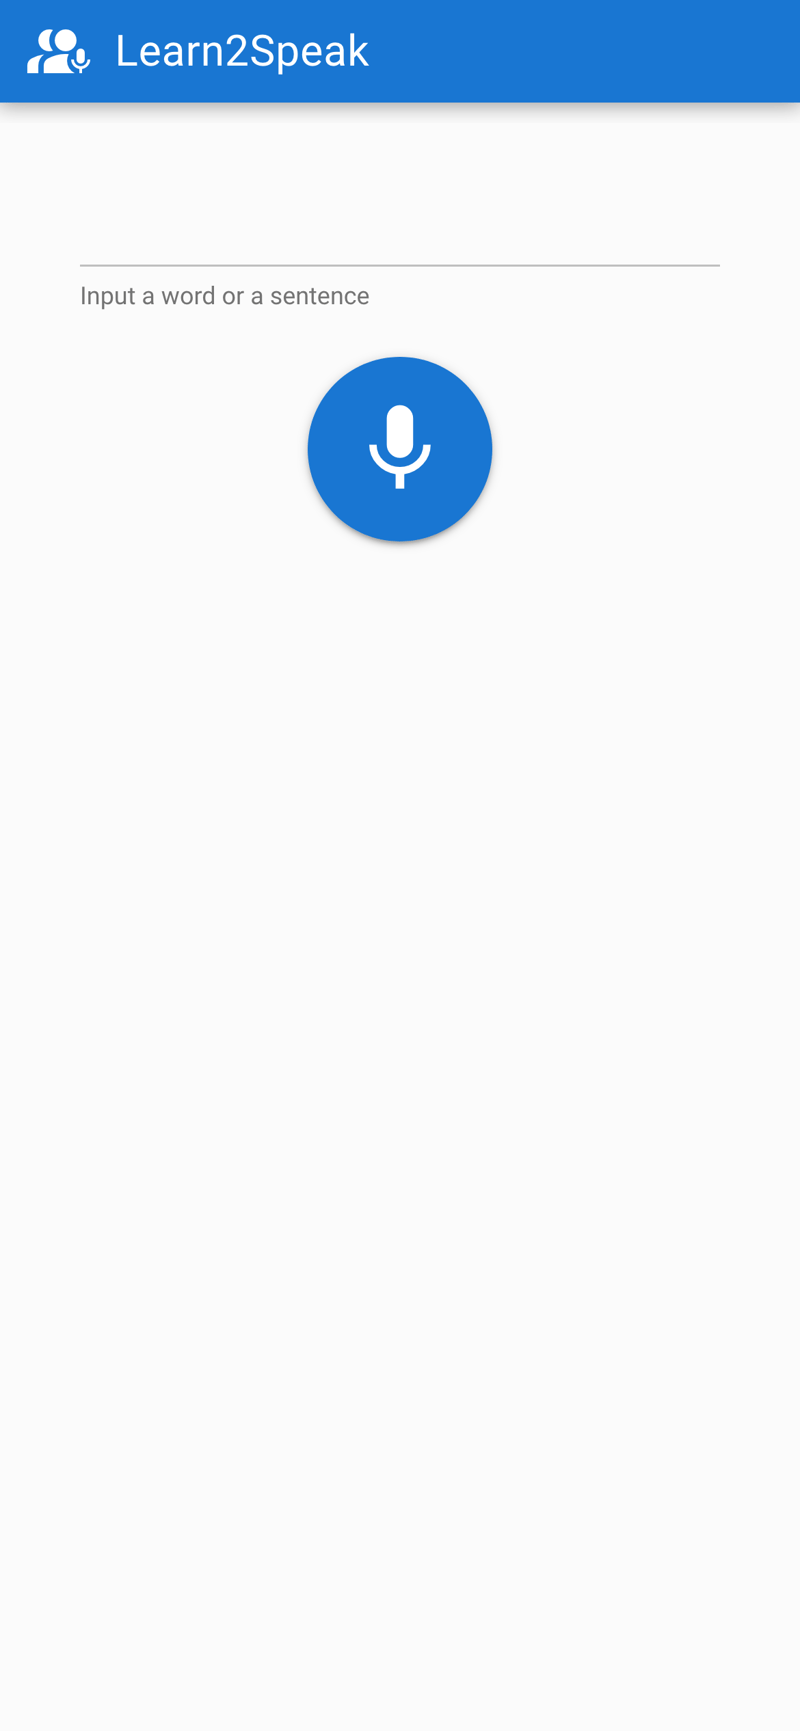
The application will look like:

What will we do next
We have therefore managed to obtain the skeleton of our application.
In a future part we will see how to acquire the audio, then how to obtain a score via the SpeechSuper API
- Part 2: Acquiring the audio
- Part 3: Obtaining the score via the SpeechSuper API
- Part 4: Packaging the application
Conclusion
Don't hesite on comments the post ! Part 2 will follow soon !
以上が発音評価アプリを作成する (パート 1)の詳細内容です。詳細については、PHP 中国語 Web サイトの他の関連記事を参照してください。

ホットAIツール

Undresser.AI Undress
リアルなヌード写真を作成する AI 搭載アプリ

AI Clothes Remover
写真から衣服を削除するオンライン AI ツール。

Undress AI Tool
脱衣画像を無料で

Clothoff.io
AI衣類リムーバー

Video Face Swap
完全無料の AI 顔交換ツールを使用して、あらゆるビデオの顔を簡単に交換できます。

人気の記事

ホットツール

メモ帳++7.3.1
使いやすく無料のコードエディター

SublimeText3 中国語版
中国語版、とても使いやすい

ゼンドスタジオ 13.0.1
強力な PHP 統合開発環境

ドリームウィーバー CS6
ビジュアル Web 開発ツール

SublimeText3 Mac版
神レベルのコード編集ソフト(SublimeText3)

ホットトピック
 1677
1677
 14
14
 1430
1430
 52
52
 1333
1333
 25
25
 1278
1278
 29
29
 1257
1257
 24
24
 Python vs. JavaScript:学習曲線と使いやすさ
Apr 16, 2025 am 12:12 AM
Pythonは、スムーズな学習曲線と簡潔な構文を備えた初心者により適しています。 JavaScriptは、急な学習曲線と柔軟な構文を備えたフロントエンド開発に適しています。 1。Python構文は直感的で、データサイエンスやバックエンド開発に適しています。 2。JavaScriptは柔軟で、フロントエンドおよびサーバー側のプログラミングで広く使用されています。
 JavaScriptとWeb:コア機能とユースケース
Apr 18, 2025 am 12:19 AM
Web開発におけるJavaScriptの主な用途には、クライアントの相互作用、フォーム検証、非同期通信が含まれます。 1)DOM操作による動的なコンテンツの更新とユーザーインタラクション。 2)ユーザーエクスペリエンスを改善するためにデータを提出する前に、クライアントの検証が実行されます。 3)サーバーとのリフレッシュレス通信は、AJAXテクノロジーを通じて達成されます。
 JavaScript in Action:実際の例とプロジェクト
Apr 19, 2025 am 12:13 AM
現実世界でのJavaScriptのアプリケーションには、フロントエンドとバックエンドの開発が含まれます。 1)DOM操作とイベント処理を含むTODOリストアプリケーションを構築して、フロントエンドアプリケーションを表示します。 2)node.jsを介してRestfulapiを構築し、バックエンドアプリケーションをデモンストレーションします。
 JavaScriptエンジンの理解:実装の詳細
Apr 17, 2025 am 12:05 AM
JavaScriptエンジンが内部的にどのように機能するかを理解することは、開発者にとってより効率的なコードの作成とパフォーマンスのボトルネックと最適化戦略の理解に役立つためです。 1)エンジンのワークフローには、3つの段階が含まれます。解析、コンパイル、実行。 2)実行プロセス中、エンジンはインラインキャッシュや非表示クラスなどの動的最適化を実行します。 3)ベストプラクティスには、グローバル変数の避け、ループの最適化、constとletsの使用、閉鎖の過度の使用の回避が含まれます。
 Python vs. JavaScript:開発環境とツール
Apr 26, 2025 am 12:09 AM
開発環境におけるPythonとJavaScriptの両方の選択が重要です。 1)Pythonの開発環境には、Pycharm、Jupyternotebook、Anacondaが含まれます。これらは、データサイエンスと迅速なプロトタイピングに適しています。 2)JavaScriptの開発環境には、フロントエンドおよびバックエンド開発に適したnode.js、vscode、およびwebpackが含まれます。プロジェクトのニーズに応じて適切なツールを選択すると、開発効率とプロジェクトの成功率が向上する可能性があります。
 JavaScript通訳者とコンパイラにおけるC/Cの役割
Apr 20, 2025 am 12:01 AM
CとCは、主に通訳者とJITコンパイラを実装するために使用されるJavaScriptエンジンで重要な役割を果たします。 1)cは、JavaScriptソースコードを解析し、抽象的な構文ツリーを生成するために使用されます。 2)Cは、Bytecodeの生成と実行を担当します。 3)Cは、JITコンパイラを実装し、実行時にホットスポットコードを最適化およびコンパイルし、JavaScriptの実行効率を大幅に改善します。
 Python vs. JavaScript:ユースケースとアプリケーションと比較されます
Apr 21, 2025 am 12:01 AM
Pythonはデータサイエンスと自動化により適していますが、JavaScriptはフロントエンドとフルスタックの開発により適しています。 1. Pythonは、データ処理とモデリングのためにNumpyやPandasなどのライブラリを使用して、データサイエンスと機械学習でうまく機能します。 2。Pythonは、自動化とスクリプトにおいて簡潔で効率的です。 3. JavaScriptはフロントエンド開発に不可欠であり、動的なWebページと単一ページアプリケーションの構築に使用されます。 4. JavaScriptは、node.jsを通じてバックエンド開発において役割を果たし、フルスタック開発をサポートします。
 Webサイトからアプリまで:JavaScriptの多様なアプリケーション
Apr 22, 2025 am 12:02 AM
JavaScriptは、Webサイト、モバイルアプリケーション、デスクトップアプリケーション、サーバー側のプログラミングで広く使用されています。 1)Webサイト開発では、JavaScriptはHTMLおよびCSSと一緒にDOMを運用して、JQueryやReactなどのフレームワークをサポートします。 2)ReactNativeおよびIonicを通じて、JavaScriptはクロスプラットフォームモバイルアプリケーションを開発するために使用されます。 3)電子フレームワークにより、JavaScriptはデスクトップアプリケーションを構築できます。 4)node.jsを使用すると、JavaScriptがサーバー側で実行され、高い並行リクエストをサポートします。


