

Golang と AWS Cognito による認証

コグニートとは何ですか?
アプリケーションの認証はシステムにおいて非常に重要ですが、非常に機密性の高いものでもあり、さまざまな実装、セキュリティ、検証を考慮する必要があります。
私は、多くの人が知らない Web アプリケーションやモバイル アプリケーションのユーザーの認証と検証に役立つ AWS の非常に優れたツールである Cognito についてデモンストレーションする投稿を作成することにしました。
Cognito は、OAuth トークンの生成に加えて、ユーザー アクセス データの作成と検証を担当する AWS プラットフォームであり、ユーザーの登録とその情報の保存が可能です。また、Cognito はすべてのユーザー検証も提供できます。
電子メール、名前、電話番号、生年月日、ニックネーム、性別、ウェブサイトなどのユーザー データを作成でき、カスタム フィールドを配置することもできます。
Cognito を使用すると、Google、Facebook、GitHub などのソーシャル ログインとして知られる「フェデレーション プロバイダー」と連携することができます。この投稿では取り上げませんが、Cognito を使用して実行することは可能です。
何をしましょうか?
cognito がどのように機能するかを示すためにいくつかのエンドポイントを作成します。ユーザーの作成、電子メールの確認、ログイン、cognito によって提供されるトークンを使用したユーザーの検索、情報の更新を行います。
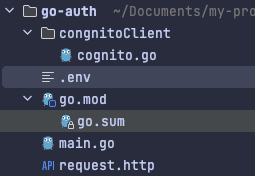
プロジェクトのセットアップ
私たちは非常に単純なことをやろうとしています。プロジェクトの親のことを心配するつもりはありません。知識の使用だけに取り組みたいと考えています。
エンドポイントを作成するには、gin を使用します。
次のファイルを作成しましょう:
プロジェクトのルートにあるアプリケーション main.go のエントリポイント
.env コグニティブ認証情報を保存するには
cognitoClient という名前のペーストと cognito.go
というファイル内
リクエストを完了するための request.http というファイルがあります。
構造は次のようになります:
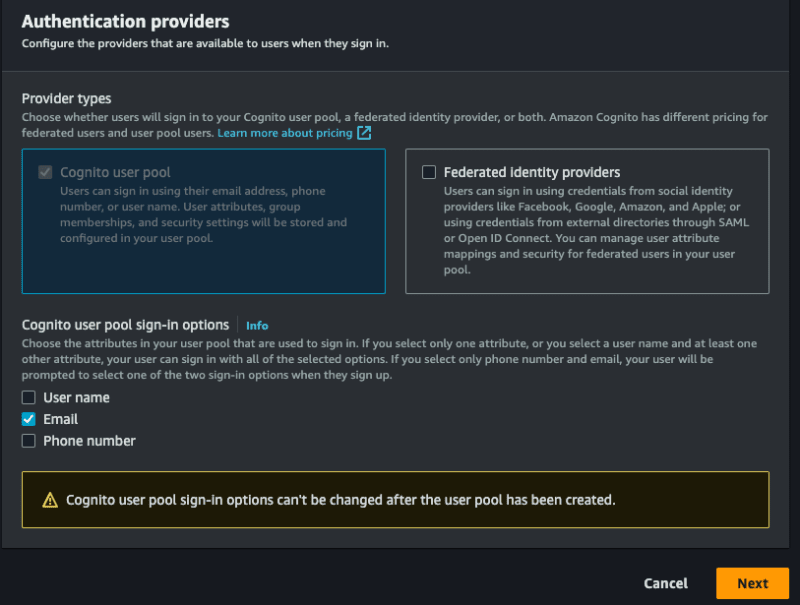
AWS での Cognito のセットアップ
コードを開始する前に、AWS でコグニートを設定し、パネルにアクセスしてコグニートで検索します。プールを作成した後、アプリにユーザー ディレクトリを追加 オプションを選択します。
プロバイダー タイプ については、Cognito ユーザー プール オプションを選択します。電子メール、ユーザー名、電話番号を使用したログインを許可するかどうかを選択できます。電子メールのみを選択でき、必要なものを選択できます。優先して、最初のステージに割り当てを選択してください:
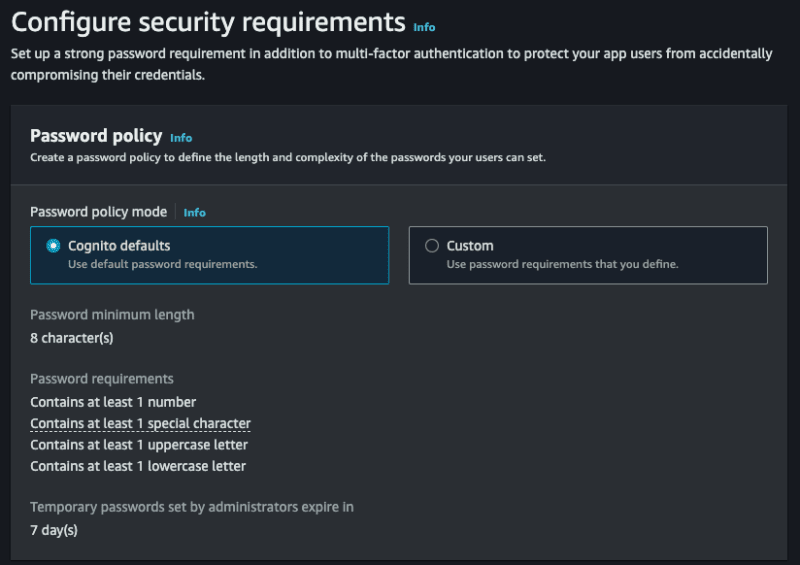
さらにいくつか設定する必要があるので、いきましょう!
- パスワード ポリシー モード では、特定のポリシーを選択できます。Cognito のデフォルト を詳細に説明します。
- 多要素認証 により、ログインに 2 要素認証が可能になります。省略しましょう。ただし、必要に応じて実装できます。MFA なし を選択することもできます。
- 最後に、ユーザー アカウントの回復では、アカウントを回復する方法を選択できます。メールを選択するだけです。
次のステップ:
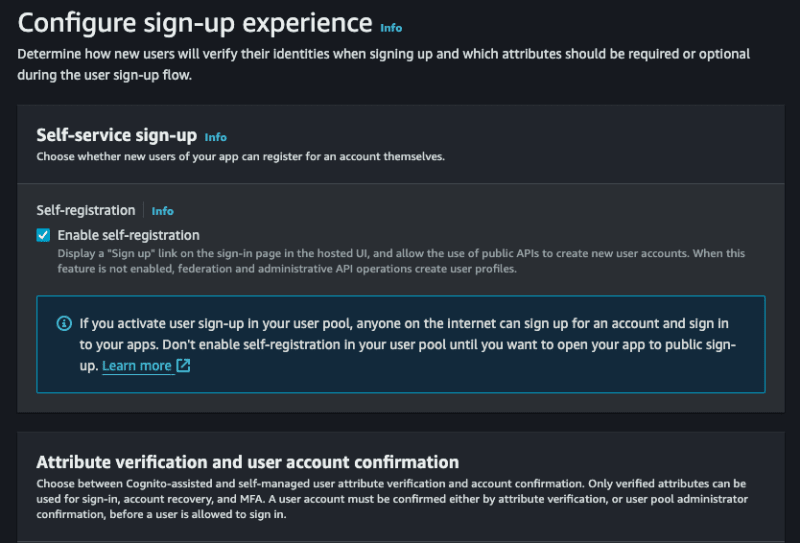
- セルフサービス サインアップ。誰でも行うことができます。選択したままにしておきます。
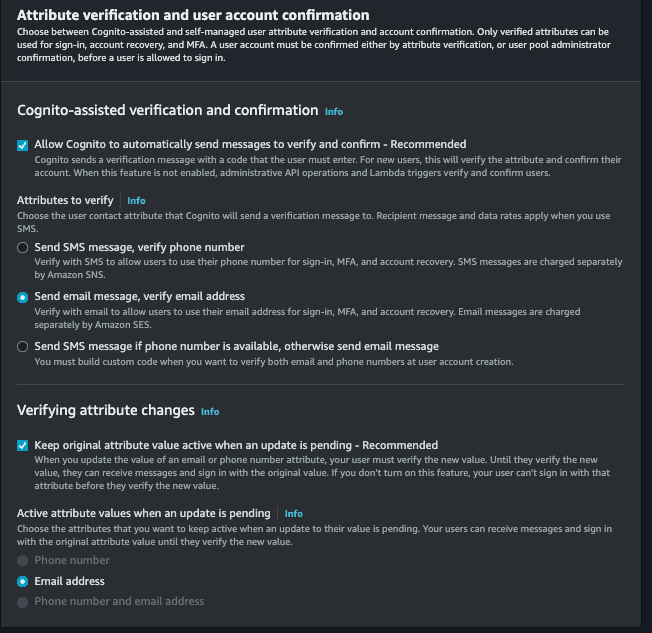
- Cognito 支援の検証と確認。Cognito がユーザーの身元を確認する責任を負うことを許可し、それを確認し、オプション メール メッセージの送信、メール アドレスの確認 も選択します。
- 属性変更の検証。ユーザーの電子メールの更新を再度検証する必要があるように、このオプションをオンにします。
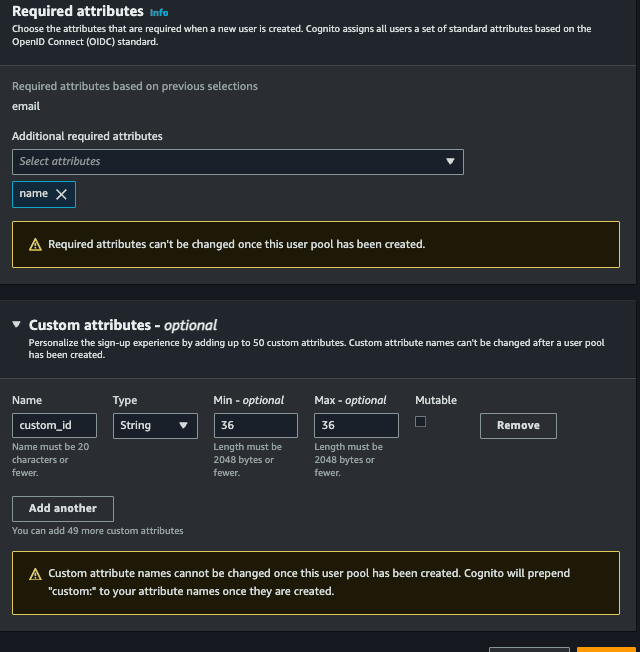
- 必須属性、新しいユーザーを作成するために必須にするフィールドを選択します。オプション、電子メール (および名前) を選択します。名前は父親にも必須になります。
- カスタム属性。これはオプションですが、カスタム フィールドを追加できます。たとえば、任意の uuid となるcustom_id というフィールドを作成します。
この段階も発生しました:
次に、Cognito で電子メールを送信 オプションを選択します。これにより、電子メールをトリガーするために何も設定する必要はありません。
次のステップで、ユーザー プール名 に希望する名前を アプリ クライアント名 に入力し、希望する名前も入力して続行します。
最後の段階では何も変更する必要はなく、終了してユーザー プールを作成するだけです。
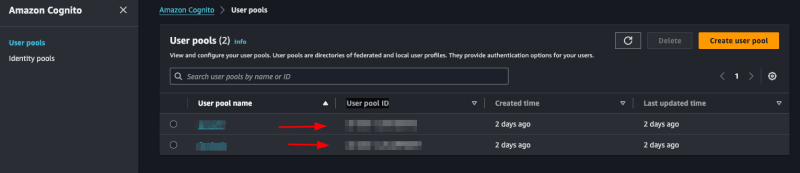
すべてにアクセスまたは認識 >ユーザー プール。作成したばかりのプールを選択します。この部分にはアプリケーションのすべてのユーザーがリストされ、ユーザーのトークンの取り消し、非アクティブ化、検証などが可能です。
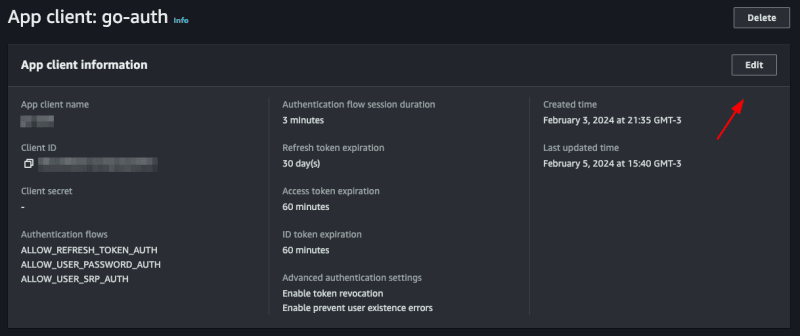
作成されたプールにアクセスするために、AWS の Go SDK を使用できるようにするために、プールの ID を指定します アプリ統合 > アプリクライアントリスト、クライアント ID:
を参照してください。
この ID を .env ファイルに保存しましょう:
COGNITO_CLIENT_ID=client_id
AWS 認証情報が必要であることに注意してください。AWS 認証情報は通常 /Users/your-user/.aws ディレクトリにあります。まだ設定していない場合は、その方法をここで参照してください。
コグニートの実装
cognito 部分を別のファイルに分離しましょう。
ユーザーの登録
cognito.go ファイル内で、cognito を初期化し、インターフェースを作成します。
  package congnitoClient

  import (
    "github.com/aws/aws-sdk-go/aws"
    "github.com/aws/aws-sdk-go/aws/session"
    cognito "github.com/aws/aws-sdk-go/service/cognitoidentityprovider"
    "github.com/google/uuid"
  )

  type User struct {
    Name     string `json:"name" binding:"required"`
    Email    string `json:"email" binding:"required,email"`
    Password string `json:"password" binding:"required"`
  }

  type CognitoInterface interface {
    SignUp(user *User) error
  }

  type cognitoClient struct {
    cognitoClient *cognito.CognitoIdentityProvider
    appClientID   string
  }

  func NewCognitoClient(appClientId string) CognitoInterface {
    config := &aws.Config{Region: aws.String("us-east-1")}
    sess, err := session.NewSession(config)
    if err != nil {
      panic(err)
    }
    client := cognito.New(sess)

    return &cognitoClient{
      cognitoClient: client,
      appClientID:   appClientId,
    }
  }

  func (c *cognitoClient) SignUp(user *User) error {
    return nil
  }
まず、User という構造体を作成します。この構造体には、cognito で保存する必要があるユーザー フィールドが含まれます。
次に、CognitoInterface というインターフェイスを作成します。使用するメソッドを用意します。まず、User 構造体へのポインタを受け取る SignUp だけを用意します。
次に、コンストラクターとなる NewCognitoClient のインスタンスを含む cognitoClient という別の構造体を作成します。
前述したように、NewCognitoClient はコンストラクターのようなもので、ここで AWS とのセッションを作成し、この接続を返します。この接続はグローバル変数である可能性がありますが、この場合はこれを行いません。ユースケースに最適なアプローチがどれであるかを確認するのはあなた次第です。
次に、SignUp を実装しましょう:
  func (c *cognitoClient) SignUp(user *User) error {
    userCognito := &cognito.SignUpInput{
      ClientId: aws.String(c.appClientID),
      Username: aws.String(user.Email),
      Password: aws.String(user.Password),
      UserAttributes: []*cognito.AttributeType{
        {
          Name:  aws.String("name"),
          Value: aws.String(user.Name),
        },
        {
          Name:  aws.String("email"),
          Value: aws.String(user.Email),
        },
        {
          Name:  aws.String("custom:custom_id"),
          Value: aws.String(uuid.NewString()),
        },
      },
    }
    _, err := c.cognitoClient.SignUp(userCognito)
    if err != nil {
      return err
    }
    return nil
  }
Cognito の AttributeType を使用して、AWS SDK のサインアップに送信するパラメーターを組み立てます。カスタムフィールドであるcustom_idは、事前にカスタムで配置する必要があることに注意してください。これがないと受け入れられません。 、Google パッケージで uuid を作成したところです。このフィールドは、カスタム属性の使用方法を示すためだけにあります。
ClientId フィールドは環境の COGNITO_CLIENT_ID を参照し、main.go の起動時にそれを渡します。
ユーザーを救うために必要なのはこれです。簡単ですよね?
次のコマンドでプロジェクトを開始することを忘れないでください。
go mod init <your project name>
必要なパッケージをインストールします:
go mod tidy
アカウントの確認
電子メール経由でユーザーのアカウントを確認する別の関数を作成しましょう。アカウントを確認するには、ユーザーは電子メールで送信されたコードを入力する必要があります。新しい構造体を作成し、新しい confirmAccount メソッドをインターフェイスに追加しましょう:
  type UserConfirmation struct {
    Email string `json:"email" binding:"required,email"`
    Code  string `json:"code" binding:"required"`
  }
  type CognitoInterface interface {
    SignUp(user *User) error
    ConfirmAccount(user *UserConfirmation) error
  }
次に実装しましょう:
  func (c *cognitoClient) ConfirmAccount(user *UserConfirmation) error {
    confirmationInput := &cognito.ConfirmSignUpInput{
      Username:         aws.String(user.Email),
      ConfirmationCode: aws.String(user.Code),
      ClientId:         aws.String(c.appClientID),
    }
    _, err := c.cognitoClient.ConfirmSignUp(confirmationInput)
    if err != nil {
      return err
    }
    return nil
  }
これは非常に簡単です。ユーザー名がユーザーの電子メールであることを思い出しながら、cognito パッケージの confirmSignUpInput を使用してパラメーターを組み立てます。最後に、confirmSignUp を呼び出して、confirmInput を渡します。
エラーを返しただけであることを思い出して、エラー メッセージの種類を改善して確認してください。
ログイン
これは最もよく使用される機能です。SignIn というメソッドと構造体を作成しましょう。
  type UserLogin struct {
    Email    string `json:"email" binding:"required,email"`
    Password string `json:"password" binding:"required"`
  }
  type CognitoInterface interface {
    SignUp(user *User) error
    ConfirmAccount(user *UserConfirmation) error
    SignIn(user *UserLogin) (string, error)
  }
サインインは UserLogin を受け取ります。
実装しましょう:
  func (c *cognitoClient) SignIn(user *UserLogin) (string, error) {
    authInput := &cognito.InitiateAuthInput{
      AuthFlow: aws.String("USER_PASSWORD_AUTH"),
      AuthParameters: aws.StringMap(map[string]string{
        "USERNAME": user.Email,
        "PASSWORD": user.Password,
      }),
      ClientId: aws.String(c.appClientID),
    }
    result, err := c.cognitoClient.InitiateAuth(authInput)
    if err != nil {
      return "", err
    }
    return *result.AuthenticationResult.AccessToken, nil
  }
aws cognito パッケージの InitiateAuth 関数を使用します。ユーザー名 (ユーザーのメールアドレス)、パスワード、および AuthFlow を渡す必要があります。このフィールドは、許可するアクセスのタイプを指します (この場合は USER_PASSWORD_AUTH)。
次のようなエラーが表示された場合:
すべてのプロキシを信頼しましたが、これは安全ではありません。値を設定することをお勧めします
AWS パネルでアクセス認識を設定するには、ALLOW_USER_PASSWORD_AUTH フローを有効にする必要があります。
ユーザープール > プールの選択 > アプリの統合 > アプリクライアントリスト > クライアントを選択すると、次の画面が開きます:
Click on edit and in Authentication flows select the option ALLOW_USER_PASSWORD_AUTH then save, with this you can now log in with the user's password and email.
Listando um usuário
Para mostrar como utilizar o token jwt fornecido pelo cognito vamos criar um endpoint que mostra os dados do usuário salvos no cognito apenas com o token.
Let's create another function called GetUserByToken that will receive a token and return a struct of type GetUserOutput that we will get from the cognito package.
  type CognitoInterface interface {
    SignUp(user *User) error
    ConfirmAccount(user *UserConfirmation) error
    SignIn(user *UserLogin) (string, error)
    GetUserByToken(token string) (*cognito.GetUserOutput, error)
  }
If you click on GetUserOutput you will see what is inside this struct
  type GetUserOutput struct {
    _ struct{} `type:"structure"`
    MFAOptions []*MFAOptionType `type:"list"`
    PreferredMfaSetting *string `type:"string"`
    UserAttributes []*AttributeType `type:"list" required:"true"`
    UserMFASettingList []*string `type:"list"`
    Username *string `min:"1" type:"string" required:"true" sensitive:"true"`
  }
inside the _ struct{} there are custom attributes that we created for our user, in our case the custom_id.
Let's implement:
  func (c *cognitoClient) GetUserByToken(token string) (*cognito.GetUserOutput, error) {
    input := &cognito.GetUserInput{
      AccessToken: aws.String(token),
    }
    result, err := c.cognitoClient.GetUser(input)
    if err != nil {
      return nil, err
    }
    return result, nil
  }
We use GetUser from the cognito package, it only needs an AccessToken which is the token provided by cognito itself.
Updating password
Finally, we will update the user's password. To do this, we will need the email address and the new password. We already have the UserLogin struct with the fields we need. We will reuse it. If you wish, create a new one just for this function. Let's create the UpdatePassword function:
  type CognitoInterface interface {
    SignUp(user *User) error
    ConfirmAccount(user *UserConfirmation) error
    SignIn(user *UserLogin) (string, error)
    GetUserByToken(token string) (*cognito.GetUserOutput, error)
    UpdatePassword(user *UserLogin) error
  }
Let's implement:
  func (c *cognitoClient) UpdatePassword(user *UserLogin) error {
    input := &cognito.AdminSetUserPasswordInput{
      UserPoolId: aws.String(os.Getenv("COGNITO_USER_POOL_ID")),
      Username:   aws.String(user.Email),
      Password:   aws.String(user.Password),
      Permanent:  aws.Bool(true),
    }
    _, err := c.cognitoClient.AdminSetUserPassword(input)
    if err != nil {
      return err
    }
    return nil
  }
We will use the AdminSetUserPassword function from the cognito package, we need to pass the user's email and the new password, in addition we have to pass the UserPoolId, we will put the COGNITO_USER_POOL_ID in the .env file, to search in aws just access your pool and copy the User pool ID
We will also pass Permanent, informing that it is a permanent password, you could pass false, so Cognito would create a temporary password for the user, this will depend on the strategy you will use in your application.
Creating the main
Let's create our main.go, this will be the file where we will start cognito and create our routes.
  func main() {
    err := godotenv.Load()
    if err != nil {
      panic(err)
    }
    cognitoClient := congnitoClient.NewCognitoClient(os.Getenv("COGNITO_CLIENT_ID"))
    r := gin.Default()

    fmt.Println("Server is running on port 8080")
    err = r.Run(":8080")
    if err != nil {
      panic(err)
    }
  }
First we will load our envs with the godotenv package, then we start our cognito client, passing the COGNITO_CLIENT_ID, which we got earlier, then we start gin and create a server, that's enough.
Creating the endpoints
Creating a user
Let's create a function inside the main.go file itself, let's call it CreateUser:
  func CreateUser(c *gin.Context, cognito congnitoClient.CognitoInterface) error {
    var user congnitoClient.User
    if err := c.ShouldBindJSON(&user); err != nil {
      return errors.New("invalid json")
    }
    err := cognito.SignUp(&user)
    if err != nil {
      return errors.New("could not create use")
    }
    return nil
  }
Something simple, we just convert what we receive in the body to our struct using gin's ShouldBindJSON, then we call the SignUp that we created in cognito.go.
Now let's create the endpoint inside the main.go function:
  r.POST("user", func(context *gin.Context) {
        err := CreateUser(context, cognitoClient)
        if err != nil {
            context.JSON(http.StatusBadRequest, gin.H{"error": err.Error()})
            return
        }
        context.JSON(http.StatusCreated, gin.H{"message": "user created"})
    })
We call the function we just created CreateUser, if there is an error we throw a StatusBadRequest, if it is successful a StatusCreated, let's test.
Let's do a go mod tidy downloading all the packages, then we'll run the application with go run main.go
Now we can create a call in the request.http file and execute:
POST http://localhost:8080/user HTTP/1.1
content-type: application/json

{
  "Name": "John Doe",
  "email": "wivobi1159@bitofee.com",
  "password": "Pass@1234"
}
If everything is correct we will receive the message:
{
  "message": "user created"
}
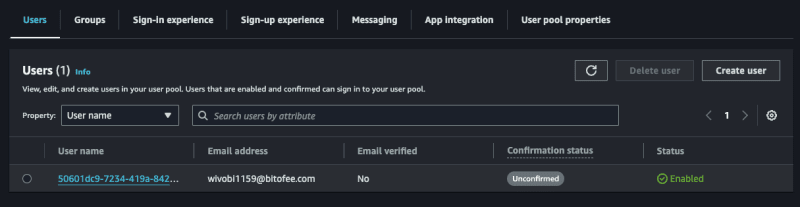
Now entering the Cognito panel on AWS, and accessing the pool then the users, we will have our user there:
Confirming a user
Note that the user we created above is not confirmed, let's confirm it!
Create a function called ConfirmAccount in the main.go file:
  func ConfirmAccount(c *gin.Context, cognito congnitoClient.CognitoInterface) error {
    var user congnitoClient.UserConfirmation
    if err := c.ShouldBindJSON(&user); err != nil {
      return errors.New("invalid json")
    }
    err := cognito.ConfirmAccount(&user)
    if err != nil {
      return errors.New("could not confirm user")
    }
    return nil
  }
Same concept we used before, let's convert the body to the UserConfirmation struct and pass it to ConfirmAccount in cognito.go.
Let's create the endpoint:
  r.POST("user/confirmation", func(context *gin.Context) {
        err := ConfirmAccount(context, cognitoClient)
        if err != nil {
            context.JSON(http.StatusBadRequest, gin.H{"error": err.Error()})
            return
        }
        context.JSON(http.StatusCreated, gin.H{"message": "user confirmed"})
    })
It's also simple, we just handle the error and return a message, let's create our call and test it:
POST http://localhost:8080/user/confirmation HTTP/1.1
content-type: application/json

{
  "email": "wivobi1159@bitofee.com",
  "code": "363284"
}
We will receive the message:
{
  "message": "user confirmed"
}
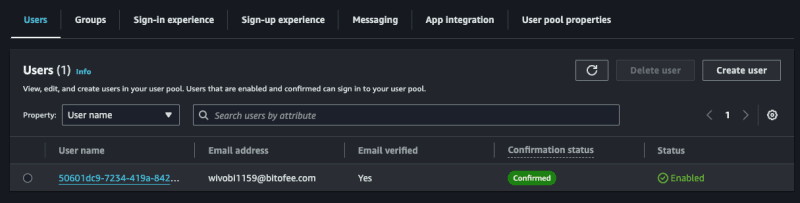
Now accessing Cognito again on the AWS panel, notice that the user is confirmed, remembering that you need to enter a valid email, you can use a temporary email to play around, but it needs to be valid, as Cognito will send the confirmation code and it needs to be a valid code to confirm successfully.
Login
Now let's create our token, to do this in the main.go file create a function called SignIn, this function will return an error and a token.
  func SignIn(c *gin.Context, cognito congnitoClient.CognitoInterface) (string, error) {
    var user congnitoClient.UserLogin
    if err := c.ShouldBindJSON(&user); err != nil {
      return "", errors.New("invalid json")
    }
    token, err := cognito.SignIn(&user)
    if err != nil {
      return "", errors.New("could not sign in")
    }
    return token, nil
  }
Same pattern as the other functions, we convert the body to the UserLogin struct and pass it to SignIn of cognito.go.
Let's create the endpoint:
  r.POST("user/login", func(context *gin.Context) {
        token, err := SignIn(context, cognitoClient)
        if err != nil {
            context.JSON(http.StatusBadRequest, gin.H{"error": err.Error()})
            return
        }
        context.JSON(http.StatusCreated, gin.H{"token": token})
    })
Now we return a token to the user, let's create the call and test:
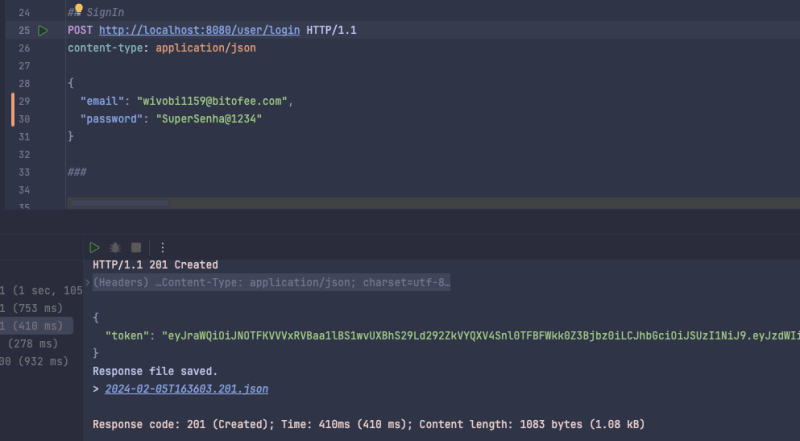
POST http://localhost:8080/user/login HTTP/1.1
content-type: application/json

{
  "email": "wivobi1159@bitofee.com",
  "password": "Pass@1234"
}
When making the call we will receive our jwt token:
{
  "token": "token_here"
}
If we get the jwt token we can see what's inside, using the website jwt.io.
Listing a user
Now we will list the user data saved in cognito using only the token, to do this create a function called GetUserByToken in main.go and we will need a struct to represent the response that we will return to the user, we will create it in main as well:
  type UserResponse struct {
    ID            string `json:"id"`
    Name          string `json:"name"`
    Email         string `json:"email"`
    CustomID      string `json:"custom_id"`
    EmailVerified bool   `json:"email_verified"`
  }

  func main() {}
Now the function:
  func GetUserByToken(c *gin.Context, cognito congnitoClient.CognitoInterface) (*UserResponse, error) {
    token := strings.TrimPrefix(c.GetHeader("Authorization"), "Bearer ")
    if token == "" {
      return nil, errors.New("token not found")
    }
    cognitoUser, err := cognito.GetUserByToken(token)
    if err != nil {
      return nil, errors.New("could not get user")
    }
    user := &UserResponse{}
    for _, attribute := range cognitoUser.UserAttributes {
      switch *attribute.Name {
      case "sub":
        user.ID = *attribute.Value
      case "name":
        user.Name = *attribute.Value
      case "email":
        user.Email = *attribute.Value
      case "custom:custom_id":
        user.CustomID = *attribute.Value
      case "email_verified":
        emailVerified, err := strconv.ParseBool(*attribute.Value)
        if err == nil {
          user.EmailVerified = emailVerified
        }
      }
    }
    return user, nil
  }
This will be the biggest function, we need to map what we receive from Cognito to our UserResponse struct, we do this with a for and a switch, of course we could improve it, but for the sake of example we will keep it like this. Also to map custom attributes we need to put custom before, like custom:custom_id.
We also check if the user passed the token in the header, if not we return an error.
Let's create the endpoint:
  r.GET("user", func(context *gin.Context) {
        user, err := GetUserByToken(context, cognitoClient)
        if err != nil {
            if err.Error() == "token not found" {
                context.JSON(http.StatusUnauthorized, gin.H{"error": "token not found"})
                return
            }
            context.JSON(http.StatusBadRequest, gin.H{"error": err.Error()})
            return
        }
        context.JSON(http.StatusOK, gin.H{"user": user})
    })
We perform the same validation as the other endpoints, but now we check the error type and if it is of the token not found type we return a StatusUnauthorized.
Let's test:
GET http://localhost:8080/user HTTP/1.1
content-type: application/json
Authorization: Bearer token_jwt
Let's receive the user:
{
  "user": {
    "id": "50601dc9-7234-419a-8427-2a4bda92d33f",
    "name": "John Doe",
    "email": "wivobi1159@bitofee.com",
    "custom_id": "cb748d09-40de-457a-af23-ed9483d69f8d",
    "email_verified": true
  }
}
Updating password
Finally, let's create the UpdatePassword function that will update the user's password:
  func UpdatePassword(c *gin.Context, cognito congnitoClient.CognitoInterface) error {
    token := strings.TrimPrefix(c.GetHeader("Authorization"), "Bearer ")
    if token == "" {
      return errors.New("token not found")
    }
    var user congnitoClient.UserLogin
    if err := c.ShouldBindJSON(&user); err != nil {
      return errors.New("invalid json")
    }
    err := cognito.UpdatePassword(&user)
    if err != nil {
      return errors.New("could not update password")
    }
    return nil
  }
We also make it mandatory to inform the token in the header, the rest of the function is what we have already done previously.
Let's create the last endpoint:
  r.PATCH("user/password", func(context *gin.Context) {
        err := UpdatePassword(context, cognitoClient)
        if err != nil {
            if err.Error() == "token not found" {
                context.JSON(http.StatusUnauthorized, gin.H{"error": "token not found"})
                return
            }
            context.JSON(http.StatusBadRequest, gin.H{"error": err.Error()})
            return
        }
        context.JSON(http.StatusOK, gin.H{"message": "password updated"})
    })
Let's make the call:
PATCH http://localhost:8080/user/password HTTP/1.1
content-type: application/json
Authorization: Bearer token_jwt

{
  "email": "wivobi1159@bitofee.com",
  "password": "NovaSenha2@2222"
}
Now when you update your password and try to log in you will receive an error, and if you use the new password, everything will work.
Final considerations
In this post we talk a little about Cognito, one of the many AWS services that many people don't know about but that helps a lot in the evolution of your system.
Cognito's practicality goes beyond what I've discussed. Making a basic login is simple, but Cognito stands out for already providing you with an account verification system "ready", a login option with social networks (which can be quite annoying to implement without Coginito), two-factor authentication, among others, and it also has AWS security to protect user data.
Cognito has more functionality, it's worth seeing all of them in the documentation.
Repository link
Project repository
See the post on my blog here
Subscribe and receive notification of new posts, participate
以上がGolang と AWS Cognito による認証の詳細内容です。詳細については、PHP 中国語 Web サイトの他の関連記事を参照してください。

ホットAIツール

Undresser.AI Undress
リアルなヌード写真を作成する AI 搭載アプリ

AI Clothes Remover
写真から衣服を削除するオンライン AI ツール。

Undress AI Tool
脱衣画像を無料で

Clothoff.io
AI衣類リムーバー

Video Face Swap
完全無料の AI 顔交換ツールを使用して、あらゆるビデオの顔を簡単に交換できます。

人気の記事
ホットツール

メモ帳++7.3.1
使いやすく無料のコードエディター

SublimeText3 中国語版
中国語版、とても使いやすい

ゼンドスタジオ 13.0.1
強力な PHP 統合開発環境

ドリームウィーバー CS6
ビジュアル Web 開発ツール

SublimeText3 Mac版
神レベルのコード編集ソフト(SublimeText3)
ホットトピック
 1671
1671
 14
1428
52
1329
25
1276
29
1256
24
14
1428
52
1329
25
1276
29
1256
24

 Golang vs. Python:パフォーマンスとスケーラビリティ
Apr 19, 2025 am 12:18 AM
Golang vs. Python:パフォーマンスとスケーラビリティ
Apr 19, 2025 am 12:18 AM
Golangは、パフォーマンスとスケーラビリティの点でPythonよりも優れています。 1)Golangのコンピレーションタイプの特性と効率的な並行性モデルにより、高い並行性シナリオでうまく機能します。 2)Pythonは解釈された言語として、ゆっくりと実行されますが、Cythonなどのツールを介してパフォーマンスを最適化できます。
 Golang and C:Concurrency vs. Raw Speed
Apr 21, 2025 am 12:16 AM
Golang and C:Concurrency vs. Raw Speed
Apr 21, 2025 am 12:16 AM
Golangは並行性がCよりも優れていますが、Cは生の速度ではGolangよりも優れています。 1)Golangは、GoroutineとChannelを通じて効率的な並行性を達成します。これは、多数の同時タスクの処理に適しています。 2)Cコンパイラの最適化と標準ライブラリを介して、極端な最適化を必要とするアプリケーションに適したハードウェアに近い高性能を提供します。
 ゴーを始めましょう:初心者のガイド
Apr 26, 2025 am 12:21 AM
ゴーを始めましょう:初心者のガイド
Apr 26, 2025 am 12:21 AM
goisidealforforbeginnersandsutable forcloudnetworkservicesduetoitssimplicity、andconcurrencyfeatures.1)installgofromtheofficialwebsiteandverify with'goversion'.2)
 Golang vs. C:パフォーマンスと速度の比較
Apr 21, 2025 am 12:13 AM
Golang vs. C:パフォーマンスと速度の比較
Apr 21, 2025 am 12:13 AM
Golangは迅速な発展と同時シナリオに適しており、Cは極端なパフォーマンスと低レベルの制御が必要なシナリオに適しています。 1)Golangは、ごみ収集と並行機関のメカニズムを通じてパフォーマンスを向上させ、高配列Webサービス開発に適しています。 2)Cは、手動のメモリ管理とコンパイラの最適化を通じて究極のパフォーマンスを実現し、埋め込みシステム開発に適しています。
 Golangの影響:速度、効率、シンプルさ
Apr 14, 2025 am 12:11 AM
Golangの影響:速度、効率、シンプルさ
Apr 14, 2025 am 12:11 AM
speed、効率、およびシンプル性をspeedsped.1)speed:gocompilesquilesquicklyandrunseffictient、理想的なlargeprojects.2)効率:等系dribribraryreducesexexternaldedenciess、開発効果を高める3)シンプルさ:
 Golang vs. Python:重要な違いと類似点
Apr 17, 2025 am 12:15 AM
Golang vs. Python:重要な違いと類似点
Apr 17, 2025 am 12:15 AM
GolangとPythonにはそれぞれ独自の利点があります。Golangは高性能と同時プログラミングに適していますが、PythonはデータサイエンスとWeb開発に適しています。 Golangは同時性モデルと効率的なパフォーマンスで知られていますが、Pythonは簡潔な構文とリッチライブラリエコシステムで知られています。
 GolangとC:パフォーマンスのトレードオフ
Apr 17, 2025 am 12:18 AM
GolangとC:パフォーマンスのトレードオフ
Apr 17, 2025 am 12:18 AM
GolangとCのパフォーマンスの違いは、主にメモリ管理、コンピレーションの最適化、ランタイム効率に反映されています。 1)Golangのゴミ収集メカニズムは便利ですが、パフォーマンスに影響を与える可能性があります。
 パフォーマンスレース:ゴラン対c
Apr 16, 2025 am 12:07 AM
パフォーマンスレース:ゴラン対c
Apr 16, 2025 am 12:07 AM
GolangとCにはそれぞれパフォーマンス競争において独自の利点があります。1)Golangは、高い並行性と迅速な発展に適しており、2)Cはより高いパフォーマンスと微細な制御を提供します。選択は、プロジェクトの要件とチームテクノロジースタックに基づいている必要があります。
