

YOLOv と OpenCV を使用して、画像から検出されたすべてのオブジェクトを抽出し、別のファイルとして保存する簡単な方法

目次
はじめに
サンプル画像
YOLOv8
を使用してオブジェクトを検出する
さまざまな YOLOv8 モデルの詳細
モデルを実行してオブジェクトを検出します
検出結果を解析します
背景付きのオブジェクトを抽出
背景なしでオブジェクトを抽出
結論
導入
このチュートリアルでは、ニューラル ネットワークを使用して画像上のすべてのオブジェクトを検出し、抽出して別のファイルに保存する方法を説明します。
これは一般的なタスクであり、これを行うにはさまざまなオプションがあります。この記事では、YOLOv8 ニューラル ネットワークと OpenCV を使用した、非常に簡単な方法を紹介します。
このチュートリアルではこのトピックのみを取り上げているため、YOLOv8 ニューラル ネットワークとコンピューター ビジョンについて詳しく知りたい場合は、YOLOv8 シリーズの以前の記事を読んでください。
この記事ではすべてのコードを Python を使用して記述します。そのため、Python で開発できることを前提としています。また、Jupyter Notebook を使用していますが、必須ではありません。任意の IDE またはテキスト エディタを使用して、コードを作成して実行できます。
サンプル画像
このチュートリアルでは、YOLOv8 ニューラル ネットワークと OpenCV を使用して、画像からオブジェクトを検出して抽出します。画像の例として、Wikipedia ページから取得した次の画像を使用します:
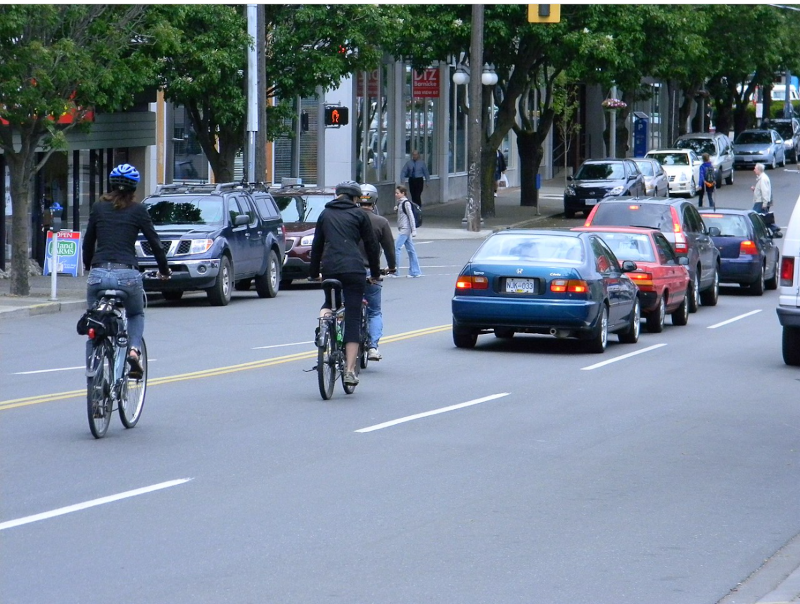
出典: https://en.wikipedia.org/wiki/Vehicular_cycling
この画像上のすべての人物と車を検出し、抽出して別の画像ファイルに保存します。抽出したオブジェクトを背景ありまたは背景なしで保存する方法を説明します。ニーズに応じて、最初または 2 番目のオプションを選択できます。
YOLOv8 を使用してオブジェクトを検出する
それでは、始めましょう。最初に行う必要があるアクションは、YOLOv8.2 パッケージをまだインストールしていない場合はインストールすることです。これを行うには、Jupyter ノートブックで次のコマンドを実行します。
%pip install ultralytics
次に、YOLOv8 API をインポートします。
from ultralytics import YOLO
完了したら、YOLOv8 ニューラル ネットワーク モデルをロードしましょう:
model = YOLO("yolov8m-seg.pt")
このコード行は、yolov8m-seg.pt ニューラル ネットワーク モデルをダウンロードし、モデル変数にロードします。
さまざまな YOLOv8 モデルの詳細
このチュートリアルでは、80 の一般的なオブジェクト クラスの検出に使用できる、事前トレーニングされた YOLOv8 モデルの 1 つを使用します。 YOLOv8 モデルには 3 つのタイプが存在し、5 つの異なるサイズがあります。
| Classification | Detection | Segmentation | Kind |
| yolov8n-cls.pt | yolov8n.pt | yolov8n-seg.pt | Nano |
| yolov8s-cls.pt | yolov8s.pt | yolov8s-seg.pt | Small |
| yolov8m-cls.pt | yolov8m.pt | yolov8m-seg.pt | Medium |
| yolov8l-cls.pt | yolov8l.pt | yolov8l-seg.pt | Large |
| yolov8x-cls.pt | yolov8x.pt | yolov8x-seg.pt | Huge |
The bigger model you choose, the more quality results you'll get, but the slower it works.
There are three types of YOLOv8 models exist: for classification, for object detection and for instance segmentation. The classification models used only to detect a class of object on the image, so it can't be used for our task. The object detection models can detect bounding boxes of detected objects. These models can be used to get x1,y1,x2,y2 coordinates of each object, and you can use this coordinates to extract the object with background. Finally, segmentation models can be used to detect not only bounding boxes of the objects, but also exact shapes (bounding polygons) for them. Using bounding polygon, you can extract an object without background.
In the code above, I've loaded the middle-sized model for segmentation yolov8m-seg.pt, that can be used both to extract object with background and without it.
To detect specific object classes, that do not exist in pretrained models, you can create and train your own model, save it to the .pt file and load it. Read the first part of my YOLOv8 series to learn how to do this.
Run the model to detect objects
To detect objects on images, you can pass the list of image file names to the model object and receive the array of results for each image:
results = model(["road.jpg"])
This code assumes, that the sample image saved to the road.jpg file. If you send a single image in the list, the results array will contain a single element. You can send more and in this case, the result will contain more elements.
Parse detection results
Now, let's get detection results for the first image (road.jpg)
result = results[0]
The result is an object of the ultralytics.engine.results.Results class, which contains different information about detected objects on the image.
You can use a link above to learn more about all methods and properties, that this object contains, but here we need only few of them:
result.boxes.xyxy - array of bounding boxes for all objects, detected on the image.
result.masks.xy - array of bounding polygons for all objects, detected on the image.
For example, the result.boxes.xyxy[0] will contain [x1,y1,x2,y2] coordinates for the first object, detected on the image:
print(result.boxes.xyxy[0])
tensor([2251.1409, 1117.8158, 3216.7141, 1744.1128], device='cuda:0')
and the bounding polygon for the same object:
print(result.masks.xy[0])
[[       2500        1125]
 [     2493.8      1131.2]
 [     2481.2      1131.2]
 [       2475      1137.5]
 [     2468.8      1137.5]
 [     2462.5      1143.8]
 [     2456.2      1143.8]
 [     2418.8      1181.2]
 [     2418.8      1187.5]
 [     2381.2        1225]
 [     2381.2      1231.2]
 [       2350      1262.5]
 [       2350      1268.8]
 [     2337.5      1281.2]
 [     2337.5      1287.5]
 [       2325        1300]
 [       2325      1306.2]
 [     2306.2        1325]
 [     2306.2      1331.2]
 [       2300      1337.5]
 [       2300      1343.8]
 [     2287.5      1356.2]
 [     2287.5      1362.5]
 [     2281.2      1368.8]
 [     2281.2      1387.5]
 [       2275      1393.8]
 [       2275        1700]
 [     2281.2      1706.2]
 [     2281.2      1712.5]
 [     2287.5      1718.8]
 [     2356.2      1718.8]
 [     2368.8      1706.2]
 [     2368.8        1700]
 [     2381.2      1687.5]
 [     2381.2      1681.2]
 [     2393.8      1668.8]
 [     2393.8      1662.5]
 [     2412.5      1643.8]
 [     2456.2      1643.8]
 [     2462.5        1650]
 [     2468.8        1650]
 [     2481.2      1662.5]
 [     2562.5      1662.5]
 [     2568.8      1656.2]
 [       2575      1656.2]
 [     2581.2        1650]
 [     2712.5        1650]
 [     2718.8      1656.2]
 [     2737.5      1656.2]
 [     2743.8      1662.5]
 [     2768.8      1662.5]
 [       2775      1668.8]
 [     2831.2      1668.8]
 [     2837.5        1675]
 [     2868.8        1675]
 [       2875      1681.2]
 [     2887.5      1681.2]
 [       2900      1693.8]
 [     2906.2      1693.8]
 [     2912.5        1700]
 [     2918.8        1700]
 [     2931.2      1712.5]
 [     2931.2      1718.8]
 [     2937.5      1718.8]
 [       2950      1731.2]
 [     2956.2      1731.2]
 [     2962.5      1737.5]
 [     3018.8      1737.5]
 [     3018.8      1731.2]
 [     3037.5      1712.5]
 [     3037.5      1706.2]
 [     3043.8        1700]
 [     3043.8      1681.2]
 [       3050        1675]
 [       3050      1668.8]
 [     3056.2      1662.5]
 [     3062.5      1662.5]
 [     3068.8      1668.8]
 [     3081.2      1668.8]
 [       3100      1687.5]
 [     3106.2      1687.5]
 [     3112.5      1693.8]
 [       3175      1693.8]
 [     3181.2      1687.5]
 [     3187.5      1687.5]
 [     3193.8      1681.2]
 [     3193.8      1662.5]
 [       3200      1656.2]
 [       3200      1562.5]
 [     3193.8      1556.2]
 [     3193.8        1500]
 [     3187.5      1493.8]
 [     3187.5      1468.8]
 [     3181.2      1462.5]
 [     3181.2      1437.5]
 [       3175      1431.2]
 [       3175      1418.8]
 [     3168.8      1412.5]
 [     3168.8        1400]
 [     3143.8        1375]
 [     3143.8      1368.8]
 [       3125        1350]
 [       3125      1343.8]
 [     3112.5      1331.2]
 [     3112.5        1325]
 [       3100      1312.5]
 [       3100      1306.2]
 [     3087.5      1293.8]
 [     3087.5      1287.5]
 [       3075        1275]
 [       3075      1268.8]
 [     3068.8      1262.5]
 [     3068.8      1256.2]
 [       3050      1237.5]
 [       3050      1231.2]
 [     3006.2      1187.5]
 [     3006.2      1181.2]
 [       3000        1175]
 [       3000      1168.8]
 [     2993.8      1162.5]
 [     2993.8      1156.2]
 [     2987.5        1150]
 [     2987.5      1143.8]
 [       2975      1143.8]
 [     2968.8      1137.5]
 [       2950      1137.5]
 [     2943.8      1131.2]
 [     2868.8      1131.2]
 [     2862.5        1125]]
This is a list of [x,y] coordinates for all points in the polygon.
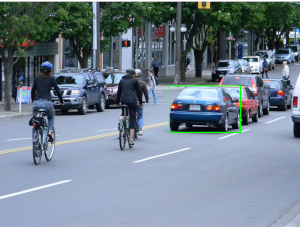
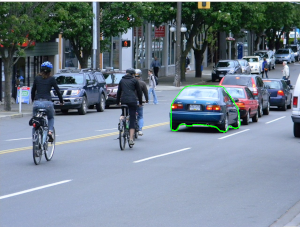
You can see below the bounding box and the bounding polygon for the first detected object:
| Bounding box | Bounding polygon |
|
|
As you may assume, to extract the object with background you can use the bounding box, but to extract the object without background, you will need to use the bounding polygon.
To extract all objects and save to separate files, you need to run the code for each detected object in a loop.
In the next sections, I will show how to achieve both.
Extract objects with background
First, I will show how to crop a single object, using coordinates of bounding box. Then, we will write a loop to extract all detected objects.
So, in the previous section, we extracted the bounding box for the first detected object as result.boxes.xyxy[0]. It contains an [x1,y1,x2,y2] array with coordinates. However, this is a PyTorch Tensor with values of Float32 type, but coordinates must be integers. Let's convert the tensor for appropriate coordinates:
x1,y1,x2,y2 = result.boxes.xyxy[0].cpu().numpy().astype(int);
Now, you need to load the image and crop it, using the coordninates above.
I will use a OpenCV library for this. Ensure that it's installed in your system or install it:
%pip install opencv-python
Then import it and load the image:
import cv2

img = cv2.imread("road.jpg")
The OpenCV image is a regular NumPy array. You can see it shape:
print(img.shape)
(604, 800, 3)
The first dimension is a number of rows (height of the image), the second dimensions is a number of columns (width of the image), and the third dimension is a number of color channels, which is 3 for standard RGB images.
Now, it's easy to crop the part of this array, using x1,y1,x2,y2 coordinates that we have:
img[y1:y2,x1:x2,:]
This way you get only rows from y1 to y2 and columns from x1 to x2, e.g. only the object, that is required. Let's save this cropped image to a new file:
cv2.imwrite("image1.png",img[y1:y2,x1:x2,:])
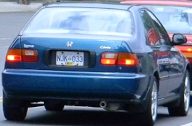
That's all. After running this code, you should see the new file image1.png. If you open it, you should see the cropped object with background:
Now, you can write a loop, to extract and save all detected objects:
for idx,box in enumerate(result.boxes.xyxy):
    x1,y1,x2,y2 = box.cpu().numpy().astype(int)
    cv2.imwrite(f"image{idx}.png", img[y1:y2,x1:x2,:])
After running this, you'll see the files image0.png, image1.png ... etc. with all detected objects on the image.
This is a full solution:
from ultralytics import YOLO
import cv2

model = YOLO("yolov8m-seg.pt")
results = model(["road.jpg"])

result = results[0]

img = cv2.imread("road.jpg")
for idx,box in enumerate(result.boxes.xyxy):
    x1,y1,x2,y2 = box.cpu().numpy().astype(int)
    cv2.imwrite(f"image{idx}.png", img[y1:y2,x1:x2,:])
Extract objects without background
First, to make an image transparent, we need to add a transparency channel to the input image. By default, JPG images do not have this channel, so, to add it using OpenCV you have to run this line of code:
img = cv2.cvtColor(img,cv2.COLOR_BGR2BGRA)
It's easy to cut the image, using the rectangular area, as you seen in the previous section, but I did not find any Python library, that can crop a part of image, using custom polygon.That is why, we will go other way. First, we will make transparent all pixels of the whole input image, that are not in a bounding polygon and then, we will cut the object from this transparent image, using the bounding box, as we did in the previous section.
To implement the first part (make the image transparent), we will need to create and apply a binary mask to the image. The binary mask is a black and white image, on which all pixels that are white treated as pixels, that belong to object and all pixels that are black treated as transparent pixels. For example, the binary mask for the image, that contains the first object will look like this:
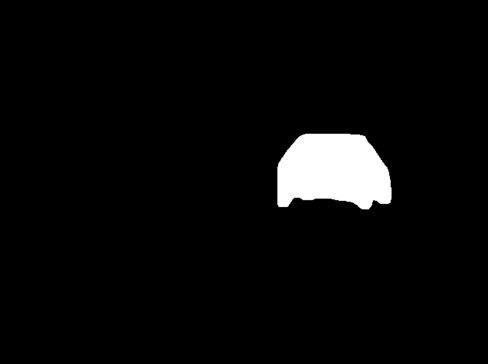
OpenCV has a function, that allows to apply the binary mask to the image and this operation makes all pixels on the image transparent, except pixels, that are white on the binary mask.
But first, we need to create a binary mask for OpenCV: the black image with white bounding polygon.
As I said above, the OpenCV image is a NumPy array, so, to create a black binary image, you need to create the NumPy array of the same size as original image, filled with 0.
import numpy as np

mask = np.zeros_like(img,dtype=np.int32)
This code created array with the same size as original road.jpg image, filled with 0. The data type of items in this image must be integer. Now, you need to draw white bounding polygon on it, to make it look the same, as binary mask on the previous image.
The bounding polygon for the first object located in the result.masks.xy[0]. The type of items in this polygon is float32, but for images they must be int32. To convert the polygon to correct type, use the following code:
polygon = result.masks.xy[0].astype(np.int32)
Now, the fillPoly function of the OpenCV library can be used to draw white polygon on the black mask:
cv2.fillPoly(mask,[polygon],color=(255, 255, 255))
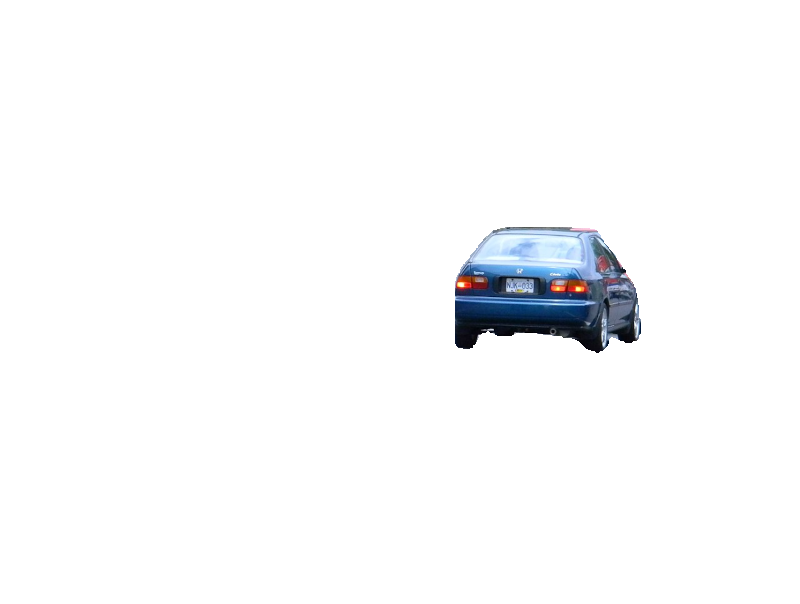
Finally, let's make everything except the object transparent on the image, using OpenCV binary AND operation:
img = cv2.bitwise_and(img, img, mask=mask[:,:,0].astype('uint8'))
It applies binary AND operation for each pixel on the img image using the mask. So, all pixels of the image that have 0 on the mask will be transparent.
As a result, of this operation, you will have the following image:
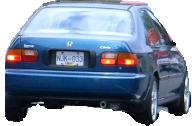
Finally, you can crop the object from it, using the bounding box coordinates, as in previous section:
x1,y1,x2,y2 = result.boxes.xyxy[0].cpu().numpy().astype(int)
cv2.imwrite("image1.png",img[y1:y2,x1:x2,:])
after running this, the image.png file will contain the object, without background:
Now, let's extract all detected objects from the image. To do this, we need to repeat all the code from this section for each detected object in a loop:
for idx,polygon in enumerate(result.masks.xy):
    polygon = polygon.astype(np.int32)
    img = cv2.imread("road.jpg")
    img = cv2.cvtColor(img,cv2.COLOR_BGR2BGRA)
    mask = np.zeros_like(img,dtype=np.int32)
    cv2.fillPoly(mask,[polygon],color=(255, 255, 255))
    x1,y1,x2,y2 = result.boxes.xyxy[idx].cpu().numpy().astype(int)
    img = cv2.bitwise_and(img, img, mask=mask[:,:,0].astype('uint8'))
    cv2.imwrite(f"image{idx}.png", img[y1:y2,x1:x2,:])
After running this code, you should see the image files image0.png, image1.png, image2.png and so on. Each image will have transparent background.
Here is a whole solution to extract all objects from the image with transparent background using YOLOv8.2 and OpenCV and save them to files:
from ultralytics import YOLO
import cv2
import numpy as np

model = YOLO("yolov8m-seg.pt")
results = model(["road.jpg"])

result = results[0]

for idx,polygon in enumerate(result.masks.xy):
    polygon = polygon.astype(np.int32)
    img = cv2.imread("road.jpg")
    img = cv2.cvtColor(img,cv2.COLOR_BGR2BGRA)
    mask = np.zeros_like(img,dtype=np.int32)
    cv2.fillPoly(mask,[polygon],color=(255, 255, 255))
    x1,y1,x2,y2 = result.boxes.xyxy[idx].cpu().numpy().astype(int)
    img = cv2.bitwise_and(img, img, mask=mask[:,:,0].astype('uint8'))
    cv2.imwrite(f"image{idx}.png", img[y1:y2,x1:x2,:])
Conclusion
In this article I showed a simple way to extract and save all detected objects from image using YOLOv8 and OpenCV in less than 20 lines of code. I did not dive to many details in this post. If you want to know more about computer vision and YOLOv8, welcome to read previous articles from my YOLOv8 article series. Links to them you can find either in the beginning or in the end of this article.
You can follow me on LinkedIn, Twitter, and Facebook to know first about new articles like this one and other software development news.
Have a fun coding and never stop learning!
以上がYOLOv と OpenCV を使用して、画像から検出されたすべてのオブジェクトを抽出し、別のファイルとして保存する簡単な方法の詳細内容です。詳細については、PHP 中国語 Web サイトの他の関連記事を参照してください。

ホットAIツール

Undresser.AI Undress
リアルなヌード写真を作成する AI 搭載アプリ

AI Clothes Remover
写真から衣服を削除するオンライン AI ツール。

Undress AI Tool
脱衣画像を無料で

Clothoff.io
AI衣類リムーバー

Video Face Swap
完全無料の AI 顔交換ツールを使用して、あらゆるビデオの顔を簡単に交換できます。

人気の記事
ホットツール

メモ帳++7.3.1
使いやすく無料のコードエディター

SublimeText3 中国語版
中国語版、とても使いやすい

ゼンドスタジオ 13.0.1
強力な PHP 統合開発環境

ドリームウィーバー CS6
ビジュアル Web 開発ツール

SublimeText3 Mac版
神レベルのコード編集ソフト(SublimeText3)
ホットトピック
 1670
1670
 14
1428
52
1329
25
1274
29
1256
24
14
1428
52
1329
25
1274
29
1256
24

 Python vs. C:曲線と使いやすさの学習
Apr 19, 2025 am 12:20 AM
Python vs. C:曲線と使いやすさの学習
Apr 19, 2025 am 12:20 AM
Pythonは学習と使用が簡単ですが、Cはより強力ですが複雑です。 1。Python構文は簡潔で初心者に適しています。動的なタイピングと自動メモリ管理により、使いやすくなりますが、ランタイムエラーを引き起こす可能性があります。 2.Cは、高性能アプリケーションに適した低レベルの制御と高度な機能を提供しますが、学習しきい値が高く、手動メモリとタイプの安全管理が必要です。
 Pythonと時間:勉強時間を最大限に活用する
Apr 14, 2025 am 12:02 AM
Pythonと時間:勉強時間を最大限に活用する
Apr 14, 2025 am 12:02 AM
限られた時間でPythonの学習効率を最大化するには、PythonのDateTime、時間、およびスケジュールモジュールを使用できます。 1. DateTimeモジュールは、学習時間を記録および計画するために使用されます。 2。時間モジュールは、勉強と休息の時間を設定するのに役立ちます。 3.スケジュールモジュールは、毎週の学習タスクを自動的に配置します。
 Python vs. C:パフォーマンスと効率の探索
Apr 18, 2025 am 12:20 AM
Python vs. C:パフォーマンスと効率の探索
Apr 18, 2025 am 12:20 AM
Pythonは開発効率でCよりも優れていますが、Cは実行パフォーマンスが高くなっています。 1。Pythonの簡潔な構文とリッチライブラリは、開発効率を向上させます。 2.Cのコンピレーションタイプの特性とハードウェア制御により、実行パフォーマンスが向上します。選択を行うときは、プロジェクトのニーズに基づいて開発速度と実行効率を比較検討する必要があります。
 Pythonの学習:2時間の毎日の研究で十分ですか?
Apr 18, 2025 am 12:22 AM
Pythonの学習:2時間の毎日の研究で十分ですか?
Apr 18, 2025 am 12:22 AM
Pythonを1日2時間学ぶだけで十分ですか?それはあなたの目標と学習方法に依存します。 1)明確な学習計画を策定し、2)適切な学習リソースと方法を選択します。3)実践的な実践とレビューとレビューと統合を練習および統合し、統合すると、この期間中にPythonの基本的な知識と高度な機能を徐々に習得できます。
 Python vs. C:重要な違いを理解します
Apr 21, 2025 am 12:18 AM
Python vs. C:重要な違いを理解します
Apr 21, 2025 am 12:18 AM
PythonとCにはそれぞれ独自の利点があり、選択はプロジェクトの要件に基づいている必要があります。 1)Pythonは、簡潔な構文と動的タイピングのため、迅速な開発とデータ処理に適しています。 2)Cは、静的なタイピングと手動メモリ管理により、高性能およびシステムプログラミングに適しています。
 Python Standard Libraryの一部はどれですか:リストまたは配列はどれですか?
Apr 27, 2025 am 12:03 AM
Python Standard Libraryの一部はどれですか:リストまたは配列はどれですか?
Apr 27, 2025 am 12:03 AM
PythonListSarePartOfThestAndardarenot.liestareBuilting-in、versatile、forStoringCollectionsのpythonlistarepart。
 Python:自動化、スクリプト、およびタスク管理
Apr 16, 2025 am 12:14 AM
Python:自動化、スクリプト、およびタスク管理
Apr 16, 2025 am 12:14 AM
Pythonは、自動化、スクリプト、およびタスク管理に優れています。 1)自動化:OSやShutilなどの標準ライブラリを介してファイルバックアップが実現されます。 2)スクリプトの書き込み:Psutilライブラリを使用してシステムリソースを監視します。 3)タスク管理:スケジュールライブラリを使用してタスクをスケジュールします。 Pythonの使いやすさと豊富なライブラリサポートにより、これらの分野で優先ツールになります。
 Web開発用のPython:主要なアプリケーション
Apr 18, 2025 am 12:20 AM
Web開発用のPython:主要なアプリケーション
Apr 18, 2025 am 12:20 AM
Web開発におけるPythonの主要なアプリケーションには、DjangoおよびFlaskフレームワークの使用、API開発、データ分析と視覚化、機械学習とAI、およびパフォーマンスの最適化が含まれます。 1。DjangoandFlask Framework:Djangoは、複雑な用途の迅速な発展に適しており、Flaskは小規模または高度にカスタマイズされたプロジェクトに適しています。 2。API開発:フラスコまたはdjangorestFrameworkを使用して、Restfulapiを構築します。 3。データ分析と視覚化:Pythonを使用してデータを処理し、Webインターフェイスを介して表示します。 4。機械学習とAI:Pythonは、インテリジェントWebアプリケーションを構築するために使用されます。 5。パフォーマンスの最適化:非同期プログラミング、キャッシュ、コードを通じて最適化
