リアクティブなリアルタイム Web アプリケーションを構築する準備はできていますか?
tl;dr このチュートリアル全体を読んで取り組む時間がありませんか?あなたは幸運です!完全に動作するサンプルは GitHub で見つけることができます。自由にそこにアクセスして、リポジトリのクローンを作成し、探索を開始してください。
このチュートリアルでは、Svelte と Couchbase Capella の組み合わせを検討して、動的でインタラクティブなチャット アプリケーションを作成します。 2024 年の Stack Overflow Developer Survey によると、72.8% という驚異的な賞賛率を誇る Svelte は、いくつかの理由で称賛されています。コンポーネントを DOM を直接操作する高効率の命令型コードにコンパイルすることで、ブラウザーでの作業の多くを効率的に取り除き、仮想 DOM の必要性を排除し、更新の高速化とバンドル サイズの縮小につながります。
Svelte の組み込み反応性は状態の変化を自動的に追跡し、複雑な状態管理ライブラリを必要とせずに高速かつ効率的な更新を保証します。この反応性により、開発プロセスが簡素化され、パフォーマンスが向上します。さらに、Svelte のコンポーネントベースのアーキテクチャにより、複雑なユーザー インターフェイスの構築と保守が容易になり、より簡単で楽しい開発エクスペリエンスが提供されます。また、アプリケーションが応答性の高い適応型データを必要とする場合、Couchbase Capella は実装する簡単なソリューションを提供します。
Couchbase Capella は単なる NoSQL クラウド データベース プラットフォームではありません。これは、全文検索、ベクトル検索、データ キャッシュ、分析などを提供するオールインワン データ プラットフォームです。この包括的な機能により、さまざまなデータ要件に対応した堅牢なアプリケーションを構築できます。 Svelte と Couchbase Capella を連携すると、非常に高速でパフォーマンスの高いリアルタイム アプリケーションが可能になります。
はい、話はもう十分です。始めましょう!
セットアップに入る前に、Svelte と SvelteKit の違いを明確にしましょう。 Svelte は、コードを DOM を直接操作する非常に効率的な命令型コードにコンパイルするフロントエンド フレームワークです。これにより、アップデートが高速化され、バンドル サイズが小さくなります。一方、SvelteKit は Svelte 上に構築されたフレームワークで、フルスタック Web アプリケーションを構築するために設計されています。 SvelteKit は、ルーティング、サーバー側レンダリング、静的サイト生成などの追加機能を提供し、最新の Web アプリケーションを開発するための強力なツールとなります。
プロジェクトでは、SvelteKit がアプリケーション構造、ルーティング、サーバー側レンダリングを処理し、Svelte が UI コンポーネントの効率的なレンダリングを管理します。
新しいプロジェクトを開始するには、コマンドラインで初期化できます:
> npm create svelte@latest svelte-couchbase-real-time-chat
> cd svelte-couchbase-real-time-chat
CLI ツールにより、いくつかの選択肢が求められます。次の応答で答えてください:
次に、コマンドラインから npm install を実行して依存関係をインストールします。これらのコマンドを実行すると、新しい SvelteKit プロジェクトがセットアップされ、準備が整います!
次に、スタイル設定用の Tailwind CSS、データベース操作用の Couchbase SDK、リアルタイム通信用の WebSocket サポートなど、プロジェクトに必要な追加の依存関係をインストールします。
> npm install -D tailwindcss postcss autoprefixer couchbase ws dotenv
> npx tailwindcss init -p
これらの依存関係はそれぞれ、アプリケーション内で何を行っていますか?
As mentioned above, TailwindCSS introduces classes that you can use to define the styling for your application. This is helpful if you are not a frontend expert, or even if you are, if you wish to shortcut the process of building elegantly designed applications. To use TailwindCSS in your Svelte project, follow these steps:
Update the tailwind.config.cjs file to specify the content sources. This ensures that Tailwind CSS can remove unused styles from your production build, making it more efficient.
/** @type {import('tailwindcss').Config} */
module.exports = {
  content: ['./src/**/*.{html,js,svelte,ts}'],
  theme: {
    extend: {},
  },
  plugins: [],
}
Create or update the src/app.css file to include Tailwind CSS directives. These directives load Tailwind’s base, components, and utility styles.
@tailwind base;
@tailwind components;
@tailwind utilities;
Open or create the src/routes/+layout.svelte file and import the CSS file. This ensures that Tailwind’s styles are available throughout your application.
<script>
  import "../app.css";
</script>

<slot />
Now that you’ve completed these steps, TailwindCSS has been successfully initialized in your application! You’re ready to move on to setting up Couchbase Capella and building the backend for your chat application.
It is free to sign up and try Couchbase Capella, and if you have not done so yet, you can do so by navigating to cloud.couchbase.com and creating an account using your GitHub or Google credentials, or by making a new account with an email address and password combination.
Once you have done so, from within your Capella dashboard, you will create your first cluster. For the purposes of this walkthrough, let’s name it SvelteChatApp.
The summary of your new cluster will be presented on the left-hand side of the dashboard. Capella is multi-cloud and can work with AWS, Google Cloud or Azure. For this example, you will deploy to AWS.
After you have created your cluster, you need to create a bucket. A bucket in Couchbase is the container where the data is stored. Each item of data, known as a document, is kept in JSON making its syntax familiar to most developers. You can name your bucket whatever you want. However, for the purposes of this walkthrough, let’s name this bucket svelte_chat_app_messages.
Now that you have created both your database and your bucket, you are ready to create your database access credentials and to fetch your connection URL that you will be using in your Lambda function.
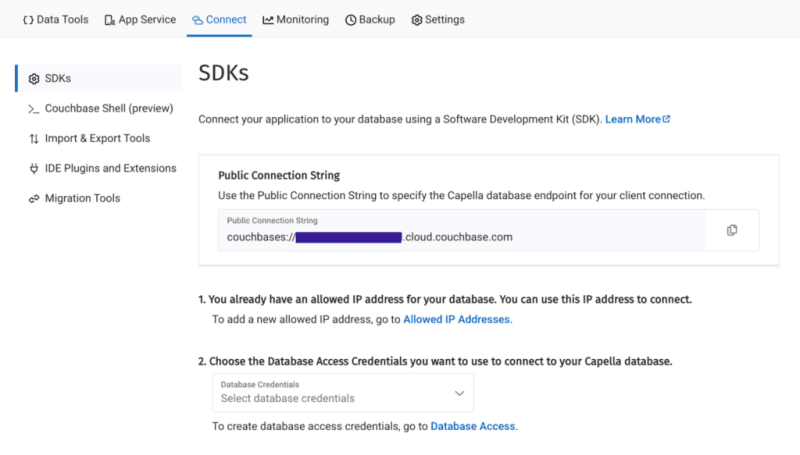
The connection details are essential as you will be using them in your application to establish a connection to your Couchbase data and to interact with the data. Navigate to the Connect section in the Capella dashboard and take note of the Connection String.

Then, click on the Database Access link under section two. In that section, you will create credentials – a username and password – that your application will use to authenticate with the database. You can scope the credentials to the specific bucket you created or give it permission for all buckets and databases in your account. You need to make sure it has both read and write access, regardless.
Once you have finished, the last step in this part of the process is to add your new connection string and connection credentials to your application as environment variables.
In a production environment, you will store your credentials and other confidential information for your application in a secure format. Different cloud providers have different paths to store sensitive information, and you should follow the procedure defined by the cloud provider you are using, whether it is AWS, Google Cloud, Azure, Netlify, Vercel or any other. For our purposes, you are adding your credentials to a .env file in the root folder of your application. The dotenv package reads those credentials from there and loads them into your application.
# .env
COUCHBASE_BUCKET=your_bucket_name
COUCHBASE_CONNECTION_STRING=your_connection_string
COUCHBASE_USER=your_username
COUCHBASE_PASSWORD=your_password
That’s it! Your Couchbase cluster is all set up and ready to be used. At this point, you are ready to build the application. Let’s start with the backend server with Nodejs and then move on to the frontend with Svelte.
With our development environment set up, it’s time to build the backend for our real-time chat application. We’ll use Node.js to create the server, connect to Couchbase Capella for data storage, and set up a WebSocket server for real-time communication.
First, we’ll create a file named server.cjs which will serve as the entry point for our backend.
const express = require('express');
const couchbase = require('couchbase');
const { createServer } = require('http');
const { WebSocketServer } = require('ws');
const dotenv = require('dotenv');

dotenv.config();

const app = express();
const server = createServer(app);
const wss = new WebSocketServer({ server });
Next, we’ll set up the connection to Couchbase Capella. Ensure your .env file contains the correct connection details. Add the following code to server.cjs to connect to Couchbase:
let cluster, bucket, collection;

async function connectToCouchbase() {
    try {
        console.log('Connecting to Couchbase...');
        const clusterConnStr = process.env.COUCHBASE_CONNECTION_STRING;
        const username = process.env.COUCHBASE_USER;
        const password = process.env.COUCHBASE_PASSWORD;
        const bucketName = process.env.COUCHBASE_BUCKET;

        cluster = await couchbase.connect(clusterConnStr, {
          username: username,
          password: password,
          configProfile: 'wanDevelopment',
        });
        bucket = cluster.bucket(bucketName);
        collection = bucket.defaultCollection();

        console.log('Connected to Couchbase successfully.');
    } catch (error) {
        console.error('Error connecting to Couchbase:', error);
        process.exit(1);
    }
}

connectToCouchbase();
This function handles the connection to Couchbase, ensuring that all necessary parameters are properly configured. All that is left for our backend is to create the websocket server to handle the sending and receiving of new chat messages.
The Websocket server functionality is also added to the server.cjs file. The server will broadcast all new messages for the frontend of the application to receive, and send all newly created messages to Couchbase for saving in the bucket you created.
wss.on('connection', (ws) => {
    console.log('New WebSocket connection established.');
    ws.on('message', async (message) => {
        try {
            const messageString = message.toString();
            console.log('Received message:', messageString);
            // Save message to Couchbase
            const id = `message::${Date.now()}`;
            await collection.upsert(id, { text: messageString });
            console.log('Message saved to Couchbase:', id);

            // Broadcast message
            wss.clients.forEach((client) => {
                if (client.readyState === WebSocket.OPEN) {
                    client.send(messageString);
                    console.log('Broadcasted message to client:', messageString);
                }
            });
        } catch (error) {
            console.error('Error handling message:', error);
        }
    });
});

server.listen(3000, () => {
    console.log('Server started on http://localhost:3000');
});
Note that before sending the message to Couchbase, you first convert the message into a String as it is received as binary data buffers by default. The conversion to String format is achieved by calling the toString() function on the message. The newly defined messageString variable now contains the data in readable format for both sending to Couchbase and rendering in the application.
That is the entire backend of your new real-time chat application. However, as good as any backend for a web application is, it needs a frontend to render it for the user. Svelte offers us the performance and reactivity to do so with speed and with an excellent developer experience.
With your backend set up, it’s time to build the frontend of our real-time chat application using Svelte. You’ll leverage Svelte’s strengths to create a responsive and dynamic chat interface.
touch src/routes/+page.svelte
<script>
  import { onMount } from 'svelte';

  let messages = [];
  let newMessage = '';

  let ws;

  onMount(() => {
    ws = new WebSocket('ws://localhost:3000');

    ws.onmessage = (event) => {
      messages = [...messages, event.data];
    };

    ws.onopen = () => {
      console.log('WebSocket connection opened');
    };

    ws.onclose = () => {
      console.log('WebSocket connection closed');
    };
  });

  function sendMessage() {
    ws.send(newMessage);
    newMessage = '';
  }
</script>

<div class="container mx-auto p-4">
  <h1 class="text-2xl mb-4">Chat Application</h1>
  <div class="border p-4 mb-4 h-64 overflow-y-scroll">
    {#each messages as message}
      <div>{message}</div>
    {/each}
  </div>
  <input
    type="text"
    bind:value={newMessage}
    class="border p-2 w-full mb-2"
    placeholder="Type a message"
  />
  <button on:click={sendMessage} class="bg-blue-500 text-white p-2 w-full">Send</button>
</div>
The section of the above code example initializes Websocket and handles the messages, both sending and receiving. The onMount function ensures that the Websocket connection is established when the component is initialized. Svelte’s reactivity automatically updates the DOM whenever the messages array changes, ensuring new messages are displayed in real-time. With that your frontend is now complete.
You did it! You have built an entire chat application enabling real-time communication utilizing the performance, flexibility and adaptability of both Svelte and Couchbase to deliver an optimal experience for your users. Yes, this is a fairly simple implementation, however, it provides the skeleton for you to build even more expansive and complex real-time applications. The potential is only limited by your imagination.
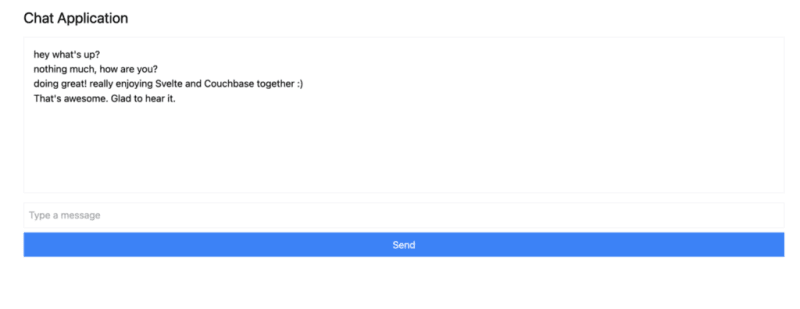
試してみませんか?アプリケーションを起動してチャットを始めましょう。
アプリケーションを実行するには、バックエンド Node.js サーバーと SvelteKit フロントエンドの両方を初期化します。まず、ターミナルからバックエンドを起動しましょう:
次に、新しいターミナル ウィンドウでフロントエンドを起動します。
それでは、ブラウザで http://localhost:5173 に移動して、チャットを開始してください。

複数のブラウザ タブを開いて複数のユーザーをシミュレートしたり、ngrok などのサービスを使用してアプリケーションを友達と共有し、リアルタイムでチャットしたりすることができます。
このチュートリアルでは、リアルタイム データを処理して機能する完全に応答性の高いアプリケーションをいかに迅速に作成できるかを学びました。 Svelte は DOM を簡単に更新しますが、Couchbase を使用すると、わずか数秒でメッセージの作成と保存を開始できます。
競争の激しい Web フレームワーク分野で Svelte が急速に賞賛と人気を高めている理由はたくさんあります。データ バックエンドとしての Couchbase を Svelte と組み合わせることで、構築および達成できる可能性がさらに高まります。複雑なスキーマを定義する必要はなく、データ キャッシュや検索機能を実装したい場合に後で依存関係を追加する必要もありません。すべて Couchbase に組み込まれており、すぐに使用できるようになります。
残る唯一の質問は、次は何を構築しますか?
Couchbase Capella を無料で使い始めましょう。
以上がSvelte と素早く同期の詳細内容です。詳細については、PHP 中国語 Web サイトの他の関連記事を参照してください。