

配列は、任意のデータ型の要素のコレクションです。 PHPには文字列、整数、ブール値、配列、オブジェクト、リソースなどの多くのデータ型があります。 2D 配列は、主に配列であるこれらのデータ型を組み合わせたものです。 PHP には、次の 3 つの異なるタイプの 2D 配列があります:
広告 このカテゴリーの人気コース PHP 開発者 - 専門分野 | 8コースシリーズ | 3 つの模擬テスト無料ソフトウェア開発コースを始めましょう
Web 開発、プログラミング言語、ソフトウェア テスト、その他
これら 3 つの配列については以下で説明します。
数値インデックスを持つ配列。
構文:
array(value1, value2, value3, …);
例:
$input = array(10,20,30,40,50);
文字列または数値のインデックスを持つ配列。この配列の要素は、キーと値のペアの形式で保存されます。
構文:
array('key1' => 'value1', 'key2' => 'value2', 'key3' => 'value3',…);例:
$input = array(0 =>Emma, 1=>Alice, 2=>'John');
配列の配列は、多次元配列、2D 配列、または入れ子配列です。この形式は常に配列または配列です。したがって、ネストされた配列と呼ばれます。
構文:
array (
array (elements...),
array (elements...),
...
)
例:
$input = array(
array( "red", "green", "blue" ),
array( "yellow", "black", "white" )
);
上記の例では、入力配列は 2 次元配列の例です。ここで、メイン配列には 2 つの要素が含まれており、各要素はさらに 3 つの要素からなる配列です。
2D 配列では、値要素がさらにサブ配列を持つ可能性がある配列であることを学びました。配列で指定される次元は行と列の形式です。配列の表形式を念頭に置くと、これらの配列の定義方法を学ぶのが簡単になります。つまり、2 次元配列の場合は 2 つのインデックスが使用され、同様に、3 次元配列の場合は 3 つのインデックスが使用されます。
2D 配列の定義方法がわかったので、今すぐ作成できます。ここではインデックスは定義されておらず、デフォルトでは常に 0 から始まる数値になります。
$input=array(
array( "red", "green", "blue" ),
array( "yellow", "black", "white" )
);
配列は連想配列の形式で定義することもできます。
(in key =>value form)
インデックスまたはキーは、色、果物、車などの文字列です。値の要素は、それぞれ 3 つの要素を含む配列の形式です。
$input = array(
'colors'=>array ("Red", "Green", "Blue"),
'fruits'=>array ("Apple", "Orange", "Grapes"),
'cars'=>array ("BMW", "Skoda", "Mercedes")
);これらの配列値にアクセスするには、角かっこを使用できます。 2D 配列のさらに多くのレベルの内部に進むにつれて、レベルごとに角括弧のセットの使用が増加します。
コード:
$input = array (
'colors' =>array ("Red", "Green", "Blue"),
'fruits' =>array ("Apple", "Orange", "Grapes"),
'cars' =>array ("Skoda", "BMW", "Mercedes")
);角かっこの最初のセットにはキーが含まれており、この場合は色、果物、車です。続いて角括弧のセットがもう 1 つ続き、次のレベルに移動し、0、1、2 のような数字でアクセスできます。
上記の配列の要素「Grapes」にアクセスしたい場合は、
echo $input['fruits'][2];
以下の例も同様
配列内の要素「Mercedes」にアクセスしたい場合は、
echo $input['cars'][2];
配列内の要素「Red」にアクセスしたい場合は、
echo $input['colors'][0];
配列内のインデックスは常に 0 から始まるため。
コード:
$input = array (
array ("Red", "Green", "Blue"),
array ("Yellow", "Orange", "Purple"),
);上記の配列の要素「Orange」にアクセスしたい場合は、次の行を使用します
echo $input[0][1];
は「緑」を与えます
echo $input[1][2];
は「パープル」を与えます
echo $input[0][0];
は「赤」を与えます
配列要素を定義、作成、アクセスする方法はわかったので、今度は配列に要素を挿入する方法を学びます。 PHP には、挿入する array_push() 関数、削除する array_shift() 関数など、多次元配列を操作する配列関数が定義されています。
$input = array (
'colors'=>array ("Red", "Green", "Blue"),
'fruits'=>array ("Apple", "Orange", "Grapes"),
'cars'=>array ("Skoda", "BMW", "Mercedes")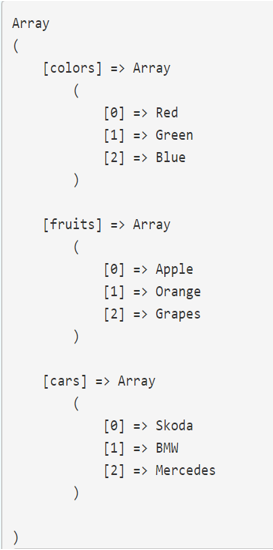
);print_r() 関数を使用して、まず配列をそのまま出力します。
コード:
//create multidimensional array
$input = array (
"colors"=>array ("Red", "Green", "Blue"),
"fruits"=>array ("Apple", "Orange", "Grapes"),
"cars"=>array ("Skoda", "BMW", "Mercedes")
);
// print the multidimensional array
echo "<pre class="brush:php;toolbar:false">";
print_r($input);
echo "<pre class="brush:php;toolbar:false">";出力:
次に、フルーツのサブ配列に要素を追加するために使用します
array_push() function
構文:
array_push(array, value1,value2...)
どこ、
コード:
$input = array (
"colors"=>array ("Red", "Green", "Blue"),
"fruits"=>array ("Apple", "Orange", "Grapes"),
"cars"=>array ("Skoda", "BMW", "Mercedes")
);
array_push($input['colors'], "Black");
echo "<pre class="brush:php;toolbar:false">";
print_r($input);
echo "<pre class="brush:php;toolbar:false">";出力:

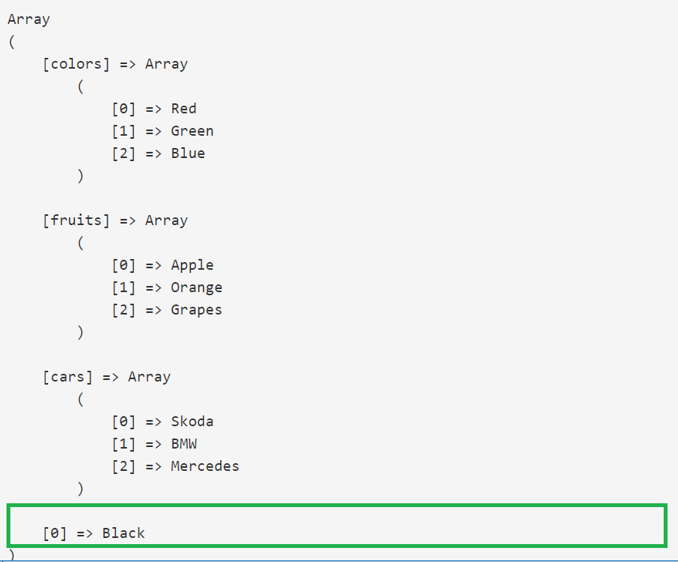
以下のプログラムでは、キー「colors」を削除するだけで、出力画像に示すように、指定された配列の最後に 0 キーが追加されることがわかりました。
Code:
// create multidimensional array
$input = array (
"colors"=>array ("Red", "Green", "Blue"),
"fruits"=>array ("Apple", "Orange", "Grapes"),
"cars"=>array ("Skoda", "BMW", "Mercedes")
);
// adding a value to array
array_push($input, "Black");
// print the multidimensional array
echo "<pre class="brush:php;toolbar:false">";
print_r($input);
echo "<pre class="brush:php;toolbar:false">";Output:
Code:
//create multidimensional array
$input = array (
array ("Red", "Green", "Blue"),
array ("Yellow", "Orange", "Purple")
);
//add a color to the array
array_push($input, "Black");
// print the multidimensional array
echo "<pre class="brush:php;toolbar:false">";
print_r($input);
echo "<pre class="brush:php;toolbar:false">";Output:

To update an element of the 2D array just get the key from the array and replace the value of that key in a particular array.
$input['cars']['Mercedes'] = 'Duster';
Code:
//create multidimensional array
$input = array (
"colors"=>array ("Red", "Green", "Blue"),
"fruits"=>array ("Apple", "Orange", "Grapes"),
"cars"=>array ("Skoda", "BMW", "Mercedes")
);
//update the Mercedes with Duster
$input["cars"][2]  = "Duster";
// print the multidimensional array
echo "<pre class="brush:php;toolbar:false">";
print_r($input);
echo "<pre class="brush:php;toolbar:false">";Output:

Code:
//create multidimensional array
$input = array (
array ("Red", "Green", "Blue"),
array ("Yellow", "Orange", "Purple")
);
//update the Mercedes with Duster
$input[0][1] = "White";
// print the multidimensional array
echo "<pre class="brush:php;toolbar:false">";
print_r($input);
echo "<pre class="brush:php;toolbar:false">";Output:

To delete an element of the 2D array we will use array_shift() function.
array_shift removes and returns the first element value of the array.
Syntax:
array_shift(array)
where
-array is the $input array
Code:
//create multidimensional array
$input = array (
"colors"=>array ("Red", "Green", "Blue"),
"fruits"=>array ("Apple", "Orange", "Grapes"),
"cars"=>array ("Skoda", "BMW", "Mercedes")
);
//print the removed element
print_r(array_shift($input));Output:

Code:
//create multidimensional array
$input = array (
array ("Red", "Green", "Blue"),
array ("Yellow", "Orange", "Purple")
);
//print the removed element
print_r(array_shift($input));Output:

In the following example, we have created a 2-d array containing the information of books like the author of the book, type of book, and published in the year. Also, we will learn how to traverse or loop through this array. Looping through the multidimensional array we will use a nested foreach loop. Meaning one foreach loop inside another foreach loop. The same can also be done using for loop.
$input = array(
"The_Alchemist" => array (
"author" => "Paulo Coelho",
"type" => "Fiction",
"published_year" => 1988
),
"Managing_Oneself" => array (
"author" => "Peter Drucker",
"type" => "Non-fiction",
"published_year" => 1999
),
"Measuring_the_World" => array(
"author" => "Daniel Kehlmann",
"type" => "Fiction",
"published_year" => 2005
)
);
Just printing the above array without any loop will give us the following output:
Code:
// create multidimensional array
$input = array(
"The_Alchemist" => array (
"author" => "Paulo Coelho",
"type" => "Fiction",
"published_year" => 1988
),
"Managing_Oneself" => array (
"author" => "Peter Drucker",
"type" => "Non-fiction",
"published_year" => 1999
),
"Measuring_the_World" => array(
"author" => "Daniel Kehlmann",
"type" => "Fiction",
"published_year" => 2005
)
);
// print the plain multidimensional array
echo "";
print_r($input);
echo "";
Output:

Now we will print the multidimensional array using a foreach loop.
Code:
// create multidimensional array
$input = array(
"The_Alchemist" => array (
"author" => "Paulo Coelho",
"type" => "Fiction",
"published_year" => 1988
),
"Managing_Oneself" => array (
"author" => "Peter Drucker",
"type" => "Non-fiction",
"published_year" => 1999
),
"Measuring_the_World" => array(
"author" => "Daniel Kehlmann",
"type" => "Fiction",
"published_year" => 2005
)
);
//foreach to loop the outer array
foreach($input as $book) {
echo "
";
// foreach to loop the inner array
foreach($book as $key=>$value)
{
echo $key." ". $value. "
";
}
}Output:

I hope this article is helpful to learn the concepts of the topic on a 2D array in PHP. This topic covers all the concepts required for the understanding related to the 2D array in PHP. This topic is made simpler with the help of examples with the output snapshots to refer to. According to the article, if all the programs are practiced well will surely help you to grasp the concepts easily. I hope the topic is made more informative for gaining more knowledge.
以上がPHP の 2D 配列の詳細内容です。詳細については、PHP 中国語 Web サイトの他の関連記事を参照してください。


![[Web フロントエンド] Node.js クイック スタート](https://img.php.cn/upload/course/000/000/067/662b5d34ba7c0227.png)


