

Wasp: Web 開発における Django に対する JavaScript の答え

Wasp 対 Django: フルスタック アプリケーションの構築がはるかに簡単になりました
こんにちは、私は Sam です。Django の経験が豊富なバックエンド エンジニアです。私は思い切って、フルスタック アプリのフロントエンドを学びたいと思いました。私は React-with-Django プロジェクトの困難な性質をすぐに経験し、その痛みは開発プロセスの一部にすぎないと思いました。しかし、Wasp と呼ばれる非常にクールな新しいフルスタック フレームワークに出会いました。
Wasp は、フルスタック アプリケーション用の素晴らしい開発ツールです。 React、Node.js、Prisma などを組み合わせることで、Wasp を使用すると、これまでにない方法で開発を迅速化できます。
この記事では、非常に従来のフルスタック テクノロジに対する Wasp の単純さを証明するために、Django と Wasp でフルスタック アプリケーションを作成する手順を説明します。 Django に接続する React フロントエンドも作成する予定です。重要なのは、Django/react で発生する可能性がある (そして今後発生する) 非効率性、困難さ、問題を強調することですが、これらは
によって大幅に簡素化されます。この記事はハウツーを目的としたものではありませんが、Django アプリの徹底的な性質を強調するためにいくつかのコードを提供します。

パート 1: 光あれ!
いくつかのプロジェクトを作成して設定してみましょう
この部分は、Django と Wasp の間に重要な重複がある唯一の部分です。どちらもターミナルから始めて、簡単なタスク アプリを作成しましょう (Django と Wasp がインストールされており、パスにあることを前提としています)。
ジャンゴ ?
django-admin startproject
python manage.py starapp Todo
スズメバチ ?
wasp new Todo
wasp start
今、Wasp が元気よく門から出てきます。以下に提供されるメニューを確認してください。 Wasp は、基本的なアプリを起動することも、事前に作成された多数のテンプレート (完全に機能する SaaS アプリを含む) から選択することも、説明に基づいて AI が生成したアプリを使用することもできます!

一方、Django はプロジェクト内のアプリを含むプロジェクトとして動作し (繰り返しますが、これは基本的にすべてバックエンド操作用です)、1 つの Django プロジェクトに多数のアプリが存在する可能性があります。したがって、Django プロジェクト設定で各アプリを登録する必要があります。
python `manage.py` startapp todo
settings.py:
INSTALLED_APPS [
...
'Todo'
]
データベース時間
それではデータベースが必要になりますが、これは Wasp が最も得意とするもう 1 つの領域です。 Django では、models.py ファイルにモデルを作成する必要があります。一方、Wasp は Prisma を ORM として使用しているため、必要なフィールドを明確に定義し、わかりやすい方法でデータベースの作成を簡単に行うことができます。
ジャンゴ ?
モデル.py:
from django.db import models

class Task(models.Model):
    title = models.CharField(max_length=200)
    completed = models.BooleanField(default=False)

    def __str__(self):
        return self.title
スズメバチ ?
スキーマ.プリズマ:
model Task {
    id          Int     @id @default(autoincrement())
    description String
    isDone      Boolean @default(false)
}
Django と Wasp はデータベースを移行する同様の方法を共有しています:
ジャンゴ ?
python manage.py makemigrations
python manage.py migrate
スズメバチ ?
wasp db migrate-dev
しかし、Wasp を使用すると、Django ではできない、非常に気の利いたデータベース機能も実行できます。
現在 SQLite を使用していますが、開発用 Posgres データベースを即座にセットアップしてみてはどうでしょうか? Wasp は次のようにしてそれを行うことができます:
wasp db start
それだけです!これで、Postgres インスタンスを実行する Docker コンテナが完成し、即座に Wasp アプリに接続されました。 ?
あるいは、Prisma のデータベース スタジオ UI を介してデータベースをリアルタイムで表示したい場合はどうすればよいでしょうか。これは、Django を使用したサードパーティの拡張機能がなければ不可能です。そのためには、次を実行するだけです:
wasp db studio
私の言っている意味が分かり始めましたか?
ルート
Django と Wasp のルートは、少し似たパターンに従います。ただし、React に慣れている場合は、Wasp のシステムの方がはるかに優れています。
Django は、すべての CRUD 操作を実行するバックエンド (views.py、この記事で後ほど説明します) を通じて動作します。これらのビュー関数は、プロジェクト内のアプリ内の特定のルートに関連付けられており (よく知っています)、主キーと ID を使用し始めると、さらに複雑になる可能性があります。 urls.py ファイルを作成し、特定のビュー ファイルと関数をルートに送信する必要があります。これらのアプリの URL はプロジェクトの URL に接続されます。ふー。
Wasp の方法: ルートを定義し、コンポーネントに誘導します。
ジャンゴ ?
todo/urls.py:
from django.urls import path
from . import views

urlpatterns = [
    path('', views.index, name='index'),
    path('update/<str:pk>/', views.updateTask, name='update_task'),
    path('delete/<str:pk>/', views.deleteTask, name='delete_task'),
]
./urls.py:
from django.contrib import admin
from django.urls import path, include

urlpatterns = [
    path('admin/', admin.site.urls),
    path('', include('todo.urls')),
]
スズメバチ ?
main.wasp:
route TaskRoute { path: "/", to: TaskPage }
page TaskPage {
  component: import { TaskPage } from "@src/TaskPage"
}
クラッド
OK、ここで Wasp の利点がさらに明らかになります。
Firstly, I am going to revisit the views.py file. This is where magic is going to happen for Django backend. Here is a simple version of what the create, update, and delete functions could look like for our Task/Todo example:
Django ?
todo/views.py:
from django.shortcuts import render, redirect
from .models import Task
from .forms import TaskForm

def index(request):
    tasks = Task.objects.all()
    form = TaskForm()
    if request.method == 'POST':
        form = TaskForm(request.POST)
        if form.is_valid():
            form.save()
        return redirect('/')
    context = {'tasks': tasks, 'form': form}
    return render(request, 'todo/index.html', context)

def updateTask(request, pk):
    task = Task.objects.get(id=pk)
    form = TaskForm(instance=task)
    if request.method == 'POST':
        form = TaskForm(request.POST, instance=task)
        if form.is_valid():
            form.save()
        return redirect('/')
    context = {'form': form}
    return render(request, 'todo/update_task.html', context)

def deleteTask(request, pk):
    task = Task.objects.get(id=pk)
    if request.method == 'POST':
        task.delete()
        return redirect('/')
    context = {'task': task}
    return render(request, 'todo/delete.html', context)
app/forms.py:
from django import forms
from .models import Task

class TaskForm(forms.ModelForm):
    class Meta:
        model = Task
        fields = ['title', 'completed']
Wasp ?
main.wasp:
query getTasks {
  fn: import { getTasks } from "@src/operations",
  // Tell Wasp that this operation affects the `Task` entity. Wasp will automatically
  // refresh the client (cache) with the results of the operation when tasks are modified.
  entities: [Task]
}

action updateTask {
  fn: import { updateTask } from "@src/operations",
  entities: [Task]
}

action deleteTask {
  fn: import { deleteTask } from "@src/operations",
  entities: [Task]
}
operations.js:
export const getTasks = async (args, context) => {
  return context.entities.Task.findMany({
    orderBy: { id: 'asc' },
  })
}

export const updateTask = async ({ id, data }, context) => {
  return context.entities.Task.update({
    where: { id },
    data
  })
}

export const deleteTask = async ({ id }, context) => {
  return context.entities.Task.delete({
    where: { id }
  })
}
So right now, Wasp has a fully functioning backend with middleware configured for you. At this point we can create some React components, and then import and call these operations from the client. That is not the case with Django, unfortunately there is still a lot we need to do to configure React in our app and get things working together, which we will look at below.
Part 2: So you want to use React with Django?

At this point we could just create a simple client with HTML and CSS to go with our Django app, but then this wouldn't be a fair comparison, as Wasp is a true full-stack framework and gives you a managed React-NodeJS-Prisma app out-of-the-box. So let's see what we'd have to do to get the same thing set up with Django.
Note that this section is going to highlight Django, so keep in mind that you can skip all the following steps if you just use Wasp. :)
Django ?
First thing’s first. Django needs a REST framework and CORS (Cross Origin Resource Sharing):
pip install djangorestframework
pip install django-cors-headers
Include Rest Framework and Cors Header as installed apps, CORS headers as middleware, and then also set a local host for the react frontend to be able to communicate with the backend (Django) server (again, there is no need to do any of this initial setup in Wasp as it's all handled for you).
settings.py:
INSTALLED_APPS = [
    ...
    'corsheaders',
]

MIDDLEWARE = [
    ...
    'corsheaders.middleware.CorsMiddleware',
    ...
]

CORS_ALLOWED_ORIGINS = [
    'http://localhost:3000',
]
And now a very important step, which is to serialize all the data from Django to be able to work in json format for React frontend.
app/serializers.py:
from rest_framework import serializers
from .models import Task

class TaskSerializer(serializers.ModelSerializer):
    class Meta:
        model = Task
        fields = '__all__'
Now, since we are handling CRUD on the React side, we can change the views.py file:
from rest_framework import viewsets
from .models import Task
from .serializers import TaskSerializer

class TaskViewSet(viewsets.ModelViewSet):
    queryset = Task.objects.all()
    serializer_class = TaskSerializer
And now we need to change both app and project URLS since we have a frontend application on a different url than our backend.
urls.py:
from django.contrib import admin
from django.urls import path, include

urlpatterns = [
    path('admin/', admin.site.urls),
    path('api/', include('todo.urls')),  # Add this line
]
from django.urls import path, include
from rest_framework.routers import DefaultRouter
from .views import TaskViewSet

router = DefaultRouter()
router.register(r'tasks', TaskViewSet)

urlpatterns = [
    path('', include(router.urls)),
]
By now you should be understanding why I've made the switch to using Wasp when building full-stack apps. Anyways, now we are actually able to make a react component with a Django backend ?
React time
Ok, so now we can actually get back to comparing Wasp and Django.
Django ?
To start, lets create our React app in our Django project:
npx create-react-app frontend
Finally, we can make a component in React. A few things:
I am using axios in the Django project here. Wasp comes bundled with React-Query (aka Tanstack Query), so the execution of (CRUD) operations is a lot more elegant and powerful.
The api call is to my local server, obviously this will change in development.
You can make this many different ways, I tried to keep it simple.
main.jsx:
import React, { useEffect, useState } from 'react';
import axios from 'axios';

const TaskList = () => {
  const [tasks, setTasks] = useState([]);
  const [newTask, setNewTask] = useState('');
  const [editingTask, setEditingTask] = useState(null);

  useEffect(() => {
      fetchTasks();
  }, []);

  const fetchTasks = () => {
    axios.get('http://127.0.0.1:8000/api/tasks/')
      .then(response => {
        setTasks(response.data);
      })
      .catch(error => {
        console.error('There was an error fetching the tasks!', error);
      });
  };

  const handleAddTask = () => {
    if (newTask.trim()) {
      axios.post('http://127.0.0.1:8000/api/tasks/', { title: newTask, completed: false })
        .then(() => {
          setNewTask('');
          fetchTasks();
        })
        .catch(error => {
          console.error('There was an error adding the task!', error);
        });
    }
  };

  const handleUpdateTask = (task) => {
    axios.put(`http://127.0.0.1:8000/api/tasks/${task.id}/`, task)
      .then(() => {
        fetchTasks();
        setEditingTask(null);
      })
      .catch(error => {
        console.error('There was an error updating the task!', error);
      });
  };

  const handleDeleteTask = (taskId) => {
    axios.delete(`http://127.0.0.1:8000/api/tasks/${taskId}/`)
      .then(() => {
        fetchTasks();
      })
      .catch(error => {
        console.error('There was an error deleting the task!', error);
      });
  };

  const handleEditTask = (task) => {
    setEditingTask(task);
  };

  const handleChange = (e) => {
    setNewTask(e.target.value);
  };

  const handleEditChange = (e) => {
    setEditingTask({ ...editingTask, title: e.target.value });
  };

  const handleEditCompleteToggle = () => {
    setEditingTask({ ...editingTask, completed: !editingTask.completed });
  };

  return (
    <div>
      <h1>To-Do List</h1>
      <input type="text" value={newTask} onChange={handleChange} placeholder="Add new task" />
      <button onClick={handleAddTask}>Add Task</button>
      <ul>
        {tasks.map(task => (
          <li key={task.id}>
            {editingTask && editingTask.id === task.id ? (
              <div>
                <input type="text" value={editingTask.title} onChange={handleEditChange} />
                <button onClick={() => handleUpdateTask(editingTask)}>Save</button>
                <button onClick={() => setEditingTask(null)}>Cancel</button>
                <button onClick={handleEditCompleteToggle}>
                  {editingTask.completed ? 'Mark Incomplete' : 'Mark Complete'}
                </button>
              </div>
          ) : (
            <div>
              {task.title} - {task.completed ? 'Completed' : 'Incomplete'}
              <button onClick={() => handleEditTask(task)}>Edit</button>
              <button onClick={() => handleDeleteTask(task.id)}>Delete</button>
            </div>
            )}
          </li>
        ))}
      </ul>
    </div>
  );
};

export default TaskList;
Wasp ?
And here's the Wasp React client for comparison. Take note how we're able to import the operations we defined earlier and call them here easily on the client with less configuration than the Django app. We also get the built-in caching power of the useQuery hook, as well as the ability to pass in our authenticated user as a prop (we'll get into this more below).
Main.jsx:
import React, { FormEventHandler, FormEvent } from "react";
import { type Task } from "wasp/entities";
import { type AuthUser, getUsername } from "wasp/auth";
import { logout } from "wasp/client/auth";
import { createTask, updateTask, deleteTasks, useQuery, getTasks } from "wasp/client/operations";
import waspLogo from "./waspLogo.png";

import "./Main.css";

export const MainPage = ({ user }) => {
  const { data: tasks, isLoading, error } = useQuery(getTasks);

  if (isLoading) return "Loading...";
  if (error) return "Error: " + error;

  const completed = tasks?.filter((task) => task.isDone).map((task) => task.id);

  return (
    <main>
      <img src={waspLogo} alt="wasp logo" />
      {user && user.identities.username && (
        <h1>
          {user.identities.username.id}
          {`'s tasks :)`}
        </h1>
      )}
      <NewTaskForm />
      {tasks && <TasksList tasks={tasks} />}
      <div className="buttons">
        <button
          className="logout"
          onClick={() => deleteTasks(completed ?? [])}
        >
          Delete completed
        </button>
        <button className="logout" onClick={logout}>
          Logout
        </button>
      </div>
    </main>
  );
};

function Todo({ id, isDone, description }) {
  const handleIsDoneChange = async (
    event
  ) => {
    try {
      await updateTask({
        id,
        isDone: event.currentTarget.checked,
      });
    } catch (err: any) {
      window.alert("Error while updating task " + err?.message);
    }
  };

  return (
    <li>
      <span className="todo-item">
        <input
          type="checkbox"
          id={id.toString()}
          checked={isDone}
          onChange={handleIsDoneChange}
        />
        <span>{description}</span>
        <button onClick={() => void deleteTasks([id])}>Delete</button>
      </span>
    </li>
  );
}

function TasksList({ tasks }) {
  if (tasks.length === 0) return <p>No tasks yet.</p>;
  return (
    <ol className="tasklist">
      {tasks.map((task, idx) => (
        <Todo {...task} key={idx} />
      ))}
    </ol>
  );
}

function NewTaskForm() {
  const handleSubmit = async (event) => {
    event.preventDefault();

    try {
      const description = event.currentTarget.description.value;
      console.log(description);
      event.currentTarget.reset();
      await createTask({ description });
    } catch (err: any) {
      window.alert("Error: " + err?.message);
    }
  };

  return (
    <form onSubmit={handleSubmit}>
      <input name="description" type="text" defaultValue="" />
      <input type="submit" value="Create task" />
    </form>
  );
}
Very nice! In the Wasp app you can see how much easier it is to call the server-side code via Wasp operations. Plus, Wasp gives you the added benefit of refreshing the client-side cache for the Entity that's referenced in the operation definition (in this case Task). And the cherry on top is how easy it is to pass the authenticated user to the component, something we haven't even touched on in the Django app, and which we will talk about more below.
Part 3: Auth with Django? No way, José

So we already started to get a feel in the above code for how simple it is to pass an authenticated user around in Wasp. But how do we actually go about implementing full-stack Authentication in Wasp and Django.
This is one of Wasp’s biggest advantages. It couldn't be easier or more intuitive. On the other hand, the Django implementation is so long and complicated I'm not going to even bother showing you the code and I'll just list out the stps instead;
Wasp ?
main.wasp:
app TodoApp {
  wasp: {
    version: "^0.14.0"
  },

  title: "Todo App",

  auth: {
    userEntity: User,
    methods: {
      usernameAndPassword: {}
    }
  }

  //...
And that's all it takes to implement full-stack Auth with Wasp! But that's just one example, you can also add other auth methods easily, like google: {}, gitHub: {} and discord: {} social auth, after configuring the apps and adding your environment variables.
Wasp allows you to get building without worrying about so many things. I don’t need to worry about password hashing, multiple projects and apps, CORS headers, etc. I just need to add a couple lines of code.
Wasp just makes sense.

Django ?
Let's check out what it takes to add a simple username and password auth implementation to a Django app (remember, this isn't even the code, just a checklist!):
Install Necessary Packages:
- Use pip to install djangorestframework, djoser, and djangorestframework-simplejwt for Django.
- Use npm to install axios and jwt-decode for React.
Update Django Settings:
- Add required apps (rest_framework, djoser, corsheaders, and your Django app) to INSTALLED_APPS.
- Configure middleware to include CorsMiddleware.
- Set up Django REST Framework settings for authentication and permissions.
- Configure SimpleJWT settings for token expiration and authorization header types.
Set Up URL Routing:
- Include the djoser URLs for authentication and JWT endpoints in Django’s urls.py.
Implement Authentication Context in React:
- Create an authentication context in React to manage login state and tokens.
- Provide methods for logging in and out, and store tokens in local storage.
Create Login Component in React:
- Build a login form component in React that allows users to enter their credentials and authenticate using the Django backend.
Protect React Routes and Components:
- Use React Router to protect routes that require authentication.
- Ensure that API requests include the JWT token for authenticated endpoints.
Implement Task Update and Delete Functionality:
- Add methods in the React components to handle updating and deleting tasks.
- Use axios to make PUT and DELETE requests to the Django API.
Add Authentication to Django Views:
- Ensure that Django views and endpoints require authentication.
- Use Django REST Framework permissions to protect API endpoints.
One Final Thing
I just want to highlight one more aspect of Wasp that I really love. In Django, we're completely responsible for dealing with all the boilerplate code when setting up a new app. In other words, we have to set up new apps from scratch every time (even if it's been done before a million times by us and other devs). But with Wasp we can scaffold a new app template in a number of ways to really jump start the development process.
Let's check out these other ways to get a full-stack app started in Wasp.
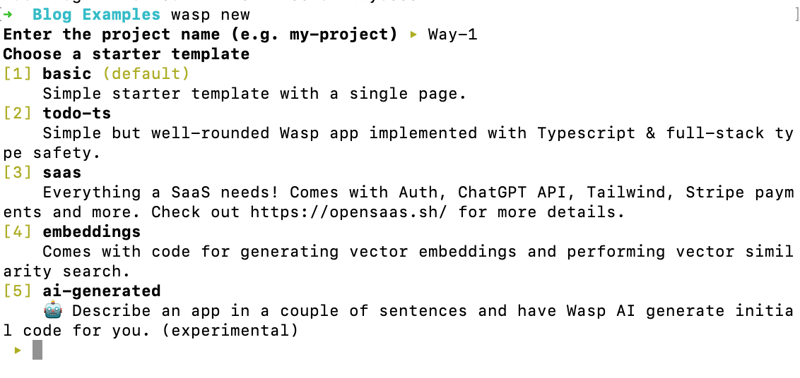
Way #1: Straight Outta Terminal
A simple wasp new in the terminal shows numerous starting options and app templates. If I really want to make a todo app for example, well there you have it, option 2.
Right out of the box you have a to-do application with authentication, CRUD functionality, and some basic styling. All of this is ready to be amended for your specific use case.
Or what if you want to turn code into money? Well, you can also get a fully functioning SaaS app. Interested in the latest AI offereings? You also have a vector embeddings template, or an AI full-stack app protoyper! 5 options that save you from having to write a ton of boilerplate code.
Way #2: Mage.ai (Free!)
Just throw a name, prompt, and select a few of your desired settings and boom, you get a fully functioning prototype app. From here you can use other other AI tools, like Cursor's AI code editor, to generate new features and help you debug!
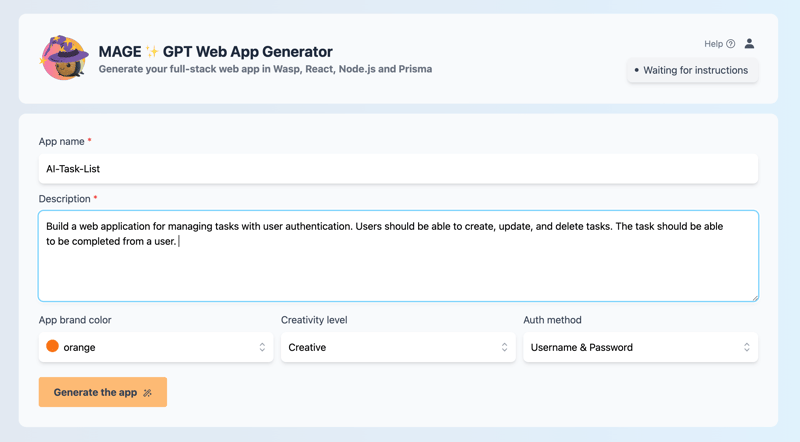
? Note that the Mage functionality is also achievable via the terminal ("ai-generated"), but you need to provide your own open-ai api key for it to work.
あなたのサポートを示してもらえますか?

このようなコンテンツに興味がありますか?ニュースレターに登録して、GitHub でスターを付けてください。私たちのプロジェクトを前進させ続けるにはあなたのサポートが必要です?
⭐️ GitHub 上の Star Wasp ?
結論
これで完了です。最初に述べたように、Django から来た私は、Wasp を使用してフルスタック アプリを構築するのがいかに簡単であるかに驚きました。それが、この記事を書こうと思ったきっかけです。
Django から離れて Wasp を選択することが、時間、エネルギー、感情の面で有益である理由を説明できれば幸いです。
以上がWasp: Web 開発における Django に対する JavaScript の答えの詳細内容です。詳細については、PHP 中国語 Web サイトの他の関連記事を参照してください。

ホットAIツール

Undresser.AI Undress
リアルなヌード写真を作成する AI 搭載アプリ

AI Clothes Remover
写真から衣服を削除するオンライン AI ツール。

Undress AI Tool
脱衣画像を無料で

Clothoff.io
AI衣類リムーバー

Video Face Swap
完全無料の AI 顔交換ツールを使用して、あらゆるビデオの顔を簡単に交換できます。

人気の記事
ホットツール

メモ帳++7.3.1
使いやすく無料のコードエディター

SublimeText3 中国語版
中国語版、とても使いやすい

ゼンドスタジオ 13.0.1
強力な PHP 統合開発環境

ドリームウィーバー CS6
ビジュアル Web 開発ツール

SublimeText3 Mac版
神レベルのコード編集ソフト(SublimeText3)
ホットトピック
 1671
1671
 14
1428
52
1330
25
1276
29
1256
24
14
1428
52
1330
25
1276
29
1256
24

 Python vs. JavaScript:学習曲線と使いやすさ
Apr 16, 2025 am 12:12 AM
Python vs. JavaScript:学習曲線と使いやすさ
Apr 16, 2025 am 12:12 AM
Pythonは、スムーズな学習曲線と簡潔な構文を備えた初心者により適しています。 JavaScriptは、急な学習曲線と柔軟な構文を備えたフロントエンド開発に適しています。 1。Python構文は直感的で、データサイエンスやバックエンド開発に適しています。 2。JavaScriptは柔軟で、フロントエンドおよびサーバー側のプログラミングで広く使用されています。
 C/CからJavaScriptへ:すべてがどのように機能するか
Apr 14, 2025 am 12:05 AM
C/CからJavaScriptへ:すべてがどのように機能するか
Apr 14, 2025 am 12:05 AM
C/CからJavaScriptへのシフトには、動的なタイピング、ゴミ収集、非同期プログラミングへの適応が必要です。 1)C/Cは、手動メモリ管理を必要とする静的に型付けられた言語であり、JavaScriptは動的に型付けされ、ごみ収集が自動的に処理されます。 2)C/Cはマシンコードにコンパイルする必要がありますが、JavaScriptは解釈言語です。 3)JavaScriptは、閉鎖、プロトタイプチェーン、約束などの概念を導入します。これにより、柔軟性と非同期プログラミング機能が向上します。
 JavaScriptとWeb:コア機能とユースケース
Apr 18, 2025 am 12:19 AM
JavaScriptとWeb:コア機能とユースケース
Apr 18, 2025 am 12:19 AM
Web開発におけるJavaScriptの主な用途には、クライアントの相互作用、フォーム検証、非同期通信が含まれます。 1)DOM操作による動的なコンテンツの更新とユーザーインタラクション。 2)ユーザーエクスペリエンスを改善するためにデータを提出する前に、クライアントの検証が実行されます。 3)サーバーとのリフレッシュレス通信は、AJAXテクノロジーを通じて達成されます。
 JavaScript in Action:実際の例とプロジェクト
Apr 19, 2025 am 12:13 AM
JavaScript in Action:実際の例とプロジェクト
Apr 19, 2025 am 12:13 AM
現実世界でのJavaScriptのアプリケーションには、フロントエンドとバックエンドの開発が含まれます。 1)DOM操作とイベント処理を含むTODOリストアプリケーションを構築して、フロントエンドアプリケーションを表示します。 2)node.jsを介してRestfulapiを構築し、バックエンドアプリケーションをデモンストレーションします。
 JavaScriptエンジンの理解:実装の詳細
Apr 17, 2025 am 12:05 AM
JavaScriptエンジンの理解:実装の詳細
Apr 17, 2025 am 12:05 AM
JavaScriptエンジンが内部的にどのように機能するかを理解することは、開発者にとってより効率的なコードの作成とパフォーマンスのボトルネックと最適化戦略の理解に役立つためです。 1)エンジンのワークフローには、3つの段階が含まれます。解析、コンパイル、実行。 2)実行プロセス中、エンジンはインラインキャッシュや非表示クラスなどの動的最適化を実行します。 3)ベストプラクティスには、グローバル変数の避け、ループの最適化、constとletsの使用、閉鎖の過度の使用の回避が含まれます。
 Python vs. JavaScript:コミュニティ、ライブラリ、リソース
Apr 15, 2025 am 12:16 AM
Python vs. JavaScript:コミュニティ、ライブラリ、リソース
Apr 15, 2025 am 12:16 AM
PythonとJavaScriptには、コミュニティ、ライブラリ、リソースの観点から、独自の利点と短所があります。 1)Pythonコミュニティはフレンドリーで初心者に適していますが、フロントエンドの開発リソースはJavaScriptほど豊富ではありません。 2)Pythonはデータサイエンスおよび機械学習ライブラリで強力ですが、JavaScriptはフロントエンド開発ライブラリとフレームワークで優れています。 3)どちらも豊富な学習リソースを持っていますが、Pythonは公式文書から始めるのに適していますが、JavaScriptはMDNWebDocsにより優れています。選択は、プロジェクトのニーズと個人的な関心に基づいている必要があります。
 Python vs. JavaScript:開発環境とツール
Apr 26, 2025 am 12:09 AM
Python vs. JavaScript:開発環境とツール
Apr 26, 2025 am 12:09 AM
開発環境におけるPythonとJavaScriptの両方の選択が重要です。 1)Pythonの開発環境には、Pycharm、Jupyternotebook、Anacondaが含まれます。これらは、データサイエンスと迅速なプロトタイピングに適しています。 2)JavaScriptの開発環境には、フロントエンドおよびバックエンド開発に適したnode.js、vscode、およびwebpackが含まれます。プロジェクトのニーズに応じて適切なツールを選択すると、開発効率とプロジェクトの成功率が向上する可能性があります。
 JavaScript通訳者とコンパイラにおけるC/Cの役割
Apr 20, 2025 am 12:01 AM
JavaScript通訳者とコンパイラにおけるC/Cの役割
Apr 20, 2025 am 12:01 AM
CとCは、主に通訳者とJITコンパイラを実装するために使用されるJavaScriptエンジンで重要な役割を果たします。 1)cは、JavaScriptソースコードを解析し、抽象的な構文ツリーを生成するために使用されます。 2)Cは、Bytecodeの生成と実行を担当します。 3)Cは、JITコンパイラを実装し、実行時にホットスポットコードを最適化およびコンパイルし、JavaScriptの実行効率を大幅に改善します。
