Spring Boot での OAuth 認証: Google と GitHub ログインを統合するためのガイド
OAuth 2.0 によるセキュリティの強化: Spring Boot でのソーシャル ログインの実装
現代の Web 開発の世界では、アプリケーションを保護し、ユーザーの認証を可能な限りスムーズにすることが最優先事項です。ここで OAuth 2.0 が登場します。OAuth 2.0 は、API を保護するだけでなく、ユーザーが Google や GitHub などのプラットフォームから既存のアカウントでログインできるようにする強力なツールです。これにより、誰にとっても作業が簡単になります。ユーザーは別のパスワードを覚える必要がなく、開発者は認証を管理するための信頼できる方法を得ることができます。
このブログでは、Spring Boot アプリケーションで OAuth 2.0 をセットアップする方法を段階的に説明します。認証のために Google と GitHub の両方を統合するので、ユーザーはログインに使用するサービスを選択できます。また、JWT (JSON Web トークン) を使用して API エンドポイントを保護し、認証されたユーザーは、本来のリソースにアクセスできます。
新しいアプリを構築する場合でも、既存のアプリにセキュリティを追加する場合でも、このガイドでは Spring Boot アプリケーションを安全でユーザーフレンドリーに保つために必要なツールが提供されます。
https://start.spring.io/
にアクセスしてくださいプロジェクトを作成する
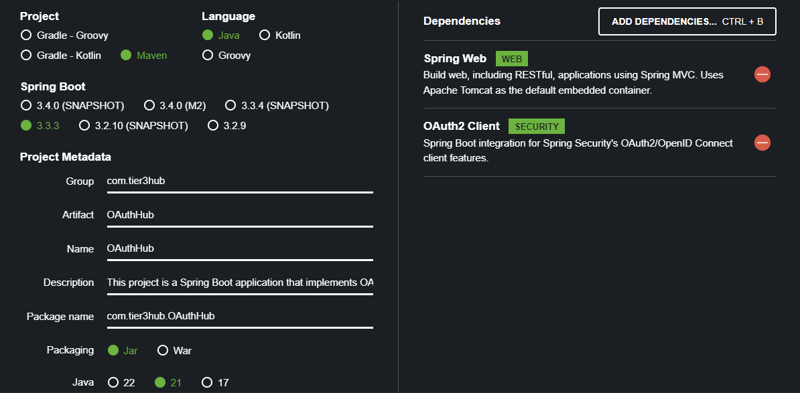
zip をダウンロードして解凍し、プロジェクトを IDE にロードします。
Spring Boot の "OAuth2 Client" 依存関係により、OAuth 2.0 認証と Google や GitHub などのプロバイダーとの統合が簡素化されます。ユーザーのプロバイダーのログイン ページへのリダイレクト、トークンの管理、API エンドポイントの保護など、OAuth ログイン フロー全体を処理します。この依存関係を追加すると、Spring Boot アプリケーションで安全でユーザーフレンドリーな認証を簡単に有効にすることができます。
Spring Boot の "Spring Web" 依存関係は、Web アプリケーションの開発にとって重要です。 RESTful API の作成、MVC アーキテクチャのサポート、HTML ビューを提供する機能などの重要な機能を提供します。 Spring Web を使用すると、HTTP リクエストと応答を簡単に処理し、ルーティングを管理し、他の Spring コンポーネントと統合できるため、堅牢な Web アプリケーションを構築するための基礎部分となります。
アプリケーション構成
Google および GitHub での OAuth 2.0 認証用に Spring Boot アプリケーションを設定するには、application.properties ファイルを設定する必要があります。このファイルには、OAuth クライアントの資格情報、ログ レベル、JWT 構成など、アプリケーションの重要な設定が含まれています。
spring.application.name=oauth2-authentication-service
server.port=8000

#for google
spring.security.oauth2.client.registration.google.client-id=YOUR_GOOGLE_CLIENT_ID
spring.security.oauth2.client.registration.google.client-secret=YOUR_GOOGLE_CLIENT_SECRET

#for github
spring.security.oauth2.client.registration.github.client-id=YOUR_GITHUB_CLIENT_ID
spring.security.oauth2.client.registration.github.client-secret= YOUR_GITHUB_CLIENT_SECRET
OAuth クライアント構成: YOUR_GOOGLE_CLIENT_ID、YOUR_GOOGLE_CLIENT_SECRET、YOUR_GITHUB_CLIENT_ID、および YOUR_GITHUB_CLIENT_SECRET を、アプリケーションの登録時に Google および GitHub から取得した認証情報に置き換えます。
OAuth 2.0 認証のためにアプリケーションを Google および GitHub に登録するには、https://console.cloud.google.com にアクセスする必要があります
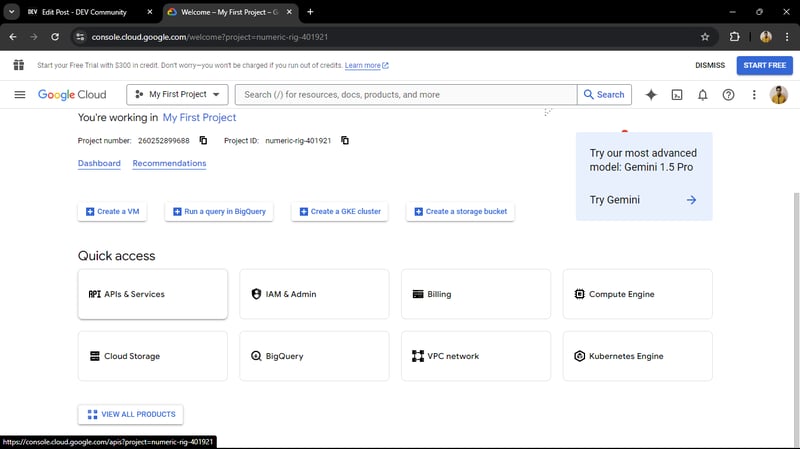
「API サービス」をクリックします
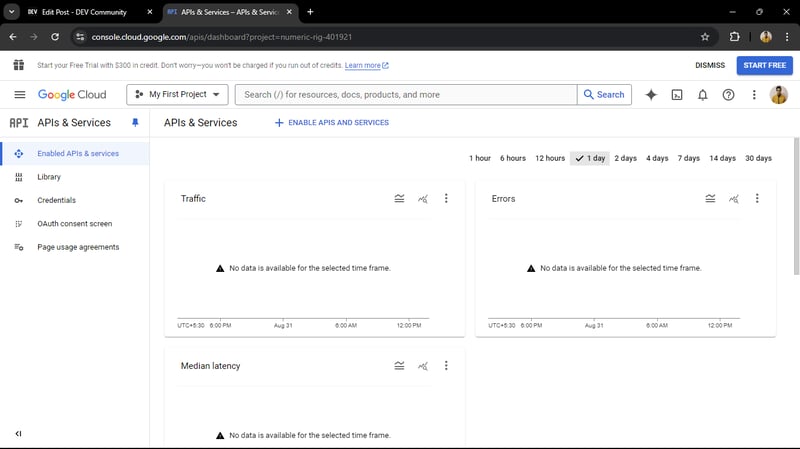
資格情報 ->認証情報を作成 -> OAuth クライアント ID
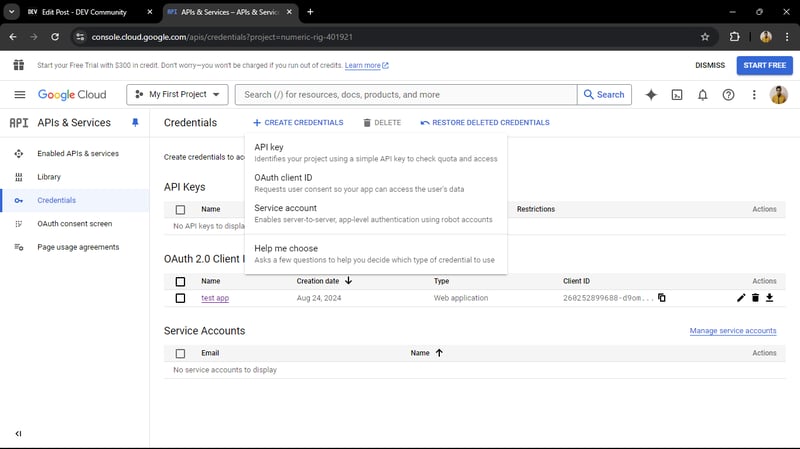
OAuth クライアント ID -> OAuth クライアント ID を作成します
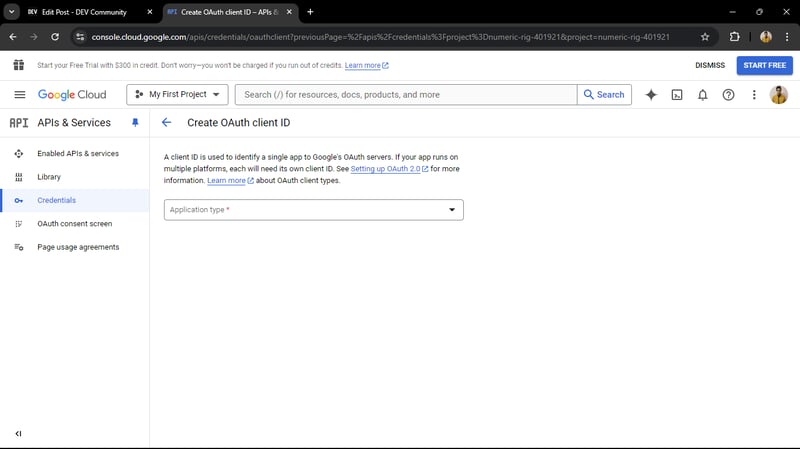
アプリケーション タイプをWeb アプリケーション
に選択します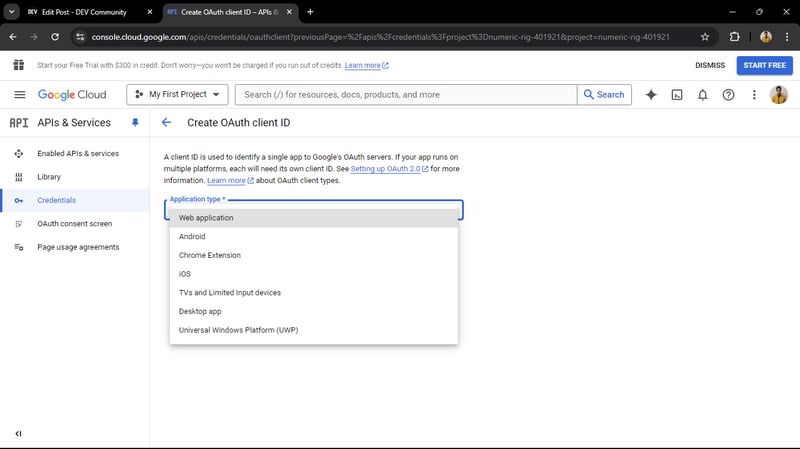
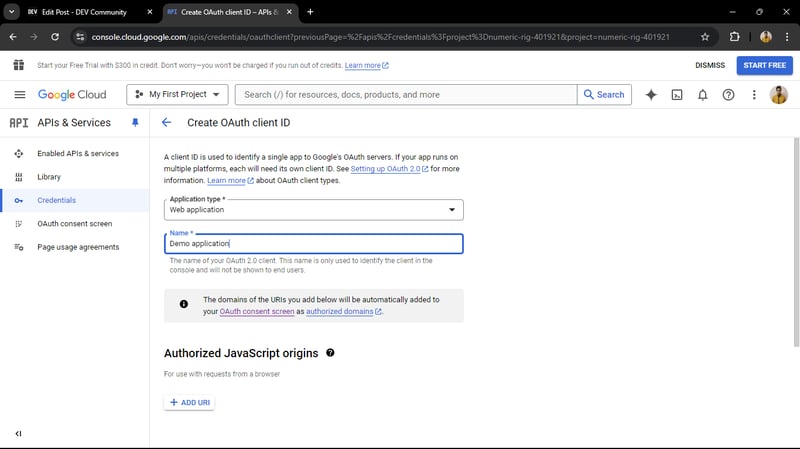
アプリケーション名を入力してください
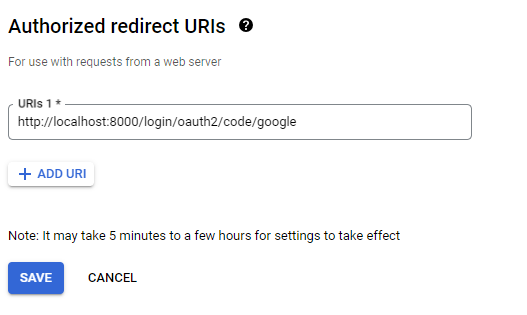
この URL で 承認されたリダイレクト URI を設定します。ここではアプリケーションが 8000 ポートで実行されているため、アプリケーション ポートは 8000 です。次に、作成をクリックします
http://localhost:8000/login/oauth2/code/google
その後、OAuth クライアントが作成され、クライアント ID とクライアント シークレットを取得します。
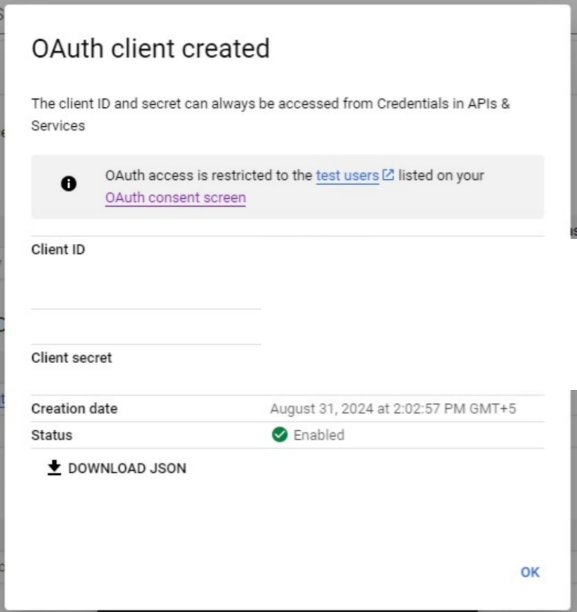
copy both and replace with the the properties of application.properties file
spring.security.oauth2.client.registration.google.client-id=YOUR_GOOGLE_CLIENT_ID
spring.security.oauth2.client.registration.google.client-secret=YOUR_GOOGLE_CLIENT_SECRET
The SecurityConfig class configures security for a Spring Boot application using OAuth2. It defines a SecurityFilterChain bean, which sets up security rules. The authorizeHttpRequests method ensures that all incoming requests require authentication. The .oauth2Login(Customizer.withDefaults()) line enables OAuth2 login functionality with default settings. Finally, the securityFilterChain method returns the configured security filter chain by calling http.build(). This setup ensures that the application is secure and supports OAuth2 authentication for users.
Accessing Your Application via Chrome
When developing and testing your Spring Boot application, it's crucial to know how to interact with it through Postman. If your application is running locally on port 8000, you can access it using the following base URL:
http://localhost:8000
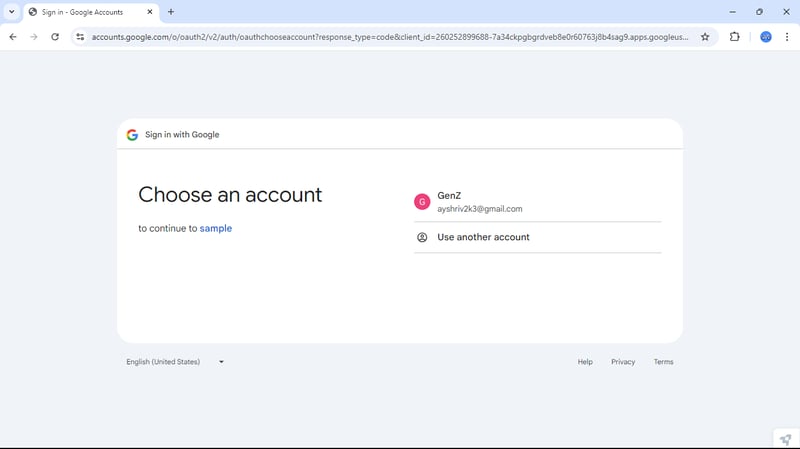
we get the similar response like this

now we can access the end points.
GitHub Authentication
GitHub Authentication in Spring Boot allows users to log in using their GitHub accounts, streamlining the authentication process and enhancing security. By integrating GitHub as an OAuth 2.0 provider, your application can authenticate users through GitHub's trusted platform. This involves registering your application on GitHub to obtain a Client ID and Client Secret, which are then configured in your Spring Boot application. Users are redirected to GitHub for login, and upon successful authentication, they are redirected back to your application with an access token, allowing secure access to your protected resources. This integration is ideal for applications targeting developers and tech-savvy users.
create GitHub account and go to settings
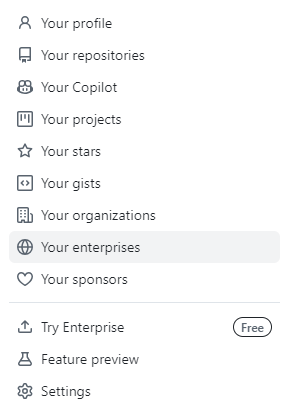
in the left corner we get the developer settings
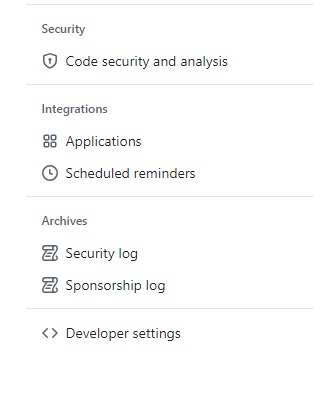
Navigate to OAuth Apps

click on create OAuth App

we get the interface like this
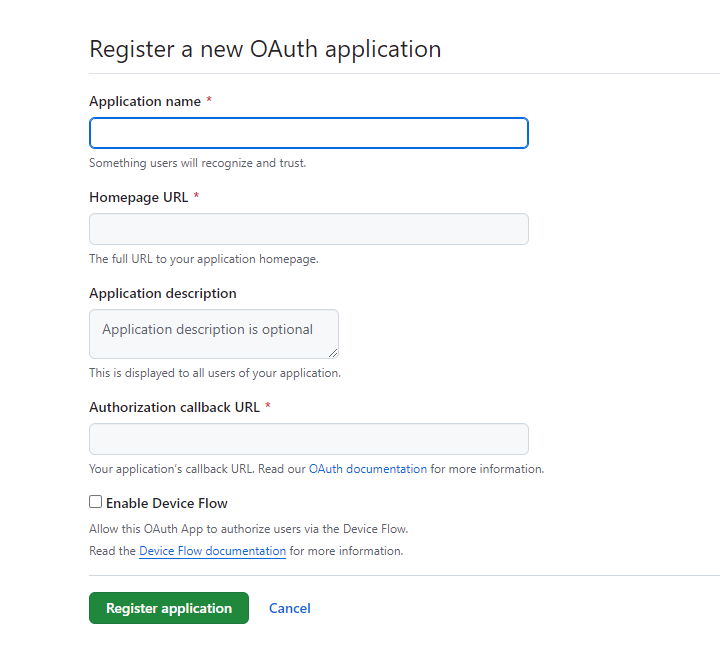
set ** Authorization callback URL ** according to your application port
http://localhost:8000/login/oauth2/code/github
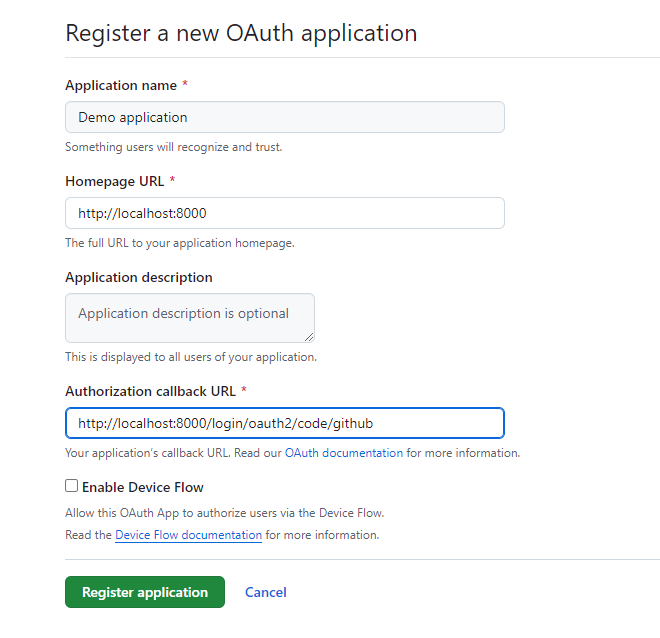
and set Homepage URL
http://localhost:8000
after registering the Application we get the Client ID and Client Secret

now replace with the Application.properties file properties
spring.security.oauth2.client.registration.github.client-id=Ov23liBMLc5e1ItoONPx
spring.security.oauth2.client.registration.github.client-secret=

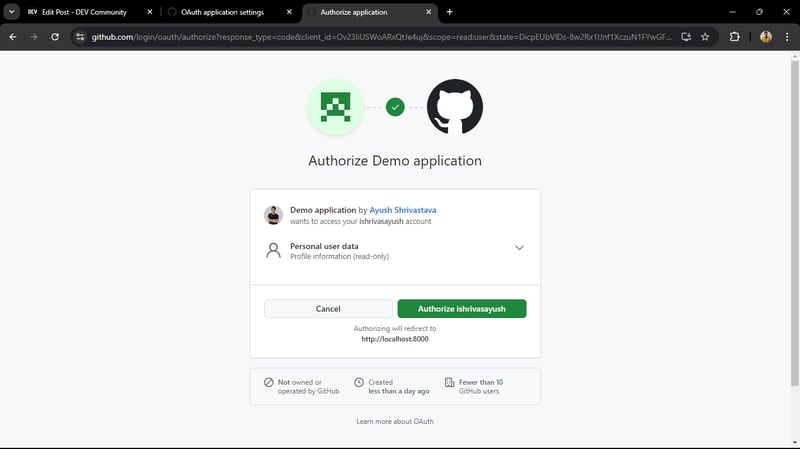
Test the GitHub Login
Login with GitHub: When prompted, log in with your GitHub credentials.
Success Redirect: Upon successful authentication, you'll be redirected to the /home page of your application.
私の GitHub リポジトリでユーザー認証サービスの完全なソース コードを探索できます。このプロジェクトでは、ユーザー登録、ログイン、認証に JWT を使用した安全なアクセスなどのさまざまな機能を紹介します。自由にチェックしたり、投稿したり、独自のプロジェクトの参考として使用したりしてください!
GitHub リポジトリ: https://github.com/ishrivasayush/oauth2-authentication-service
結論
Google と GitHub を認証プロバイダーとして使用して、Spring Boot で OAuth 2.0 を実装することは、アプリケーションのセキュリティと使いやすさを強化する強力な方法です。ユーザーが既存のアカウントでログインできるようにすることで、煩わしさが軽減され、よりスムーズなユーザー エクスペリエンスが提供されます。同時に、JWT で API エンドポイントを保護することで、認証されたユーザーのみが機密リソースにアクセスできるようになります。
このガイドでは、Google と GitHub での OAuth 資格情報の設定から、認証を処理してエンドポイントを保護するための Spring Boot アプリケーションの構成まで、すべてを説明しました。 OAuth 2.0 を初めて使用する場合でも、OAuth 2.0 をプロジェクトに統合しようとしている場合でも、これらの手順は安全でスケーラブルな認証システムを構築するのに役立ちます。
セキュリティは終わりのない旅ですが、適切なツールと実践を使用すれば、安全でユーザーフレンドリーなアプリケーションを構築できます。強固な基盤ができたので、プロバイダーを追加したり、ユーザー エクスペリエンスをカスタマイズしたり、JWT 構成をさらに詳しく調べたりすることができます。コーディングを楽しんでください!
以上がSpring Boot での OAuth 認証: Google と GitHub ログインを統合するためのガイドの詳細内容です。詳細については、PHP 中国語 Web サイトの他の関連記事を参照してください。

ホットAIツール

Undresser.AI Undress
リアルなヌード写真を作成する AI 搭載アプリ

AI Clothes Remover
写真から衣服を削除するオンライン AI ツール。

Undress AI Tool
脱衣画像を無料で

Clothoff.io
AI衣類リムーバー

AI Hentai Generator
AIヘンタイを無料で生成します。

人気の記事

ホットツール

メモ帳++7.3.1
使いやすく無料のコードエディター

SublimeText3 中国語版
中国語版、とても使いやすい

ゼンドスタジオ 13.0.1
強力な PHP 統合開発環境

ドリームウィーバー CS6
ビジュアル Web 開発ツール

SublimeText3 Mac版
神レベルのコード編集ソフト(SublimeText3)

ホットトピック
 7315
7315
 9
9
 1625
1625
 14
14
 1348
1348
 46
46
 1260
1260
 25
25
 1207
1207
 29
29
 2025年のトップ4 JavaScriptフレームワーク:React、Angular、Vue、Svelte
Mar 07, 2025 pm 06:09 PM
2025年のトップ4 JavaScriptフレームワーク:React、Angular、Vue、Svelte
 カフェインやグアバキャッシュなどのライブラリを使用して、Javaアプリケーションにマルチレベルキャッシュを実装するにはどうすればよいですか?
Mar 17, 2025 pm 05:44 PM
カフェインやグアバキャッシュなどのライブラリを使用して、Javaアプリケーションにマルチレベルキャッシュを実装するにはどうすればよいですか?
 Javaのクラスロードメカニズムは、さまざまなクラスローダーやその委任モデルを含むどのように機能しますか?
Mar 17, 2025 pm 05:35 PM
Javaのクラスロードメカニズムは、さまざまなクラスローダーやその委任モデルを含むどのように機能しますか?
 Spring Boot Snakeyaml 2.0 CVE-2022-1471問題修正
Mar 07, 2025 pm 05:52 PM
Spring Boot Snakeyaml 2.0 CVE-2022-1471問題修正
 キャッシュや怠zyなロードなどの高度な機能を備えたオブジェクトリレーショナルマッピングにJPA(Java Persistence API)を使用するにはどうすればよいですか?
Mar 17, 2025 pm 05:43 PM
キャッシュや怠zyなロードなどの高度な機能を備えたオブジェクトリレーショナルマッピングにJPA(Java Persistence API)を使用するにはどうすればよいですか?
 高度なJavaプロジェクト管理、自動化の構築、依存関係の解像度にMavenまたはGradleを使用するにはどうすればよいですか?
Mar 17, 2025 pm 05:46 PM
高度なJavaプロジェクト管理、自動化の構築、依存関係の解像度にMavenまたはGradleを使用するにはどうすればよいですか?


