

TensorFlow と JavaScript を使用して基本的なチャットボットを構築する方法

私たちはさまざまなサイトにアクセスするとチャットボットに遭遇しますが、その中には実際の人間とのやり取りの背後で動作するものもあれば、AI を利用しているものもあります。
この記事では、TensorFlow と JavaScript を使用して、AI を活用したシンプルなチャットボットを構築する手順を説明します。チャットボットはユーザーのコマンドを認識し、事前定義された回答で応答します。
ステップバイステップガイド
プロジェクトのセットアップ
まず、プロジェクト用に新しいディレクトリを作成し、npm で初期化します。このステップを開始する前に、システムに Node.js がインストールされていることを確認してください。
mkdir chatbot
cd chatbot
npm init -y
必要なパッケージをインストールします
単純なプロジェクトでは次の npm パッケージを使用します:
- tensorflow/tfjs: 機械学習用の TensorFlow.js ライブラリ。
- tensorflow-models/universal-sentence-encoder: 意図認識用の事前トレーニング済みユニバーサル センテンス エンコーダー モデル。
npm install @tensorflow/tfjs @tensorflow-models/universal sentence-encoder
-
インテントの作成
インテント/コマンドを保存するために、intents.js という名前のファイルを作成します。これらは、チャットボットが認識するユーザー入力のカテゴリです (挨拶、製品のお問い合わせ、注文ステータスなど)。
// intents.js
const intents = {
  greeting: ["hello", "hi", "hey", "good morning", "good evening", "howdy"],
  goodbye: ["bye", "goodbye", "see you later", "farewell", "catch you later"],
  thanks: ["thank you", "thanks", "much appreciated", "thank you very much"],
  product_inquiry: ["tell me about your products", "what do you sell?", "product information", "what can I buy?", "show me your products"],
  order_status: ["where is my order?", "order status", "track my order", "order tracking", "order update"],
  shipping_info: ["shipping information", "how do you ship?", "shipping methods", "delivery options", "how long does shipping take?"],
  return_policy: ["return policy", "how to return?", "return process", "can I return?", "returns"],
  payment_methods: ["payment options", "how can I pay?", "payment methods", "available payments"],
  support_contact: ["contact support", "how to contact support?", "customer support contact", "support info", "customer service contact"],
  business_hours: ["business hours", "working hours", "when are you open?", "opening hours", "store hours"]
};

module.exports = { intents }
ログイン後にコピー -
応答を作成する
response.js という名前の別のファイルを作成して、事前定義された応答を保存します。これらは、認識された意図に基づいてチャットボットが返す事前定義された応答です。
// responses.js
const responses = {
  greeting: "Hello! How can I help you today?",
  goodbye: "Goodbye! Have a great day!",
  thanks: "You're welcome! If you have any other questions, feel free to ask.",
  product_inquiry: "We offer a variety of products including electronics, books, clothing, and more. How can I assist you further?",
  order_status: "Please provide your order ID, and I will check the status for you.",
  shipping_info: "We offer various shipping methods including standard, express, and next-day delivery. Shipping times depend on the method chosen and your location.",
  return_policy: "Our return policy allows you to return products within 30 days of purchase. Please visit our returns page for detailed instructions.",
  payment_methods: "We accept multiple payment methods including credit/debit cards, PayPal, and bank transfers. Please choose the method that suits you best at checkout.",
  support_contact: "You can contact our support team via email at support@example.com or call us at 1-800-123-4567.",
  business_hours: "Our business hours are Monday to Friday, 9 AM to 5 PM. We are closed on weekends and public holidays."
};

module.exports = { responses };
ログイン後にコピー -
TensorFlow と文エンコーダーの読み込み
chatbot.js という名前のメイン スクリプト ファイルを作成し、必要なライブラリとモデルをロードします。ユニバーサル センテンス エンコーダ モデルを非同期でロードし、モデルがロードされたらチャットボットを開始します。
// chatbot.js
const tf = require('@tensorflow/tfjs');
const use = require('@tensorflow-models/universal-sentence-encoder');
const { intents } = require('./intents');
const { responses } = require('./responses');
const readline = require('readline');

// Load the Universal Sentence Encoder model
let model;
use.load().then((loadedModel) => {
  model = loadedModel;
  console.log("Model loaded");
  startChatbot();
});
ログイン後にコピー -
意図認識の実装
ユーザー入力の意図を認識する機能を追加します。ユニバーサル エンコーダーを使用してユーザー入力を高次元ベクトルに埋め込み、その意図に基づいて最も高い類似性スコアを追跡します。
async function recognizeIntent(userInput) {
  const userInputEmb = await model.embed([userInput]);
  let maxScore = -1;
  let recognizedIntent = null;

  for (const [intent, examples] of Object.entries(intents)) {
    // Embedding the example phrases for each intent & Calculating similarity scores between the user input embedding and the example embeddings
    const examplesEmb = await model.embed(examples);
    const scores = await tf.matMul(userInputEmb, examplesEmb, false, true).data();
    const maxExampleScore = Math.max(...scores);
    if (maxExampleScore > maxScore) {
      maxScore = maxExampleScore;
      recognizedIntent = intent;
    }
  }
  return recognizedIntent;
}
ログイン後にコピー -
応答の生成
認識されたインテントに基づいて応答を生成する関数を追加します:
async function generateResponse(userInput) {
  const intent = await recognizeIntent(userInput);
  if (intent && responses[intent]) {
    return responses[intent];
  } else {
    return "I'm sorry, I don't understand that. Can you please rephrase?";
  }
}
ログイン後にコピー -
チャットボット インタラクションの実装
最後に、コマンド ラインからユーザー入力を読み取り、ユーザーに入力を促し、それに応じて応答を生成するためのインターフェイスを設定することで、チャットボットとの対話ループを実装します。
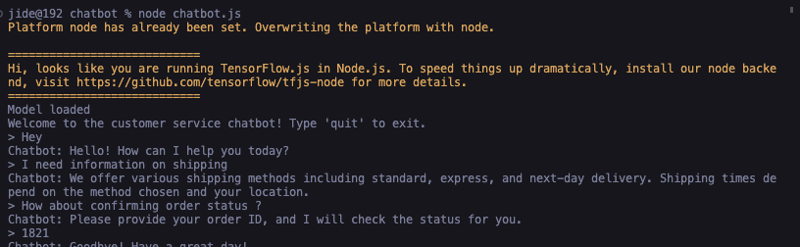
function startChatbot() { const rl = readline.createInterface({ input: process.stdin, output: process.stdout }); console.log("Welcome to the customer service chatbot! Type 'quit' to exit."); rl.prompt(); rl.on('line', async (line) => { const userInput = line.trim(); if (userInput.toLowerCase() === 'quit') { console.log("Chatbot: Goodbye!"); rl.close(); return; } const response = await generateResponse(userInput); console.log(`Chatbot: ${response}`); rl.prompt(); }); }ログイン後にコピーchatbot.js の完成したコードは次のとおりです:
// chatbot.js

const tf = require('@tensorflow/tfjs');
const use = require('@tensorflow-models/universal-sentence-encoder');
const { intents } = require('./intents');
const { responses } = require('./responses');
const readline = require('readline');

// Load the Universal Sentence Encoder model
let model;
use.load().then((loadedModel) => {
  model = loadedModel;
  console.log("Model loaded");
  startChatbot();
});

async function recognizeIntent(userInput) {
  const userInputEmb = await model.embed([userInput]);
  let maxScore = -1;
  let recognizedIntent = null;

  for (const [intent, examples] of Object.entries(intents)) {
    const examplesEmb = await model.embed(examples);
    const scores = await tf.matMul(userInputEmb, examplesEmb, false, true).data();
    const maxExampleScore = Math.max(...scores);
    if (maxExampleScore > maxScore) {
      maxScore = maxExampleScore;
      recognizedIntent = intent;
    }
  }

  return recognizedIntent;
}

async function generateResponse(userInput) {
  const intent = await recognizeIntent(userInput);
  if (intent && responses[intent]) {
    return responses[intent];
  } else {
    return "I'm sorry, I don't understand that. Can you please rephrase?";
  }
}

function startChatbot() {
  const rl = readline.createInterface({
    input: process.stdin,
    output: process.stdout
  });

  console.log("Welcome to the customer service chatbot! Type 'quit' to exit.");
  rl.prompt();

  rl.on('line', async (line) => {
    const userInput = line.trim();
    if (userInput.toLowerCase() === 'quit') {
      console.log("Chatbot: Goodbye!");
      rl.close();
      return;
    }

    const response = await generateResponse(userInput);
    console.log(`Chatbot: ${response}`);
    rl.prompt();
  });
}
ログイン後にコピー -
チャットボットを実行するには、 chatbot.js ファイル:
を実行します。node chatbot.js
ログイン後にコピー
出来上がり!コマンド出力ではチャットボットが実行されているはずです:
結論
この記事では、TensorFlow と JavaScript を使用して、シンプルなカスタマー サービス チャットボットを構築しました。この実装は基本的なものですが、より洗練されたチャットボットを構築するための強固な基盤を提供します。 AXIOS を使用して API を統合したり、インテントと応答を追加したり、Web プラットフォームにデプロイしたりすることで、このプロジェクトを拡張できます。
コーディングを楽しんでください!
?? 私についてもっと詳しく
?? LinkedIn で接続します
?? ブログを購読してください
以上がTensorFlow と JavaScript を使用して基本的なチャットボットを構築する方法の詳細内容です。詳細については、PHP 中国語 Web サイトの他の関連記事を参照してください。

ホットAIツール

Undresser.AI Undress
リアルなヌード写真を作成する AI 搭載アプリ

AI Clothes Remover
写真から衣服を削除するオンライン AI ツール。

Undress AI Tool
脱衣画像を無料で

Clothoff.io
AI衣類リムーバー

Video Face Swap
完全無料の AI 顔交換ツールを使用して、あらゆるビデオの顔を簡単に交換できます。

人気の記事
ホットツール

メモ帳++7.3.1
使いやすく無料のコードエディター

SublimeText3 中国語版
中国語版、とても使いやすい

ゼンドスタジオ 13.0.1
強力な PHP 統合開発環境

ドリームウィーバー CS6
ビジュアル Web 開発ツール

SublimeText3 Mac版
神レベルのコード編集ソフト(SublimeText3)
ホットトピック
 7878
7878
 15
1649
14
1409
52
1301
25
1245
29
15
1649
14
1409
52
1301
25
1245
29

 フロントエンドのサーマルペーパーレシートのために文字化けしたコード印刷に遭遇した場合はどうすればよいですか?
Apr 04, 2025 pm 02:42 PM
フロントエンドのサーマルペーパーレシートのために文字化けしたコード印刷に遭遇した場合はどうすればよいですか?
Apr 04, 2025 pm 02:42 PM
フロントエンドのサーマルペーパーチケット印刷のためのよくある質問とソリューションフロントエンド開発におけるチケット印刷は、一般的な要件です。しかし、多くの開発者が実装しています...
 javascriptの分解:それが何をするのか、なぜそれが重要なのか
Apr 09, 2025 am 12:07 AM
javascriptの分解:それが何をするのか、なぜそれが重要なのか
Apr 09, 2025 am 12:07 AM
JavaScriptは現代のWeb開発の基礎であり、その主な機能には、イベント駆動型のプログラミング、動的コンテンツ生成、非同期プログラミングが含まれます。 1)イベント駆動型プログラミングにより、Webページはユーザー操作に応じて動的に変更できます。 2)動的コンテンツ生成により、条件に応じてページコンテンツを調整できます。 3)非同期プログラミングにより、ユーザーインターフェイスがブロックされないようにします。 JavaScriptは、Webインタラクション、シングルページアプリケーション、サーバー側の開発で広く使用されており、ユーザーエクスペリエンスとクロスプラットフォーム開発の柔軟性を大幅に改善しています。
 誰がより多くのPythonまたはJavaScriptを支払われますか?
Apr 04, 2025 am 12:09 AM
誰がより多くのPythonまたはJavaScriptを支払われますか?
Apr 04, 2025 am 12:09 AM
スキルや業界のニーズに応じて、PythonおよびJavaScript開発者には絶対的な給与はありません。 1. Pythonは、データサイエンスと機械学習でさらに支払われる場合があります。 2。JavaScriptは、フロントエンドとフルスタックの開発に大きな需要があり、その給与もかなりです。 3。影響要因には、経験、地理的位置、会社の規模、特定のスキルが含まれます。
 JavaScriptは学ぶのが難しいですか?
Apr 03, 2025 am 12:20 AM
JavaScriptは学ぶのが難しいですか?
Apr 03, 2025 am 12:20 AM
JavaScriptを学ぶことは難しくありませんが、挑戦的です。 1)変数、データ型、関数などの基本概念を理解します。2)非同期プログラミングをマスターし、イベントループを通じて実装します。 3)DOM操作を使用し、非同期リクエストを処理することを約束します。 4)一般的な間違いを避け、デバッグテクニックを使用します。 5)パフォーマンスを最適化し、ベストプラクティスに従ってください。
 Shiseidoの公式Webサイトのように、視差スクロールと要素のアニメーション効果を実現する方法は?
または:
Shiseidoの公式Webサイトのようにスクロールするページを伴うアニメーション効果をどのように実現できますか?
Apr 04, 2025 pm 05:36 PM
Shiseidoの公式Webサイトのように、視差スクロールと要素のアニメーション効果を実現する方法は?
または:
Shiseidoの公式Webサイトのようにスクロールするページを伴うアニメーション効果をどのように実現できますか?
Apr 04, 2025 pm 05:36 PM
この記事の視差スクロールと要素のアニメーション効果の実現に関する議論では、Shiseidoの公式ウェブサイト(https://www.shisido.co.co.jp/sb/wonderland/)と同様の達成方法について説明します。
 JavaScriptの進化:現在の傾向と将来の見通し
Apr 10, 2025 am 09:33 AM
JavaScriptの進化:現在の傾向と将来の見通し
Apr 10, 2025 am 09:33 AM
JavaScriptの最新トレンドには、TypeScriptの台頭、最新のフレームワークとライブラリの人気、WebAssemblyの適用が含まれます。将来の見通しは、より強力なタイプシステム、サーバー側のJavaScriptの開発、人工知能と機械学習の拡大、およびIoTおよびEDGEコンピューティングの可能性をカバーしています。
 JavaScriptを使用して、同じIDを持つArray要素を1つのオブジェクトにマージする方法は?
Apr 04, 2025 pm 05:09 PM
JavaScriptを使用して、同じIDを持つArray要素を1つのオブジェクトにマージする方法は?
Apr 04, 2025 pm 05:09 PM
同じIDを持つ配列要素をJavaScriptの1つのオブジェクトにマージする方法は?データを処理するとき、私たちはしばしば同じIDを持つ必要性に遭遇します...
 Console.log出力の違い結果:なぜ2つの呼び出しが異なるのですか?
Apr 04, 2025 pm 05:12 PM
Console.log出力の違い結果:なぜ2つの呼び出しが異なるのですか?
Apr 04, 2025 pm 05:12 PM
Console.log出力の違いの根本原因に関する詳細な議論。この記事では、Console.log関数の出力結果の違いをコードの一部で分析し、その背後にある理由を説明します。 �...
