HTML のパディング プロパティは、ボックスのような構造の最も内側の要素のコンテンツの周囲にスペースを与えます。 HTML の margin プロパティは、ボックスのような構造の最も外側の要素のコンテンツの周囲にスペースを提供します。パディングとマージンの周囲のスペースはボーダーと呼ばれます。
パディング、マージン、ボーダーの違いは以下で確認できます:

構文 1:
img
{
Padding: 10px,10px,10px,10px; //padding positions
}構文 1 説明:
4 つの値でパディングを適用すると、最初の値は上部に、2 番目の値は右側に、3 番目の値は下部に、4 番目の値は左側にそれぞれ適用されます。
構文 2:
img
{
Padding: 10px,10px,10px; //padding positions
}構文の説明:
3 つの値でパディングを適用する場合、最初の値は上部に適用され、2 番目は左右に適用され、3 番目は下部に適用されます。
構文 3:
img
{
Padding: 10px,10px; //padding positions
}構文の説明:
2 つの値でパディングを適用する場合、最初の値は上と下に適用され、2 番目の値は左と右にそれぞれ適用されます。
構文 4:
img
{
Padding: 10px; //padding positions
}構文の説明:
単一の値のみでパディングを適用する場合は、4 つの辺すべてに均等にパディングを使用します。
以下は HTML 画像パディングの例です:
HTML コード:
<!DOCTYPE html>
<html>
<head>
<title>Image Padding</title>
<link rel="stylesheet" href="ImagePaddingFourSides.css"></link>
</head>
<body>
<font color="green">
<h2>Image without Padding</h2>
</font>
<p>
<img src="Tulips.jpg" class="noPadding">
</p>
<font color="green">
<h2>Image with Padding</h2>
</font>
<p>
<img src="Tulips.jpg" class="padding">
</p>
</body>
</html>
CSS コード:
.noPadding
{
width:400px;
height:400px;
border: 5px solid brown;
}
.padding
{
width:400px;
height:400px;
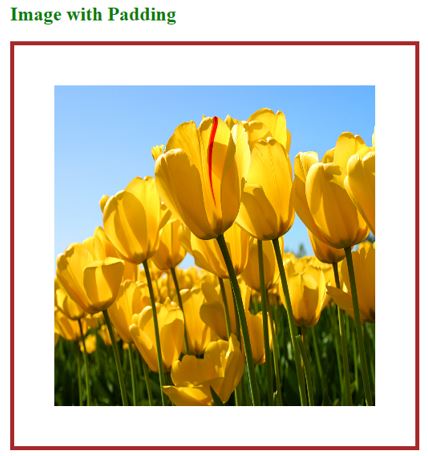
padding: 50px 50px 50px 50px;
}出力:
パディングを適用する前:

パディング適用後:

説明:
HTML コード:
<!DOCTYPE html>
<html>
<head>
<title>Image Padding</title>
<link rel="stylesheet" href="ImagePaddingThreeSides.css"></link>
</head>
<body>
<font color="green">
<h2>Image without Padding</h2>
</font>
<p>
<img src="Koala.jpg" class="noPadding">
</p>
<font color="green">
<h2>Image with Padding</h2>
</font>
<p>
<img src="Tulips.jpg" class="padding">
</p>
</body>
</html>
CSS コード:
.noPadding
{
width:400px;
height:400px;
border: 5px solid yellow;
}
.padding
{
width:400px;
height:400px;
padding: 50px 20px 50px;
border: 5px solid yellow;
}出力:
パディングを適用する前:

パディング適用後:

説明:
HTML コード:
<!DOCTYPE html> <html> <head> <title>Image Padding</title> <link rel="stylesheet" href="ImagePaddingTwoSides.css"></link> </head> <body> <font color="green"> <h2>Image without Padding</h2> </font> <p> <img src="Desert.jpg" class="noPadding"> </p> <font color="green"> <h2>Image with Padding</h2> </font> <p> <img src="Desert.jpg" class="padding"> </p> </body> </html>
CSS コード:
.noPadding
{
width:400px;
height:400px;
border: 5px solid yellow;
}
.padding
{
width:400px;
height:400px;
padding: 75px 50px;
border: 5px solid yellow;
}出力:
パディングを適用する前:

パディング適用後:

説明:
HTML Code:
<!DOCTYPE html>
<html>
<head>
<title>Image Padding</title>
<link rel="stylesheet" href="ImagePaddingSingleSides.css"></link>
</head>
<body>
<font color="green">
<h2>Image without Padding</h2>
</font>
<p>
<img src="Penguins.jpg" class="noPadding">
</p>
<font color="green">
<h2>Image with Padding</h2>
</font>
<p>
<img src="Penguins.jpg" class="padding">
</p>
</body>
</html>
CSS Code:
.noPadding
{
width:400px;
height:400px;
border: 5px solid blue;
}
.padding
{
width:400px;
height:400px;
padding: 70px;
border: 5px solid blue;
}Output:
Before applying padding:

After applying padding:

Explanation:
If we want to apply only particular side padding, then CSS provides predefined properties:
Image padding gives space around the innermost portion. We can apply with one, two, three, and four values with padding inside the img tag.
以上がHTML画像のパディングの詳細内容です。詳細については、PHP 中国語 Web サイトの他の関連記事を参照してください。