

Go でシンプルなロードバランサーを構築する

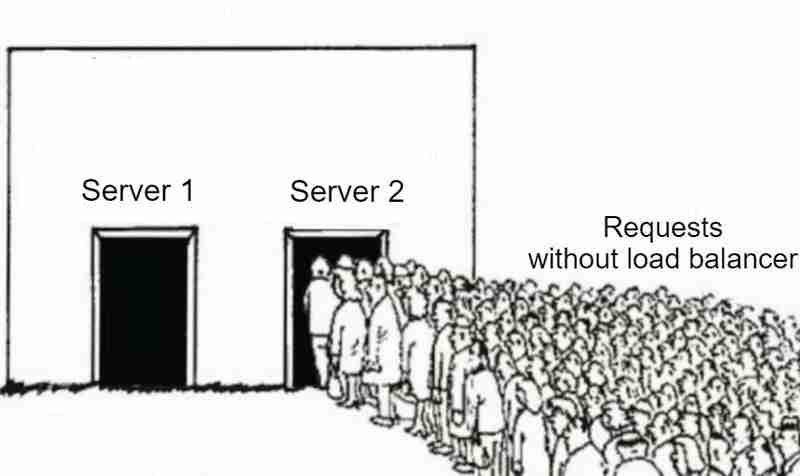
ロード バランサーは、最新のソフトウェア開発において非常に重要です。リクエストがどのように複数のサーバーに分散されるのか、またはトラフィックが多いときでも特定の Web サイトがなぜ速く感じるのか疑問に思ったことがある場合、その答えは効率的な負荷分散にあることがよくあります。
この投稿では、Go の ラウンド ロビン アルゴリズム を使用して、シンプルなアプリケーション ロード バランサーを構築します。この投稿の目的は、ロード バランサーが内部でどのように機能するかを段階的に理解することです。
ロードバランサーとは何ですか?
ロード バランサーは、受信ネットワーク トラフィックを複数のサーバーに分散するシステムです。これにより、単一のサーバーに過大な負荷がかかることがなくなり、ボトルネックが防止され、全体的なユーザー エクスペリエンスが向上します。また、負荷分散アプローチにより、1 つのサーバーに障害が発生した場合、トラフィックが別の利用可能なサーバーに自動的に再ルーティングされるため、障害の影響が軽減され、可用性が向上します。
ロードバランサーを使用する理由は何ですか?
- 高可用性: ロード バランサーはトラフィックを分散することで、1 台のサーバーに障害が発生した場合でもトラフィックを他の正常なサーバーにルーティングできるようにし、アプリケーションの回復力を高めます。
- スケーラビリティ: ロード バランサーを使用すると、トラフィックの増加に応じてサーバーを追加し、システムを水平方向に拡張できます。
- 効率: すべてのサーバーがワークロードを均等に共有することにより、リソースの使用率を最大化します。
負荷分散アルゴリズム
トラフィックを分散するには、さまざまなアルゴリズムと戦略があります:
- ラウンドロビン: 利用可能な最も単純な方法の 1 つ。リクエストは利用可能なサーバー間で順番に分散されます。最後のサーバーに到達すると、最初から再度開始されます。
- 加重ラウンドロビン: 各サーバーに固定の数値重みが割り当てられる点を除き、ラウンド ロビン アルゴリズムに似ています。この指定された重みは、トラフィックをルーティングするサーバーを決定するために使用されます。
- 最小接続: アクティブな接続が最も少ないサーバーにトラフィックをルーティングします。
- IP ハッシュ: クライアントの IP アドレスに基づいてサーバーを選択します。
この投稿では、ラウンド ロビン ロード バランサの実装に焦点を当てます。
ラウンドロビンアルゴリズムとは何ですか?
ラウンド ロビン アルゴリズムは、受信した各リクエストを次に利用可能なサーバーに循環的に送信します。サーバー A が最初のリクエストを処理する場合、サーバー B が 2 番目のリクエストを処理し、サーバー C が 3 番目のリクエストを処理します。すべてのサーバーがリクエストを受信すると、サーバー A から再度リクエストが開始されます。
それでは、コードに進んでロード バランサーを構築しましょう!
ステップ 1: ロードバランサーとサーバーを定義する
type LoadBalancer struct {
    Current int
    Mutex   sync.Mutex
}
最初に、どのサーバーが次のリクエストを処理する必要があるかを追跡するために、Current フィールドを持つ単純な LoadBalancer 構造体を定義します。 Mutex により、コードを同時に安全に使用できることが保証されます。
負荷分散する各サーバーは、サーバー構造体によって定義されます。
type Server struct {
    URL       *url.URL
    IsHealthy bool
    Mutex     sync.Mutex
}
ここで、各サーバーには URL と、サーバーがリクエストを処理できるかどうかを示す IsHealthy フラグがあります。
ステップ 2: ラウンドロビンアルゴリズム
ロード バランサの中心となるのはラウンド ロビン アルゴリズムです。仕組みは次のとおりです:
func (lb *LoadBalancer) getNextServer(servers []*Server) *Server {
    lb.Mutex.Lock()
    defer lb.Mutex.Unlock()

    for i := 0; i < len(servers); i++ {
        idx := lb.Current % len(servers)
        nextServer := servers[idx]
        lb.Current++

        nextServer.Mutex.Lock()
        isHealthy := nextServer.IsHealthy
        nextServer.Mutex.Unlock()

        if isHealthy {
            return nextServer
        }
    }

    return nil
}
- このメソッドは、サーバーのリストをラウンドロビン方式でループします。選択したサーバーが正常な場合は、そのサーバーを返して受信リクエストを処理します。
- Mutex を使用して、一度に 1 つの goroutine だけがロード バランサーの Current フィールドにアクセスして変更できるようにしています。これにより、複数のリクエストが同時に処理されるときに、ラウンド ロビン アルゴリズムが正しく動作することが保証されます。
- 各サーバーには独自のミューテックスもあります。 IsHealthy フィールドをチェックすると、サーバーの Mutex がロックされ、複数の goroutine からの同時アクセスが防止されます。
- Mutex をロックしないと、別の goroutine が値を変更する可能性があり、その結果、不正なデータや一貫性のないデータが読み取られる可能性があります。
- クリティカル セクションを可能な限り小さく保つために、Current フィールドを更新するか、IsHealthy フィールド値を読み取るとすぐに Mutex のロックを解除します。このようにして、競合状態を回避するために Mutex を使用しています。
ステップ 3: ロードバランサーの構成
設定は config.json ファイルに保存されており、このファイルにはサーバー URL とヘルスチェック間隔が含まれています (詳細については、以下のセクションで説明します)。
type Config struct {
    Port                string   `json:"port"`
    HealthCheckInterval string   `json:"healthCheckInterval"`
    Servers             []string `json:"servers"`
}
設定ファイルは次のようになります:
{
  "port": ":8080",
  "healthCheckInterval": "2s",
  "servers": [
    "http://localhost:5001",
    "http://localhost:5002",
    "http://localhost:5003",
    "http://localhost:5004",
    "http://localhost:5005"
  ]
}
Step 4: Health Checks
We want to make sure that the servers are healthy before routing any incoming traffic to them. This is done by sending periodic health checks to each server:
func healthCheck(s *Server, healthCheckInterval time.Duration) {
    for range time.Tick(healthCheckInterval) {
        res, err := http.Head(s.URL.String())
        s.Mutex.Lock()
        if err != nil || res.StatusCode != http.StatusOK {
            fmt.Printf("%s is down\n", s.URL)
            s.IsHealthy = false
        } else {
            s.IsHealthy = true
        }
        s.Mutex.Unlock()
    }
}
Every few seconds (as specified in the config), the load balancer sends a HEAD request to each server to check if it is healthy. If a server is down, the IsHealthy flag is set to false, preventing future traffic from being routed to it.
Step 5: Reverse Proxy
When the load balancer receives a request, it forwards the request to the next available server using a reverse proxy. In Golang, the httputil package provides a built-in way to handle reverse proxying, and we will use it in our code through the ReverseProxy function:
func (s *Server) ReverseProxy() *httputil.ReverseProxy {
    return httputil.NewSingleHostReverseProxy(s.URL)
}
What is a Reverse Proxy?
A reverse proxy is a server that sits between a client and one or more backend severs. It receives the client's request, forwards it to one of the backend servers, and then returns the server's response to the client. The client interacts with the proxy, unaware of which specific backend server is handling the request.
In our case, the load balancer acts as a reverse proxy, sitting in front of multiple servers and distributing incoming HTTP requests across them.
Step 6: Handling Requests
When a client makes a request to the load balancer, it selects the next available healthy server using the round robin algorithm implementation in getNextServer function and proxies the client request to that server. If no healthy server is available then we send service unavailable error to the client.
http.HandleFunc("/", func(w http.ResponseWriter, r *http.Request) {
        server := lb.getNextServer(servers)
        if server == nil {
            http.Error(w, "No healthy server available", http.StatusServiceUnavailable)
            return
        }
        w.Header().Add("X-Forwarded-Server", server.URL.String())
        server.ReverseProxy().ServeHTTP(w, r)
    })
The ReverseProxy method proxies the request to the actual server, and we also add a custom header X-Forwarded-Server for debugging purposes (though in production, we should avoid exposing internal server details like this).
Step 7: Starting the Load Balancer
Finally, we start the load balancer on the specified port:
log.Println("Starting load balancer on port", config.Port)
err = http.ListenAndServe(config.Port, nil)
if err != nil {
        log.Fatalf("Error starting load balancer: %s\n", err.Error())
}
Working Demo
TL;DR
In this post, we built a basic load balancer from scratch in Golang using a round robin algorithm. This is a simple yet effective way to distribute traffic across multiple servers and ensure that your system can handle higher loads efficiently.
There's a lot more to explore, such as adding sophisticated health checks, implementing different load balancing algorithms, or improving fault tolerance. But this basic example can be a solid foundation to build upon.
You can find the source code in this GitHub repo.
以上がGo でシンプルなロードバランサーを構築するの詳細内容です。詳細については、PHP 中国語 Web サイトの他の関連記事を参照してください。

ホットAIツール

Undresser.AI Undress
リアルなヌード写真を作成する AI 搭載アプリ

AI Clothes Remover
写真から衣服を削除するオンライン AI ツール。

Undress AI Tool
脱衣画像を無料で

Clothoff.io
AI衣類リムーバー

Video Face Swap
完全無料の AI 顔交換ツールを使用して、あらゆるビデオの顔を簡単に交換できます。

人気の記事
ホットツール

メモ帳++7.3.1
使いやすく無料のコードエディター

SublimeText3 中国語版
中国語版、とても使いやすい

ゼンドスタジオ 13.0.1
強力な PHP 統合開発環境

ドリームウィーバー CS6
ビジュアル Web 開発ツール

SublimeText3 Mac版
神レベルのコード編集ソフト(SublimeText3)
ホットトピック
 1672
1672
 14
1428
52
1332
25
1277
29
1257
24
14
1428
52
1332
25
1277
29
1257
24

 Golang vs. Python:パフォーマンスとスケーラビリティ
Apr 19, 2025 am 12:18 AM
Golang vs. Python:パフォーマンスとスケーラビリティ
Apr 19, 2025 am 12:18 AM
Golangは、パフォーマンスとスケーラビリティの点でPythonよりも優れています。 1)Golangのコンピレーションタイプの特性と効率的な並行性モデルにより、高い並行性シナリオでうまく機能します。 2)Pythonは解釈された言語として、ゆっくりと実行されますが、Cythonなどのツールを介してパフォーマンスを最適化できます。
 Golang and C:Concurrency vs. Raw Speed
Apr 21, 2025 am 12:16 AM
Golang and C:Concurrency vs. Raw Speed
Apr 21, 2025 am 12:16 AM
Golangは並行性がCよりも優れていますが、Cは生の速度ではGolangよりも優れています。 1)Golangは、GoroutineとChannelを通じて効率的な並行性を達成します。これは、多数の同時タスクの処理に適しています。 2)Cコンパイラの最適化と標準ライブラリを介して、極端な最適化を必要とするアプリケーションに適したハードウェアに近い高性能を提供します。
 ゴーを始めましょう:初心者のガイド
Apr 26, 2025 am 12:21 AM
ゴーを始めましょう:初心者のガイド
Apr 26, 2025 am 12:21 AM
goisidealforforbeginnersandsutable forcloudnetworkservicesduetoitssimplicity、andconcurrencyfeatures.1)installgofromtheofficialwebsiteandverify with'goversion'.2)
 Golang vs. C:パフォーマンスと速度の比較
Apr 21, 2025 am 12:13 AM
Golang vs. C:パフォーマンスと速度の比較
Apr 21, 2025 am 12:13 AM
Golangは迅速な発展と同時シナリオに適しており、Cは極端なパフォーマンスと低レベルの制御が必要なシナリオに適しています。 1)Golangは、ごみ収集と並行機関のメカニズムを通じてパフォーマンスを向上させ、高配列Webサービス開発に適しています。 2)Cは、手動のメモリ管理とコンパイラの最適化を通じて究極のパフォーマンスを実現し、埋め込みシステム開発に適しています。
 Golang vs. Python:重要な違いと類似点
Apr 17, 2025 am 12:15 AM
Golang vs. Python:重要な違いと類似点
Apr 17, 2025 am 12:15 AM
GolangとPythonにはそれぞれ独自の利点があります。Golangは高性能と同時プログラミングに適していますが、PythonはデータサイエンスとWeb開発に適しています。 Golangは同時性モデルと効率的なパフォーマンスで知られていますが、Pythonは簡潔な構文とリッチライブラリエコシステムで知られています。
 GolangとC:パフォーマンスのトレードオフ
Apr 17, 2025 am 12:18 AM
GolangとC:パフォーマンスのトレードオフ
Apr 17, 2025 am 12:18 AM
GolangとCのパフォーマンスの違いは、主にメモリ管理、コンピレーションの最適化、ランタイム効率に反映されています。 1)Golangのゴミ収集メカニズムは便利ですが、パフォーマンスに影響を与える可能性があります。
 パフォーマンスレース:ゴラン対c
Apr 16, 2025 am 12:07 AM
パフォーマンスレース:ゴラン対c
Apr 16, 2025 am 12:07 AM
GolangとCにはそれぞれパフォーマンス競争において独自の利点があります。1)Golangは、高い並行性と迅速な発展に適しており、2)Cはより高いパフォーマンスと微細な制御を提供します。選択は、プロジェクトの要件とチームテクノロジースタックに基づいている必要があります。
 Golang vs. Python:長所と短所
Apr 21, 2025 am 12:17 AM
Golang vs. Python:長所と短所
Apr 21, 2025 am 12:17 AM
GolangisidealforBuildingsCalables Systemsduetoitsefficiency andConcurrency、Whilepythonexcelsinquickscriptinganddataanalysisduetoitssimplicityand vastecosystem.golang'ssignencouragesclean、readisinediteNeditinesinedinediseNabletinedinedinedisedisedioncourase
