

方法: Docker を使用して Django および Postgres アプリをコンテナー化する

この記事はもともと造船所ブログに公開されたものです。
Django および PostgreSQL アプリを構築しているとき、おそらく、チェックしてもらいたいいくつかのボックスについて考えているでしょう。
- ポータブル: これをマシンまたはチームメンバー間で配布できますか?
- スケーラブル: このアプリはユーザー数、リクエスト、または一般的なワークロードの増加に対応できますか?
- クラウド ネイティブ: このアプリを開発、一時、ステージング、運用クラウド環境でホストできますか?
Docker と Docker Compose を使用すると、ローカルから運用まで、開発ライフ サイクルのあらゆる段階でアプリを準備することができます。この投稿では、Postgres データベースを使用して Django アプリの Dockerfile と Compose ファイルをカスタマイズするための基本のいくつかを説明します。
TLDR: Shipyard は、Docker および Docker Compose で構築および実行するように設定された Django / Postgres スターター アプリケーションを保守しています。ここでフォークします。プロジェクト テンプレートとして、または既存のアプリの参照として使用できます。
ジャンゴとは何ですか?
Django は、オープンソースの Python ベースの Web フレームワークです。主に Web アプリのバックエンドとして使用されます。 Django は「バッテリー付属」の理念に従っており、ルーティング サポート、ログイン フレームワーク、Web サーバー、データベース ツールなどが完備されています。 Django は Flask と比較されることが多く、ほぼすべての面でより有利な点を示しています。
あなたは毎日 Django アプリを使用しています。 Spotify、Doordash、Instagram、Eventbrite、Pinterest のスタックには Django が含まれています。これは、Django がいかに拡張可能でスケーラブルであるかを雄弁に物語っています。
Django アプリを Docker 化する利点
Docker コンテナーを使用して Django アプリを実行すると、いくつかの新しいユースケースが可能になります。これは、ローカル開発ワークフローの改善であり、セットアップをよりクリーンかつ簡単にします。
プロジェクトをクラウドホストしたい場合は、通常、プロジェクトをコンテナ化する必要があります。 Docker コンテナの優れた点は、ローカルから本番まで、開発のあらゆる段階で使用できることです。また、Docker イメージを配布して、インストールやビルドを行わずに他の人が即座に実行できるようにすることもできます。
少なくとも、プロジェクトに Dockerfile を含める場合、毎回、すべてのシステムで同じようにビルドして実行することができます。
Python パッケージマネージャーの選択
私たちの Python アプリには、依存関係を追跡、バージョン管理、インストールするためのパッケージ マネージャーが必要です。これは、依存関係の初期化/更新を個別に実行するのではなく管理し、マシン間でパッケージのバージョンを保持するのに役立ちます。
Pip と Poetry はどちらも Python の人気のある依存関係マネージャーですが、他にもかなりの数の依存関係マネージャー (uv、Conda、Rye など) が出回っています。
Pip は信じられないほど単純です。ユーザーは、requirements.txt ファイル内のパッケージをそれぞれのバージョンとともにリストし、pip install を実行してセットアップできます。ユーザーは pip フリーズ > を実行することで、既存の依存関係とそのバージョンをキャプチャできます。プロジェクトのルートにあるrequirements.txt。
Poetry は、あらゆる規模のアプリに対応する高機能なパッケージ マネージャーですが、Pip よりも設定が若干簡単ではありません (テーブル、メタデータ、スクリプトを含む TOML ファイルを使用します)。 Poetry はまた、ロックファイル (poetry.lock) を使用して、現在のバージョンでの依存関係 (およびバージョンごとの 依存関係) を「ロック」します。こうすることで、プロジェクトが特定の時点で特定のマシン上で動作する場合、その状態が保存されます。詩の初期化を実行すると、pyproject.toml ファイルを生成するための一連のオプションがユーザーに求められます。
Django アプリ用の Dockerfile を作成する
Django アプリを Dockerize するには、従来の Dockerfile 構造 (ベース イメージの設定、作業ディレクトリの設定など) に従い、その後、README に記載されているプロジェクト固有のインストール手順に従ってそれを変更します。
ベース画像の選択
この Dockerfile のベースとして機能する軽量の Python イメージを選択できます。タグごとにバージョンを参照するには、Docker Hub の Python ページをチェックしてください。ここでは画像を小さく保つために Alpine を選択しました:
FROM python:3.8.8-alpine3.13
作業ディレクトリの設定
ここでは、Docker コンテナ内の作業ディレクトリを定義します。後で説明するすべてのパスはこれに対する相対パスになります。
WORKDIR /srv
システム依存関係のインストール
Poetry を構成する前に追加する必要があるライブラリがいくつかあります:
RUN apk add --update --no-cache \
  gcc \
  libc-dev \
  libffi-dev \
  openssl-dev \
  bash \
  git \
  libtool \
  m4 \
  g++ \
  autoconf \
  automake \
  build-base \
  postgresql-dev
詩のインストール
次に、最新バージョンの Pip を使用していることを確認し、それを使用してコンテナ内に Poetry をインストールします。
RUN pip install --upgrade pip
RUN pip install poetry
Installing our project’s dependencies
This app’s dependencies are defined in our pyproject.toml and poetry.lock files. Let’s bring them over to the container’s working directory, and then install from their declarations:
ADD pyproject.toml poetry.lock ./
RUN poetry install
Adding and installing the project itself
Now, we’ll copy over the rest of the project, and install the Django project itself within the container:
ADD src ./src
RUN poetry install
Executing the start command
Finally, we’ll run our project’s start command. In this particular app, it’ll be the command that uses Poetry to start the Django development server:
CMD ["poetry", "run", "python", "src/manage.py", "runserver", "0:8080"]
The complete Dockerfile
When we combine the snippets from above, we’ll get this Dockerfile:
FROM python:3.8.8-alpine3.13

WORKDIR /srv

RUN apk add --update --no-cache \
  gcc \
  libc-dev \
  libffi-dev \
  openssl-dev \
  bash \
  git \
  libtool \
  m4 \
  g++ \
  autoconf \
  automake \
  build-base \
  postgresql-dev

RUN pip install --upgrade pip
RUN pip install poetry

ADD pyproject.toml poetry.lock ./
RUN poetry install

ADD src ./src
RUN poetry install

CMD ["poetry", "run", "python", "src/manage.py", "runserver", "0:8080"]
Writing a Docker Compose service definition for Django
We’re going to split this app into two services: django and postgres. Our django service will be built from our Dockerfile, containing all of our app’s local files.
Setting the build context
For this app, we want to build the django service from our single Dockerfile and use the entire root directory as our build context path. We can set our build label accordingly:
django:
  build: .
Setting host and container ports
We can map port 8080 on our host machine to 8080 within the container. This will also be the port we use to access our Django app — which will soon be live at http://localhost:8080.
ports:
  - '8080:8080'
Adding a service dependency
Since our Django app is connecting to a database, we want to instruct Compose to spin up our database container (postgres) first. We’ll use the depends_on label to make sure that service is ready and running before our django service starts:
depends_on:
  - postgres
Creating a bind mount
Since we’ll be sharing files between our host and this container, we can define a bind mount by using the volumes label. To set the volume, we’ll provide a local path, followed by a colon, followed by a path within the container. The ro flag gives the container read-only permissions for these files:
volumes:
  - './src:/srv/src:ro'
The end result
Combining all the options/configurations from above, our django service should look like this:
django:
  build: .
  ports:
    - '8080:8080'
  depends_on:
    - postgres
  volumes:
    - './src:/srv/src:ro'
Adding a PostgreSQL database
Our Django app is configured to connect to a PostgreSQL database. This is defined in our settings.py:
DATABASES = {
    'default': {
        'ENGINE': 'django.db.backends.postgresql',
        'NAME': 'app',
        'USER': 'obscure-user',
        'PASSWORD': 'obscure-password',
        'HOST': 'postgres',
        'PORT': 5432,
    }
}
Pulling the Postgres image
We can migrate our existing database to its own Docker container to isolate it from the base Django app. First, let’s define a postgres service in our Compose file and pull the latest lightweight Postgres image from Docker Hub:
postgres:
  image: 'postgres:14.13-alpine3.20'
Passing in env vars
To configure our PostgreSQL database, we can pass in a few environment variables to set credentials and paths. You may want to consider using a Secrets Manager for this.
environment:
  - POSTGRES_DB=app
  - POSTGRES_USER=obscure-user
  - POSTGRES_PASSWORD=obscure-password
  - PGDATA=/var/lib/postgresql/data/pgdata
Setting host and container ports
We can expose our container port by setting it to the default Postgres port: 5432. For this service, we’re only specifying a single port, which means that the host port will be randomized. This avoids collisions if you’re running multiple Postgres instances.
ports:
  - '5432'
Adding a named data volume
In our postgres definition, we can add a named volume. This is different from the bind mount that we created for the django service. This will persist our data after the Postgres container spins down.
volumes:
  - 'postgres:/var/lib/postgresql/data'
Outside of the service definitions and at the bottom of the Compose file, we’ll declare the named postgres volume again. By doing so, we can reference it from our other services if needed.
volumes:
  postgres:
Putting it all together
And here’s the resulting PostgreSQL definition in our Compose file:
  postgres:
    image: 'postgres:14.13-alpine3.20'
    environment:
      - POSTGRES_DB=app
      - POSTGRES_USER=obscure-user
      - POSTGRES_PASSWORD=obscure-password
      - PGDATA=/var/lib/postgresql/data/pgdata
    ports:
      - '5432'
    volumes:
      - 'postgres:/var/lib/postgresql/data'

volumes:
  postgres:
Deploying our app in a Shipyard ephemeral environment
We can get our app production-ready by deploying it in a Shipyard application — this means we’ll get an ephemeral environment for our base branch, as well as environments for every PR we open.

Adding Docker Compose labels
Shipyard transpiles Compose files to Kubernetes manifests, so we’ll add some labels to make it Kubernetes-compatible.
Under our django service, we can add two custom Shipyard labels:
labels:
  shipyard.init: 'poetry run python src/manage.py migrate'
  shipyard.route: '/'
- The shipyard.init label will run a database migration before our django service starts
- The shipyard.route label will send HTTP requests to this service’s port
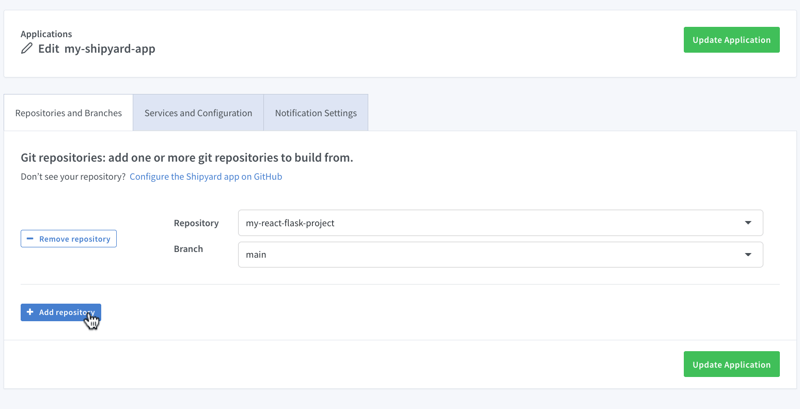
Creating a Shipyard app
Next, you can go to your Shipyard dashboard. If you haven’t already, sign up for a 30-day free trial.
Click the + Application button, then select your repo, services, and import your env vars.
Visiting the app
Once it finishes building, you can click the green Visit button to access your short-lived ephemeral environment. What comes next?
- View your app’s build, deploy, and run logs
- Use our GitHub Action or CircleCI orb to integrate with your CI/CD
- Add SSO visitors to your app
- Create a PR to see your code changes in a new environment
And that’s all!
Now you have a fully containerized Django app with a database! You can run it locally with Docker Compose, preview and test it in an ephemeral environment, and iterate until it’s production-ready.
Want to Dockerize a Yarn app next? Check out our guide!
以上が方法: Docker を使用して Django および Postgres アプリをコンテナー化するの詳細内容です。詳細については、PHP 中国語 Web サイトの他の関連記事を参照してください。

ホットAIツール

Undresser.AI Undress
リアルなヌード写真を作成する AI 搭載アプリ

AI Clothes Remover
写真から衣服を削除するオンライン AI ツール。

Undress AI Tool
脱衣画像を無料で

Clothoff.io
AI衣類リムーバー

Video Face Swap
完全無料の AI 顔交換ツールを使用して、あらゆるビデオの顔を簡単に交換できます。

人気の記事
ホットツール

メモ帳++7.3.1
使いやすく無料のコードエディター

SublimeText3 中国語版
中国語版、とても使いやすい

ゼンドスタジオ 13.0.1
強力な PHP 統合開発環境

ドリームウィーバー CS6
ビジュアル Web 開発ツール

SublimeText3 Mac版
神レベルのコード編集ソフト(SublimeText3)
ホットトピック
 1675
1675
 14
1429
52
1333
25
1278
29
1257
24
14
1429
52
1333
25
1278
29
1257
24

 Python vs. C:曲線と使いやすさの学習
Apr 19, 2025 am 12:20 AM
Python vs. C:曲線と使いやすさの学習
Apr 19, 2025 am 12:20 AM
Pythonは学習と使用が簡単ですが、Cはより強力ですが複雑です。 1。Python構文は簡潔で初心者に適しています。動的なタイピングと自動メモリ管理により、使いやすくなりますが、ランタイムエラーを引き起こす可能性があります。 2.Cは、高性能アプリケーションに適した低レベルの制御と高度な機能を提供しますが、学習しきい値が高く、手動メモリとタイプの安全管理が必要です。
 Pythonの学習:2時間の毎日の研究で十分ですか?
Apr 18, 2025 am 12:22 AM
Pythonの学習:2時間の毎日の研究で十分ですか?
Apr 18, 2025 am 12:22 AM
Pythonを1日2時間学ぶだけで十分ですか?それはあなたの目標と学習方法に依存します。 1)明確な学習計画を策定し、2)適切な学習リソースと方法を選択します。3)実践的な実践とレビューとレビューと統合を練習および統合し、統合すると、この期間中にPythonの基本的な知識と高度な機能を徐々に習得できます。
 Python vs. C:パフォーマンスと効率の探索
Apr 18, 2025 am 12:20 AM
Python vs. C:パフォーマンスと効率の探索
Apr 18, 2025 am 12:20 AM
Pythonは開発効率でCよりも優れていますが、Cは実行パフォーマンスが高くなっています。 1。Pythonの簡潔な構文とリッチライブラリは、開発効率を向上させます。 2.Cのコンピレーションタイプの特性とハードウェア制御により、実行パフォーマンスが向上します。選択を行うときは、プロジェクトのニーズに基づいて開発速度と実行効率を比較検討する必要があります。
 Python vs. C:重要な違いを理解します
Apr 21, 2025 am 12:18 AM
Python vs. C:重要な違いを理解します
Apr 21, 2025 am 12:18 AM
PythonとCにはそれぞれ独自の利点があり、選択はプロジェクトの要件に基づいている必要があります。 1)Pythonは、簡潔な構文と動的タイピングのため、迅速な開発とデータ処理に適しています。 2)Cは、静的なタイピングと手動メモリ管理により、高性能およびシステムプログラミングに適しています。
 Python Standard Libraryの一部はどれですか:リストまたは配列はどれですか?
Apr 27, 2025 am 12:03 AM
Python Standard Libraryの一部はどれですか:リストまたは配列はどれですか?
Apr 27, 2025 am 12:03 AM
PythonListSarePartOfThestAndardarenot.liestareBuilting-in、versatile、forStoringCollectionsのpythonlistarepart。
 Python:自動化、スクリプト、およびタスク管理
Apr 16, 2025 am 12:14 AM
Python:自動化、スクリプト、およびタスク管理
Apr 16, 2025 am 12:14 AM
Pythonは、自動化、スクリプト、およびタスク管理に優れています。 1)自動化:OSやShutilなどの標準ライブラリを介してファイルバックアップが実現されます。 2)スクリプトの書き込み:Psutilライブラリを使用してシステムリソースを監視します。 3)タスク管理:スケジュールライブラリを使用してタスクをスケジュールします。 Pythonの使いやすさと豊富なライブラリサポートにより、これらの分野で優先ツールになります。
 科学コンピューティングのためのPython:詳細な外観
Apr 19, 2025 am 12:15 AM
科学コンピューティングのためのPython:詳細な外観
Apr 19, 2025 am 12:15 AM
科学コンピューティングにおけるPythonのアプリケーションには、データ分析、機械学習、数値シミュレーション、視覚化が含まれます。 1.numpyは、効率的な多次元配列と数学的関数を提供します。 2。ScipyはNumpy機能を拡張し、最適化と線形代数ツールを提供します。 3. Pandasは、データ処理と分析に使用されます。 4.matplotlibは、さまざまなグラフと視覚的な結果を生成するために使用されます。
 Web開発用のPython:主要なアプリケーション
Apr 18, 2025 am 12:20 AM
Web開発用のPython:主要なアプリケーション
Apr 18, 2025 am 12:20 AM
Web開発におけるPythonの主要なアプリケーションには、DjangoおよびFlaskフレームワークの使用、API開発、データ分析と視覚化、機械学習とAI、およびパフォーマンスの最適化が含まれます。 1。DjangoandFlask Framework:Djangoは、複雑な用途の迅速な発展に適しており、Flaskは小規模または高度にカスタマイズされたプロジェクトに適しています。 2。API開発:フラスコまたはdjangorestFrameworkを使用して、Restfulapiを構築します。 3。データ分析と視覚化:Pythonを使用してデータを処理し、Webインターフェイスを介して表示します。 4。機械学習とAI:Pythonは、インテリジェントWebアプリケーションを構築するために使用されます。 5。パフォーマンスの最適化:非同期プログラミング、キャッシュ、コードを通じて最適化
