

GitHub Copilot のようなコード補完ツールの構築が複雑だと思ったことはありますか?驚いたことに、思っているほど難しくありません!
エンジニアとして、私はコード補完ツールが内部でどのように機能するかに常に興味を持ってきました。そこで、プロセスをリバース エンジニアリングして、自分で構築できるかどうかを確認しました。
これは私が自分で構築して公開したものです - LLM-Autocompleter
ソフトウェア開発では AI 支援ツールが標準になりつつあり、独自のコード補完ツールを作成することは、言語サーバー プロトコル (LSP)、API、OpenAI の GPT などの高度なモデルとの統合について学ぶのに最適な方法です。さらに、これは非常にやりがいのあるプロジェクトです。
コード補完ツールは基本的に、言語サーバー プロトコル (LSP) サーバーと VS Code などのプラットフォームのインライン コード補完メカニズムを組み合わせたものです。このチュートリアルでは、VS Code のインライン補完 API を活用し、独自の LSP サーバーを構築します。
本題に入る前に、LSP サーバーとは何かを理解しましょう。
LSP サーバーは、言語固有の機能をテキスト エディターまたは統合開発環境 (IDE) に提供するバックエンド サービスです。エディター (クライアント) と言語固有のツールの間のブリッジとして機能し、次のような機能を提供します。
コード補完 (入力時にコードのスニペットを提案)、
定義へ移動 (シンボルが定義されているコードの部分に移動)、
エラーチェック (リアルタイムで構文エラーを強調表示)。
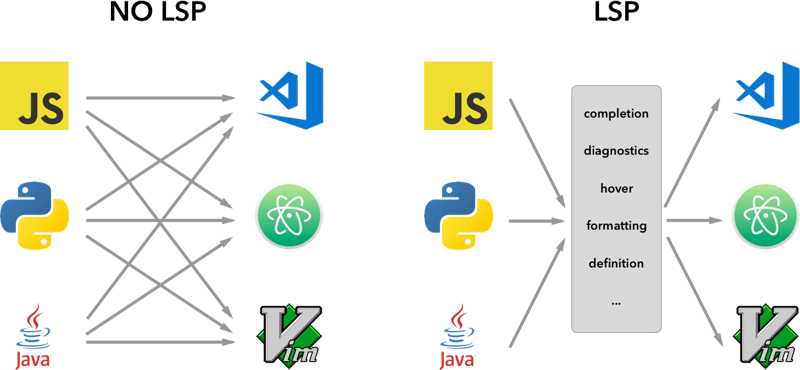
言語サーバー プロトコル (LSP) の背後にある考え方は、サーバーと開発ツールが通信する方法のプロトコルを標準化することです。このようにして、単一の言語サーバーを複数の開発ツールで再利用でき、LSP は単なるプロトコルです。
これらのサーバーが LSP を通じてエディターと通信する方法を標準化することで、開発者は、VS Code、Sublime Text、さらには Vim などのさまざまなプラットフォーム間でシームレスに動作する言語固有の機能を作成できます。
LSP の基本を理解したところで、独自のコード補完ツールを段階的に構築してみましょう。
まず、VS Code が提供するサンプルのインライン補完拡張機能を使用します。 GitHub から直接クローンを作成できます:
vscode-sample-inlinecompletion
それでは、lsp サーバーをセットアップしてみましょう。以下の構造に従うことができます
.
├── client // Language Client
│   ├── src
│   │   ├── test // End to End tests for Language Client / Server
│   │   └── extension.ts // Language Client entry point
├── package.json // The extension manifest.
└── server // Language Server
    └── src
        └── server.ts // Language Server entry point
詳細については、lsp-sample
も参照してください。私はあなたに少しのコードを与えるつもりですが、あなたは物事をつなぎ合わせなければなりません、私はあなたたちに学んでほしいと思います。下の画像は、これから構築するものを示しています。
client/src/extension.ts に移動し、activate 関数からすべてを削除しましょう
export function activate(context: ExtensionContext) {
}
セットアップを始めましょう
拡張子.ts
export function activate(context: ExtensionContext) {
    const serverModule = context.asAbsolutePath(
        path.join("server", "out", "server.js")
    );

    const debugOptions = { execArgv: ['--nolazy', '--
 inspect=6009'] };

  // communication with the server using Stdio
    const serverOptions: ServerOptions = {
        run: {
            module: serverModule,
            transport: TransportKind.stdio,
        },
        debug: {
            module: serverModule,
            transport: TransportKind.stdio,
            options: debugOptions
        }
    };

        const clientOptions: LanguageClientOptions = {
        documentSelector: [{ scheme: 'file' }],
        initializationOptions: serverConfiguration
    };


     client = new LanguageClient(
        'LSP Server Name',
        serverOptions,
        clientOptions
    );

  client.start();
}
ちょっとした情報
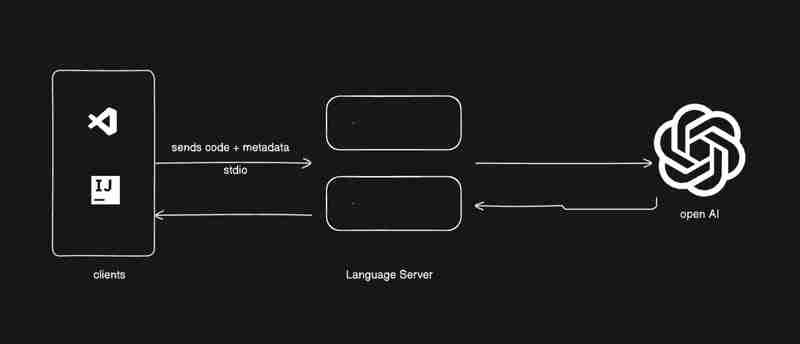
サーバーとクライアント間の通信に従うことができるさまざまなタイプのプロトコルがあります。
を参照してください。
詳細については、microsoft-lsp-docs
なぜ標準デジタルなのですか? Stdio は、クライアントとサーバー間で最も広くサポートされている通信プロトコルの 1 つです。これにより、私たちが構築している LSP サーバーが VS Code だけでなく、Vim や Sublime Text などの他のエディターでも動作することが可能になります。
server.ts
const methodStore: Record<string, any> = {
  exit,
  initialize,
  shutdown,
};

process.stdin.on("data", async (bufferChuck) => {
    buffer += bufferChuck;

    while (true) {
        try {
            // Check for the Content-Length line
            const lengthMatch = buffer.match(/Content-Length: (\d+)\r\n/);
            if (!lengthMatch) break;

            const contentLength = parseInt(lengthMatch[1], 10);
            const messageStart = buffer.indexOf("\r\n\r\n") + 4;

            // Continue unless the full message is in the buffer
            if (buffer.length < messageStart + contentLength) break;

            const rawMessage = buffer.slice(messageStart, messageStart + contentLength);
            const message = JSON.parse(rawMessage);


            const method = methodStore[message.method];

            if (method) {
                const result = await method(message);

                if (result !== undefined) {
                    respond(message.id, result);
                }
            }
            buffer = buffer.slice(messageStart + contentLength);
        } catch (error: any) {

            const errorMessage = {
                jsonrpc: "2.0",
                method: "window/showMessage",
                params: {
                    type: 1, // Error type
                    message: `Error processing request: ${error.message}`
                }
            };

            const errorNotification = JSON.stringify(errorMessage);
            const errorNotificationLength = Buffer.byteLength(errorNotification, "utf-8");
            const errorHeader = `Content-Length: ${errorNotificationLength}\r\n\r\n`;

            process.stdout.write(errorHeader + errorNotification);
        }
    }
});
.ts を初期化する
export const initialize = (message: RequestMessage): InitializeResult => {

    return {
        capabilities: {
            completionProvider: {
                resolveProvider: true
            },
            textDocumentSync: TextDocumentSyncKind.Incremental,
            codeActionProvider: {
                resolveProvider: true
            }
        },
        serverInfo: {
            name: "LSP-Server",
            version: "1.0.0",
        },
    };
};
exit.ts
export const exit = () => {
    process.exit(0);
  };
シャットダウン.ts
export const shutdown = () => {
    return null;
  };
基本機能を完了したら、キーボードの F5 キーを使用して vscode をデバッグ モードで実行するか、デバッグ ガイドに従うことができます
次に、インラインプロバイダーの追加から始めて、それに応じてリクエストとレスポンスを取得しましょう
新しいメソッドをメソッドストアに追加しましょう
server.ts
const methodStore: Record<string, any> = {
  exit,
  initialize,
  shutdown,
  "textDocument/generation": generation
};
世代.ts
export const generation = async (message: any) => {
    if(!message && message !== undefined) return {};

    const text = message.params.textDocument.text as string;

    if(!text) return {};

        const cursorText = getNewCursorText(text, message.params.position.line, message.params.position.character);

  const response = await getResponseFromOpenAI(cursorText, message.params.fsPath);

 return {
    generatedText: response,
  }

}

function getNewCursorText(text: string, line: number, character: number): string {
    const lines = text.split('\n');
    if (line < 0 || line >= lines.length) return text;

    const targetLine = lines[line];
    if (character < 0 || character > targetLine.length) return text;

    lines[line] = targetLine.slice(0, character) + '<CURSOR>' + targetLine.slice(character);
    return lines.join('\n');
}


const getResponseFromOpenAI = async (text: string, fsPath: stiring): Promise<string> => {
     const message = {
          "role": "user",
          "content": text
    };

   const systemMetaData: Paramaters = {
    max_token: 128,
    max_context: 1024,
    messages: [],
    fsPath: fsPath
   }

   const messages = [systemPrompt(systemMetaData), message]

   const chatCompletion: OpenAI.Chat.ChatCompletion | undefined = await this.open_ai_client?.chat.completions.create({
            messages: messages,
            model: "gpt-3.5-turbo",
            max_tokens: systemMetaData?.max_tokens ?? 128,
        });


        if (!chatCompletion) return "";

        const generatedResponse = chatCompletion.choices[0].message.content;

        if (!generatedResponse) return "";

        return generatedResponse;
}
template.ts
interface Parameters {
    max_tokens: number;
    max_context: number;
    messages: any[];
    fsPath: string;
}

 export const systemPrompt = (paramaters: Parameters | null) => {
    return {
        "role": "system",
        "content": `
        Instructions:
            - You are an AI programming assistant.
            - Given a piece of code with the cursor location marked by <CURSOR>, replace <CURSOR> with the correct code.
            - First, think step-by-step.
            - Describe your plan for what to build in pseudocode, written out in great detail.
            - Then output the code replacing the <CURSOR>.
            - Ensure that your completion fits within the language context of the provided code snippet.
            - Ensure, completion is what ever is needed, dont write beyond 1 or 2 line, unless the <CURSOR> is on start of a function, class or any control statment(if, switch, for, while).

            Rules:
            - Only respond with code.
            - Only replace <CURSOR>; do not include any previously written code.
            - Never include <CURSOR> in your response.
            - Handle ambiguous cases by providing the most contextually appropriate completion.
            - Be consistent with your responses.
            - You should only generate code in the language specified in the META_DATA.
            - Never mix text with code.
            - your code should have appropriate spacing.

            META_DATA:
            ${paramaters?.fsPath}`
    };
};
インラインプロバイダーを登録しましょう
拡張子.ts
import {languages} from "vscode";


function getConfiguration(configName: string) {
    if(Object.keys(workspace.getConfiguration(EXTENSION_ID).get(configName)).length > 0){
        return workspace.getConfiguration(EXTENSION_ID).get(configName);
    }
    return null;
}

const inLineCompletionConfig = getConfiguration("inlineCompletionConfiguration");

export function activate(context: ExtensionContext) {
 // OTHER CODE

  languages.registerInlineCompletionItemProvider(
        { pattern: "**" },
        {
            provideInlineCompletionItems: (document: TextDocument, position: Position) => {
                const mode = inLineCompletionConfig["mode"] || 'slow';
                return provideInlineCompletionItems(document, position, mode);
            },
        }

    );

}


let lastInlineCompletion = Date.now();
let lastPosition: Position | null = null;
let inlineCompletionRequestCounter = 0;

const provideInlineCompletionItems = async (document: TextDocument, position: Position, mode: 'fast' | 'slow') => {
    const params = {
        textDocument: {
            uri: document.uri.toString(),
            text: document.getText(),
        },
        position: position,
        fsPath: document.uri.fsPath.toString()
    };

    inlineCompletionRequestCounter += 1;
    const localInCompletionRequestCounter = inlineCompletionRequestCounter;
    const timeSinceLastCompletion = (Date.now() - lastInlineCompletion) / 1000;
    const minInterval = mode === 'fast' ? 0 : 1 / inLineCompletionConfig["maxCompletionsPerSecond"];

    if (timeSinceLastCompletion < minInterval) {
        await new Promise(r => setTimeout(r, (minInterval - timeSinceLastCompletion) * 1000));
    }

    if (inlineCompletionRequestCounter === localInCompletionRequestCounter) {
        lastInlineCompletion = Date.now();

        let cancelRequest = CancellationToken.None;
        if (lastPosition && position.isAfter(lastPosition)) {
            cancelRequest = CancellationToken.Cancelled;
        }
        lastPosition = position;

        try {
            const result = await client.sendRequest("textDocument/generation", params, cancelRequest);


            const snippetCode = new SnippetString(result["generatedText"]);
            return [new InlineCompletionItem(snippetCode)];
        } catch (error) {
            console.error("Error during inline completion request", error);
            client.sendNotification("window/showMessage", {
                type: 1, // Error type
                message: "An error occurred during inline completion: " + error.message
            });
            return [];
        }
    } else {
        return [];
    }
};
このブログは、独自のコード補完ツールを構築するために必要な基盤を提供しますが、旅はここで終わりません。このコードを実験、研究、改善し、LSP と AI のさまざまな機能を調べてツールをニーズに合わせて調整することをお勧めします。
これを実装しようとしている人には、学び、研究し、物事をつなぎ合わせてほしいと思います。
LSP サーバーについて: LSP サーバーとは何か、LSP サーバーが言語固有のツールをどのように強化するのか、また、エディタ間サポートに LSP サーバーが重要である理由を学びました。
VS Code 拡張機能の構築: API を使用してコード補完を VS Code に統合する方法を学習しました。
AI 主導のコード補完: OpenAI の GPT モデルに接続することで、機械学習がインテリジェントな提案によって開発者の生産性をどのように向上できるかがわかりました。
ここまで来たら、あなたが何を学んだのか知りたいです。
今日私のブログから何か新しいことを学んだ場合は、「いいね!」を押してください。
私とつながりましょう - リンクイン
以上が独自の GitHub コパイロットの構築: コード補完ツールのステップバイステップ ガイドの詳細内容です。詳細については、PHP 中国語 Web サイトの他の関連記事を参照してください。


![[Web フロントエンド] Node.js クイック スタート](https://img.php.cn/upload/course/000/000/067/662b5d34ba7c0227.png)


