

データ構造とアルゴリズムのリンク リスト

第一天
基本資料結構
我們不會僅以傳統的方式學習鍊錶;我們還將探討 Node 和 LinkedList 類別是什麼,以及可以對它們執行的所有操作。
什麼是鍊錶?
鍊錶是稱為節點的元素的集合,其中每個節點包含一個資料元素和對序列中下一個節點的引用(或連結)。
鍊錶是一種線性資料結構,其中元素儲存在節點中。每個節點包含兩個部分:
與陣列不同,*鍊錶不會將元素儲存在連續的記憶體位置。
* 相反,每個節點都指向下一個節點,允許動態記憶體使用以及輕鬆插入或刪除元素。
鍊錶的關鍵點
1。節點結構: 鍊錶由節點組成,每個節點包含一個值和下一個節點的參考。探索節點的結構和屬性有助於理解鍊錶如何組織和儲存資料。
2. 頭與尾:鍊錶中的第一個節點稱為頭,最後一個節點稱為尾。了解頭節點和尾節點的特徵和功能對於高效遍歷和操作鍊錶至關重要。
主要特點:
動態尺寸:它可以根據需要增加或縮小。
順序存取:存取元素需要從第一個節點(頭)開始遍歷。
鍊錶的類型:
鍊錶有三種基本形式
1.單鍊錶。
2.雙向鍊錶。
3.循環鍊錶。
在本文中,我們將探索單鍊錶。
單鍊錶。
每個節點都有下一個節點的引用。
- 每個節點包含:
- 資料(您要儲存的值)。
- 下一個指針,指向序列中的下一個節點。
- 最後一個節點的 next 指標為空,因為它後面沒有節點。
現實生活中的類比:箭 – 一旦射出箭,它就只能向前移動。
箭一旦射出,就會直線飛行,無法返回。
同樣,在單鍊錶中,一旦從一個節點移動到下一個節點,就無法返回,只能繼續前進。
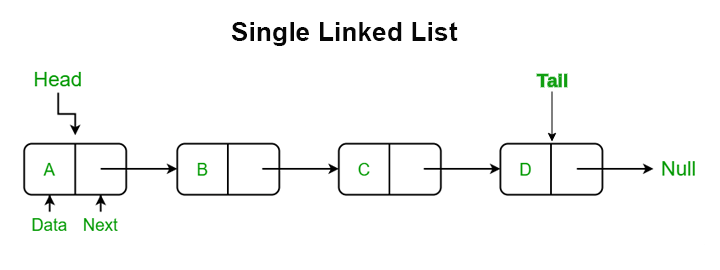
[Data | Next] -> [Data | Next] -> [Data | Next] -> null
單鍊錶上的操作
- 穿越
- 搜尋
- 長度
- 插入:
- 插入開頭
- 插入最後
- 插入到特定位置
- 刪除:
- 從頭開始刪除
- 從末尾刪除
- 刪除特定節點
插入:
插入到開頭
讓我們建立一個 Node 類別
class Node {
  constructor(data) {
    this.data = data;
    this.next = null;
  }
}
讓我們分解 Node 類別。
**Node 類別表示鍊錶中的每個單獨元素。每個節點包含兩個屬性:
特性:
- 資料: 它保存儲存在節點中的值(例如數字、字串或物件)。
- 下一個: 它保存指向鍊錶中下一個節點的引用(或指標)。最初,它被設定為 null,因為在建立節點時,它尚未連結到任何其他節點。
分解:
建構子(建構子(資料)):
這是 JavaScript 類別中的一個特殊方法,在建立 Node 類別的新實例時呼叫。
data參數是建立新節點時傳入的,它儲存的是節點的實際值。
this.next = null;最初將 next 屬性設為 null,因為在建立節點時,它尚未連接到任何其他節點。
範例:
let node1 = new Node(10); // Create a node with the value 10
console.log(node1.data);  // Output: 10
console.log(node1.next);  // Output: null (because it's not linked to any other node yet)
讓我們建立一個 SingleLinkList 類別
class SinglyLinkedList {
  constructor() {
    this.head = null; // Initially, the list is empty, so the head is null.
    this.size = 0; // The size is initially 0, as there are no nodes in the list.
  }

  // Insert at the beginning
  insertAtBeginning(data) {
    let newNode = new Node(data); // Create a new node with the given data
    newNode.next = this.head; // The new node's next points to the current head
    this.head = newNode; // Update the head to be the new node
    this.size++; // Increment the size of the list
  }
}
SinglyLinkedList 類別代表整個鍊錶結構。它管理多個 Node 對象,並提供了處理清單的方法,例如插入、刪除、遍歷節點等等。
特性:
- Head: 這是對鍊錶的第一個節點(或「頭」)的引用。最初,它被設定為 null,這意味著列表為空。
- 大小: 這會追蹤鍊錶中目前有多少個節點。最初,它設定為 0,因為列表為空。
分解:
建構子(constructor()):
this.head = null;: This initializes the linked list with no elements, so the head points to null.
this.size = 0;: The size starts as 0 because there are no nodes in the list.
insertAtBeginning(data): for the sake of simplicity, later on, we will Deep Dive into the insertAtBeginning(data) method
let newNode = new Node(data);: This creates a new node with the value passed in as data.
newNode.next = this.head;: This links the new node to the current head (which could be nullif the list is empty or point to an existing node if the list has elements).
this.head = newNode;: This updates the head of the list to point to the new node, making it the first node in the list.
this.size++;: The size of the linked list is increased by 1 as a new node has been added.
let's Test
let list = new SinglyLinkedList();
list.insertAtBeginning(10); // List becomes: 10
list.insertAtBeginning(20); // List becomes: 20 -> 10
console.log(list.head.data); // Output: 20 (since the head is now the first node with value 20)
console.log(list.size);      // Output: 2 (since there are two nodes in the list)
Linked List deep dive Line by Line.
let's jump into the insertAtBeginning(data) method .
class Node {
  constructor(data) {
    this.data = data;   // Store the data value (like 10, 20, etc.)
    this.next = null;   // Initialize the next pointer as null
  }
}

class SinglyLinkedList {
  constructor() {
    this.head = null;   // Initially, the list is empty, so the head is null
    this.size = 0;      // The size of the list starts at 0
  }

  // Insert at the beginning of the list
  insertAtBeginning(data) {
    // Step 1: Create a new node with the given data
    let newNode = new Node(data);

    // Explanation:
    // First time: If we insert 10, the newNode looks like this -> Node { data: 10, next: null }
    // Second time: If we insert 20, the newNode looks like this -> Node { data: 20, next: null }

    // Step 2: Point the new node's next property to the current head of the list
    newNode.next = this.head;

    // Explanation:
    // First time: Since the list is empty (this.head is null), newNode's next is set to null.
    // Second time: this.head is now the node with data 10, so newNode’s next will point to the node with data 10.
    // So it looks like this: Node { data: 20, next: Node { data: 10, next: null } }

    // Step 3: Make the new node the new head of the list
    this.head = newNode;

    // Explanation:
    // First time: Now, the new node becomes the head. The list looks like this: Node { data: 10, next: null }.
    // Second time: The new node (with data 20) becomes the head, and it points to the previous head (which is the node with data 10).

    // Step 4: Increment the size of the list
    this.size++;

    // Explanation:
    // First time: The size is now 1 because there is one node (data 10).
    // Second time: The size becomes 2 because we added another node (data 20).
  }
}

// Example Usage:
let list = new SinglyLinkedList();
list.insertAtBeginning(10);  // First insertion: the list becomes [10]
list.insertAtBeginning(20);  // Second insertion: the list becomes [20 -> 10]

console.log(list);

// Output:
// SinglyLinkedList {
//   head: Node { data: 20, next: Node { data: 10, next: null } },
//   size: 2
// }
Coming soon...
以上がデータ構造とアルゴリズムのリンク リストの詳細内容です。詳細については、PHP 中国語 Web サイトの他の関連記事を参照してください。

ホットAIツール

Undresser.AI Undress
リアルなヌード写真を作成する AI 搭載アプリ

AI Clothes Remover
写真から衣服を削除するオンライン AI ツール。

Undress AI Tool
脱衣画像を無料で

Clothoff.io
AI衣類リムーバー

Video Face Swap
完全無料の AI 顔交換ツールを使用して、あらゆるビデオの顔を簡単に交換できます。

人気の記事
ホットツール

メモ帳++7.3.1
使いやすく無料のコードエディター

SublimeText3 中国語版
中国語版、とても使いやすい

ゼンドスタジオ 13.0.1
強力な PHP 統合開発環境

ドリームウィーバー CS6
ビジュアル Web 開発ツール

SublimeText3 Mac版
神レベルのコード編集ソフト(SublimeText3)
ホットトピック
 1672
1672
 14
1428
52
1332
25
1277
29
1256
24
14
1428
52
1332
25
1277
29
1256
24

 Python vs. JavaScript:学習曲線と使いやすさ
Apr 16, 2025 am 12:12 AM
Python vs. JavaScript:学習曲線と使いやすさ
Apr 16, 2025 am 12:12 AM
Pythonは、スムーズな学習曲線と簡潔な構文を備えた初心者により適しています。 JavaScriptは、急な学習曲線と柔軟な構文を備えたフロントエンド開発に適しています。 1。Python構文は直感的で、データサイエンスやバックエンド開発に適しています。 2。JavaScriptは柔軟で、フロントエンドおよびサーバー側のプログラミングで広く使用されています。
 JavaScriptとWeb:コア機能とユースケース
Apr 18, 2025 am 12:19 AM
JavaScriptとWeb:コア機能とユースケース
Apr 18, 2025 am 12:19 AM
Web開発におけるJavaScriptの主な用途には、クライアントの相互作用、フォーム検証、非同期通信が含まれます。 1)DOM操作による動的なコンテンツの更新とユーザーインタラクション。 2)ユーザーエクスペリエンスを改善するためにデータを提出する前に、クライアントの検証が実行されます。 3)サーバーとのリフレッシュレス通信は、AJAXテクノロジーを通じて達成されます。
 JavaScript in Action:実際の例とプロジェクト
Apr 19, 2025 am 12:13 AM
JavaScript in Action:実際の例とプロジェクト
Apr 19, 2025 am 12:13 AM
現実世界でのJavaScriptのアプリケーションには、フロントエンドとバックエンドの開発が含まれます。 1)DOM操作とイベント処理を含むTODOリストアプリケーションを構築して、フロントエンドアプリケーションを表示します。 2)node.jsを介してRestfulapiを構築し、バックエンドアプリケーションをデモンストレーションします。
 JavaScriptエンジンの理解:実装の詳細
Apr 17, 2025 am 12:05 AM
JavaScriptエンジンの理解:実装の詳細
Apr 17, 2025 am 12:05 AM
JavaScriptエンジンが内部的にどのように機能するかを理解することは、開発者にとってより効率的なコードの作成とパフォーマンスのボトルネックと最適化戦略の理解に役立つためです。 1)エンジンのワークフローには、3つの段階が含まれます。解析、コンパイル、実行。 2)実行プロセス中、エンジンはインラインキャッシュや非表示クラスなどの動的最適化を実行します。 3)ベストプラクティスには、グローバル変数の避け、ループの最適化、constとletsの使用、閉鎖の過度の使用の回避が含まれます。
 Python vs. JavaScript:コミュニティ、ライブラリ、リソース
Apr 15, 2025 am 12:16 AM
Python vs. JavaScript:コミュニティ、ライブラリ、リソース
Apr 15, 2025 am 12:16 AM
PythonとJavaScriptには、コミュニティ、ライブラリ、リソースの観点から、独自の利点と短所があります。 1)Pythonコミュニティはフレンドリーで初心者に適していますが、フロントエンドの開発リソースはJavaScriptほど豊富ではありません。 2)Pythonはデータサイエンスおよび機械学習ライブラリで強力ですが、JavaScriptはフロントエンド開発ライブラリとフレームワークで優れています。 3)どちらも豊富な学習リソースを持っていますが、Pythonは公式文書から始めるのに適していますが、JavaScriptはMDNWebDocsにより優れています。選択は、プロジェクトのニーズと個人的な関心に基づいている必要があります。
 Python vs. JavaScript:開発環境とツール
Apr 26, 2025 am 12:09 AM
Python vs. JavaScript:開発環境とツール
Apr 26, 2025 am 12:09 AM
開発環境におけるPythonとJavaScriptの両方の選択が重要です。 1)Pythonの開発環境には、Pycharm、Jupyternotebook、Anacondaが含まれます。これらは、データサイエンスと迅速なプロトタイピングに適しています。 2)JavaScriptの開発環境には、フロントエンドおよびバックエンド開発に適したnode.js、vscode、およびwebpackが含まれます。プロジェクトのニーズに応じて適切なツールを選択すると、開発効率とプロジェクトの成功率が向上する可能性があります。
 JavaScript通訳者とコンパイラにおけるC/Cの役割
Apr 20, 2025 am 12:01 AM
JavaScript通訳者とコンパイラにおけるC/Cの役割
Apr 20, 2025 am 12:01 AM
CとCは、主に通訳者とJITコンパイラを実装するために使用されるJavaScriptエンジンで重要な役割を果たします。 1)cは、JavaScriptソースコードを解析し、抽象的な構文ツリーを生成するために使用されます。 2)Cは、Bytecodeの生成と実行を担当します。 3)Cは、JITコンパイラを実装し、実行時にホットスポットコードを最適化およびコンパイルし、JavaScriptの実行効率を大幅に改善します。
 Webサイトからアプリまで:JavaScriptの多様なアプリケーション
Apr 22, 2025 am 12:02 AM
Webサイトからアプリまで:JavaScriptの多様なアプリケーション
Apr 22, 2025 am 12:02 AM
JavaScriptは、Webサイト、モバイルアプリケーション、デスクトップアプリケーション、サーバー側のプログラミングで広く使用されています。 1)Webサイト開発では、JavaScriptはHTMLおよびCSSと一緒にDOMを運用して、JQueryやReactなどのフレームワークをサポートします。 2)ReactNativeおよびIonicを通じて、JavaScriptはクロスプラットフォームモバイルアプリケーションを開発するために使用されます。 3)電子フレームワークにより、JavaScriptはデスクトップアプリケーションを構築できます。 4)node.jsを使用すると、JavaScriptがサーバー側で実行され、高い並行リクエストをサポートします。
