Janus B: マルチモーダルな理解と生成タスクのための統合モデル
ヤヌス 1.3B
Janus は、マルチモーダルな理解と生成を統合する新しい自己回帰フレームワークです。理解タスクと生成タスクの両方に単一のビジュアル エンコーダを使用していた以前のモデルとは異なり、Janus ではこれらの関数に対して 2 つの別個のビジュアル エンコード パスウェイが導入されています。
理解と生成のためのエンコーディングの違い
- マルチモーダル理解タスクでは、ビジュアル エンコーダーは、オブジェクト カテゴリや視覚的属性などの高レベルの意味情報を抽出します。このエンコーダは、高次元の意味要素を強調し、複雑な意味を推測することに重点を置いています。
- 一方、ビジュアル生成タスクでは、細部の生成と全体的な一貫性の維持に重点が置かれます。その結果、空間構造とテクスチャをキャプチャできる低次元エンコードが必要になります。
環境のセットアップ
Google Colab で Janus を実行する手順は次のとおりです:
git clone https://github.com/deepseek-ai/Janus
cd Janus
pip install -e .
# If needed, install the following as well
# pip install wheel
# pip install flash-attn --no-build-isolation
ログイン後にコピー
ビジョンタスク
モデルのロード
次のコードを使用して、ビジョン タスクに必要なモデルをロードします。
import torch
from transformers import AutoModelForCausalLM
from janus.models import MultiModalityCausalLM, VLChatProcessor
from janus.utils.io import load_pil_images

# Specify the model path
model_path = "deepseek-ai/Janus-1.3B"
vl_chat_processor = VLChatProcessor.from_pretrained(model_path)
tokenizer = vl_chat_processor.tokenizer

vl_gpt = AutoModelForCausalLM.from_pretrained(model_path, trust_remote_code=True)
vl_gpt = vl_gpt.to(torch.bfloat16).cuda().eval()
ログイン後にコピー
エンコード用の画像のロードと準備
次に、画像をロードし、モデルが理解できる形式に変換します。
conversation = [
    {
        "role": "User",
        "content": "<image_placeholder>\nDescribe this chart.",
        "images": ["images/pie_chart.png"],
    },
    {"role": "Assistant", "content": ""},
]

# Load the image and prepare input
pil_images = load_pil_images(conversation)
prepare_inputs = vl_chat_processor(
    conversations=conversation, images=pil_images, force_batchify=True
).to(vl_gpt.device)

# Run the image encoder and obtain image embeddings
inputs_embeds = vl_gpt.prepare_inputs_embeds(**prepare_inputs)
ログイン後にコピー
応答の生成
最後に、モデルを実行して応答を生成します。
# Run the model and generate a response
outputs = vl_gpt.language_model.generate(
    inputs_embeds=inputs_embeds,
    attention_mask=prepare_inputs.attention_mask,
    pad_token_id=tokenizer.eos_token_id,
    bos_token_id=tokenizer.bos_token_id,
    eos_token_id=tokenizer.eos_token_id,
    max_new_tokens=512,
    do_sample=False,
    use_cache=True,
)

answer = tokenizer.decode(outputs[0].cpu().tolist(), skip_special_tokens=True)
print(f"{prepare_inputs['sft_format'][0]}", answer)
ログイン後にコピー
出力例

The image depicts a pie chart that illustrates the distribution of four different categories among four distinct groups. The chart is divided into four segments, each representing a category with a specific percentage. The categories and their corresponding percentages are as follows:

1. **Hogs**: This segment is colored in orange and represents 30.0% of the total.
2. **Frog**: This segment is colored in blue and represents 15.0% of the total.
3. **Logs**: This segment is colored in red and represents 10.0% of the total.
4. **Dogs**: This segment is colored in green and represents 45.0% of the total.

The pie chart is visually divided into four segments, each with a different color and corresponding percentage. The segments are arranged in a clockwise manner starting from the top-left, moving clockwise. The percentages are clearly labeled next to each segment.

The chart is a simple visual representation of data, where the size of each segment corresponds to the percentage of the total category it represents. This type of chart is commonly used to compare the proportions of different categories in a dataset.

To summarize, the pie chart shows the following:
- Hogs: 30.0%
- Frog: 15.0%
- Logs: 10.0%
- Dogs: 45.0%

This chart can be used to understand the relative proportions of each category in the given dataset.
ログイン後にコピー
出力は、色やテキストを含む画像を適切に理解していることを示します。
イメージ生成タスク
モデルのロード
次のコードを使用して、画像生成タスクに必要なモデルをロードします。
import os
import PIL.Image
import torch
import numpy as np
from transformers import AutoModelForCausalLM
from janus.models import MultiModalityCausalLM, VLChatProcessor

# Specify the model path
model_path = "deepseek-ai/Janus-1.3B"
vl_chat_processor = VLChatProcessor.from_pretrained(model_path)
tokenizer = vl_chat_processor.tokenizer

vl_gpt = AutoModelForCausalLM.from_pretrained(model_path, trust_remote_code=True)
vl_gpt = vl_gpt.to(torch.bfloat16).cuda().eval()
ログイン後にコピー
プロンプトの準備
次に、ユーザーのリクエストに基づいてプロンプトを準備します。
# Set up the prompt
conversation = [
    {
        "role": "User",
        "content": "cute japanese girl, wearing a bikini, in a beach",
    },
    {"role": "Assistant", "content": ""},
]

# Convert the prompt into the appropriate format
sft_format = vl_chat_processor.apply_sft_template_for_multi_turn_prompts(
    conversations=conversation,
    sft_format=vl_chat_processor.sft_format,
    system_prompt="",
)

prompt = sft_format + vl_chat_processor.image_start_tag
ログイン後にコピー
画像の生成
画像の生成には以下の関数を使用します。デフォルトでは、16 個の画像が生成されます:
@torch.inference_mode()
def generate(
    mmgpt: MultiModalityCausalLM,
    vl_chat_processor: VLChatProcessor,
    prompt: str,
    temperature: float = 1,
    parallel_size: int = 16,
    cfg_weight: float = 5,
    image_token_num_per_image: int = 576,
    img_size: int = 384,
    patch_size: int = 16,
):
    input_ids = vl_chat_processor.tokenizer.encode(prompt)
    input_ids = torch.LongTensor(input_ids)

    tokens = torch.zeros((parallel_size*2, len(input_ids)), dtype=torch.int).cuda()
    for i in range(parallel_size*2):
        tokens[i, :] = input_ids
        if i % 2 != 0:
            tokens[i, 1:-1] = vl_chat_processor.pad_id

    inputs_embeds = mmgpt.language_model.get_input_embeddings()(tokens)

    generated_tokens = torch.zeros((parallel_size, image_token_num_per_image), dtype=torch.int).cuda()

    for i in range(image_token_num_per_image):
        outputs = mmgpt.language_model.model(
            inputs_embeds=inputs_embeds,
            use_cache=True,
            past_key_values=outputs.past_key_values if i != 0 else None,
        )
        hidden_states = outputs.last_hidden_state

        logits = mmgpt.gen_head(hidden_states[:, -1, :])
        logit_cond = logits[0::2, :]
        logit_uncond = logits[1::2, :]

        logits = logit_uncond + cfg_weight * (logit_cond - logit_uncond)
        probs = torch.softmax(logits / temperature, dim=-1)

        next_token = torch.multinomial(probs, num_samples=1)
        generated_tokens[:, i] = next_token.squeeze(dim=-1)

        next_token = torch.cat([next_token.unsqueeze(dim=1), next_token.unsqueeze(dim=1)], dim=1).view(-1)
        img_embeds = mmgpt.prepare_gen_img_embeds(next_token)
        inputs_embeds = img_embeds.unsqueeze(dim=1)

    dec = mmgpt.gen_vision_model.decode_code(
        generated_tokens.to(dtype=torch.int),
        shape=[parallel_size, 8, img_size // patch_size, img_size // patch_size],
    )
    dec = dec.to(torch.float32).cpu().numpy().transpose(0, 2, 3, 1)
    dec = np.clip((dec + 1) / 2 * 255, 0, 255)

    visual_img = np.zeros((parallel_size, img_size, img_size, 3), dtype=np.uint8)
    visual_img[:, :, :] = dec

    os.makedirs('generated_samples', exist_ok=True)
    for i in range(parallel_size):
        save_path = os.path.join('generated_samples', f"img_{i}.jpg")
        PIL.Image.fromarray(visual_img[i]).save(save_path)

# Run the image generation
generate(vl_gpt, vl_chat_processor, prompt)
ログイン後にコピー
生成された画像は generated_samples フォルダーに保存されます。
生成された結果のサンプル
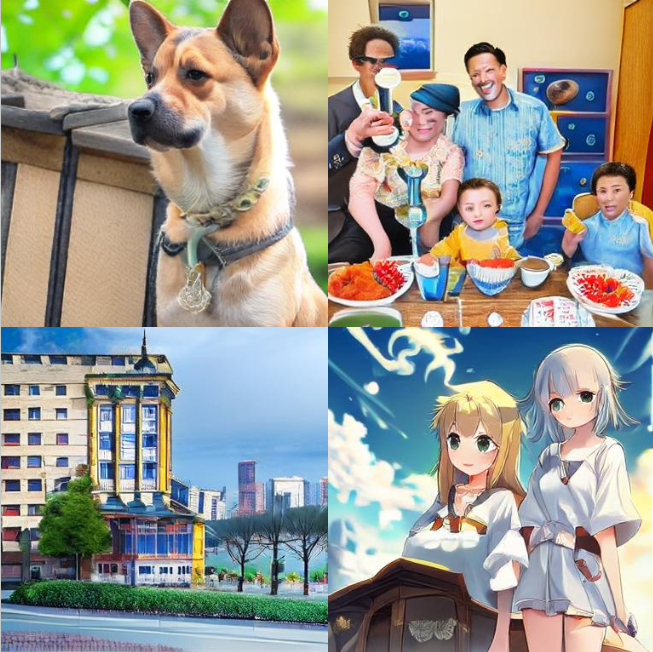
以下は生成された画像の例です:

- 犬は比較的よく描かれています。
- 建物は全体的な形状を維持していますが、窓などの一部の細部は非現実的に見える場合があります。
- ただし、人間は、フォトリアルなスタイルとアニメ風のスタイルの両方で顕著な歪みがあり、うまく生成するのが困難です。
以上がJanus B: マルチモーダルな理解と生成タスクのための統合モデルの詳細内容です。詳細については、PHP 中国語 Web サイトの他の関連記事を参照してください。
このウェブサイトの声明
この記事の内容はネチズンが自主的に寄稿したものであり、著作権は原著者に帰属します。このサイトは、それに相当する法的責任を負いません。盗作または侵害の疑いのあるコンテンツを見つけた場合は、admin@php.cn までご連絡ください。

ホットAIツール

Undresser.AI Undress
リアルなヌード写真を作成する AI 搭載アプリ

AI Clothes Remover
写真から衣服を削除するオンライン AI ツール。

Undress AI Tool
脱衣画像を無料で

Clothoff.io
AI衣類リムーバー

AI Hentai Generator
AIヘンタイを無料で生成します。

人気の記事
R.E.P.O.説明されたエネルギー結晶と彼らが何をするか(黄色のクリスタル)
2週間前
By 尊渡假赌尊渡假赌尊渡假赌
レポ:チームメイトを復活させる方法
4週間前
By 尊渡假赌尊渡假赌尊渡假赌
ハローキティアイランドアドベンチャー:巨大な種を手に入れる方法
3週間前
By 尊渡假赌尊渡假赌尊渡假赌
スプリットフィクションを打ち負かすのにどれくらい時間がかかりますか?
3週間前
By DDD
R.E.P.O.ファイルの保存場所:それはどこにあり、それを保護する方法は?
3週間前
By DDD

ホットツール

メモ帳++7.3.1
使いやすく無料のコードエディター

SublimeText3 中国語版
中国語版、とても使いやすい

ゼンドスタジオ 13.0.1
強力な PHP 統合開発環境

ドリームウィーバー CS6
ビジュアル Web 開発ツール

SublimeText3 Mac版
神レベルのコード編集ソフト(SublimeText3)

ホットトピック
Gmailメールのログイン入り口はどこですか?
 7315
7315
 9
9
 7315
7315
 9
9
Java チュートリアル
 1625
1625
 14
14
 1625
1625
 14
14
CakePHP チュートリアル
 1348
1348
 46
46
 1348
1348
 46
46
Laravel チュートリアル
 1261
1261
 25
25
 1261
1261
 25
25
PHP チュートリアル
 1208
1208
 29
29
 1208
1208
 29
29


