

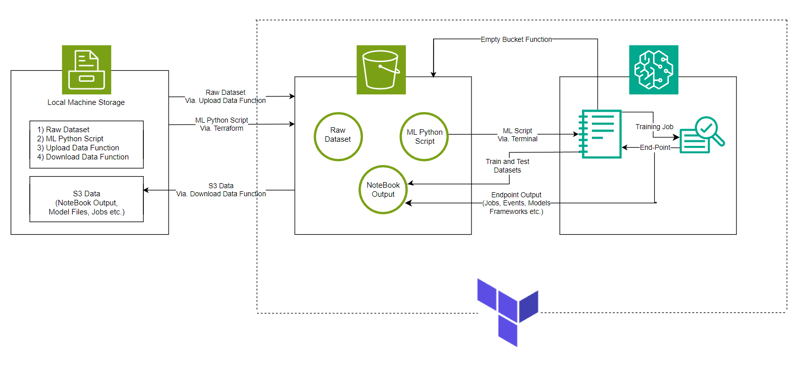
インフラストラクチャ設定の自動化に Terraform を使用して HDFS ログを分類するための AWS SageMaker とその Python SDK で作成された機械学習モデル。
リンク: GitHub
言語: HCL (terraform)、Python
  # Looks for the XGBoost image URI and builds an XGBoost container. Specify the repo_version depending on preference.
  container = get_image_uri(boto3.Session().region_name,
                            'xgboost',
                            repo_version='1.0-1')

  hyperparameters = {
        "max_depth":"5",                ## Maximum depth of a tree. Higher means more complex models but risk of overfitting.
        "eta":"0.2",                    ## Learning rate. Lower values make the learning process slower but more precise.
        "gamma":"4",                    ## Minimum loss reduction required to make a further partition on a leaf node. Controls the model’s complexity.
        "min_child_weight":"6",         ## Minimum sum of instance weight (hessian) needed in a child. Higher values prevent overfitting.
        "subsample":"0.7",              ## Fraction of training data used. Reduces overfitting by sampling part of the data.
        "objective":"binary:logistic",  ## Specifies the learning task and corresponding objective. binary:logistic is for binary classification.
        "num_round":50                  ## Number of boosting rounds, essentially how many times the model is trained.
        }
  # A SageMaker estimator that calls the xgboost-container
  estimator = sagemaker.estimator.Estimator(image_uri=container,                  # Points to the XGBoost container we previously set up. This tells SageMaker which algorithm container to use.
                                          hyperparameters=hyperparameters,      # Passes the defined hyperparameters to the estimator. These are the settings that guide the training process.
                                          role=sagemaker.get_execution_role(),  # Specifies the IAM role that SageMaker assumes during the training job. This role allows access to AWS resources like S3.
                                          train_instance_count=1,               # Sets the number of training instances. Here, it’s using a single instance.
                                          train_instance_type='ml.m5.large',    # Specifies the type of instance to use for training. ml.m5.2xlarge is a general-purpose instance with a balance of compute, memory, and network resources.
                                          train_volume_size=5, # 5GB            # Sets the size of the storage volume attached to the training instance, in GB. Here, it’s 5 GB.
                                          output_path=output_path,              # Defines where the model artifacts and output of the training job will be saved in S3.
                                          train_use_spot_instances=True,        # Utilizes spot instances for training, which can be significantly cheaper than on-demand instances. Spot instances are spare EC2 capacity offered at a lower price.
                                          train_max_run=300,                    # Specifies the maximum runtime for the training job in seconds. Here, it's 300 seconds (5 minutes).
                                          train_max_wait=600)                   # Sets the maximum time to wait for the job to complete, including the time waiting for spot instances, in seconds. Here, it's 600 seconds (10 minutes).

estimator.fit({'train': s3_input_train,'validation': s3_input_test})
xgb_predictor = estimator.deploy(initial_instance_count=1,instance_type='ml.m5.large')

  # Looks for the XGBoost image URI and builds an XGBoost container. Specify the repo_version depending on preference.
  container = get_image_uri(boto3.Session().region_name,
                            'xgboost',
                            repo_version='1.0-1')
  hyperparameters = {
        "max_depth":"5",                ## Maximum depth of a tree. Higher means more complex models but risk of overfitting.
        "eta":"0.2",                    ## Learning rate. Lower values make the learning process slower but more precise.
        "gamma":"4",                    ## Minimum loss reduction required to make a further partition on a leaf node. Controls the model’s complexity.
        "min_child_weight":"6",         ## Minimum sum of instance weight (hessian) needed in a child. Higher values prevent overfitting.
        "subsample":"0.7",              ## Fraction of training data used. Reduces overfitting by sampling part of the data.
        "objective":"binary:logistic",  ## Specifies the learning task and corresponding objective. binary:logistic is for binary classification.
        "num_round":50                  ## Number of boosting rounds, essentially how many times the model is trained.
        }
  # A SageMaker estimator that calls the xgboost-container
  estimator = sagemaker.estimator.Estimator(image_uri=container,                  # Points to the XGBoost container we previously set up. This tells SageMaker which algorithm container to use.
                                          hyperparameters=hyperparameters,      # Passes the defined hyperparameters to the estimator. These are the settings that guide the training process.
                                          role=sagemaker.get_execution_role(),  # Specifies the IAM role that SageMaker assumes during the training job. This role allows access to AWS resources like S3.
                                          train_instance_count=1,               # Sets the number of training instances. Here, it’s using a single instance.
                                          train_instance_type='ml.m5.large',    # Specifies the type of instance to use for training. ml.m5.2xlarge is a general-purpose instance with a balance of compute, memory, and network resources.
                                          train_volume_size=5, # 5GB            # Sets the size of the storage volume attached to the training instance, in GB. Here, it’s 5 GB.
                                          output_path=output_path,              # Defines where the model artifacts and output of the training job will be saved in S3.
                                          train_use_spot_instances=True,        # Utilizes spot instances for training, which can be significantly cheaper than on-demand instances. Spot instances are spare EC2 capacity offered at a lower price.
                                          train_max_run=300,                    # Specifies the maximum runtime for the training job in seconds. Here, it's 300 seconds (5 minutes).
                                          train_max_wait=600)                   # Sets the maximum time to wait for the job to complete, including the time waiting for spot instances, in seconds. Here, it's 600 seconds (10 minutes).
ターミナルに「terraform init」と入力/貼り付けて、バックエンドを初期化します。
次に、「terraform Plan」と入力/貼り付けてプランを表示するか、単純に terraform validate を実行してエラーがないことを確認します。
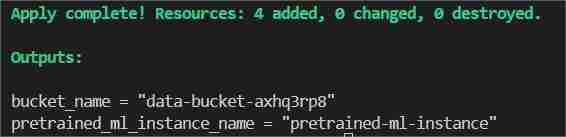
最後にターミナルに「terraform apply --auto-approve」と入力/貼り付けます
これにより、2 つの出力が表示されます。1 つはbucket_name、もう 1 つは pretrained_ml_instance_name です (3 番目のリソースは、グローバル リソースであるため、バケットに与えられた変数名です)。
estimator.fit({'train': s3_input_train,'validation': s3_input_test})
プロジェクト ディレクトリが存在するパスに変更して保存します。
xgb_predictor = estimator.deploy(initial_instance_count=1,instance_type='ml.m5.large')
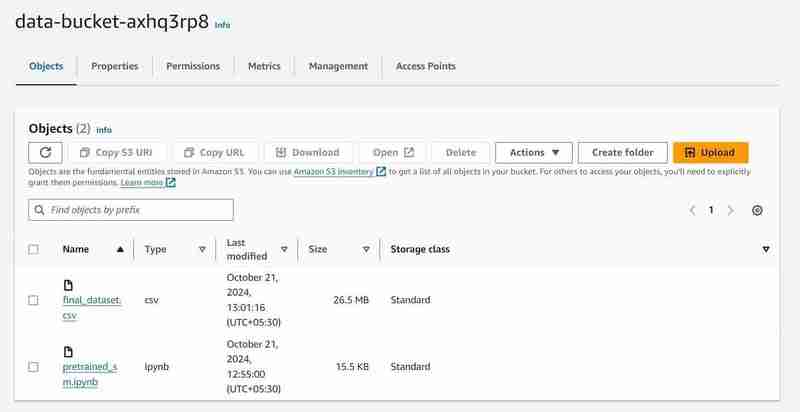
データセットを S3 バケットにアップロードします。

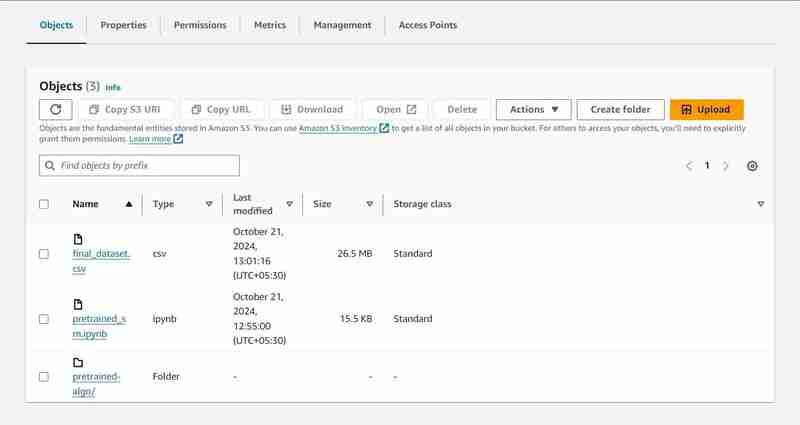
2 つのオブジェクト、データセット、モデル コードを含む pretrained_sm.ipynb ファイルがアップロードされた「data-bucket-」という名前の S3 バケット。

  # Looks for the XGBoost image URI and builds an XGBoost container. Specify the repo_version depending on preference.
  container = get_image_uri(boto3.Session().region_name,
                            'xgboost',
                            repo_version='1.0-1')
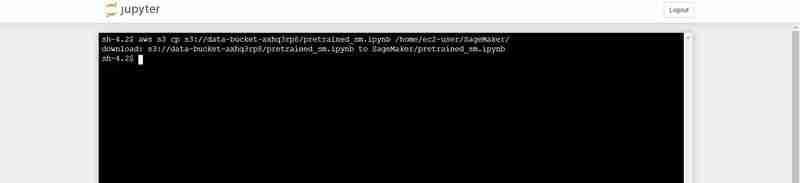
S3 から Notebook の Jupyter 環境に pretrained_sm.ipynb をアップロードするターミナル コマンド
  hyperparameters = {
        "max_depth":"5",                ## Maximum depth of a tree. Higher means more complex models but risk of overfitting.
        "eta":"0.2",                    ## Learning rate. Lower values make the learning process slower but more precise.
        "gamma":"4",                    ## Minimum loss reduction required to make a further partition on a leaf node. Controls the model’s complexity.
        "min_child_weight":"6",         ## Minimum sum of instance weight (hessian) needed in a child. Higher values prevent overfitting.
        "subsample":"0.7",              ## Fraction of training data used. Reduces overfitting by sampling part of the data.
        "objective":"binary:logistic",  ## Specifies the learning task and corresponding objective. binary:logistic is for binary classification.
        "num_round":50                  ## Number of boosting rounds, essentially how many times the model is trained.
        }
  # A SageMaker estimator that calls the xgboost-container
  estimator = sagemaker.estimator.Estimator(image_uri=container,                  # Points to the XGBoost container we previously set up. This tells SageMaker which algorithm container to use.
                                          hyperparameters=hyperparameters,      # Passes the defined hyperparameters to the estimator. These are the settings that guide the training process.
                                          role=sagemaker.get_execution_role(),  # Specifies the IAM role that SageMaker assumes during the training job. This role allows access to AWS resources like S3.
                                          train_instance_count=1,               # Sets the number of training instances. Here, it’s using a single instance.
                                          train_instance_type='ml.m5.large',    # Specifies the type of instance to use for training. ml.m5.2xlarge is a general-purpose instance with a balance of compute, memory, and network resources.
                                          train_volume_size=5, # 5GB            # Sets the size of the storage volume attached to the training instance, in GB. Here, it’s 5 GB.
                                          output_path=output_path,              # Defines where the model artifacts and output of the training job will be saved in S3.
                                          train_use_spot_instances=True,        # Utilizes spot instances for training, which can be significantly cheaper than on-demand instances. Spot instances are spare EC2 capacity offered at a lower price.
                                          train_max_run=300,                    # Specifies the maximum runtime for the training job in seconds. Here, it's 300 seconds (5 minutes).
                                          train_max_wait=600)                   # Sets the maximum time to wait for the job to complete, including the time waiting for spot instances, in seconds. Here, it's 600 seconds (10 minutes).
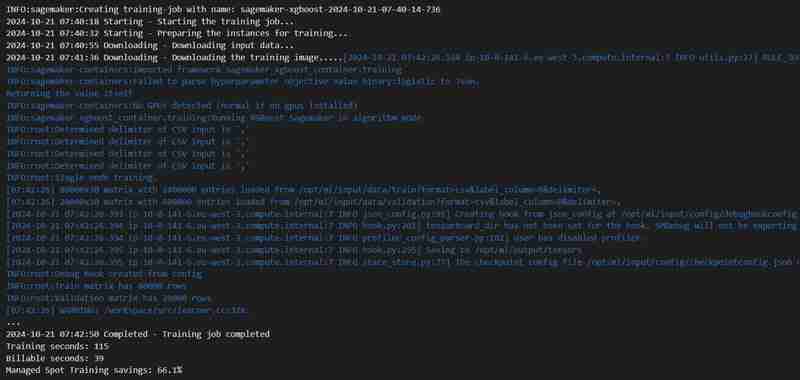
コードセル実行の出力

estimator.fit({'train': s3_input_train,'validation': s3_input_test})
8 番目のセルの実行
xgb_predictor = estimator.deploy(initial_instance_count=1,instance_type='ml.m5.large')

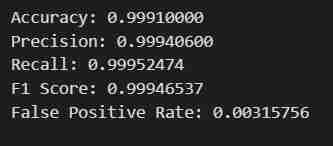
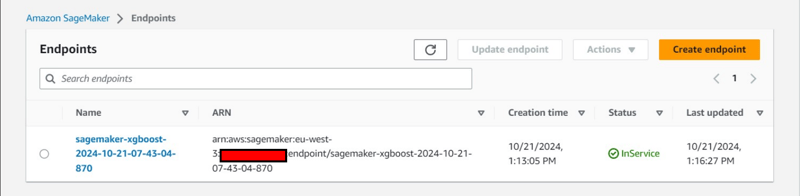
23 番目のセルの実行
  # Looks for the XGBoost image URI and builds an XGBoost container. Specify the repo_version depending on preference.
  container = get_image_uri(boto3.Session().region_name,
                            'xgboost',
                            repo_version='1.0-1')


24 番目のコードセルの実行
  hyperparameters = {
        "max_depth":"5",                ## Maximum depth of a tree. Higher means more complex models but risk of overfitting.
        "eta":"0.2",                    ## Learning rate. Lower values make the learning process slower but more precise.
        "gamma":"4",                    ## Minimum loss reduction required to make a further partition on a leaf node. Controls the model’s complexity.
        "min_child_weight":"6",         ## Minimum sum of instance weight (hessian) needed in a child. Higher values prevent overfitting.
        "subsample":"0.7",              ## Fraction of training data used. Reduces overfitting by sampling part of the data.
        "objective":"binary:logistic",  ## Specifies the learning task and corresponding objective. binary:logistic is for binary classification.
        "num_round":50                  ## Number of boosting rounds, essentially how many times the model is trained.
        }
  # A SageMaker estimator that calls the xgboost-container
  estimator = sagemaker.estimator.Estimator(image_uri=container,                  # Points to the XGBoost container we previously set up. This tells SageMaker which algorithm container to use.
                                          hyperparameters=hyperparameters,      # Passes the defined hyperparameters to the estimator. These are the settings that guide the training process.
                                          role=sagemaker.get_execution_role(),  # Specifies the IAM role that SageMaker assumes during the training job. This role allows access to AWS resources like S3.
                                          train_instance_count=1,               # Sets the number of training instances. Here, it’s using a single instance.
                                          train_instance_type='ml.m5.large',    # Specifies the type of instance to use for training. ml.m5.2xlarge is a general-purpose instance with a balance of compute, memory, and network resources.
                                          train_volume_size=5, # 5GB            # Sets the size of the storage volume attached to the training instance, in GB. Here, it’s 5 GB.
                                          output_path=output_path,              # Defines where the model artifacts and output of the training job will be saved in S3.
                                          train_use_spot_instances=True,        # Utilizes spot instances for training, which can be significantly cheaper than on-demand instances. Spot instances are spare EC2 capacity offered at a lower price.
                                          train_max_run=300,                    # Specifies the maximum runtime for the training job in seconds. Here, it's 300 seconds (5 minutes).
                                          train_max_wait=600)                   # Sets the maximum time to wait for the job to complete, including the time waiting for spot instances, in seconds. Here, it's 600 seconds (10 minutes).
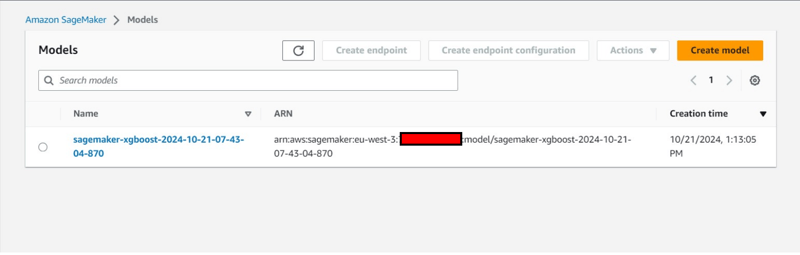
追加のコンソール観察:

estimator.fit({'train': s3_input_train,'validation': s3_input_test})

  # Looks for the XGBoost image URI and builds an XGBoost container. Specify the repo_version depending on preference.
  container = get_image_uri(boto3.Session().region_name,
                            'xgboost',
                            repo_version='1.0-1')
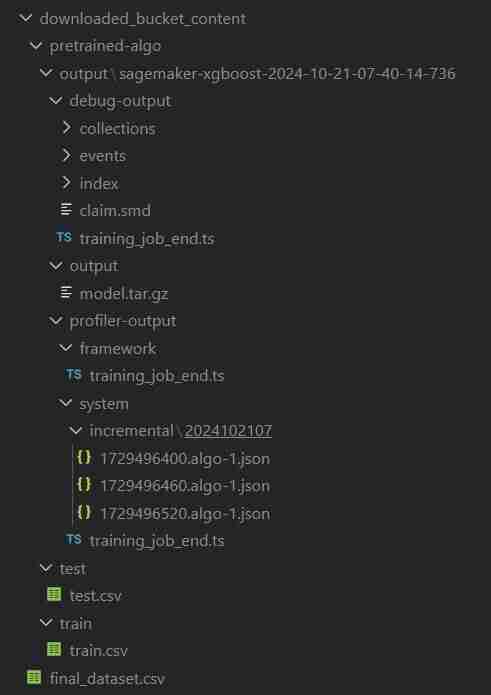
ClassiSage/downloaded_bucket_content
ClassiSage/.terraform
ClassiSage/ml_ops/pycache
ClassiSage/.terraform.lock.hcl
ClassiSage/terraform.tfstate
ClassiSage/terraform.tfstate.backup
注:
AWS クラウドの S3 と HDFS ログ分類に SageMaker を使用し、IaC (インフラストラクチャ セットアップ自動化) に Terraform を使用したこの機械学習プロジェクトのアイデアと実装が気に入っていただけた場合は、GitHub でプロジェクト リポジトリをチェックアウトした後、この投稿に「いいね!」を付けてスターを付けることを検討してください。 .
以上がClassiSage: Terraform IaC 自動化された AWS SageMaker ベースの HDFS ログ分類モデルの詳細内容です。詳細については、PHP 中国語 Web サイトの他の関連記事を参照してください。


![[Web フロントエンド] Node.js クイック スタート](https://img.php.cn/upload/course/000/000/067/662b5d34ba7c0227.png)


