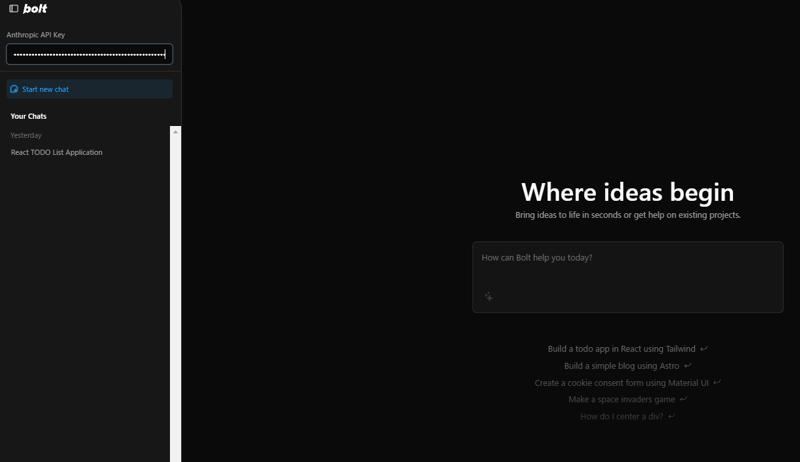
bolt.newではAPIキーを環境変数で設定できますが、今回はインターフェースから直接APIキーを入力できるように修正します。
サイドバーから直接 API キーを入力できるようにします。
現在チャット履歴が表示されているサイドバーの上部に、API キーを入力するための新しいフォームを追加します。
これを実現するには、bolt.new/app/components/sidebar/Menu.client.tsx ファイルを変更します。
まず、API キー入力を処理する関数をインポートします。
import { ApiKeyInput } from '~/components/sidebar/ApiKeyInput';
bolt.new/app/components/sidebar/ApiKeyInput.tsx ファイルは後で作成されます。
次に、メニュー内に API キーを入力するフォームを追加します。
...
  return (
      <motion.div
        ref={menuRef}
        initial="closed"
        animate={open ? 'open' : 'closed'}
        variants={menuVariants}
        className="flex flex-col side-menu fixed top-0 w-[350px] h-full bg-bolt-elements-background-depth-2 border-r rounded-r-3xl border-bolt-elements-borderColor z-sidebar shadow-xl shadow-bolt-elements-sidebar-dropdownShadow text-sm"
      >
        <div className="flex items-center h-[var(--header-height)]">{/* Placeholder */}</div>
        <div className="flex-1 flex flex-col h-full w-full overflow-hidden">
          <ApiKeyInput /> {/* Add this line */}
          <div className="p-4">
...
追加されたコードはここに配置する必要があります。
次に、次の内容を含むファイル void.new/app/components/sidebar/ApiKeyInput.tsx を作成します。
import React, { useState } from 'react';

export function ApiKeyInput() {
  const [apiKey, setApiKey] = useState(localStorage.getItem('apiKey') || '');

  const handleChange = (event: React.ChangeEvent<HTMLInputElement>) => {
    const value = event.target.value;
    setApiKey(value);
    localStorage.setItem('apiKey', value);
    // Trigger API key change event
    window.dispatchEvent(new Event('apiKeyChanged'));
  };

  return (
    <div className="px-4 py-3 border-b border-bolt-elements-borderColor">
      <label
        htmlFor="api-key"
        className="block text-bolt-elements-textSecondary text-sm mb-2"
      >
        Anthropic API Key
      </label>
      <input
        type="password"
       >


<p>This component will allow the user to input and store the API key in localStorage and trigger a custom event when the key is changed.  </p>

<h3>


  Chat Screen Modification
</h3>

<p>Update the chat screen to disable message sending until an API key is entered.<br><br>
Below is the revised code for bolt.new/app/components/chat/BaseChat.client.tsx, with additions marked between // Append start and // Append end:<br>
</p>

<pre class="brush:php;toolbar:false">export const BaseChat = React.forwardRef<HTMLDivElement, BaseChatProps>(
  (
    {
      textareaRef,
      messageRef,
      scrollRef,
      showChat = true,
      chatStarted = false,
      isStreaming = false,
      enhancingPrompt = false,
      promptEnhanced = false,
      messages,
      input = '',
      sendMessage,
      handleInputChange,
      enhancePrompt,
      handleStop,
    },
    ref,
  ) => {
    // Append start
    const [isApiKeyMissing, setIsApiKeyMissing] = useState(true); // Track API key presence

    useEffect(() => {
      const checkApiKey = () => {
        const apiKey = localStorage.getItem('apiKey');
        console.log('apiKey:', apiKey);
        setIsApiKeyMissing(!apiKey);
      };

      // Initial check
      checkApiKey();

      // Add listener for API key changes
      window.addEventListener('apiKeyChanged', checkApiKey);

      return () => {
        window.removeEventListener('apiKeyChanged', checkApiKey);
      };
    }, []);
    // Append end

    const TEXTAREA_MAX_HEIGHT = chatStarted ? 400 : 200;

    return (
      <div
        ref={ref}
        className={classNames(
          styles.BaseChat,
          'relative flex h-full w-full overflow-hidden bg-bolt-elements-background-depth-1',
        )}
        data-chat-visible={showChat}
      >
        <ClientOnly>{() => <Menu />}</ClientOnly>
        <div ref={scrollRef} className="flex overflow-y-auto w-full h-full">
          <div className={classNames(styles.Chat, 'flex flex-col flex-grow min-w-[var(--chat-min-width)] h-full')}>
            {!chatStarted && (
              <div>


<p>This ensures that users cannot send messages until they enter an API key, with clear visual feedback provided.</p>

<h3>


  Passing the API Key to the LLM
</h3>

<p>To ensure the API key entered on the interface is accessible to the LLM, update the file bolt.new/app/lib/.server/llm/api-key.ts as follows:<br>
</p>

<pre class="brush:php;toolbar:false">import { env } from 'node:process';

export function getAPIKey(cloudflareEnv: Env) {
  // Append start
  const localApiKey = typeof window !== 'undefined' ? localStorage.getItem('apiKey') : null;
  return localApiKey || env.ANTHROPIC_API_KEY || cloudflareEnv.ANTHROPIC_API_KEY;
  // Append end
}
これにより、システムは UI (localApiKey) 経由で入力された API キーを優先するようになります。 localStorage でキーが見つからない場合は、環境変数 (env.ANTHROPIC_API_KEY または CloudflareEnv.ANTHROPIC_API_KEY) にフォールバックします。
変更が完了したら、次のコマンドを使用して、bolt.new をビルドして開始します。
pnpm run build
pnpm run start


これらの手順により、変更後に機能が意図したとおりに動作することが保証されます。
以上がAPIキーの入力を許可するようにローカルのbolt.newインターフェースを変更します。の詳細内容です。詳細については、PHP 中国語 Web サイトの他の関連記事を参照してください。