AstroJS: Dev.をコンテンツに簡単に統合
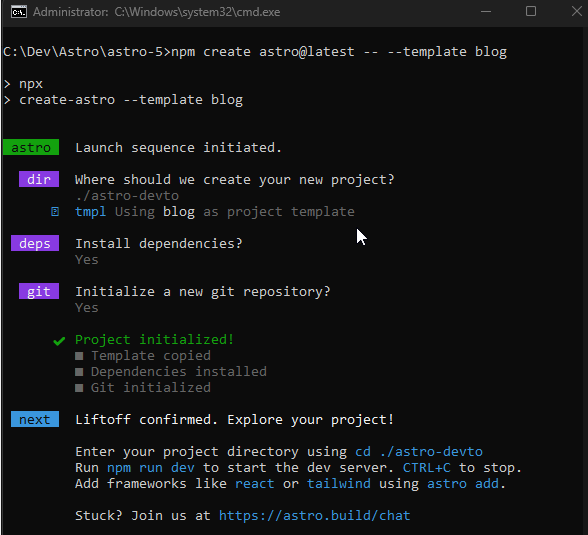
ブログ テンプレートを使用して新しいプロジェクトを開始する
npm create astro@latest -- --template ブログ

アプリを起動します
cd [project_name] && npm run dev


Astro 5 以降、Content Layer API が導入されました。このツールを使用すると、サイトの構築中に任意のソースからデータをロードし、シンプルで安全に型付けされた API を通じてアクセスできるようになります。
この API は、ローカル Markdown ファイル、リモート API、コンテンツ管理システム (CMS) など、さまざまなソースからのコンテンツを処理する柔軟性を提供します。特定のスキーマを使用してコンテンツの「コレクション」を定義すると、データを効率的に構造化して検証できます。さらに、Content Layer API により、コンテンツの多いサイトのパフォーマンスが向上し、ビルド時間が短縮され、メモリ使用量が削減されます。
https://astro.build/blog/astro-5/
Astro のコンテンツ レイヤー API を使用して、dev.to の投稿をサイトに統合します
Astro のコンテンツ レイヤー API を使用して、dev.to の投稿をサイトに統合できます。 dev.to 用の特定のローダーはありませんが、その API を使用して投稿を Astro のコンテンツ コレクションに保存するカスタム ローダーを作成できます。
これを実現するには、次の手順に従います:
1. dev.to API へのアクセスを構成する


プロジェクトのルートに .env ファイルを作成します
.env
DEV_TO_API_URL=https://dev.to/api/
DEV_API_KEY=tu_clave_de_api
2. Astro でコレクションを定義する
src/content.config.ts で、Content Layer API を使用して dev.to 投稿のコレクションを定義します。
Astro テンプレートを使用してプロジェクトを作成すると、ブログ用のコレクションが自動的に生成されます
srccontent.config.ts
import { glob } from 'astro/loaders';
import { defineCollection, z } from 'astro:content';

const blog = defineCollection({
    // Load Markdown and MDX files in the `src/content/blog/` directory.
    loader: glob({ base: './src/content/blog', pattern: '**/*.{md,mdx}' }),
    // Type-check frontmatter using a schema
    schema: z.object({
        title: z.string(),
        description: z.string(),
        // Transform string to Date object
        pubDate: z.coerce.date(),
        updatedDate: z.coerce.date().optional(),
        heroImage: z.string().optional(),
    }),
});

export const collections = { blog };
ここで、Dev.to 記事のコレクションを作成します
const devTo = defineCollection({
    loader: async () => {
        const headers = new Headers({
            "api-key": DEV_API_KEY,
        });
        const posts = await fetch(`${DEV_TO_API_URL}articles?username=jmr85`, {
            headers: headers
        }).then(res => res.json());

        return posts.map((post: any) => ({
        id: post.slug,
            title: post.title,
            description: post.description,
            pubDate: new Date(post.published_at),
            updatedDate: post.edited_at ? new Date(post.edited_at) : null,
            heroImage: post.cover_image || post.social_image,
        url: post.url,
        }));
    },
    schema: z.object({
        title: z.string(),
        description: z.string(),
        pubDate: z.coerce.date(),
        updatedDate: z.coerce.date().optional(),
        heroImage: z.string().nullable(),
    url: z.string(),
    }),
  });

export const collections = { blog, devTo };
これは
の完全なコードです
srccontent.config.ts
DEV_TO_API_URL=https://dev.to/api/
DEV_API_KEY=tu_clave_de_api
スキーマ内のフィールドの定義の詳細を確認してください。フィールドは Astro テンプレートのブログ コレクションと一致する必要があり、その後、Dev.to 投稿のコレクションに特有のものを追加する必要があります。これらはデータ型と同じ名前を持つ必要があります。これは、Astro テンプレートからのマークダウン投稿を、ブログ セクションの Dev.to からのマークダウン投稿と「マージ」できるようにするためです。
3. ページ上の投稿を使用します。
getCollection:
を使用して、Astro コンポーネントまたはページの dev.to 投稿にアクセスできるようになりました。原文:
srcpagesblogindex.astro
import { glob } from 'astro/loaders';
import { defineCollection, z } from 'astro:content';

const blog = defineCollection({
    // Load Markdown and MDX files in the `src/content/blog/` directory.
    loader: glob({ base: './src/content/blog', pattern: '**/*.{md,mdx}' }),
    // Type-check frontmatter using a schema
    schema: z.object({
        title: z.string(),
        description: z.string(),
        // Transform string to Date object
        pubDate: z.coerce.date(),
        updatedDate: z.coerce.date().optional(),
        heroImage: z.string().optional(),
    }),
});

export const collections = { blog };
ここで、インライン条件を使用して投稿を繰り返します。devto の場合は、サイト https://dev.to/{username}/{slug-article の記事の URL にリダイレクトします。 }
 {
                        Posts.map((post) => (

リポジトリ: https://github.com/jmr85/astro-devto
以上がAstroJS: Dev.をコンテンツに簡単に統合の詳細内容です。詳細については、PHP 中国語 Web サイトの他の関連記事を参照してください。

ホットAIツール

Undresser.AI Undress
リアルなヌード写真を作成する AI 搭載アプリ

AI Clothes Remover
写真から衣服を削除するオンライン AI ツール。

Undress AI Tool
脱衣画像を無料で

Clothoff.io
AI衣類リムーバー

Video Face Swap
完全無料の AI 顔交換ツールを使用して、あらゆるビデオの顔を簡単に交換できます。

人気の記事

ホットツール

メモ帳++7.3.1
使いやすく無料のコードエディター

SublimeText3 中国語版
中国語版、とても使いやすい

ゼンドスタジオ 13.0.1
強力な PHP 統合開発環境

ドリームウィーバー CS6
ビジュアル Web 開発ツール

SublimeText3 Mac版
神レベルのコード編集ソフト(SublimeText3)

ホットトピック
 7843
7843
 15
15
 1649
1649
 14
14
 1403
1403
 52
52
 1300
1300
 25
25
 1240
1240
 29
29
 フロントエンドのサーマルペーパーレシートのために文字化けしたコード印刷に遭遇した場合はどうすればよいですか?
Apr 04, 2025 pm 02:42 PM
フロントエンドのサーマルペーパーチケット印刷のためのよくある質問とソリューションフロントエンド開発におけるチケット印刷は、一般的な要件です。しかし、多くの開発者が実装しています...
 javascriptの分解:それが何をするのか、なぜそれが重要なのか
Apr 09, 2025 am 12:07 AM
JavaScriptは現代のWeb開発の基礎であり、その主な機能には、イベント駆動型のプログラミング、動的コンテンツ生成、非同期プログラミングが含まれます。 1)イベント駆動型プログラミングにより、Webページはユーザー操作に応じて動的に変更できます。 2)動的コンテンツ生成により、条件に応じてページコンテンツを調整できます。 3)非同期プログラミングにより、ユーザーインターフェイスがブロックされないようにします。 JavaScriptは、Webインタラクション、シングルページアプリケーション、サーバー側の開発で広く使用されており、ユーザーエクスペリエンスとクロスプラットフォーム開発の柔軟性を大幅に改善しています。
 誰がより多くのPythonまたはJavaScriptを支払われますか?
Apr 04, 2025 am 12:09 AM
スキルや業界のニーズに応じて、PythonおよびJavaScript開発者には絶対的な給与はありません。 1. Pythonは、データサイエンスと機械学習でさらに支払われる場合があります。 2。JavaScriptは、フロントエンドとフルスタックの開発に大きな需要があり、その給与もかなりです。 3。影響要因には、経験、地理的位置、会社の規模、特定のスキルが含まれます。
 JavaScriptは学ぶのが難しいですか?
Apr 03, 2025 am 12:20 AM
JavaScriptを学ぶことは難しくありませんが、挑戦的です。 1)変数、データ型、関数などの基本概念を理解します。2)非同期プログラミングをマスターし、イベントループを通じて実装します。 3)DOM操作を使用し、非同期リクエストを処理することを約束します。 4)一般的な間違いを避け、デバッグテクニックを使用します。 5)パフォーマンスを最適化し、ベストプラクティスに従ってください。
 Shiseidoの公式Webサイトのように、視差スクロールと要素のアニメーション効果を実現する方法は?
または:
Shiseidoの公式Webサイトのようにスクロールするページを伴うアニメーション効果をどのように実現できますか?
Apr 04, 2025 pm 05:36 PM
この記事の視差スクロールと要素のアニメーション効果の実現に関する議論では、Shiseidoの公式ウェブサイト(https://www.shisido.co.co.jp/sb/wonderland/)と同様の達成方法について説明します。
 JavaScriptを使用して、同じIDを持つArray要素を1つのオブジェクトにマージする方法は?
Apr 04, 2025 pm 05:09 PM
同じIDを持つ配列要素をJavaScriptの1つのオブジェクトにマージする方法は?データを処理するとき、私たちはしばしば同じIDを持つ必要性に遭遇します...
 JavaScriptの進化:現在の傾向と将来の見通し
Apr 10, 2025 am 09:33 AM
JavaScriptの最新トレンドには、TypeScriptの台頭、最新のフレームワークとライブラリの人気、WebAssemblyの適用が含まれます。将来の見通しは、より強力なタイプシステム、サーバー側のJavaScriptの開発、人工知能と機械学習の拡大、およびIoTおよびEDGEコンピューティングの可能性をカバーしています。
 Console.log出力の違い結果:なぜ2つの呼び出しが異なるのですか?
Apr 04, 2025 pm 05:12 PM
Console.log出力の違いの根本原因に関する詳細な議論。この記事では、Console.log関数の出力結果の違いをコードの一部で分析し、その背後にある理由を説明します。 �...


