アイビー・ワロブワ著✏️
Web アプリが複雑になるにつれて、デバッグの技術を習得することが不可欠になります。
JavaScript の効果的なデバッグには、エラーを修正するだけでは不十分です。アプリがスムーズに動作し、最高のユーザー エクスペリエンスを提供するには、コードが内部でどのように機能するかを理解する必要があります。
縮小されたコードは、運用環境でユーザーに提供されるコードのバージョンであり、パフォーマンスが最適化されています。ただし、縮小されたコードのデバッグは悪夢のようなものになる可能性があります。ユーザーがエラーに遭遇した場合、縮小されたコードで問題を再現して診断することは多くの場合困難です。
ただし、適切なツールを使用すると、JavaScript のデバッグがはるかに簡単になります。この記事では、ソース マップを活用して縮小コードをデバッグする方法を検討し、Chrome DevTools を使用してウェブ アプリの問題を効率的に特定して解決する他のテクニックについて詳しく説明します。
カウントを増やしてコンソールに記録する単純なアプリに取り組みます。このアプリは、縮小されたコードがデバッグをいかに困難にするか、またソース マップがプロセスを簡略化するのにどのように役立つかを示します。
以下の .js ファイルを作成し、次のようにコード スニペットを追加します。
1. src/counterCache.js
export const countCache = {
     previousCount: 0,
     currentCount: 0,
     totalCount: 0
}
export function updateCache(currentCount, previousCount) {
     countCache.currentCount = currentCount;
     countCache.previousCount = previousCount; c
     ountCache.totalCount = countCache.totalCount + countCache.currentCount;
}
2.src/counter.js:
import { updateCache } from './counterCache.js';
let count = 0;
export function incrementCounter()
     { count += 1;
     const previousCount = count;
     updateCache(count, previousCount);
}
3.src/index.js:
import { incrementCounter } from './counter';
import { countCache } from './counterCache';
const button = document.createElement('button');
const previousElement = document.getElementById('previous');
const currentElement = document.getElementById('current');
const totalElement = document.getElementById('total');
button.innerText = 'Click me';
document.body.appendChild(button);
button.addEventListener('click', () => {
     incrementCounter();
     previousElement.innerText = countCache.previousCount;
     currentElement.innerText = countCache.currentCount;
     totalElement.innerText = countCache.total();
});
package.json ファイルに、以下に示すように webpack パッケージを追加し、npm i を実行してインストールします。ビルドプロセスの一部として webpack を使用して、実稼働用に縮小されたコードを生成します。
  "devDependencies": {
    "webpack": "^5.96.1",
    "webpack-cli": "^5.1.4"
  }
コードの縮小を有効にするには、次のスニペットを含む webpack.config.js ファイルを追加します。モードを実稼働に設定すると、webpack に変更などの最適化を適用するよう指示します:
 const path = require('path');
    module.exports = {
        mode: 'production', // Enables optimizations like minification and tree-shaking
        entry: './src/index.js', // Specifies the entry point of your application
        output: {
            path: path.resolve(__dirname, 'dist'),// Defines the output directory for bundled files
            filename: 'bundle.js',// Specifies the name of the bundled file
        },
    };
ここで npx webpack を実行して、コードをバンドルして縮小します。 dist/bundle.js ファイルは、以下に示す内容で生成されます。縮小すると、変数名や関数名が隠され、空白、コメント、未使用のコードなどの不要な文字が削除され、出力ファイルが小さくなり、読み込みが速くなります。
(()=>{"use strict";const t={};let e=0;const n=document.createElement("button"),o=document.getElementById("previous"),u=document.getElementById("current"),r=document.getElementById("total");n.innerText="Click me",document.body.appendChild(n),n.addEventListener("click",(()=>{var n,c;e+=1,n=e,c=e,t.currentCount=n,t.previousCount=c,t.totalCount=t.totalCount||0+t.currentCount,o.innerText=t.previousCount,u.innerText=t.currentCount,r.innerText=t.total()}))})();
次に、バンドルされた出力を参照するようにindex.html ファイルを更新し、アプリケーションが縮小されたコードを使用していることを確認します。
<<!DOCTYPE html>
<html lang="en">
<head>
    <meta charset="UTF-8">
    <meta name="viewport" content="width=device-width, initial-scale=1.0">
    <title>Web Debugging Example</title>
    <link rel="stylesheet" href="styles.css">
</head>
<body>
    <h1>Web Debug App</h1>
    <p>Check console for bug</p>
    <table>
        <thead>
            <tr>
                <th>Previous count</th>
                <th>Current count</th>
                <th>Total count</th>
            </tr>
        </thead>
        <tbody>
            <tr>
                <td>


<p>Finally, run the app and check the console after clicking the button. To preview the app locally, you can use the Live Server extension in VS Code:</p>

<p><img src="/static/imghw/default1.png"  data-src="https://img.php.cn/upload/article/000/000/000/173705233279872.png"  class="lazy" alt="app error using minified code" loading="lazy"    style="max-width:90%"  style="max-width:90%"></p>

<p><img src="/static/imghw/default1.png"  data-src="https://img.php.cn/upload/article/000/000/000/173705233320770.png"  class="lazy" alt="Bundled source file" loading="lazy"    style="max-width:90%"  style="max-width:90%"></p>

<p>The error in the console, t.total is not a function, is difficult to interpret. Clicking on the file in the console does not help pinpoint the issue due to the compact and obfuscated nature of minified code. Identifying the root cause of such an error in a large codebase can be frustrating and time-consuming, as the minified code obscures the original logic and context.</p>

<h2>


  8 JavaScript debugging strategies for web apps
</h2>

<p>Let’s demonstrate eight methods to help make JavaScript debugging a bit easier:</p>

<h3>


  1. Source maps
</h3>

<p>Source maps are files that map your minified code back to the original source code. They make debugging easier and help investigate issues in production. The file names of source maps end with .map.</p>

<p>To generate source maps using webpack, update the webpack.config.js file as follows:</p>

<p>The devtool: 'source-map' or devtool: 'eval-source-map' line tells webpack to generate an external .map file which maps the minified code back to your original source code. The source map file URL is also added to the minified code in the bundle.js file.</p>

<p>Now run npx webpack. The .map file will generate alongside your minified bundle. Serve the application using a local server, and open it in an Incognito browser window. This prevents browser extensions and cached files from interfering with your debugging process.</p>

<p>With source maps generated, the following observations are made:</p>

<ol>
<li> The error is linked to the counter.js file, which is the original source code</li>
<li> The source map, bundle.js.map is successfully fetched and is visible under the <strong>Developer resources</strong> tab</li>
<li> In the <strong>Sources</strong> tab, the developer tools display the original source code and the problematic line</li>
</ol>

<p>The exact code and file causing the bug are easy to identify using source maps:</p>

<p><img src="/static/imghw/default1.png"  data-src="https://img.php.cn/upload/article/000/000/000/173705233514189.png"  class="lazy" alt="app error from source maps" loading="lazy"    style="max-width:90%"  style="max-width:90%"></p>

<p><img src="/static/imghw/default1.png"  data-src="https://img.php.cn/upload/article/000/000/000/173705233621716.png"  class="lazy" alt="mapped source code javascript debugging" loading="lazy"    style="max-width:90%"  style="max-width:90%"></p>

<p>With the clear error above, we are able to fix the error and access the correct property on countCache.</p>

<p>Our guide on how to use Chrome DevTools should provide a great start. To open the <strong>Developer resources</strong> tab, click on the <strong>More</strong> icon, then <strong>More tools</strong> then <strong>Developer resources</strong>. This tab allows you to view the source map load status and even load source maps manually:</p>

<p><img src="/static/imghw/default1.png"  data-src="https://img.php.cn/upload/article/000/000/000/173705233875017.png"  class="lazy" alt="accessing developer resources tab javascript debugging" loading="lazy"    style="max-width:90%"  style="max-width:90%"></p>

<p>The code snippet below fixes the bug on the console. Update your code, then run npx webpack to compile the changes. Once completed, serve the application and view the updated output in the table:<br>
</p>

<pre class="brush:php;toolbar:false">totalElement.innerText = countCache.totalCount;
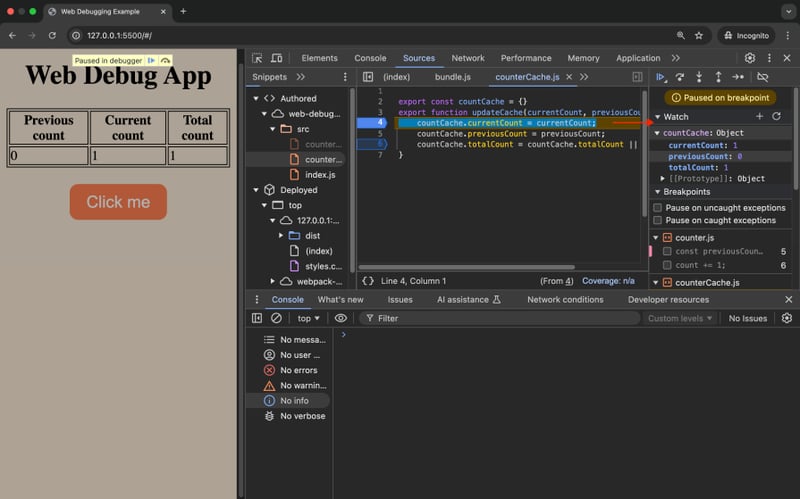
ボタンをクリックすると、現在、テーブル上の以前のカウント、現在のカウント、および合計が更新されます。前回のカウントは以前のカウント値を返し、合計カウントはすべてのカウント値の合計を返すことになっています。現時点では、前のカウントには現在のカウントが表示されますが、合計カウントは 1 のままです。
次のセクションでは、この問題を特定して修正するために、ブレークポイントの使用やコードのステップ実行など、追加の JavaScript デバッグ手法を検討します。

ブレークポイントを使用すると、コードの実行を特定の行で一時停止できるため、変数の検査、式の評価、コード フローの理解に役立ちます。目標に応じて、使用できるさまざまなブレークポイントがあります。例:
サンプル アプリケーションでは、incrementCounter 関数にブレークポイントを適用します。 [Sources] パネルで、counter.js ファイルを開き、6 行目の左側をクリックします。これにより、カウントが増加した後にコード行ブレークポイントが設定されます:

5 行目に別のブレークポイントを設定し、編集します。ブレークポイントを編集するには、強調表示されたセクションを右クリックし、ブレークポイントの編集:
をクリックします。
ブレークポイントのタイプを ログポイント に設定し、コンソールに記録するメッセージを入力します。

ボタンをクリックすると、アプリケーションはコード行のブレークポイントで一時停止し、ログポイント セットからコンソールにデバッグ ログを出力します。

画像から、次のセクションがわかります:
これにより、アプリをさらにデバッグできるようになります。
スコープ パネルは、元のソースからの変数を確認できるため、JavaScript のデバッグに効果的です。

次のスコープ変数が表示されます:
スコープ パネルとログ ポイント ブレークポイントから、現在のカウントが 1 であるのに対し、増加前のカウントは 0 であることがわかります。したがって、増分前のカウントを前のカウントとして保存する必要があります。
コードをステップ実行するには、JavaScript のデバッグ中にさまざまな方法でプログラム内を移動する必要があります。
デバッグ コントロールを使用してコードをステップ実行できます。 Step コントロールを使用すると、コードを一度に 1 行ずつ実行できます。 ステップ をクリックすると、6 行目が実行され、7 行目に移動します。スコープ内でpreviousCountの値がどのように変化するかに注目してください:

ステップオーバー コントロールを使用すると、1 行ずつ実行することなく関数を実行できます。

ステップイン コントロールを使用すると、関数に入ることができます。関数では、コードを 1 行ずつステップ実行するか、以下に示すように関数から ステップアウト することができます。関数からステップアウトすると、残りの行の実行が終了します:

問題を解決するために、以下に示すようにコードを更新します。これで、以前のカウントがテーブルに正しく表示されるようになりました:
export const countCache = {
     previousCount: 0,
     currentCount: 0,
     totalCount: 0
}
export function updateCache(currentCount, previousCount) {
     countCache.currentCount = currentCount;
     countCache.previousCount = previousCount; c
     ountCache.totalCount = countCache.totalCount + countCache.currentCount;
}
コールスタックには、コード内の現在のポイントに至る一連の関数呼び出しが表示されます。
図に示すように、counterCache.js ファイルに新しいブレークポイントを追加し、ボタンをクリックします。呼び出しスタック パネルを観察します:

アプリが counterCache.js の 6 行目を実行するときに、3 つの関数呼び出しが行われます。スタック内の関数のフローを観察するには、以下に示すように Restart Frame を使用して関数の実行を再開できます。

ページ タブで、無視するファイルを右クリックし、スクリプトを無視リストに追加します。


ページ] タブでファイルをグループ化し、ナビゲーションを容易にすることができます。


スニペット. を利用できます。
スニペット タブで、サンプル デバッグ スクリプトを追加し、スクリプトを保存して、Enter をクリックしてスクリプトを実行します。

export const countCache = {
     previousCount: 0,
     currentCount: 0,
     totalCount: 0
}
export function updateCache(currentCount, previousCount) {
     countCache.currentCount = currentCount;
     countCache.previousCount = previousCount; c
     ountCache.totalCount = countCache.totalCount + countCache.currentCount;
}
React DevTools を使用した React アプリのデバッグに関するこの記事など、Web アプリのデバッグに関する追加リソースを探索できます。これにより、React ベースのアプリケーションのデバッグに関する貴重な洞察が得られます。さらに、Chrome DevTools を使用した Node.js のデバッグに関するこのガイドでは、ウォッチャーやその他の高度な DevTools 機能を使用してサーバーサイド JavaScript をデバッグするためのヒントを提供します。これらのリソースは、ここで説明した手法を補完し、Web アプリのデバッグについての理解を広げることができます。
このチュートリアルでは、ソース マップと Chrome DevTools を使用した縮小コードのデバッグについて説明しました。ソース マップを生成することで、縮小されたコードを元のソースにマップし直し、Web アプリのデバッグを容易にしました。 Chrome DevTools は、ブレークポイント、コードのステップ実行、ウォッチ式などのメソッドを使用して JavaScript デバッグ プロセスをさらに強化しました。
これらのツールを使用すると、開発者は、複雑で縮小されたコードベースを扱う場合でも、アプリケーションを効率的にデバッグし、最適化できます。このプロジェクトの完全なコードは GitHub にあります。
NPM:
import { updateCache } from './counterCache.js';
let count = 0;
export function incrementCounter()
     { count += 1;
     const previousCount = count;
     updateCache(count, previousCount);
}
スクリプトタグ:
import { incrementCounter } from './counter';
import { countCache } from './counterCache';
const button = document.createElement('button');
const previousElement = document.getElementById('previous');
const currentElement = document.getElementById('current');
const totalElement = document.getElementById('total');
button.innerText = 'Click me';
document.body.appendChild(button);
button.addEventListener('click', () => {
     incrementCounter();
     previousElement.innerText = countCache.previousCount;
     currentElement.innerText = countCache.currentCount;
     totalElement.innerText = countCache.total();
});
3.(オプション) スタックとのより深い統合のためのプラグインをインストールします:
今すぐ始めましょう。
以上がWeb アプリの JavaScript デバッグをマスターする方法の詳細内容です。詳細については、PHP 中国語 Web サイトの他の関連記事を参照してください。