

Outlookで連絡先を印刷する方法

This article will guide you through the process of printing Outlook contacts, whether it's an entire address book or a specific record.
Microsoft Outlook offers great convenience in organizing contacts digitally, but sometimes you might need a paper copy. Printing your Outlook contacts can be helpful for various reasons, whether it's for a quick reference during your meeting or a backup for those just-in-case moments. Let's walk through the simple steps to transform your virtual network into a neatly organized tangible list.
Note. This guide shows how to print contacts in classic (old) Outlook.
How to print a list of contacts in Outlook
The Address book in Outlook is a "virtual folder" displaying information from your contact folders. However, the address book itself does not have a printing option. To get your contacts on paper, you need to go directly to the address source, and then use the print option available. Here are the detailed instructions:
- Access your Outlook contacts. In the Navigation pane on the left side of the Outlook window, click the People icon to open your Contacts view.
- Select the target folder. In the folder pane, select the folder containing the contacts you wish to print.
-
Choose the view. On the Home tab, in the Current View group, select the view that suits your needs. The view you choose will determine the available printing styles. For a card, booklet, or phone directory style, select the People, Business Card, or Card view. For a table or memo style, choose the List view.

-
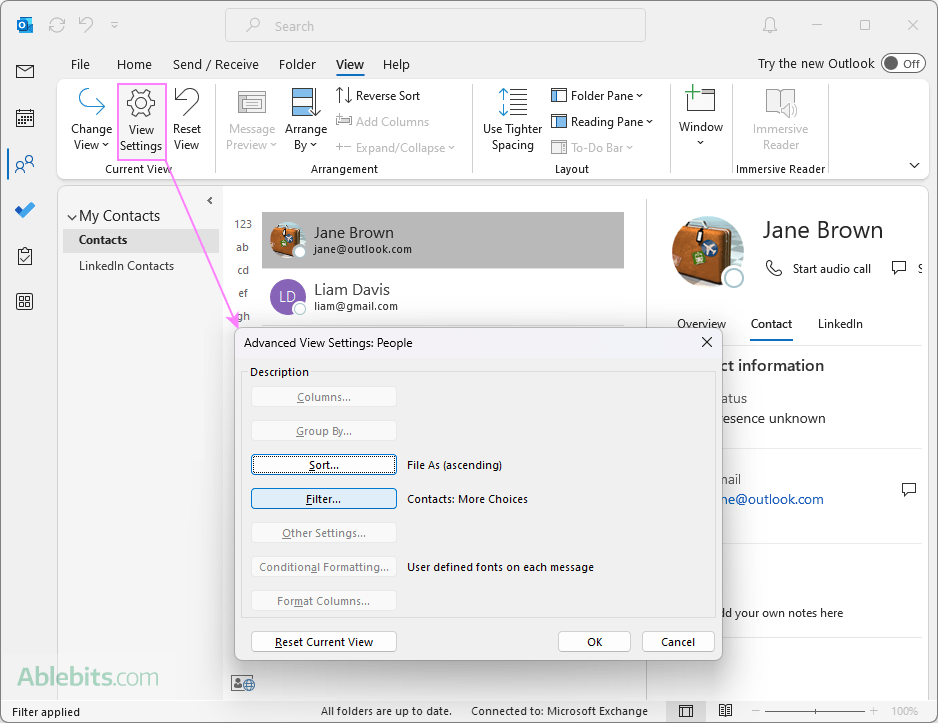
Filter the contacts. If you only want to print a subset of your contacts, you can apply a filter. For this, go to the View tab, click View Settings, and set your criteria, such as company or category. If you're aiming to print all contacts in a folder, you can skip this step.
- Access the print menu. Go to the File tab > Print or press Ctrl + P to open the Print menu.
-
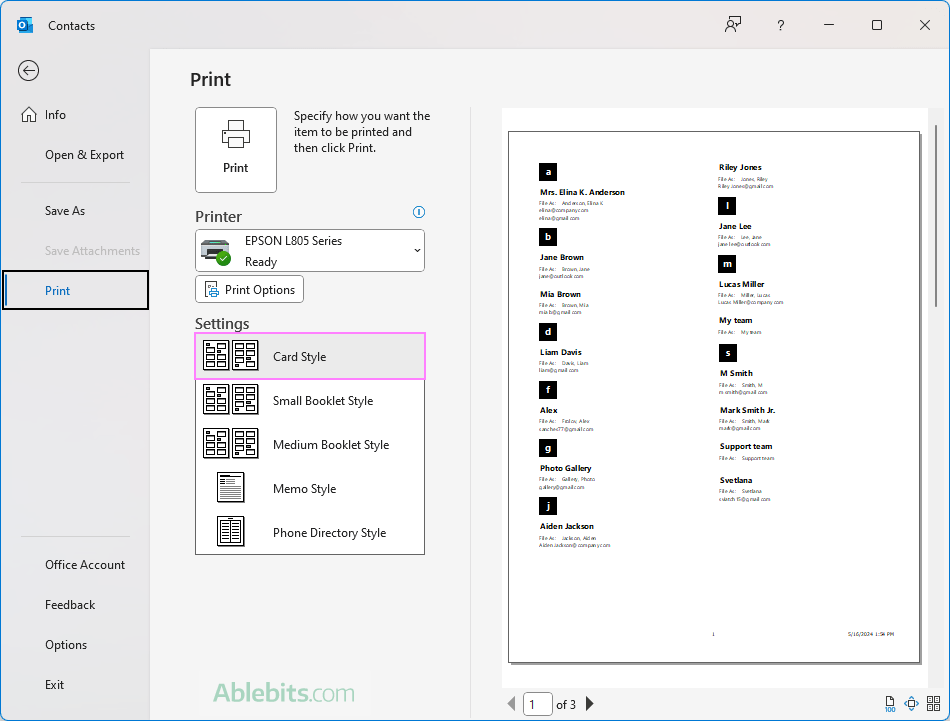
Choose the print style. Under Settings, choose the desired style. A preview of the printout will appear on the right. If you're happy with the format and want to print all pages, click Print. If not, proceed to the next step.
-
Customize the print settings. To fine-tune your settings, click the Print Options button. In the dialog box that appears, you can choose which pages to print, the number of copies, and other preferences. For further customization, click:
- Page Setup to choose fonts, formats, paper size, or to add a header and/or footer.
- Define Styles to modify a specific style or to create your custom style.
After adjusting the settings to your liking, click Preview to see how your changes will look on the final printout.
-
Print. Once you're completely satisfied with the preview, hit the Print button to initiate the printing process.


With these steps, you'll have a printed list of contacts from your Outlook address book, organized just the way you need them.
Note. These instructions are applicable to the classic desktop Outlook app for Windows. Unfortunately, in the new Outlook and Outlook on the web there is currently no option to print contacts.
How to print an individual Outlook contact
Printing a certain contact from Outlook is a simple task that can be done in just a few steps:
- In your Outlook contact folder, locate the specific contact you want to print.
- Double-click on the contact's name to open its card.
- With the contact card open, click File > Print or use the Ctrl + P shortcut.
- In the Print menu that appears, you can select the printer and tailor the settings to fit your needs. For a single contact, Outlook only provides the Memo style as the default print format. To customize the formatting, click the Print Options button.
- Preview the contact to make sure that all the necessary details are included and formatted to your preference.
- Finally, click the Print button to send the contact to the printer.


By following these steps you can quickly get a hard copy of the contact details whenever required for your meetings, networking events, or as a personal backup.
Print Outlook contacts to PDF
Printing Outlook contacts to a PDF file can be a convenient way to save and share your contact information. Here's a step-by-step guide to help you do just that:
- Select the contact folder you want to include in the PDF file. If you're looking to convert a specific contact to PDF, double-click on it to open its card.
- Click File > Print or use the Ctrl + P shortcut to get to the print menu.
- Choose Microsoft Print to PDF as your printer.
- Select your preferred style.
- To adjust additional settings like which pages to include or add a header/footer, click the Print Options button.
- Click the Print button.
- In the Save Print Output As dialog box, choose a location for your PDF and name it.
- Click Save, and your contacts will be immediately saved as a PDF in the folder you selected.


Saving to PDF lets you promptly get a digital copy of your Outlook contacts in a widely compatible format, which can be easily shared or archived.
Note. This process is applicable to the classic desktop Outlook app on Windows 10 and Windows 11. The new Outlook app and Outlook on the web currently do not offer an option to print contacts.
Outlook contacts print styles
When it comes to organizing and sharing contact information, Outlook offers a variety of styles to suit different needs and preferences. Each style offers a unique layout and presentation of your contact information. Here's an overview of the print styles available for Outlook contacts:
Card Style
This style closely resembles how contacts appear in Outlook's Card view. Each contact is displayed as a separate card, making it convenient for quick scanning through details. It's convenient for creating a physical address book with a visually appealing and compact layout.

Small Booklet Style
Ideal for creating a pocket-sized booklet, this style arranges your contacts in a compact format that's easy to carry around. It optimizes space by placing multiple entries on each page, so you can make useful reference booklets that can fit in a pocket or binder.

Medium Booklet Style
The Medium Booklet style is an excellent choice for those who prefer a balance between compactness and readability. It offers more space for each contact than the small booklet style, making it easier to read and perfect for a desk reference.

Phone Directory style
This style organizes your contacts in a format similar to a traditional phone book. It lists people alphabetically with their names and phone numbers. This style is useful for creating a phone directory of your Outlook contacts.

Memo style
The Memo style in Outlook is designed for those who need a detailed record of their contacts. It prints each contact on a separate page, providing an overview of the essential information. This style is perfect for creating personal profiles or for instances where detailed information is required for each contact.

Table style
The Table style is a practical choice for those who appreciate organization and clarity. It displays your contacts in a structured tabular format, much like a spreadsheet. Typically, it's the default print style when you apply the List view for contacts in Outlook.

As you see, different styles have different uses and serve specific purposes. Pick the one that best fits your needs to keep your contacts within reach, in the format that you prefer.
Wrapping up, printing Outlook contacts is a convenient way to stay organized and prepared for any scenario, be it a formal meeting or a casual get-together. So go ahead, give it a try, and enjoy the feeling of holding your digital world in your hands ?
以上がOutlookで連絡先を印刷する方法の詳細内容です。詳細については、PHP 中国語 Web サイトの他の関連記事を参照してください。

ホットAIツール

Undresser.AI Undress
リアルなヌード写真を作成する AI 搭載アプリ

AI Clothes Remover
写真から衣服を削除するオンライン AI ツール。

Undress AI Tool
脱衣画像を無料で

Clothoff.io
AI衣類リムーバー

Video Face Swap
完全無料の AI 顔交換ツールを使用して、あらゆるビデオの顔を簡単に交換できます。

人気の記事
ホットツール

メモ帳++7.3.1
使いやすく無料のコードエディター

SublimeText3 中国語版
中国語版、とても使いやすい

ゼンドスタジオ 13.0.1
強力な PHP 統合開発環境

ドリームウィーバー CS6
ビジュアル Web 開発ツール

SublimeText3 Mac版
神レベルのコード編集ソフト(SublimeText3)
ホットトピック
 7838
7838
 15
1649
14
1403
52
1300
25
1240
29
15
1649
14
1403
52
1300
25
1240
29

 列または行の上位3、5、10値を見つけるためのExcel式
Apr 01, 2025 am 05:09 AM
列または行の上位3、5、10値を見つけるためのExcel式
Apr 01, 2025 am 05:09 AM
このチュートリアルでは、データセット内の上部N値を効率的に見つけ、Excel式を使用して関連データを取得する方法を示しています。 最高、最低、または特定の基準を満たすものを必要とするかどうかにかかわらず、このガイドは解決策を提供します。 findi
 Outlookにカレンダーを追加する方法:共有、インターネットカレンダー、ICALファイル
Apr 03, 2025 am 09:06 AM
Outlookにカレンダーを追加する方法:共有、インターネットカレンダー、ICALファイル
Apr 03, 2025 am 09:06 AM
この記事では、IcalEndarファイルのインポートなど、Outlookデスクトップアプリケーション内で共有カレンダーにアクセスして利用する方法について説明します。 以前は、Outlookカレンダーの共有について説明しました。 それでは、共有されているカレンダーの表示方法を調べてみましょう
 Flash Fill In Excelを使用する方法例
Apr 05, 2025 am 09:15 AM
Flash Fill In Excelを使用する方法例
Apr 05, 2025 am 09:15 AM
このチュートリアルは、データ入力タスクを自動化するための強力なツールであるExcelのFlash Fill機能の包括的なガイドを提供します。 定義と場所から高度な使用やトラブルシューティングまで、さまざまな側面をカバーしています。 ExcelのFLAを理解する
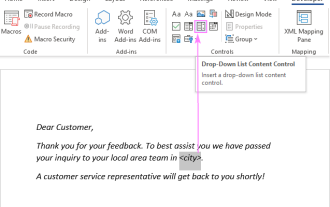 Outlookメールテンプレートにドロップダウンリストを追加します
Apr 01, 2025 am 05:13 AM
Outlookメールテンプレートにドロップダウンリストを追加します
Apr 01, 2025 am 05:13 AM
このチュートリアルでは、複数の選択やデータベースの母集団を含むOutlookメールテンプレートにドロップダウンリストを追加する方法を示します。 Outlookはドロップダウンを直接サポートしていませんが、このガイドは創造的な回避策を提供します。 メールテンプレートを保存します
 Excelの式の中央値 - 実用的な例
Apr 11, 2025 pm 12:08 PM
Excelの式の中央値 - 実用的な例
Apr 11, 2025 pm 12:08 PM
このチュートリアルでは、中央値関数を使用してExcelの数値データの中央値を計算する方法について説明します。 中央傾向の重要な尺度である中央値は、データセットの中央値を識別し、中央の傾向のより堅牢な表現を提供します
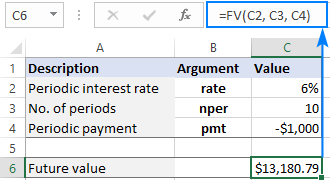 将来の値を計算するためのExcelのFV機能
Apr 01, 2025 am 04:57 AM
将来の値を計算するためのExcelのFV機能
Apr 01, 2025 am 04:57 AM
このチュートリアルでは、ExcelのFV機能を使用して投資の将来の価値を決定する方法について説明します。 効果的な財務計画は、投資の成長を理解することにかかっています。
 Excelセルでテキストと数字を削除 /分割する方法
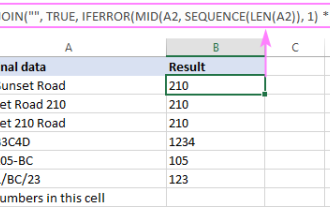
Apr 01, 2025 am 05:07 AM
Excelセルでテキストと数字を削除 /分割する方法
Apr 01, 2025 am 05:07 AM
このチュートリアルでは、Excelセル内のテキストと数値を分離するためのいくつかの方法を示しており、組み込み関数とカスタムVBA関数の両方を利用しています。 テキストを削除しながら数値を抽出する方法を学び、数字を破棄しながらテキストを分離します
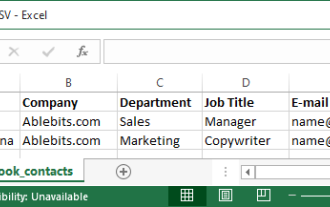 連絡先をOutlookにインポートする方法(CSVおよびPSTファイルから)
Apr 02, 2025 am 09:09 AM
連絡先をOutlookにインポートする方法(CSVおよびPSTファイルから)
Apr 02, 2025 am 09:09 AM
このチュートリアルでは、連絡先をOutlookにインポートするための2つの方法を示しています。CSVファイルとPSTファイルを使用し、オンラインでOutlookに連絡先の転送をカバーしています。 外部ソースからのデータを統合しているかどうか、別のメールプロから移行するかどうか
