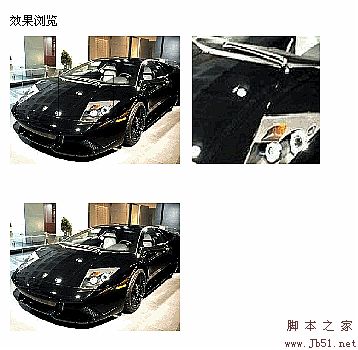
V1.0 구현 기능
1 배율 설정
2 투명도 설정
3 반전 특수 효과
4 확대된 사진 레이어의 크기를 사용자 지정
5 마우스 레이어 커스터마이징
6 ie6에서 마스킹 문제 선택
7 커서 스타일 커스터마이징
8 zIndex 설정
간단한 초기화 방법 예시
new flower.init("Demo","mag")
new flower.init("Demo1", "mag1", {
max:3,zoomType:false,zoomWidth:200,zoomHeight:200,iframe:true,zIndex:666,cursor:"row-resize"
}); >
코드 설명
defaultConfig={
/**
* 돋보기 확대
* @type 숫자
*/
최대:3,
/**
* *돋보기 마우스 움직임 레이어의 투명도
* @type Number
*/
불투명도:0.5,
/**표시 효과 false가 기본값이고 true가 색상 반전 효과
* @type Boolean
*/
ZoomType:false,
/**애니메이션 표시
* @type String
*/
showEffect:'fadein',
/**레이어 너비 확대
* @type Number
*/
zoomWidth:'auto',
/** 확대 레이어 높이
* @type Number
*/
zoomHeight:'auto',
/**마우스 레이어 너비
* @type Number
*/
tipsWidth:'auto',
/**마우스 레이어 높이
* @type Number
*/
tipsHeight: 'auto',
/**iframe 마스크 선택
* @type Boolean
*/
iframe:false,
/**iframe zIndex
* @type Number
*/
zIndex:999,
/**커서 스타일
* @type String
* /
cursor:" auto"
};
배율, 너비, 높이, 투명도 등에 대한 설정을 포함한 구성 요소의 기본 매개변수 구성입니다.
2 속성을 정의합니다.
namespace.init=function(content,mag ,config){
/**
* 원본 이미지 컨테이너
* @type HTMLElement
*/
this.content=D.get(content)
/**
* 이미지 컨테이너 확대
* @type HTMLElement
*/
this.mag=D.get (매그);
/**
* 원본 이미지
* @type HTMLElement
*/
this.imgsource=this.content.getElementsByTagName("img")[0]
/**
* 이미지 확대
* @type HTMLElement
*/
this.img=this.mag.getElementsByTagName("img" )[0];
/**
* 마우스 레이어
* @type HTMLElement
*/
this.tips=this.content.getElementsByTagName("div")[0];
/**
* 구성 매개변수
* @type this.tipsect
*/
this.config=L.merge(defaultConfig,config||{})
/*초기화*/
this._init()
};
init 이 함수는 세 가지 실제 매개변수(원본 이미지의 컨테이너 ID, 확대된 이미지 컨테이너 ID 및 구성 매개변수)를 허용합니다(Firebug를 설치한 학생은 코드 구조를 볼 수 있음).
this.config=L.merge(defaultConfig,config||{ });
이 문장은 다음 객체의 속성이 이전 객체의 속성을 덮어쓰고, 이와 같은
을 반환한다는 의미입니다. config=L.merge({"a":"aa"},{"a" :"bb"})
현재 This.config.a == "bb"
config||{ }
config가 없으면 빈 객체 인수를 반환
프로토타입 초기화 방법
코드
코드 복사 코드는 다음과 같습니다.
_init:function(){
var self=this;
/*赋值src给大图*/
this.img.src=this.imgsource.src;
/*get边框長度*/
this.borderwidth=this.imgsource.offsetWidth - this.imgsource.clientWidth;
/**
* 大きな画像の幅と高さを設定します (X 倍)
* 大きな画像コンテナの幅、高さ、位置を設定します
* マウスの次のレイヤーの幅、高さ、透明度を設定します
*/
this.pi=(this.config.zoomWidth!='auto'?this.config.zoomWidth/this.imgsource.offsetWidth:1)
this.pi2 =(this.config.zoomHeight!='auto'?this.config.zoomHeight/this.imgsource.offsetHeight:1)
this._css(this.img,{
'position':'absolute',
'width':(this.config.zoomWidth!='auto' ?this.imgsource.offsetWidth*this.config.max*this.pi:this.imgsource.offsetWidth*this.config.max) "px" ,
'高さ':(this.config.zoomHeight!='auto' ?this.imgsource.offsetHeight*this.config.max*this.pi2:this.imgsource.offsetHeight*this.config.max) "px "
})._css(this.mag,{
'width':(this.config.zoomWidth!='auto' ? this.config.zoomWidth:this.imgsource.offsetWidth) "px",
'height':(this.config.zoomHeight!='auto'?this.config.zoomHeight:this.imgsource.offsetHeight) "px",
'left':D.getX(this.content) this .imgsource.offsetWidth 10 "px",
'top':this.content.offsetTop "px",
'position' : 'absolute',
"zIndex":this.config.zIndex
})._css(this.tips,{
'display':'',
'width':(this.config.tipsWidth!='auto' ? this.config.tipsWidth: parseInt(this.imgsource.offsetWidth / this.config.max)- this.borderwidth) "px",
'height' : (this.config.tipsHeight!='auto' ? this. config.tipsHeight: parseInt(this.imgsource.offsetHeight / this.config.max) - this.borderwidth ) 'px',
'opacity' : this.config.opacity
})
E.on (this.content,'mousemove',function(e){
self._css(self.mag,{"display":"block"})._css(self.tips,{"display":"block" })._move(e,self.tips)
})
E.on(this.content,'mouseout',function(e){
self._css(self.tips,{"display ":"none"})._css(self.mag,{"display":"none"});
})
!!this.config.zoomType && E.on(self.tips,' Mouseout',function(e){
self._css(self.imgsource,{"opacity":1});
self.tips.getElementsByTagName("img")[0] && self.tips.removeChild (self.tips.getElementsByTagName("img")[0]);
})
if(ie6 && !!this.config.iframe){
this._createIframe(this.mag);
}
D.setStyle(this.content,"cursor",this.config.cursor);
}、
コンポーネントの初期化原コード
がマウスの動きを認識する層と拡大図は、
1 の接続値を使用して拡大表示されます。
2. 独自にzoomWidthやzoomHeightを設定する場合は、this.piの宽比とthis.pi2の高比(写真のサイズとの比)を設定します
3. 大きな画像のサイズと高さを設定します
4. 大画像コンテナの高さと位置を設定します
5. マウス層の位置と高さと透明度を設定します
6. 大画像コンテナの追加mousemove イベント
7. 原図コンテナ増加mouseout イベント
8 反色特効後、透明度を追加し、効果を実現するための Dom (ネズミ标层结構造内用appendChild一img元素)
9 ie6 创建iframe を遮蔽するためのselect。 (問題が発生した場合、ie6 は選択され、zIndex を使用せずに修正されます)
10 光マーク式を設定する
スタイルを設定する方法
_css:function(el,json){
for(var s in json){
D .setStyle(el,s,json[s]);
}
これを返します;
},
Yui が提供する独自の設定 Dom 式のメソッド D.setStyle(dom,style プロパティ名, プロパティの值);
for (var s in json) 来遍历 json 对オブジェクトのすべてのプロパティ
return this; 常用的链式调用写法 // this._css(/**/)._css(/**/) ._css(/**/) ……
核心mousemove イベント代牌
_move:function(e,tips){
var point=E.getXY(e);
/**
* プロンプトレイヤーの位置
* 大きな画像の表示位置
*/
this._css(tips,{
'top' : Math.min(Math.max(point[1] - this.content.offsetTop-parseInt(tips) .offsetHeight)/2 ,0),this.content.offsetHeight -tips.offsetHeight) 'px',
'left' : Math.min(Math.max(point[0] - this.content.offsetLeft-parseInt) (tips.offsetWidth)/2 ,0),this.content.offsetWidth -tips.offsetWidth) 'px'
})._css(this.img,{
'top':-(parseInt(tips. style.top) * this.config.max *this.pi2) 'px',
'left' : - (parseInt(tips.style.left) * this.config.max *this.pi) 'px'
});
/**
* 逆色効果
*/
if(!!this.config.zoomType){
if(!tips.getElementsByTagName("img").length){
var imgs=document .createElement("img");
imgs.id='temp';
imgs.src=this.imgsource.src;
this._css(imgs,{
'width':this.imgsource.offsetWidth "px",
'height':this.imgsource.offsetHeight "px",
'position':'絶対'
});
tips.appendChild(imgs);
this.imgs=imgs;
}
this._css(this.imgsource,{
"不透明度":0.2
})._css(this.tips,{
"不透明度":1,
"可視性":"可視"
})._css(D.get("temp"),{
'top':-(parseInt(tips.style.top)) "px",
' left':-(parseInt(tips.style.left)) "px"
})
}
},
提案层位置の移動ネズミ标位置X轴 - this.offsetLeft - ネズミ标框宽度/2
使用Math.maxとMath.min、無視ネズミ标框超出tuxiang
大図位置の移動=小図の位置 X 拡大倍数 X 宽比(默认1 )
の逆効果は、jquery の 1 つのアプリケーション上で見られる、他の代コードが見られないことです。下のダム構造構造と私がこのような方法で見られるのは、
設置場所の図の透明度が 0.2 であることです。灰色が完了したら、マウス層を透明に 1 に設定します。つまり、不透明です。層内は 1 つの画像と imgsource の地盤です。
この画像の父元素の位置も絶対です。したがって、上と左の位置を設定します。ネズミ标層の图片
创建iframe
_createIframe:function (el){
varlayer = document.createElement('iframe');
layer.tabIndex = '-1';
layer.src = 'javascript:false;';
el.appendChild(layer);
this._css(layer,{
"width":(this.config.zoomWidth!='auto' ? this.config.zoomWidth:this.imgsource.offsetWidth) "px",
"height ":(this.config.zoomHeight!='auto'?this.config.zoomHeight:this.imgsource.offsetHeight) "px",
"zIndex":this.config.zIndex
})
}
iframe 要素の高さと zIndex の設定、構成パラメータ設定 iframe:true に ie6 下で才会创建、他の浏览器下で設定 true も不会建、必要がないため
代码改进中
1 追加特効的插件机制
2 优化設定宽高值表达式的代码 感觉太长太臃肿
3 追加图片预ダウンロード
4
5 增加className,让用户可自定义
6 等等(...)
地址打包下ダウンロード :放大镜

