Raspberry PiでPythonを使用してGY-85の9軸モジュール情報を取得する例
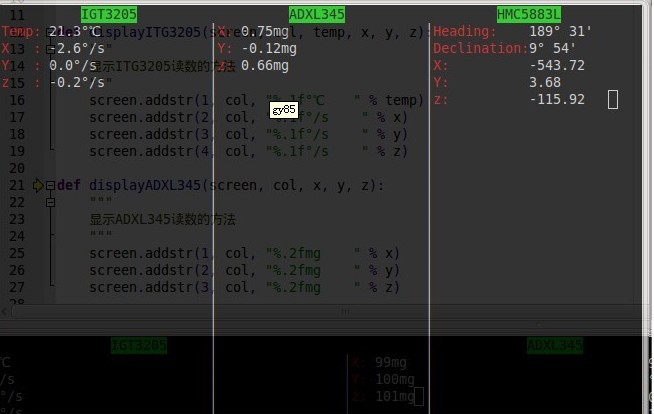
先看效果图
 |
GY-85.py:
#!/usr/bin/python3
# -*- coding: utf-8 -*-
import curses
from time import *
from i2clibraries import i2c_itg3205, i2c_adxl345, i2c_hmc5883l
#==========================================================
# GY-85传感器监控
#==========================================================
def displayITG3205(screen, col, temp, x, y, z):
"""
显示ITG3205读数的方法
"""
screen.addstr(1, col, "%.1f°℃ " % temp)
screen.addstr(2, col, "%.1f°/s " % x)
screen.addstr(3, col, "%.1f°/s " % y)
screen.addstr(4, col, "%.1f°/s " % z)
def displayADXL345(screen, col, x, y, z):
"""
显示ADXL345读数的方法
"""
screen.addstr(1, col, "%.2fmg " % x)
screen.addstr(2, col, "%.2fmg " % y)
screen.addstr(3, col, "%.2fmg " % z)
def displayHMC5883L(screen, col, heading, declination, x, y, z):
"""
显示MC5883L读数的方法
"""
screen.addstr(1, col, heading + " ")
screen.addstr(2, col, declination + " ")
screen.addstr(3, col, "%.2f " % x)
screen.addstr(4, col, "%.2f " % y)
screen.addstr(5, col, "%.2f " % z)
try:
myscreen = curses.initscr() #初始化curses
myscreen.border(0)
(screen_h, screen_w) = myscreen.getmaxyx() #获得屏幕高宽
curses.start_color() #设置颜色
curses.init_pair(1, curses.COLOR_BLACK, curses.COLOR_GREEN) #绿底黑字
curses.init_pair(2, curses.COLOR_RED, curses.COLOR_BLACK) #白底蓝字
curses.init_pair(3, curses.COLOR_MAGENTA,curses.COLOR_BLACK) #黑底什么字
myscreen.clear() #清除画布
# 计算每块的坐标, 屏幕分3列, 每列显示一个传感器
col1 = screen_w / 3 * 0
col2 = screen_w / 3 * 1
col3 = screen_w / 3 * 2
# 屏幕横向分三块,每块中间写上标题
myscreen.addstr(0, int(col1 + screen_w / 3 / 2 - 3), "IGT3205", curses.color_pair(1))
myscreen.addstr(0, int(col2 + screen_w / 3 / 2 - 4), "ADXL345", curses.color_pair(1))
myscreen.addstr(0, int(col3 + screen_w / 3 / 2 - 4), "HMC5883L", curses.color_pair(1))
#画分割线,把屏幕分为3列
for col in range(1, screen_h):
myscreen.addstr(col, int(col2), "│")
myscreen.addstr(col, int(col3), "│")
# 事先打印IGT3205的各项值的名称
myscreen.addstr(1, int(col1), "Temp:", curses.color_pair(2))
myscreen.addstr(2, int(col1), "X :", curses.color_pair(2))
myscreen.addstr(3, int(col1), "Y :", curses.color_pair(2))
myscreen.addstr(4, int(col1), "z :", curses.color_pair(2))
# 事先打印ADXL345的各项值的名称
myscreen.addstr(1, int(col2) + 1, "X:", curses.color_pair(2))
myscreen.addstr(2, int(col2) + 1, "Y:", curses.color_pair(2))
myscreen.addstr(3, int(col2) + 1, "z:", curses.color_pair(2))
# 事先打印HMC5883L的各项值的名称
myscreen.addstr(1, int(col3) + 1, "Heading: ", curses.color_pair(2))
myscreen.addstr(2, int(col3) + 1, "Declination:", curses.color_pair(2))
myscreen.addstr(3, int(col3) + 1, "X: ", curses.color_pair(2))
myscreen.addstr(4, int(col3) + 1, "Y: ", curses.color_pair(2))
myscreen.addstr(5, int(col3) + 1, "z: ", curses.color_pair(2))
# センサーを初期化します
itg3205 = i2c_itg3205.i2c_itg3205(0)
adxl345 = i2c_adxl345.i2c_adxl345(0)
hmc5883l = i2c_hmc5883l.i2c_hmc5883l(0)
hmc5883l.setContinuousMode() #連続更新モードに設定します
hmc5883l.setDeclination(9,54) #真北磁偏角補正を設定します
while True:
#Read itg3205 data
(itgready, dataready) = itg3205.getInterruptStatus()
if dataready:
temp = itg3205.getD ieTemperature()
(x, y, z) = itg3205.getDegPerSecAxes()
displayITG3205(myscreen, 6, temp, x, y, z) #キャンバスを更新
#adxl345 データの読み取り
(x, y, z) = adxl345.getAxes()
displayADXL345(myscreen, int(col2) + 4, x, y, z) #キャンバスを更新
スルー ’ s ’ s ’ s ’ s ‐ ‐ ‐ ‐ to DeclinationString() #磁気偏角を取得補正情報
displayHMC5883L(myscreen, int(col3) + 13, 方位, 赤緯, x, y, z) #キャンバスを更新
myscreen.refresh() #アプリケーションキャンバス
sleep(0.1) #0.1 秒間一時停止
myscreen.getch()
curses.endwin()

ホットAIツール

Undresser.AI Undress
リアルなヌード写真を作成する AI 搭載アプリ

AI Clothes Remover
写真から衣服を削除するオンライン AI ツール。

Undress AI Tool
脱衣画像を無料で

Clothoff.io
AI衣類リムーバー

AI Hentai Generator
AIヘンタイを無料で生成します。

人気の記事

ホットツール

メモ帳++7.3.1
使いやすく無料のコードエディター

SublimeText3 中国語版
中国語版、とても使いやすい

ゼンドスタジオ 13.0.1
強力な PHP 統合開発環境

ドリームウィーバー CS6
ビジュアル Web 開発ツール

SublimeText3 Mac版
神レベルのコード編集ソフト(SublimeText3)

ホットトピック
 7364
7364
 15
15
 1628
1628
 14
14
 1353
1353
 52
52
 1265
1265
 25
25
 1214
1214
 29
29
 XML形式を開く方法
Apr 02, 2025 pm 09:00 PM
ほとんどのテキストエディターを使用して、XMLファイルを開きます。より直感的なツリーディスプレイが必要な場合は、酸素XMLエディターやXMLSPYなどのXMLエディターを使用できます。プログラムでXMLデータを処理する場合、プログラミング言語(Pythonなど)やXMLライブラリ(XML.ETREE.ELEMENTTREEなど)を使用して解析する必要があります。
 XMLをPDFに変換できるモバイルアプリはありますか?
Apr 02, 2025 pm 09:45 PM
XML構造が柔軟で多様であるため、すべてのXMLファイルをPDFSに変換できるアプリはありません。 XMLのPDFへのコアは、データ構造をページレイアウトに変換することです。これには、XMLの解析とPDFの生成が必要です。一般的な方法には、ElementTreeなどのPythonライブラリを使用してXMLを解析し、ReportLabライブラリを使用してPDFを生成することが含まれます。複雑なXMLの場合、XSLT変換構造を使用する必要がある場合があります。パフォーマンスを最適化するときは、マルチスレッドまたはマルチプロセスの使用を検討し、適切なライブラリを選択します。
 XML形式を美化する方法
Apr 02, 2025 pm 09:57 PM
XMLの美化は、合理的なインデンテーション、ラインブレーク、タグ組織など、本質的に読みやすさを向上させています。原則は、XMLツリーを通過し、レベルに応じてインデントを追加し、テキストを含む空のタグとタグを処理することです。 PythonのXML.ETREE.ELEMENTTREEライブラリは、上記の美化プロセスを実装できる便利なchile_xml()関数を提供します。
 携帯電話でXMLをPDFに変換するとき、変換速度は高速ですか?
Apr 02, 2025 pm 10:09 PM
Mobile XMLからPDFへの速度は、次の要因に依存します。XML構造の複雑さです。モバイルハードウェア構成変換方法(ライブラリ、アルゴリズム)コードの品質最適化方法(効率的なライブラリ、アルゴリズムの最適化、キャッシュデータ、およびマルチスレッドの利用)。全体として、絶対的な答えはなく、特定の状況に従って最適化する必要があります。
 携帯電話のXMLファイルをPDFに変換する方法は?
Apr 02, 2025 pm 10:12 PM
単一のアプリケーションで携帯電話でXMLからPDF変換を直接完了することは不可能です。クラウドサービスを使用する必要があります。クラウドサービスは、2つのステップで達成できます。1。XMLをクラウド内のPDFに変換し、2。携帯電話の変換されたPDFファイルにアクセスまたはダウンロードします。
 XMLをPDFに変換できるモバイルアプリはありますか?
Apr 02, 2025 pm 08:54 PM
XMLをPDFに直接変換するアプリケーションは、2つの根本的に異なる形式であるため、見つかりません。 XMLはデータの保存に使用され、PDFはドキュメントを表示するために使用されます。変換を完了するには、PythonやReportLabなどのプログラミング言語とライブラリを使用して、XMLデータを解析してPDFドキュメントを生成できます。
 XMLを写真に変換する方法
Apr 03, 2025 am 07:39 AM
XMLは、XSLTコンバーターまたは画像ライブラリを使用して画像に変換できます。 XSLTコンバーター:XSLTプロセッサとスタイルシートを使用して、XMLを画像に変換します。画像ライブラリ:PILやImageMagickなどのライブラリを使用して、形状やテキストの描画などのXMLデータから画像を作成します。
 画像に変換されたXMLのサイズを制御する方法は?
Apr 02, 2025 pm 07:24 PM
XMLを介して画像を生成するには、XMLのメタデータ(サイズ、色)に基づいて画像を生成するために、ブリッジとしてグラフライブラリ(枕やJFreechartなど)を使用する必要があります。画像のサイズを制御するための鍵は、< width>の値を調整することです。および< height> XMLのタグ。ただし、実際のアプリケーションでは、XML構造の複雑さ、グラフ描画の細かさ、画像生成の速度とメモリ消費の速度、および画像形式の選択はすべて、生成された画像サイズに影響を与えます。したがって、グラフィックライブラリに熟練したXML構造を深く理解し、最適化アルゴリズムや画像形式の選択などの要因を考慮する必要があります。


