Laravelフレームワーク学習メモ(2) プロジェクトの実モデル(Models)、laravelmodels_PHPチュートリアル
前回の記事では開発環境の構築について紹介しましたが、この記事では実際のプロジェクト開発に焦点を当て、laravelフレームワークを段階的に理解していきます。まず、laravelフレームワークのモデルを理解しましょう (モデル)
mvc プロジェクトを開発する場合、モデルは最初のステップです。
モデリングから始めましょう。
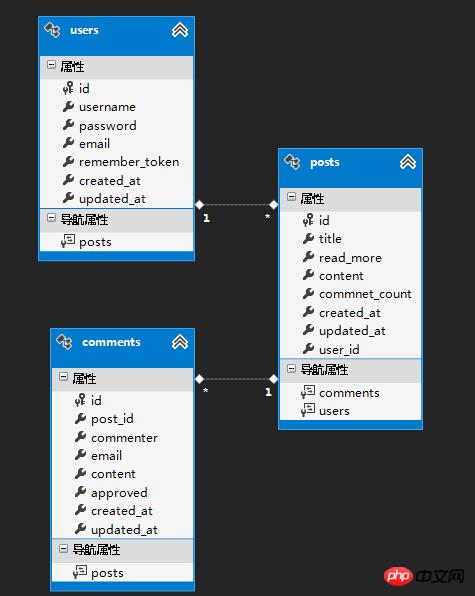
1. エンティティ関係図、
PHP で優れたモデリング ツールを知らないため、ここでは vs ado.net エンティティ モデル データ モデリングを使用します

Laravel コーディングを開始しましょう。まず設定する必要があります。コーディング データベース接続、app/config/database.php ファイルを設定した後
'mysql' => array(
  'driver' => 'mysql',
  'read' => array(
   'host' => '127.0.0.1:3306',
  ),
  'write' => array(
   'host' => '127.0.0.1:3306'
  ),
  'database' => 'test',
  'username' => 'root',
  'password' => 'root',
  'charset' => 'utf8',
  'collation' => 'utf8_unicode_ci',
  'prefix' => '',
 ),
、laravel ディレクトリにある php コマンド ツールである Artisan ツールを使用する必要があります
最初に移行を作成する必要がありますこれは asp.net mvc とほぼ同じです
laravel ディレクトリで、shfit を押しながら右クリックしてコマンド ウィンドウを開き、「artisan merge:make create_XXXX」と入力すると、タイムスタンプ プレフィックスが付いた移行ファイルが生成されます。 app/database/migrations ファイルの下
コード:
<?php

use Illuminate\Database\Schema\Blueprint;
use Illuminate\Database\Migrations\Migration;

class CreateTablenameTable extends Migration {

 /**
  * Run the migrations.
  *
  * @return void
  */
 public function up()
 {

 }

 /**
  * Reverse the migrations.
  *
  * @return void
  */
 public function down()
 {

 }

}ここでの EntityFramework の移行の経験がある人は、基本的には驚くほど似ていることがわかります。
次のステップは、エンティティ構造を作成することです。Laravel の構造ジェネレーターは http://www.php.cn/
<?php
use Illuminate\Database\Schema\Blueprint;
use Illuminate\Database\Migrations\Migration;
class CreateTablenameTable extends Migration {
/**
* Run the migrations.
*
* @return void
*/
public function up()
{
Schema::create('posts', function(Blueprint $table) {
$table->increments('id');
$table->unsignedInteger('user_id');
$table->string('title');
$table->string('read_more');
$table->text('content');
$table->unsignedInteger('comment_count');
$table->timestamps();
});
Schema::create('comments', function(Blueprint $table) {
$table->increments('id');
$table->unsignedInteger('post_id');
$table->string('commenter');
$table->string('email');
$table->text('comment');
$table->boolean('approved');
$table->timestamps();
});
Schema::table('users', function (Blueprint $table) {
$table->create();
$table->increments('id');
$table->string('username');
$table->string('password');
$table->string('email');
$table->string('remember_token', 100)->nullable();
$table->timestamps();
});
}
/**
* Reverse the migrations.
*
* @return void
*/
public function down()
{
Schema::drop('posts');
Schema::drop('comments');
Schema::drop('users');
}
}を参照して、上記のコマンド ウィンドウに php 職人 移行 と入力し続けて、移行を実行します。

ホットAIツール

Undresser.AI Undress
リアルなヌード写真を作成する AI 搭載アプリ

AI Clothes Remover
写真から衣服を削除するオンライン AI ツール。

Undress AI Tool
脱衣画像を無料で

Clothoff.io
AI衣類リムーバー

AI Hentai Generator
AIヘンタイを無料で生成します。

人気の記事

ホットツール

メモ帳++7.3.1
使いやすく無料のコードエディター

SublimeText3 中国語版
中国語版、とても使いやすい

ゼンドスタジオ 13.0.1
強力な PHP 統合開発環境

ドリームウィーバー CS6
ビジュアル Web 開発ツール

SublimeText3 Mac版
神レベルのコード編集ソフト(SublimeText3)

ホットトピック
 7331
7331
 9
9
 1627
1627
 14
14
 1351
1351
 46
46
 1262
1262
 25
25
 1209
1209
 29
29
 世界で最も強力なオープンソース MoE モデルが登場。GPT-4 に匹敵する中国語機能を備え、価格は GPT-4-Turbo のわずか 1% 近くです
May 07, 2024 pm 04:13 PM
従来のコンピューティングを超える能力を備えているだけでなく、より低コストでより効率的なパフォーマンスを実現する人工知能モデルを想像してみてください。これは SF ではありません。世界で最も強力なオープンソース MoE モデルである DeepSeek-V2[1] が登場しました。 DeepSeek-V2 は、経済的なトレーニングと効率的な推論の特徴を備えた強力な専門家混合 (MoE) 言語モデルです。これは 236B のパラメータで構成されており、そのうち 21B は各マーカーをアクティブにするために使用されます。 DeepSeek67B と比較して、DeepSeek-V2 はパフォーマンスが優れていると同時に、トレーニング コストを 42.5% 節約し、KV キャッシュを 93.3% 削減し、最大生成スループットを 5.76 倍に高めます。 DeepSeek は一般的な人工知能を研究する会社です
 MLP に代わる KAN は、オープンソース プロジェクトによって畳み込みまで拡張されました
Jun 01, 2024 pm 10:03 PM
今月初め、MIT やその他の機関の研究者らは、MLP に代わる非常に有望な代替案である KAN を提案しました。 KAN は、精度と解釈可能性の点で MLP よりも優れています。また、非常に少数のパラメーターを使用して、多数のパラメーターを使用して実行する MLP よりも優れたパフォーマンスを発揮できます。たとえば、著者らは、KAN を使用して、より小規模なネットワークと高度な自動化で DeepMind の結果を再現したと述べています。具体的には、DeepMind の MLP には約 300,000 個のパラメーターがありますが、KAN には約 200 個のパラメーターしかありません。 KAN は、MLP が普遍近似定理に基づいているのに対し、KAN はコルモゴロフ-アーノルド表現定理に基づいているのと同様に、強力な数学的基礎を持っています。以下の図に示すように、KAN は
 Google は大喜び: JAX のパフォーマンスが Pytorch や TensorFlow を上回りました! GPU 推論トレーニングの最速の選択肢となる可能性があります
Apr 01, 2024 pm 07:46 PM
Google が推進する JAX のパフォーマンスは、最近のベンチマーク テストで Pytorch や TensorFlow のパフォーマンスを上回り、7 つの指標で 1 位にランクされました。また、テストは最高の JAX パフォーマンスを備えた TPU では行われませんでした。ただし、開発者の間では、依然として Tensorflow よりも Pytorch の方が人気があります。しかし、将来的には、おそらくより大規模なモデルが JAX プラットフォームに基づいてトレーニングされ、実行されるようになるでしょう。モデル 最近、Keras チームは、ネイティブ PyTorch 実装を使用して 3 つのバックエンド (TensorFlow、JAX、PyTorch) をベンチマークし、TensorFlow を使用して Keras2 をベンチマークしました。まず、主流のセットを選択します
 こんにちは、電気アトラスです!ボストン・ダイナミクスのロボットが復活、180度の奇妙な動きにマスク氏も恐怖
Apr 18, 2024 pm 07:58 PM
Boston Dynamics Atlas は正式に電動ロボットの時代に突入します!昨日、油圧式アトラスが歴史の舞台から「涙ながらに」撤退したばかりですが、今日、ボストン・ダイナミクスは電動式アトラスが稼働することを発表しました。ボストン・ダイナミクス社は商用人型ロボットの分野でテスラ社と競争する決意を持っているようだ。新しいビデオが公開されてから、わずか 10 時間ですでに 100 万人以上が視聴しました。古い人が去り、新しい役割が現れるのは歴史的な必然です。今年が人型ロボットの爆発的な年であることは間違いありません。ネットユーザーは「ロボットの進歩により、今年の開会式は人間のように見え、人間よりもはるかに自由度が高い。しかし、これは本当にホラー映画ではないのか?」とコメントした。ビデオの冒頭では、アトラスは仰向けに見えるように地面に静かに横たわっています。次に続くのは驚くべきことです
 AI が数学研究を破壊する!フィールズ賞受賞者で中国系アメリカ人の数学者が上位 11 件の論文を主導 | テレンス・タオが「いいね!」しました
Apr 09, 2024 am 11:52 AM
AI は確かに数学を変えつつあります。最近、この問題に細心の注意を払っている陶哲軒氏が『米国数学協会会報』(米国数学協会会報)の最新号を送ってくれた。 「機械は数学を変えるのか?」というテーマを中心に、多くの数学者が意見を述べ、そのプロセス全体は火花に満ち、ハードコアで刺激的でした。著者には、フィールズ賞受賞者のアクシャイ・ベンカテシュ氏、中国の数学者鄭楽軍氏、ニューヨーク大学のコンピューター科学者アーネスト・デイビス氏、その他業界で著名な学者を含む強力な顔ぶれが揃っている。 AI の世界は劇的に変化しています。これらの記事の多くは 1 年前に投稿されたものです。
 時系列予測 NLP 大規模モデルの新機能: 時系列予測の暗黙的なプロンプトを自動的に生成
Mar 18, 2024 am 09:20 AM
今日は、時系列予測のパフォーマンスを向上させるために、時系列データを潜在空間上の大規模な自然言語処理 (NLP) モデルと整合させる方法を提案するコネチカット大学の最近の研究成果を紹介したいと思います。この方法の鍵は、潜在的な空間ヒント (プロンプト) を使用して時系列予測の精度を高めることです。論文タイトル: S2IP-LLM: SemanticSpaceInformedPromptLearningwithLLMforTimeSeriesForecasting ダウンロードアドレス: https://arxiv.org/pdf/2403.05798v1.pdf 1. 大きな問題の背景モデル
 テスラのロボットは工場で働く、マスク氏:手の自由度は今年22に達する!
May 06, 2024 pm 04:13 PM
テスラのロボット「オプティマス」の最新映像が公開され、すでに工場内で稼働可能となっている。通常の速度では、バッテリー(テスラの4680バッテリー)を次のように分類します:公式は、20倍の速度でどのように見えるかも公開しました - 小さな「ワークステーション」上で、ピッキング、ピッキング、ピッキング:今回は、それがリリースされたハイライトの1つビデオの内容は、オプティマスが工場内でこの作業を完全に自律的に行い、プロセス全体を通じて人間の介入なしに完了するというものです。そして、オプティマスの観点から見ると、自動エラー修正に重点を置いて、曲がったバッテリーを拾い上げたり配置したりすることもできます。オプティマスのハンドについては、NVIDIA の科学者ジム ファン氏が高く評価しました。オプティマスのハンドは、世界の 5 本指ロボットの 1 つです。最も器用。その手は触覚だけではありません
 FisheyeDetNet: 魚眼カメラに基づいた最初のターゲット検出アルゴリズム
Apr 26, 2024 am 11:37 AM
目標検出は自動運転システムにおいて比較的成熟した問題であり、その中でも歩行者検出は最も初期に導入されたアルゴリズムの 1 つです。ほとんどの論文では非常に包括的な研究が行われています。ただし、サラウンドビューに魚眼カメラを使用した距離認識については、あまり研究されていません。放射状の歪みが大きいため、標準のバウンディング ボックス表現を魚眼カメラに実装するのは困難です。上記の説明を軽減するために、拡張バウンディング ボックス、楕円、および一般的な多角形の設計を極/角度表現に探索し、これらの表現を分析するためのインスタンス セグメンテーション mIOU メトリックを定義します。提案された多角形モデルの FisheyeDetNet は、他のモデルよりも優れたパフォーマンスを示し、同時に自動運転用の Valeo 魚眼カメラ データセットで 49.5% の mAP を達成しました。


