

Android+PHP は HttpClient を使用して POST リクエストを送信し、JSON を使用して応答を解析します。

ここでは、Android プログラムにネットワーク機能を持たせる方法を紹介します。もちろん、最初にサーバーを用意する必要があります。テストするだけの場合は、代わりに LAN (コンピューターの Wi-Fi に接続された携帯電話) を使用できます。
コンピューターがApache+PHP環境で構成されている必要があります。
以下は簡単な Android プログラムです。Java の基礎があれば、その意味を大まかに「推測」できると思います。 (プログラムが十分に書かれていない可能性があります)
Androidプログラム
レイアウトファイル
<LinearLayout xmlns:android="http://schemas.android.com/apk/res/android"
    xmlns:tools="http://schemas.android.com/tools"
    android:layout_width="match_parent"
    android:layout_height="match_parent"
    android:paddingBottom="@dimen/<strong>Activity</strong>_vertical_margin"
    android:paddingLeft="@dimen/<strong>Activity</strong>_horizontal_margin"
    android:paddingRight="@dimen/<strong>Activity</strong>_horizontal_margin"
    android:paddingTop="@dimen/<strong>Activity</strong>_vertical_margin"
    tools:c
    android:orientation="vertical" >

    <TextView
        android:layout_width="match_parent"
        android:layout_height="wrap_content"
        android:<strong>gravity</strong>="center"
        android:text="使用JSON解析"
        android:textSize="30sp"/>

    <LinearLayout
        android:layout_width="match_parent"
        android:layout_height="wrap_content"
        android:orientation="horizontal"
        android:<strong>gravity</strong>="center">

        <TextView
        android:layout_width="wrap_content"
        android:layout_height="wrap_content"
        android:text="账号"
        android:textSize="20sp"
        android:layout_marginRight="20dp" />

        <EditText
            android:id="@+id/et_id"
            android:layout_width="match_parent"
            android:layout_height="wrap_content"/>
    </LinearLayout>

	<LinearLayout
        android:layout_width="match_parent"
        android:layout_height="wrap_content"
        android:orientation="horizontal"
        android:<strong>gravity</strong>="center">

        <TextView
        android:layout_width="wrap_content"
        android:layout_height="wrap_content"
        android:text="密码"
        android:textSize="20sp"
        android:layout_marginRight="20dp" />

        <EditText
            android:id="@+id/et_psw"
            android:layout_width="match_parent"
            android:layout_height="wrap_content"/>
    </LinearLayout>

	<Button
	    android:id="@+id/btn_login"
	    android:layout_width="match_parent"
	    android:layout_height="wrap_content"
	    android:text="登录"/>
</LinearLayout>
package com.example.jsontest;

import java.io.BufferedReader;
import java.io.InputStream;
import java.io.InputStreamReader;
import java.util.ArrayList;
import java.util.List;

import org.<strong>Apache</strong>.http.HttpEntity;
import org.<strong>Apache</strong>.http.HttpResponse;
import org.<strong>Apache</strong>.http.NameValuePair;
import org.<strong>Apache</strong>.http.client.HttpClient;
import org.<strong>Apache</strong>.http.client.entity.UrlEncodedFormEntity;
import org.<strong>Apache</strong>.http.client.methods.HttpPost;
import org.<strong>Apache</strong>.http.impl.client.DefaultHttpClient;
import org.<strong>Apache</strong>.http.message.BasicNameValuePair;
import org.<strong>Apache</strong>.http.protocol.HTTP;
import org.json.JSONArray;
import org.json.JSONObject;

import android.os.Bundle;
import android.os.Looper;
import android.support.v7.app.ActionBar<strong>Activity</strong>;
import android.view.Menu;
import android.view.MenuItem;
import android.view.View;
import android.view.View.OnClickListener;
import android.widget.Button;
import android.widget.EditText;
import android.widget.Toast;


public class Main<strong>Activity</strong> extends ActionBar<strong>Activity</strong> {
	EditText et_id;
	EditText et_psw;
	Button btn_login;

    @Override
    protected void onCreate(Bundle savedInstanceState) {
        super.onCreate(savedInstanceState);
        setContentView(R.layout.<strong>Activity</strong>_main);

        initView();
    }

    private boolean check(String id, String psw) {
    	if("".equals(id) || "".equals(psw))
    		return false;
    	return true;
    }

    private void initView() {
    	et_id = (EditText)findViewById(R.id.et_id);
    	et_psw = (EditText)findViewById(R.id.et_psw);
    	btn_login = (Button)findViewById(R.id.btn_login);

    	btn_login.setOnClickListener(new OnClickListener() {

			@Override
			public void onClick(View v) {
				// TODO Auto-generated method stub
				//获取用户输入的用户名和密码
				final String id = et_id.getText().toString().trim();
				final String psw = et_psw.getText().toString().trim();

				if(check(id, psw)) {
					new Thread() {
						public void run() {
							try {
								HttpPost post = new HttpPost("这里要改成服务器文件所在URL地址");
								//如果传递参数个数比较多,可以对传递的参数进行封装
								List<NameValuePair> params = new ArrayList<NameValuePair>();
								params.add(new BasicNameValuePair("id", id));
								params.add(new BasicNameValuePair("psw", psw));
								//设置请求参数
								post.setEntity(new UrlEncodedFormEntity(params, HTTP.UTF_8));

								HttpClient httpClient = new DefaultHttpClient();
								//发送POST请求
								HttpResponse response = httpClient.execute(post);
								//如果服务器成功地返回响应
								if(response.getStatusLine().getStatusCode() == 200) {
									//String msg = EntityUtils.toString(response.getEntity());
									HttpEntity entity = response.getEntity();
									InputStream is = entity.getContent();

									BufferedReader reader = new BufferedReader(new InputStreamReader(is, "utf-8"), 8);
									StringBuilder sb = new StringBuilder();
									sb.append(reader.readLine() + "\n"); // 这里 “ + "\n" ”加不加似乎对结果没有什么影响

									String line = "0";
									while((line = reader.readLine()) != null) {
										sb.append(line + "\n"); // 这里 “ + "\n" ”加不加似乎对结果没有什么影响
									}
									is.close();

									//获取请求响应结果
									String result = sb.toString();
									System.out.println(result);

									//打包成JSON进行解析
									JSONArray jsonArray = new JSONArray(result);
									JSONObject jsonData = null;
									//返回用户ID,用户密码
									String userId = "";
									String userPsw = "";
									//使用List进行存储
									List<String> data = new ArrayList<String>();
									for(int i = 0; i < jsonArray.length(); i++) {
										jsonData = jsonArray.getJSONObject(i);
										userId = jsonData.getString("userId"); //userId是来源于服务器端php程序响应结果res的<strong>索引</strong>,根据<strong>索引</strong>获取值
										userPsw = jsonData.getString("userPsw"); //userPsw是来源于服务器端php程序响应结果res的<strong>索引</strong>,根据<strong>索引</strong>获取值
										data.add("用户ID:" + userId + ",用户密码:" + userPsw); //保存返回的值,可进行相应的操作,这里只进行显示
									}

									Looper.prepare();
									Toast.makeText(Main<strong>Activity</strong>.this, data.toString(), Toast.LENGTH_LONG).show();
									Looper.loop();
								}
								else {
									Looper.prepare();
									Toast.makeText(Main<strong>Activity</strong>.this, "登录失败", Toast.LENGTH_LONG).show();
									Looper.loop();
								}
							}
							catch(<strong>Exception</strong> e) {
								e.printStackTrace();
							}
						}
					}.start();
				}
			}
		});
    }


    @Override
    public boolean onCreateOptionsMenu(Menu menu) {
        // Inflate the menu; this adds items to the action bar if it is present.
        getMenuInflater().inflate(R.menu.main, menu);
        return true;
    }

    @Override
    public boolean onOptionsItemSelected(MenuItem item) {
        // Handle action bar item clicks here. The action bar will
        // automatically handle clicks on the Home/Up button, so long
        // as you specify a parent <strong>Activity</strong> in <strong>AndroidManifest.xml</strong>.
        int id = item.getItemId();
        if (id == R.id.action_settings) {
            return true;
        }
        return super.onOptionsItemSelected(item);
    }
}
そして、以下はサーバーサイドのphpファイルです(ファイル内でデータベースに接続していない操作については、必要に応じてデータベースに接続して動的データを取得することができます。PHPを知っている人は、これを簡単にデータベースに接続して取得するように変更できますデータ)
checkId.php
<?php
//获取客户端发送过来的ID和密码
$id=$_POST['id'];
$psw=$_POST['psw'];
if($id == "admin" && $psw == "123") {
$res=array(array());
$res[0]['userId']=$id;
$res[0]['userPsw']=$psw;
$res[1]['userId']="testId1";
$res[1]['userPsw']="testPsw1";
$res[2]['userId']="testId2";
$res[2]['userPsw']="testPsw2";
}
echo json_encode($res);
?>上記では、HttpClient を使用して POST リクエストを送信し、JSON を使用して応答を解析する方法 (重力、Apache、例外、インデックス、データベース接続など) を紹介しました。PHP チュートリアルに興味のある友人に役立つことを願っています。

ホットAIツール

Undresser.AI Undress
リアルなヌード写真を作成する AI 搭載アプリ

AI Clothes Remover
写真から衣服を削除するオンライン AI ツール。

Undress AI Tool
脱衣画像を無料で

Clothoff.io
AI衣類リムーバー

AI Hentai Generator
AIヘンタイを無料で生成します。

人気の記事
ホットツール

メモ帳++7.3.1
使いやすく無料のコードエディター

SublimeText3 中国語版
中国語版、とても使いやすい

ゼンドスタジオ 13.0.1
強力な PHP 統合開発環境

ドリームウィーバー CS6
ビジュアル Web 開発ツール

SublimeText3 Mac版
神レベルのコード編集ソフト(SublimeText3)
ホットトピック
 7530
7530
 15
1378
52
82
11
21
76
15
1378
52
82
11
21
76

 新しいレポートは、噂のSamsung Galaxy S25、Galaxy S25 Plus、Galaxy S25 Ultraのカメラアップグレードのひどい評価を提供します
Sep 12, 2024 pm 12:23 PM
新しいレポートは、噂のSamsung Galaxy S25、Galaxy S25 Plus、Galaxy S25 Ultraのカメラアップグレードのひどい評価を提供します
Sep 12, 2024 pm 12:23 PM
ここ数日、Ice Universeは、サムスンの次期主力スマートフォンであると広く信じられているGalaxy S25 Ultraの詳細を着実に明らかにしている。とりわけ、リーカーはサムスンがカメラのアップグレードを1つだけ計画していると主張した
 Samsung Galaxy S25 Ultraの最初のレンダリング画像がリークされ、噂のデザイン変更が明らかに
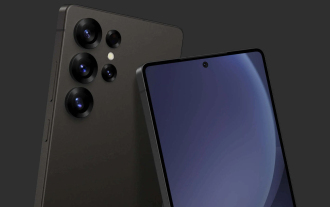
Sep 11, 2024 am 06:37 AM
Samsung Galaxy S25 Ultraの最初のレンダリング画像がリークされ、噂のデザイン変更が明らかに
Sep 11, 2024 am 06:37 AM
OnLeaks は、X (旧 Twitter) のフォロワーから 4,000 ドル以上を集めようとして失敗した数日後、Android Headlines と提携して Galaxy S25 Ultra のファーストルックを提供しました。コンテキストとして、h の下に埋め込まれたレンダリング イメージ
 IFA 2024 | TCLのNXTPAPER 14は、パフォーマンスではGalaxy Tab S10 Ultraに匹敵しませんが、サイズではほぼ匹敵します
Sep 07, 2024 am 06:35 AM
IFA 2024 | TCLのNXTPAPER 14は、パフォーマンスではGalaxy Tab S10 Ultraに匹敵しませんが、サイズではほぼ匹敵します
Sep 07, 2024 am 06:35 AM
TCLは、2つの新しいスマートフォンの発表に加えて、NXTPAPER 14と呼ばれる新しいAndroidタブレットも発表しました。その巨大な画面サイズはセールスポイントの1つです。 NXTPAPER 14 は、TCL の代表的なブランドであるマット LCD パネルのバージョン 3.0 を搭載しています。
 Vivo Y300 Pro は、7.69 mm のスリムなボディに 6,500 mAh のバッテリーを搭載
Sep 07, 2024 am 06:39 AM
Vivo Y300 Pro は、7.69 mm のスリムなボディに 6,500 mAh のバッテリーを搭載
Sep 07, 2024 am 06:39 AM
Vivo Y300 Pro は完全に公開されたばかりで、大容量バッテリーを備えた最もスリムなミッドレンジ Android スマートフォンの 1 つです。正確に言うと、このスマートフォンの厚さはわずか 7.69 mm ですが、6,500 mAh のバッテリーを搭載しています。これは最近発売されたものと同じ容量です
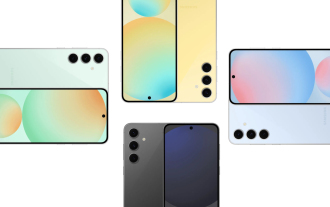 Samsung Galaxy S24 FEは、4色と2つのメモリオプションで予想よりも低価格で発売されると請求されています
Sep 12, 2024 pm 09:21 PM
Samsung Galaxy S24 FEは、4色と2つのメモリオプションで予想よりも低価格で発売されると請求されています
Sep 12, 2024 pm 09:21 PM
サムスンは、ファンエディション(FE)スマートフォンシリーズをいつアップデートするかについて、まだ何のヒントも提供していない。現時点では、Galaxy S23 FE は 2023 年 10 月初めに発表された同社の最新版のままです。
 新しいレポートは、噂のSamsung Galaxy S25、Galaxy S25 Plus、Galaxy S25 Ultraのカメラアップグレードのひどい評価を提供します
Sep 12, 2024 pm 12:22 PM
新しいレポートは、噂のSamsung Galaxy S25、Galaxy S25 Plus、Galaxy S25 Ultraのカメラアップグレードのひどい評価を提供します
Sep 12, 2024 pm 12:22 PM
ここ数日、Ice Universeは、サムスンの次期主力スマートフォンであると広く信じられているGalaxy S25 Ultraの詳細を着実に明らかにしている。とりわけ、リーカーはサムスンがカメラのアップグレードを1つだけ計画していると主張した
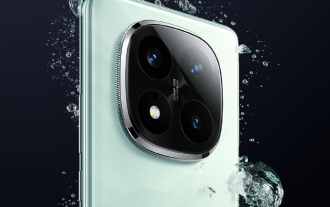 Xiaomi Redmi Note 14 Pro Plusは、Light Hunter 800カメラを搭載した初のQualcomm Snapdragon 7s Gen 3スマートフォンとして登場します
Sep 27, 2024 am 06:23 AM
Xiaomi Redmi Note 14 Pro Plusは、Light Hunter 800カメラを搭載した初のQualcomm Snapdragon 7s Gen 3スマートフォンとして登場します
Sep 27, 2024 am 06:23 AM
Redmi Note 14 Pro Plusは、昨年のRedmi Note 13 Pro Plus(Amazonで現在375ドル)の直接の後継者として正式に発表されました。予想通り、Redmi Note 14 Pro Plusは、Redmi Note 14およびRedmi Note 14 Proと並んでRedmi Note 14シリーズをリードします。李
 iQOO Z9 Turbo Plus: 強化されたシリーズフラッグシップの予約開始
Sep 10, 2024 am 06:45 AM
iQOO Z9 Turbo Plus: 強化されたシリーズフラッグシップの予約開始
Sep 10, 2024 am 06:45 AM
OnePlus の姉妹ブランドである iQOO の製品サイクルは 2023 年から 4 年で、ほぼ終わりに近づいている可能性があります。それにもかかわらず、ブランドはまだZ9シリーズの開発を終えていないと宣言しました。その最終、そしておそらく最高エンドとなる Turbo+ バリアントが、予測どおりに発表されました。 T
