Nginxのメモリ管理

Jul 30, 2016 pm 01:31 PM
log nbsp pool size

1. ソースコードの場所

ヘッダーファイル: http://trac.nginx.org/nginx/browser/nginx/src/core/ngx_palloc.h

ソースファイル: http://trac.nginx.org/ nginx/browser/nginx/src/core/ngx_palloc.c

2. データ構造の定義

まず、nginx メモリ プールのいくつかの主要なデータ構造について学びましょう:

ngx_pool_data_t (メモリ プール データ ブロック構造)

リー
  • last: これは、現在のメモリ プールに割り当てられた最後のアドレスを保存する unsigned char 型のポインタです。つまり、次の割り当てはここから始まります。
  • end: メモリ プールの終了位置;
  • next: メモリ プールには多数のメモリ ブロックがあり、これらのメモリ ブロックはこのポインタを通じてリンク リストに接続され、next はメモリの次のブロックを指します。
  • failed: メモリ プール割り当ての失敗の数。

ngx_pool_s (メモリプールヘッダ構造)

<span> 1:</span><span>typedef</span> <span>struct</span> {<precourier new width:950px padding:0px direction:ltr margin:0em line-height:12pt background-color:rgb><span> 2:</span>     u_char               *last;        <precourier new width:950px padding:0px direction:ltr margin:0em line-height:12pt background-color:rgb><span> 3:</span>     u_char               *end;<precourier new width:950px padding:0px direction:ltr margin:0em line-height:12pt background-color:rgb><span> 4:</span>     ngx_pool_t           *next;<precourier new width:950px padding:0px direction:ltr margin:0em line-height:12pt background-color:rgb><span> 5:</span>     ngx_uint_t            failed;<precourier new width:950px padding:0px direction:ltr margin:0em line-height:12pt background-color:rgb><span> 6:</span> } ngx_pool_data_t;<precourier new width:950px padding:0px direction:ltr margin:0em line-height:12pt background-color:rgb><span> 1:</span><span>struct</span> ngx_pool_s {<ul> <li>d: メモリプールのデータブロック </li> <li>max: メモリプールのデータブロックの最大値。 </li>current: 現在を指しますメモリプール; <li>chain: このポインタは ngx_chain_t 構造体にアタッチされます; <li>large: 割り当てられたスペースが最大を超えたときに使用されるメモリのリンクされたリストの大きなブロック。 log: ログ情報 <li> <li> は、ngx_pool_data_t と ngx_pool_t で構成されます。 構成された nginx メモリ プールの構造を以下の図に示します。 </li> <li> </ul><p> 3. 関連関数の紹介 </p><p><img src="/static/imghw/default1.png" data-src="http://image.codes51.com/Article/image/20150814/20150814194335_5243.jpg" class="lazy" style="max-width:90%" style="max-width:90%" alt="Nginxのメモリ管理" > メモリ プール方式を分析する前に、次のことを行う必要があります。いくつかのメインメモリ関連関数を導入します: </p><p>ngx_alloc: (just对malloc进行了简单的封装)</p><blockquote> <p><precourier new width:950px padding:0px direction:ltr margin:0em line-height:12pt background-color:rgb><span> 2:</span>     ngx_pool_data_t       d;<precourier new width:950px padding:0px direction:ltr margin:0em line-height:12pt background-color:rgb><span> 3:</span>     size_t                max;<precourier new width:950px padding:0px direction:ltr margin:0em line-height:12pt background-color:rgb><span> 4:</span>     ngx_pool_t           *current;<precourier new width:950px padding:0px direction:ltr margin:0em line-height:12pt background-color:rgb><span> 5:</span>     ngx_chain_t          *chain;<precourier new width:950px padding:0px direction:ltr margin:0em line-height:12pt background-color:rgb><span> 6:</span>     ngx_pool_large_t     *large;<precourier new width:950px padding:0px direction:ltr margin:0em line-height:12pt background-color:rgb><span> 7:</span>     ngx_pool_cleanup_t   *cleanup;<precourier new width:950px padding:0px direction:ltr margin:0em line-height:12pt background-color:rgb><span> 8:</span>     ngx_log_t            *log;<precourier new width:950px padding:0px direction:ltr margin:0em line-height:12pt background-color:rgb><span> 9:</span> };<precourier new width:870px padding:0px direction:ltr margin:0em line-height:12pt background-color:rgb><span> 1:</span><span>void</span> *<precourier new width:870px padding:0px direction:ltr margin:0em line-height:12pt background-color:rgb><span> 2:</span> ngx_alloc(size_t size, ngx_log_t *log)<precourier new width:870px padding:0px direction:ltr margin:0em line-height:12pt background-color:rgb><span> 3:</span> {<precourier new width:870px padding:0px direction:ltr margin:0em line-height:12pt background-color:rgb><span> 4:</span>     <span>void</span>  *p;</precourier></precourier></precourier></precourier></precourier></precourier></precourier></precourier></precourier></precourier></precourier></precourier></p> <p></p> <p> <divcourier new width:870px color:black padding:0px direction:ltr line-height:12pt background-color:rgb>ngx_calloc:(调用malloc并初期化0)</divcourier></p> </blockquote><blockquote><p><precourier new width:870px padding:0px direction:ltr margin:0em line-height:12pt background-color:rgb><span> 5:</span>  <precourier new width:870px padding:0px direction:ltr margin:0em line-height:12pt background-color:rgb><span> 6:</span>     p = malloc(size);<precourier new width:870px padding:0px direction:ltr margin:0em line-height:12pt background-color:rgb><span> 7:</span>     <span>if</span> (p == NULL) {<precourier new width:870px padding:0px direction:ltr margin:0em line-height:12pt background-color:rgb><span> 8:</span>         ngx_log_error(NGX_LOG_EMERG, log, ngx_errno,<precourier new width:870px padding:0px direction:ltr margin:0em line-height:12pt background-color:rgb><span> 9:</span>                       <span>"malloc(%uz) failed"</span>, size);<precourier new width:870px padding:0px direction:ltr margin:0em line-height:12pt background-color:rgb><span> 10:</span>     }<precourier new width:870px padding:0px direction:ltr margin:0em line-height:12pt background-color:rgb><span> 11:</span>  <precourier new width:870px padding:0px direction:ltr margin:0em line-height:12pt background-color:rgb><span> 12:</span>     ngx_log_debug2(NGX_LOG_DEBUG_ALLOC, log, 0, <span>"malloc: %p:%uz"</span>, p, size);<precourier new width:870px padding:0px direction:ltr margin:0em line-height:12pt background-color:rgb><span> 13:</span>  <precourier new width:870px padding:0px direction:ltr margin:0em line-height:12pt background-color:rgb><span> 14:</span>     <span>return</span> p;<precourier new width:870px padding:0px direction:ltr margin:0em line-height:12pt background-color:rgb><span> 15:</span> }<precourier new width:870px padding:0px direction:ltr margin:0em line-height:12pt background-color:rgb><span> 1:</span><span>void</span> *<precourier new width:870px padding:0px direction:ltr margin:0em line-height:12pt background-color:rgb><span> 2:</span> ngx_calloc(size_t size, ngx_log_t *log)<precourier new width:870px padding:0px direction:ltr margin:0em line-height:12pt background-color:rgb><span> 3:</span> {<precourier new width:870px padding:0px direction:ltr margin:0em line-height:12pt background-color:rgb><span> 4:</span>     <span>void</span>  *p;<precourier new width:870px padding:0px direction:ltr margin:0em line-height:12pt background-color:rgb><span> 5:</span>  </precourier></precourier></precourier></precourier></precourier></precourier></precourier></precourier></precourier></precourier></precourier></precourier></precourier></precourier></precourier></precourier></p></blockquote><blockquote> <p><divcourier new width:870px color:black padding:0px direction:ltr line-height:12pt background-color:rgb>ngx_memzero:</divcourier></p> </blockquote><precourier new width:870px padding:0px direction:ltr margin:0em line-height:12pt background-color:rgb><span> 6:</span>     p = ngx_alloc(size, log);<blockquote> <p></p> <p><divcourier new width:870px color:black padding:0px direction:ltr line-height:12pt background-color:rgb>ngx_free:</divcourier></p> </blockquote><precourier new width:870px padding:0px direction:ltr margin:0em line-height:12pt background-color:rgb><span> 7:</span>  <blockquote> <p></p> <p><divcourier new width:870px color:black padding:0px direction:ltr line-height:12pt background-color:rgb>ngx_memalign:</divcourier></p> </blockquote><blockquote>rrereerreerreerreerreerreerreerreerreerreerreerreerreerreerreerreerreerreerreerreerreeほとんどの場合、コンパイラと C ライブラリがアラインメントの問題を透過的に処理します。 nginx はマクロ NGX_HAVE_POSIX_MEMALIGN によって制御されており、<p>posix_memalign( )</p> を正常に呼び出すと、<p>size<divcourier new width:870px color:black padding:0px direction:ltr line-height:12pt background-color:rgb> バイトの動的メモリが返され、このメモリのアドレスは </divcourier></p>alignment の倍数になります。パラメーター </blockquote>alignment は 2 のべき乗、または <limicrosoft yahei font-size:15px line-height:35px>void<blockquote> ポインターのサイズの倍数でなければなりません。返されたメモリブロックのアドレスは<em>memptr</em>に置かれ、関数の戻り値は<em>0</em>.<em></em><em></em> <em></em>4. メモリプールの基本動作<em><ul><li>メモリプールの主な外部メソッドは次のとおりです: </li></ul> <limicrosoft yahei font-size:15px line-height:35px><table cellspacing="0" cellpadding="2" border="1"><tbody> <tr> <td valign="top" width="118">メモリプールを作成する</td> <td valign="top" width="768">ngx_pool_t * ngx_create_pool(size_t size, ngx_log_t *log);</td> </tr> <tr> <td valign="top" width="118">メモリプールを破棄する</td> <td valign="top" width="768">vo ID ngx_destroy_pool(ngx_pool_t *pool ; (調整されていません)</td> </tr>void * ngx_pnalloc(ngx_pool_t *pool, size_t size);<tr> <td valign="top" width="118"></td> <td valign="top" width="768">メモリクリア</td> </tr>ngx_int_t ngx_pfree(ngx_pool_t *pool, void *p);<tr> <td valign="top" width="118"></td> <td valign="top" width="768"><limicrosoft yahei font-size:15px line-height:35px><limicrosoft yahei font-size:15px line-height:35px><p>4.1 创建内存池ngx_create_pool</p> <blockquote><p>ngx_create_pool用于创建一个内存池,我们创建时,传入我们的需要的初始大小:</p></blockquote> <limicrosoft yahei font-size:15px line-height:35px><blockquote><p><divcourier new width:870px color:black padding:0px direction:ltr line-height:12pt background-color:rgb><precourier new width:870px padding:0px direction:ltr margin:0em line-height:12pt background-color:rgb><span> 1:</span> ngx_pool_t *<precourier new width:870px padding:0px direction:ltr margin:0em line-height:12pt background-color:rgb><span> 2:</span> ngx_create_pool(size_t size, ngx_log_t *log)<precourier new width:870px padding:0px direction:ltr margin:0em line-height:12pt background-color:rgb><span> 3:</span> {<precourier new width:870px padding:0px direction:ltr margin:0em line-height:12pt background-color:rgb><span> 4:</span>     ngx_pool_t  *p;<precourier new width:870px padding:0px direction:ltr margin:0em line-height:12pt background-color:rgb><span> 5:</span>     <precourier new width:870px padding:0px direction:ltr margin:0em line-height:12pt background-color:rgb><span> 6:</span>     <span>//以16(NGX_POOL_ALIGNMENT)字节对齐分配size内存</span><precourier new width:870px padding:0px direction:ltr margin:0em line-height:12pt background-color:rgb><span> 7:</span>     p = ngx_memalign(NGX_POOL_ALIGNMENT, size, log);<precourier new width:870px padding:0px direction:ltr margin:0em line-height:12pt background-color:rgb><span> 8:</span>     <span>if</span> (p == NULL) {<precourier new width:870px padding:0px direction:ltr margin:0em line-height:12pt background-color:rgb><span> 9:</span>         <span>return</span> NULL;<precourier new width:870px padding:0px direction:ltr margin:0em line-height:12pt background-color:rgb><span> 10:</span>     }<precourier new width:870px padding:0px direction:ltr margin:0em line-height:12pt background-color:rgb><span> 11:</span>  <precourier new width:870px padding:0px direction:ltr margin:0em line-height:12pt background-color:rgb><span> 12:</span>     <span>//初始状态:last指向ngx_pool_t结构体之后数据取起始位置</span><precourier new width:870px padding:0px direction:ltr margin:0em line-height:12pt background-color:rgb><span> 13:</span>     p->d.last = (u_char *) p + <span>sizeof</span>(ngx_pool_t);<precourier new width:870px padding:0px direction:ltr margin:0em line-height:12pt background-color:rgb><span> 14:</span>     <span>//end指向分配的整个size大小的内存的末尾</span><precourier new width:870px padding:0px direction:ltr margin:0em line-height:12pt background-color:rgb><span> 15:</span>     p->d.end = (u_char *) p + size;<precourier new width:870px padding:0px direction:ltr margin:0em line-height:12pt background-color:rgb><span> 16:</span>     <precourier new width:870px padding:0px direction:ltr margin:0em line-height:12pt background-color:rgb><span> 17:</span>     p->d.next = NULL;<precourier new width:870px padding:0px direction:ltr margin:0em line-height:12pt background-color:rgb><span> 18:</span>     p->d.failed = 0;<precourier new width:870px padding:0px direction:ltr margin:0em line-height:12pt background-color:rgb><span> 19:</span>  <precourier new width:870px padding:0px direction:ltr margin:0em line-height:12pt background-color:rgb><span> 20:</span>     size = size - <span>sizeof</span>(ngx_pool_t);<precourier new width:870px padding:0px direction:ltr margin:0em line-height:12pt background-color:rgb><span> 21:</span>     <span>//#define NGX_MAX_ALLOC_FROM_POOL  (ngx_pagesize - 1),内存池最大不超过4095,x86中页的大小为4K</span><precourier new width:870px padding:0px direction:ltr margin:0em line-height:12pt background-color:rgb><span> 22:</span>     p->max = (size < NGX_MAX_ALLOC_FROM_POOL) ? size : NGX_MAX_ALLOC_FROM_POOL;
ログイン後にコピー
<span> 23:</span>
ログイン後にコピー
24: p->current = p; 25:     p->chain = NULL; 26:     p->large = NULL; 27:     p->cleanup = NULL; 28:     p->log = log; 29:  30:     return p; 31: }

nginx对内存的管理分为大内存与小内存,当某一个申请的内存大于某一个值时,就需要从大内存中分配空间,否则从小内存中分配空间。

nginx中的内存池是在创建的时候就设定好了大小,在以后分配小块内存的时候,如果内存不够,则是重新创建一块内存串到内存池中,而不是将原有的内存池进行扩张。当要分配大块内存是,则是在内存池外面再分配空间进行管理的,称为大块内存池。


4.2 内存申请 ngx_palloc

1:void * 2: ngx_palloc(ngx_pool_t *pool, size_t size) 3: { 4:     u_char      *m; 5:     ngx_pool_t  *p; 6:  7:     //如果申请的内存大小小于内存池的max值 8:     if (size <= pool->max) { 9:  10:         p = pool->current; 11:  12:         do { 13:             //对内存地址进行对齐处理 14:             m = ngx_align_ptr(p->d.last, NGX_ALIGNMENT); 15:  16:             //如果当前内存块够分配内存,则直接分配 17:             if ((size_t) (p->d.end - m) >= size) 18:             { 19:                 p->d.last = m + size; 20:  21:                 return m; 22:             } 23:             24:             //如果当前内存块有效容量不够分配,则移动到下一个内存块进行分配 25:             p = p->d.next; 26:  27:         } while (p); 28:  29:         //当前所有内存块都没有空闲了,开辟一块新的内存,如下2详细解释 30:         return ngx_palloc_block(pool, size); 31:     } 32:  33:     //分配大块内存 34:     return ngx_palloc_large(pool, size); 35: }

需要说明的几点:

1、ngx_align_ptr,这是一个用来内存地址取整的宏,非常精巧,一句话就搞定了。作用不言而喻,取整可以降低CPU读取内存的次数,提高性能。因为这里并没有真正意义调用malloc等函数申请内存,而是移动指针标记而已,所以内存对齐的活,C编译器帮不了你了,得自己动手。

1: #define ngx_align_ptr(p, a)                                                   \ 2:      (u_char *) (((uintptr_t) (p) + ((uintptr_t) a - 1)) & ~((uintptr_t) a - 1))

2、开辟一个新的内存块 ngx_palloc_block(ngx_pool_t *pool, size_t size)

这个函数是用来分配新的内存块,为pool内存池开辟一个新的内存块,并申请使用size大小的内存;

1:static void * 2: ngx_palloc_block(ngx_pool_t *pool, size_t size) 3: { 4:     u_char      *m; 5:     size_t       psize; 6:     ngx_pool_t  *p, *new; 7:  8:     //计算内存池第一个内存块的大小 9:     psize = (size_t) (pool->d.end - (u_char *) pool); 10:  11:     //分配和第一个内存块同样大小的内存块 12:     m = ngx_memalign(NGX_POOL_ALIGNMENT, psize, pool->log); 13:     if (m == NULL) { 14:         return NULL; 15:     } 16:  17:     new = (ngx_pool_t *) m; 18:  19:     //设置新内存块的end 20:     new->d.end = m + psize; 21:     new->d.next = NULL; 22:     new->d.failed = 0; 23:  24:     //将指针m移动到d后面的一个位置,作为起始位置 25:     m += sizeof(ngx_pool_data_t); 26:     //对m指针按4字节对齐处理 27:     m = ngx_align_ptr(m, NGX_ALIGNMENT); 28:     //设置新内存块的last,即申请使用size大小的内存 29:     new->d.last = m + size; 30:  31:     //这里的循环用来找最后一个链表节点,这里failed用来控制循环的长度,如果分配失败次数达到5次,就忽略,不需要每次都从头找起 32:     for (p = pool->current; p->d.next; p = p->d.next) { 33:         if (p->d.failed++ > 4) { 34:             pool->current = p->d.next; 35:         } 36:     } 37:  38:     p->d.next = new; 39:  40:     return m; 41: }

3、分配大块内存 ngx_palloc_large(ngx_pool_t *pool, size_t size)

在ngx_palloc中首先会判断申请的内存大小是否超过内存块的最大限值,如果超过,则直接调用ngx_palloc_large,进入大内存块的分配流程;

1:static void * 2: ngx_palloc_large(ngx_pool_t *pool, size_t size) 3: { 4:     void              *p; 5:     ngx_uint_t         n; 6:     ngx_pool_large_t  *large; 7:  8:     // 直接在系统堆中分配一块大小为size的空间 9:     p = ngx_alloc(size, pool->log); 10:     if (p == NULL) { 11:         return NULL; 12:     } 13:  14:     n = 0; 15:  16:     // 查找到一个空的large区,如果有,则将刚才分配的空间交由它管理  17:     for (large = pool->large; large; large = large->next) { 18:         if (large->alloc == NULL) { 19:             large->alloc = p; 20:             return p; 21:         } 22:         //为了提高效率, 如果在三次内没有找到空的large结构体,则创建一个 23:         if (n++ > 3) { 24:             break; 25:         } 26:     } 27:  28:  29:     large = ngx_palloc(pool, sizeof(ngx_pool_large_t)); 30:     if (large == NULL) { 31:         ngx_free(p); 32:         return NULL; 33:     } 34:     35:     //将large链接到内存池 36:     large->alloc = p; 37:     large->next = pool->large; 38:     pool->large = large; 39:  40:     return p; 41: }

整个内存池分配如下图:

Nginxのメモリ管理

  • 4.3 内存池重置 ngx_reset_pool

1:void 2: ngx_reset_pool(ngx_pool_t *pool) 3: { 4:     ngx_pool_t        *p; 5:     ngx_pool_large_t  *l; 6:     7:     //释放大块内存 8:     for (l = pool->large; l; l = l->next) { 9:         if (l->alloc) { 10:             ngx_free(l->alloc); 11:         } 12:     } 13:     14:     // 重置所有小块内存区 15:     for (p = pool; p; p = p->d.next) { 16:         p->d.last = (u_char *) p + sizeof(ngx_pool_t); 17:         p->d.failed = 0; 18:     } 19:  20:     pool->current = pool; 21:     pool->chain = NULL; 22:     pool->large = NULL; 23: }

4.4 内存池释放 ngx_pfree

1: ngx_int_t 2: ngx_pfree(ngx_pool_t *pool, void *p) 3: { 4:     ngx_pool_large_t  *l; 5:  6:     //只检查是否是大内存块,如果是大内存块则释放 7:     for (l = pool->large; l; l = l->next) { 8:         if (p == l->alloc) { 9:             ngx_log_debug1(NGX_LOG_DEBUG_ALLOC, pool->log, 0, 10:                            "free: %p", l->alloc); 11:             ngx_free(l->alloc); 12:             l->alloc = NULL; 13:  14:             return NGX_OK; 15:         } 16:     } 17: 

このウェブサイトの声明
この記事の内容はネチズンが自主的に寄稿したものであり、著作権は原著者に帰属します。このサイトは、それに相当する法的責任を負いません。盗作または侵害の疑いのあるコンテンツを見つけた場合は、admin@php.cn までご連絡ください。

ホットAIツール

Undresser.AI Undress

Undresser.AI Undress

リアルなヌード写真を作成する AI 搭載アプリ

AI Clothes Remover

AI Clothes Remover

写真から衣服を削除するオンライン AI ツール。

Undress AI Tool

Undress AI Tool

脱衣画像を無料で

Clothoff.io

Clothoff.io

AI衣類リムーバー

Video Face Swap

Video Face Swap

完全無料の AI 顔交換ツールを使用して、あらゆるビデオの顔を簡単に交換できます。

ホットツール

メモ帳++7.3.1

メモ帳++7.3.1

使いやすく無料のコードエディター

SublimeText3 中国語版

SublimeText3 中国語版

中国語版、とても使いやすい

ゼンドスタジオ 13.0.1

ゼンドスタジオ 13.0.1

強力な PHP 統合開発環境

ドリームウィーバー CS6

ドリームウィーバー CS6

ビジュアル Web 開発ツール

SublimeText3 Mac版

SublimeText3 Mac版

神レベルのコード編集ソフト(SublimeText3)

解決策: 組織では PIN を変更する必要があります。 解決策: 組織では PIN を変更する必要があります。 Oct 04, 2023 pm 05:45 PM

ログイン画面に「組織から PIN の変更を求められています」というメッセージが表示されます。これは、個人のデバイスを制御できる組織ベースのアカウント設定を使用しているコンピューターで PIN の有効期限の制限に達した場合に発生します。ただし、個人アカウントを使用して Windows をセットアップした場合、エラー メッセージは表示されないのが理想的です。常にそうとは限りませんが。エラーが発生したほとんどのユーザーは、個人アカウントを使用して報告します。私の組織が Windows 11 で PIN を変更するように要求するのはなぜですか?アカウントが組織に関連付けられている可能性があるため、主なアプローチはこれを確認することです。ドメイン管理者に問い合わせると解決できます。さらに、ローカル ポリシー設定が間違っていたり、レジストリ キーが間違っていたりすると、エラーが発生する可能性があります。今すぐ

Windows 11 でウィンドウの境界線の設定を調整する方法: 色とサイズを変更する Windows 11 でウィンドウの境界線の設定を調整する方法: 色とサイズを変更する Sep 22, 2023 am 11:37 AM

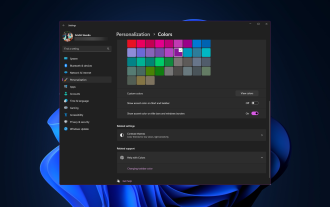
Windows 11 では、新鮮でエレガントなデザインが前面に押し出されており、最新のインターフェイスにより、ウィンドウの境界線などの細部をカスタマイズして変更することができます。このガイドでは、Windows オペレーティング システムで自分のスタイルを反映した環境を作成するのに役立つ手順について説明します。ウィンドウの境界線の設定を変更するにはどうすればよいですか? + を押して設定アプリを開きます。 Windows [個人用設定] に移動し、[色の設定] をクリックします。ウィンドウの境界線の色の変更設定ウィンドウ 11" width="643" height="500" > [タイトル バーとウィンドウの境界線にアクセント カラーを表示する] オプションを見つけて、その横にあるスイッチを切り替えます。 [スタート] メニューとタスク バーにアクセント カラーを表示するにはスタート メニューとタスク バーにテーマの色を表示するには、[スタート メニューとタスク バーにテーマを表示] をオンにします。

Windows 11でタイトルバーの色を変更するにはどうすればよいですか? Windows 11でタイトルバーの色を変更するにはどうすればよいですか? Sep 14, 2023 pm 03:33 PM

デフォルトでは、Windows 11 のタイトル バーの色は、選択したダーク/ライト テーマによって異なります。ただし、任意の色に変更できます。このガイドでは、デスクトップ エクスペリエンスを変更し、視覚的に魅力的なものにするためにカスタマイズする 3 つの方法について、段階的な手順を説明します。アクティブなウィンドウと非アクティブなウィンドウのタイトル バーの色を変更することはできますか?はい、設定アプリを使用してアクティブなウィンドウのタイトル バーの色を変更したり、レジストリ エディターを使用して非アクティブなウィンドウのタイトル バーの色を変更したりできます。これらの手順を学習するには、次のセクションに進んでください。 Windows 11でタイトルバーの色を変更するにはどうすればよいですか? 1. 設定アプリを使用して + を押して設定ウィンドウを開きます。 Windows「個人用設定」に進み、

Windows 11/10修復におけるOOBELANGUAGEエラーの問題 Windows 11/10修復におけるOOBELANGUAGEエラーの問題 Jul 16, 2023 pm 03:29 PM

Windows インストーラー ページに「問題が発生しました」というメッセージとともに「OOBELANGUAGE」というメッセージが表示されますか?このようなエラーが原因で Windows のインストールが停止することがあります。 OOBE とは、すぐに使えるエクスペリエンスを意味します。エラー メッセージが示すように、これは OOBE 言語の選択に関連する問題です。心配する必要はありません。OOBE 画面自体から気の利いたレジストリ編集を行うことで、この問題を解決できます。クイックフィックス – 1. OOBE アプリの下部にある [再試行] ボタンをクリックします。これにより、問題が発生することなくプロセスが続行されます。 2. 電源ボタンを使用してシステムを強制的にシャットダウンします。システムの再起動後、OOBE が続行されます。 3. システムをインターネットから切断します。 OOBE のすべての側面をオフライン モードで完了する

Windows 11 でタスクバーのサムネイル プレビューを有効または無効にする方法 Windows 11 でタスクバーのサムネイル プレビューを有効または無効にする方法 Sep 15, 2023 pm 03:57 PM

タスクバーのサムネイルは楽しい場合もありますが、気が散ったり煩わしい場合もあります。この領域にマウスを移動する頻度を考えると、重要なウィンドウを誤って閉じてしまったことが何度かある可能性があります。もう 1 つの欠点は、より多くのシステム リソースを使用することです。そのため、リソース効率を高める方法を探している場合は、それを無効にする方法を説明します。ただし、ハードウェアの仕様が対応可能で、プレビューが気に入った場合は、有効にすることができます。 Windows 11でタスクバーのサムネイルプレビューを有効にする方法は? 1. 設定アプリを使用してキーをタップし、[設定] をクリックします。 Windows では、「システム」をクリックし、「バージョン情報」を選択します。 「システムの詳細設定」をクリックします。 [詳細設定] タブに移動し、[パフォーマンス] の下の [設定] を選択します。 「視覚効果」を選択します

Windows 11 でのディスプレイ スケーリング ガイド Windows 11 でのディスプレイ スケーリング ガイド Sep 19, 2023 pm 06:45 PM

Windows 11 のディスプレイ スケーリングに関しては、好みが人それぞれ異なります。大きなアイコンを好む人もいれば、小さなアイコンを好む人もいます。ただし、適切なスケーリングが重要であることには誰もが同意します。フォントのスケーリングが不十分であったり、画像が過度にスケーリングされたりすると、作業中の生産性が大幅に低下する可能性があるため、システムの機能を最大限に活用するためにカスタマイズする方法を知る必要があります。カスタム ズームの利点: これは、画面上のテキストを読むのが難しい人にとって便利な機能です。一度に画面上でより多くの情報を確認できるようになります。特定のモニターおよびアプリケーションにのみ適用するカスタム拡張プロファイルを作成できます。ローエンド ハードウェアのパフォーマンスの向上に役立ちます。画面上の内容をより詳細に制御できるようになります。 Windows 11の使用方法

Windows 11で明るさを調整する10の方法 Windows 11で明るさを調整する10の方法 Dec 18, 2023 pm 02:21 PM

画面の明るさは、最新のコンピューティング デバイスを使用する上で不可欠な部分であり、特に長時間画面を見る場合には重要です。目の疲れを軽減し、可読性を向上させ、コンテンツを簡単かつ効率的に表示するのに役立ちます。ただし、設定によっては、特に新しい UI が変更された Windows 11 では、明るさの管理が難しい場合があります。明るさの調整に問題がある場合は、Windows 11 で明るさを管理するすべての方法を次に示します。 Windows 11で明るさを変更する方法【10の方法を解説】 シングルモニターユーザーは、次の方法でWindows 11の明るさを調整できます。これには、ラップトップだけでなく、単一のモニターを使用するデスクトップ システムも含まれます。はじめましょう。方法 1: アクション センターを使用する アクション センターにアクセスできる

Windows Serverでアクティベーションエラーコード0xc004f069を修正する方法 Windows Serverでアクティベーションエラーコード0xc004f069を修正する方法 Jul 22, 2023 am 09:49 AM

Windows のライセンス認証プロセスが突然切り替わり、このエラー コード 0xc004f069 を含むエラー メッセージが表示されることがあります。ライセンス認証プロセスはオンラインですが、Windows Server を実行している一部の古いシステムではこの問題が発生する可能性があります。これらの初期チェックを実行し、システムのアクティブ化に役に立たない場合は、問題を解決するための主要な解決策に進んでください。回避策 – エラー メッセージとアクティベーション ウィンドウを閉じます。次に、コンピュータを再起動します。 Windows ライセンス認証プロセスを最初から再試行します。解決策 1 – ターミナルからアクティブ化する cmd ターミナルから Windows Server Edition システムをアクティブ化します。ステージ – 1 Windows Server のバージョンを確認する 使用している W の種類を確認する必要があります

See all articles