GUIイベント処理の基本
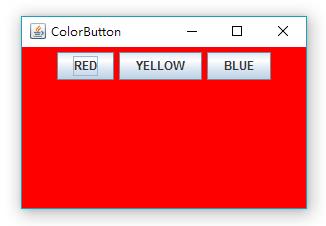
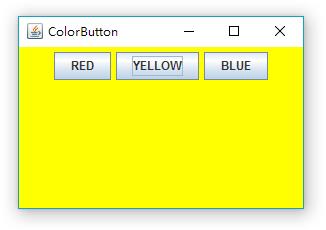
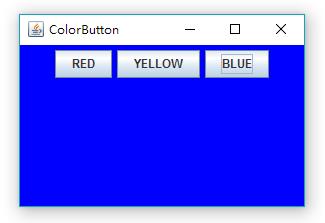
イベント処理はこのように簡単に理解できます。イベントが発生すると、プログラムはそのイベントに応じて応答する必要があります。たとえば、ボタンで背景色を変更できるウィンドウを作成しました。ボタンをクリックするとイベントが発生し、プログラムはこのイベントに応じて、つまり背景色を変更します。
では、プログラムはどう反応するのでしょうか?これには、actionPerformed メソッド (つまり、イベントに基づいて実行される操作) を含むインターフェイスであるイベント リスナー ActionListener が必要です。そのため、リスナー オブジェクトを作成するには、このインターフェイスを実装する (インターフェイスに actionPerformed メソッドを実装する) 必要があります。 . を使用し、ボタンをクリックするとリスナーが呼び出されて応答が実行されるように、ボタンを使用してリスナー オブジェクトを登録します。


実行結果
コード (インターフェースを実装するための 42 行目から):
package buttonPanel;

import java.awt.*;
import java.awt.event.*; //事件监听器接口ActionListener的位置。
import javax.swing.*;

public class ButtonFrame extends JFrame {
    private ButtonPanel buttonPanel;
    private static final int DEFAULT_WIDTH = 300;
    private static final int DEFAULT_HEIGHT = 200;

    public ButtonFrame() {
        setSize(DEFAULT_WIDTH,DEFAULT_HEIGHT);
        setLocationByPlatform(true);

        //构造按钮
        JButton redButton = new JButton("RED");
        JButton yellowButton = new JButton("YELLOW");
        JButton blueButton = new JButton("BLUE");

        buttonPanel = new ButtonPanel();

        //添加按钮到面板
        buttonPanel.add(redButton);
        buttonPanel.add(yellowButton);
        buttonPanel.add(blueButton);

        add(buttonPanel);

        //构造对应颜色的动作监听器
        ColorAction redAction = new ColorAction(Color.red);
        ColorAction yellowAction = new ColorAction(Color.yellow);
        ColorAction blueAction = new ColorAction(Color.blue);

        //每个按钮注册对应的监听器
        redButton.addActionListener(redAction);
        yellowButton.addActionListener(yellowAction);
        blueButton.addActionListener(blueAction);
    }

    //为了方便调用buttonPanel,将ColorAction作为ButtonFrame的内部类。
    private class ColorAction implements ActionListener {
        private Color backgroundColor;
        public ColorAction(Color c) {
            backgroundColor = c;
        }
        public void actionPerformed(ActionEvent event) {
            buttonPanel.setBackground(backgroundColor);
        }
    }

    public static void main(String[] args) {
        EventQueue.invokeLater(new Runnable() {
            public void run() {
                JFrame frame = new ButtonFrame();
                frame.setTitle("ColorButton");
                frame.setDefaultCloseOperation(EXIT_ON_CLOSE);
                frame.setVisible(true);
            }
        });
    }
}

class ButtonPanel extends JPanel {
    private static final int DEFAUT_WIDTH = 300;
    private static final int DEFAUT_HEIGHT = 200;

    @Override
    protected void paintComponent(Graphics g) {
        g.create();
        super.paintComponent(g);
    }

    @Override
    public Dimension getPreferredSize() {
        return new Dimension(DEFAUT_WIDTH,DEFAUT_HEIGHT);
    }
}上記のコードでは、リスナーが呼び出すのを容易にするために、 buttonPanel、ColorActionはButtonFrameの内部クラスとして使用されます。 。 ColorAction クラスを分離する場合は、ButtonPanel を ColorAction に渡す必要があります。実装は次のとおりです。
package buttonPanel2;

import java.awt.*;
import java.awt.event.*;
import javax.swing.*;

public class ButtonFrame2 extends JFrame {
    private ButtonPanel buttonPanel;
    private static final int DEFAULT_WIDTH = 300;
    private static final int DEFAULT_HEIGHT = 200;

    public ButtonFrame2() {
        setSize(DEFAULT_WIDTH,DEFAULT_HEIGHT);
        setLocationByPlatform(true);

        JButton redButton = new JButton("RED");
        JButton yellowButton = new JButton("YELLOW");
        JButton blueButton = new JButton("BLUE");

        buttonPanel = new ButtonPanel();

        buttonPanel.add(redButton);
        buttonPanel.add(yellowButton);
        buttonPanel.add(blueButton);

        add(buttonPanel);

        //将此对象通过this传到ColorAction的构造器。
        ColorAction redAction = new ColorAction(this,Color.red);
        ColorAction yellowAction = new ColorAction(this,Color.yellow);
        ColorAction blueAction = new ColorAction(this,Color.blue);

        redButton.addActionListener(redAction);
        yellowButton.addActionListener(yellowAction);
        blueButton.addActionListener(blueAction);
    }

    public void setButtonPanelsBackground(Color backgroundColor) {
        buttonPanel.setBackground(backgroundColor);
    }

    public static void main(String[] args) {
        EventQueue.invokeLater(new Runnable() {
            public void run() {
                JFrame frame = new ButtonFrame2();
                frame.setTitle("ColorButton");
                frame.setDefaultCloseOperation(EXIT_ON_CLOSE);
                frame.setVisible(true);
            }
        });
    }
}

class ColorAction implements ActionListener {
    private ButtonFrame2 buttonFrame;
    private Color backgroundColor;

    //通过构造器的方法把ButtonFrame2对象传过来,这个对象包含了成员变量buttonPanel,以便对其更换背景色。
    public ColorAction(ButtonFrame2 buttonFrame,Color c) {
        this.buttonFrame = buttonFrame; //this.buttonFrame只是对象管理者,管理的还是ButtonFrame的对象frame。
        backgroundColor = c;
    }
    public void actionPerformed(ActionEvent event) {
        buttonFrame.setButtonPanelsBackground(backgroundColor);
        //这是我们在ButtonFrame2中添加的新方法。
    }
}

class ButtonPanel extends JPanel {
    private static final int DEFAUT_WIDTH = 300;
    private static final int DEFAUT_HEIGHT = 200;

    public ButtonPanel() {
        setBackground(Color.pink);
    }

    @Override
    protected void paintComponent(Graphics g) {
        g.create();
        super.paintComponent(g);
    }

    @Override
    public Dimension getPreferredSize() {
        return new Dimension(DEFAUT_WIDTH,DEFAUT_HEIGHT);
    }
}

ButtonFrame2コードに欠陥があります。つまり、ボタンを構築する際にコードが重複しています。コードの重複を避けるために、次のように、これらの繰り返し操作を含める makeButton メソッドを作成できます:
package buttonPanel3;

import java.awt.*;
import java.awt.event.*;
import javax.swing.*;

public class ButtonFrame3 extends JFrame {
    private ButtonPanel buttonPanel;
    private static final int DEFAULT_WIDTH = 300;
    private static final int DEFAULT_HEIGHT = 200;

    public ButtonFrame3() {
        setSize(DEFAULT_WIDTH,DEFAULT_HEIGHT);
        setLocationByPlatform(true);

        buttonPanel = new ButtonPanel();
        add(buttonPanel);

        makeButton("RED",Color.red);
        makeButton("YELLOW",Color.yellow);
        makeButton("BLUE",Color.blue);
    }

    //为了避免代码重复,我们将重复的操作放在这个函数里。
    public void makeButton(String name,final Color bg) {
        JButton button = new JButton(name);
        buttonPanel.add(button);
        button.addActionListener(new ActionListener() { //可以new一个接口出来,但是后面必须接花括号实现内部方法。
            public void actionPerformed(ActionEvent event) {
                buttonPanel.setBackground(bg);
            }
        });
    }

    public static void main(String[] args) {
        EventQueue.invokeLater(new Runnable() {
            public void run() {
                JFrame frame = new ButtonFrame3();
                frame.setTitle("ColorButton");
                frame.setDefaultCloseOperation(EXIT_ON_CLOSE);
                frame.setVisible(true);
            }
        });
    }
}

class ButtonPanel extends JPanel {
    private static final int DEFAUT_WIDTH = 300;
    private static final int DEFAUT_HEIGHT = 200;

    @Override
    protected void paintComponent(Graphics g) {
        g.create();
        super.paintComponent(g);
    }

    @Override
    public Dimension getPreferredSize() {
        return new Dimension(DEFAUT_WIDTH,DEFAUT_HEIGHT);
    }
}

ButtonFrame3コードでは、リスナーのみが呼び出されます。 1 回、つまり addActionListener() のときに。したがって、リスナー用に別のクラスを作成する必要はなく、リスナーを使用するときに新しい ActionListener インターフェイスを直接作成し、中かっこでインターフェイス メソッドを実装するだけです。

ホットAIツール

Undresser.AI Undress
リアルなヌード写真を作成する AI 搭載アプリ

AI Clothes Remover
写真から衣服を削除するオンライン AI ツール。

Undress AI Tool
脱衣画像を無料で

Clothoff.io
AI衣類リムーバー

Video Face Swap
完全無料の AI 顔交換ツールを使用して、あらゆるビデオの顔を簡単に交換できます。

人気の記事

ホットツール

メモ帳++7.3.1
使いやすく無料のコードエディター

SublimeText3 中国語版
中国語版、とても使いやすい

ゼンドスタジオ 13.0.1
強力な PHP 統合開発環境

ドリームウィーバー CS6
ビジュアル Web 開発ツール

SublimeText3 Mac版
神レベルのコード編集ソフト(SublimeText3)

ホットトピック
 7681
7681
 15
15
 1639
1639
 14
14
 1393
1393
 52
52
 1286
1286
 25
25
 1229
1229
 29
29
 ジャワのウェカ
Aug 30, 2024 pm 04:28 PM
Java の Weka へのガイド。ここでは、weka java の概要、使い方、プラットフォームの種類、利点について例を交えて説明します。
 Java Springのインタビューの質問
Aug 30, 2024 pm 04:29 PM
この記事では、Java Spring の面接で最もよく聞かれる質問とその詳細な回答をまとめました。面接を突破できるように。
 Java 8 Stream Foreachから休憩または戻ってきますか?
Feb 07, 2025 pm 12:09 PM
Java 8は、Stream APIを導入し、データ収集を処理する強力で表現力のある方法を提供します。ただし、ストリームを使用する際の一般的な質問は次のとおりです。 従来のループにより、早期の中断やリターンが可能になりますが、StreamのForeachメソッドはこの方法を直接サポートしていません。この記事では、理由を説明し、ストリーム処理システムに早期終了を実装するための代替方法を調査します。 さらに読み取り:JavaストリームAPIの改善 ストリームを理解してください Foreachメソッドは、ストリーム内の各要素で1つの操作を実行する端末操作です。その設計意図はです
 Java での日付までのタイムスタンプ
Aug 30, 2024 pm 04:28 PM
Java での日付までのタイムスタンプに関するガイド。ここでは、Java でタイムスタンプを日付に変換する方法とその概要について、例とともに説明します。
 カプセルの量を見つけるためのJavaプログラム
Feb 07, 2025 am 11:37 AM
カプセルは3次元の幾何学的図形で、両端にシリンダーと半球で構成されています。カプセルの体積は、シリンダーの体積と両端に半球の体積を追加することで計算できます。このチュートリアルでは、さまざまな方法を使用して、Javaの特定のカプセルの体積を計算する方法について説明します。 カプセルボリュームフォーミュラ カプセルボリュームの式は次のとおりです。 カプセル体積=円筒形の体積2つの半球体積 で、 R:半球の半径。 H:シリンダーの高さ(半球を除く)。 例1 入力 RADIUS = 5ユニット 高さ= 10単位 出力 ボリューム= 1570.8立方ユニット 説明する 式を使用してボリュームを計算します。 ボリューム=π×R2×H(4
 未来を創る: まったくの初心者のための Java プログラミング
Oct 13, 2024 pm 01:32 PM
Java は、初心者と経験豊富な開発者の両方が学習できる人気のあるプログラミング言語です。このチュートリアルは基本的な概念から始まり、高度なトピックに進みます。 Java Development Kit をインストールしたら、簡単な「Hello, World!」プログラムを作成してプログラミングを練習できます。コードを理解したら、コマンド プロンプトを使用してプログラムをコンパイルして実行すると、コンソールに「Hello, World!」と出力されます。 Java の学習はプログラミングの旅の始まりであり、習熟が深まるにつれて、より複雑なアプリケーションを作成できるようになります。


