Android カスタム ビュー
Nov 17, 2016 am 09:07 AM前書き
Android カスタム ビューの詳細な手順は、開発中に常にカスタム ビューの必要性に遭遇するため、すべての Android 開発者が習得する必要があるスキルです。私の技術レベルを向上させるために、私は体系的に勉強し、いくつかの経験をここに書き留めました。不足している点があれば、皆さんに指摘していただければ幸いです。
プロセス
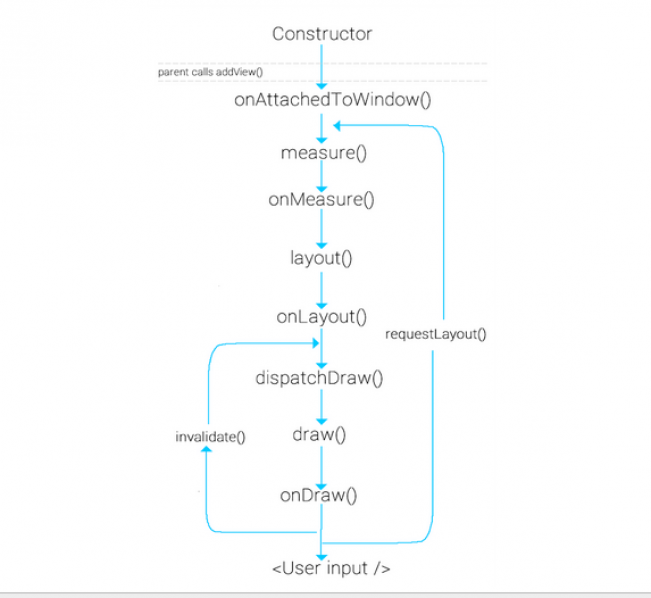
Androidでは、Androidフレームワーク層でレイアウト要求の描画が開始されます。ルートノードから描画を開始し、レイアウトツリーを計測・描画します。 RootViewImpl で PerformTraversals を展開します。これが行うことは、必要なビュー上での測定 (ビューのサイズの測定)、レイアウト (ビューの位置の決定)、および描画 (ビューの描画) です。次の図は、ビューの描画プロセスをよく示しています:

ユーザーが requestLayout を呼び出すと、測定とレイアウトのみがトリガーされますが、システムが呼び出しを開始すると描画もトリガーされます
以下では、これらを紹介します。プロセスを詳しく説明します。
measure
measure は View の最終メソッドであり、オーバーライドできません。これはビューのサイズを測定して計算しますが、onMeasure メソッドをコールバックするため、View をカスタマイズするときに、必要に応じて onMeasure メソッドをオーバーライドして View を測定できます。これには、widthMeasureSpec と heightMeasureSpec の 2 つのパラメータがあります。実際、これら 2 つのパラメータには、サイズとモードという 2 つの部分が含まれています。 size は測定されたサイズ、mode はビューのレイアウト モードです
次のコードで取得できます:
int widthSize = MeasureSpec.getSize(widthMeasureSpec);
int heightSize = MeasureSpec.getSize(heightMeasureSpec);
int widthMode = MeasureSpec.getMode(widthMeasureSpec);
int heightMode = MeasureSpec.getMode(heightMeasureSpec);
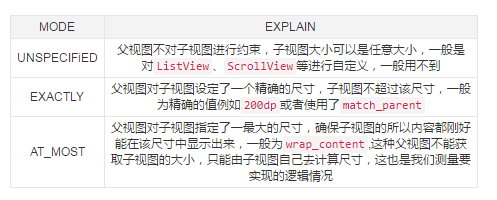
取得されるモードの種類は次の 3 つのタイプに分けられます:

setMeasuredDimension
を通じてビューを取得します上記のロジックの幅と高さ、最後に setMeasuredDimension メソッドを呼び出して、測定された幅と高さを渡します。実際、最終的には、渡された値に属性を割り当てるために setMeasuredDimensionRaw メソッドが呼び出されます。 super.onMeasure() を呼び出すための呼び出しロジックも同じです。
以下は、検証コード View をカスタマイズする例です。その onMeasure メソッドは次のとおりです:
@Override
    protected void onMeasure(int widthMeasureSpec, int heightMeasureSpec) {
        int widthSize = MeasureSpec.getSize(widthMeasureSpec);
        int heightSize = MeasureSpec.getSize(heightMeasureSpec);
        int widthMode = MeasureSpec.getMode(widthMeasureSpec);
        int heightMode = MeasureSpec.getMode(heightMeasureSpec);
        if (widthMode == MeasureSpec.EXACTLY) {
            //直接获取精确的宽度
            width = widthSize;
        } else if (widthMode == MeasureSpec.AT_MOST) {
            //计算出宽度(文本的宽度+padding的大小)
            width = bounds.width() + getPaddingLeft() + getPaddingRight();
        }
        if (heightMode == MeasureSpec.EXACTLY) {
            //直接获取精确的高度
            height = heightSize;
        } else if (heightMode == MeasureSpec.AT_MOST) {
            //计算出高度(文本的高度+padding的大小)
            height = bounds.height() + getPaddingBottom() + getPaddingTop();
        }
        //设置获取的宽高
        setMeasuredDimension(width, height);
}カスタム View のlayout_width とlayout_height に異なる属性を設定して、異なるモード タイプに到達することができ、異なる効果を確認できます。
measureChildren
ViewGroup を継承する View をカスタマイズしている場合、それ自体のサイズを測定するときにサブビューのサイズも測定する必要があります。一般に、サブビューのサイズは、measureChildren(int widthMeasureSpec, int heightMeasureSpec) メソッドを通じて測定されます。
protected void measureChildren(int widthMeasureSpec, int heightMeasureSpec) {
        final int size = mChildrenCount;
        final View[] children = mChildren;
        for (int i = 0; i < size; ++i) {
            final View child = children[i];
            if ((child.mViewFlags & VISIBILITY_MASK) != GONE) {
                measureChild(child, widthMeasureSpec, heightMeasureSpec);
            }
        }
}上記のソース コードを通して、サブビューが非表示になっていない場合は、measureChild メソッドが呼び出されていることがわかります。次に、measureChild のソース コードを見てください。最初に getChildMeasureSpec メソッドを呼び出し、幅と高さをそれぞれ取得し、最後に View の測定メソッドを呼び出します。これは、ビューのサイズを計算することであることがすでにわかっています。メジャーのパラメータは getChildMeasureSpec を通じて取得されます。
protected void measureChild(View child, int parentWidthMeasureSpec,
            int parentHeightMeasureSpec) {
        final LayoutParams lp = child.getLayoutParams();
        final int childWidthMeasureSpec = getChildMeasureSpec(parentWidthMeasureSpec,
                mPaddingLeft + mPaddingRight, lp.width);
        final int childHeightMeasureSpec = getChildMeasureSpec(parentHeightMeasureSpec,
                mPaddingTop + mPaddingBottom, lp.height);
        child.measure(childWidthMeasureSpec, childHeightMeasureSpec);
}というソース コードを見てみましょう。少しは理解しやすいでしょうか。前述したように、モードの種類に応じて対応するサイズを取得します。サブビューが属するモードは、親ビューのモード タイプとサブビューの LayoutParams タイプに基づいて決定され、最後に取得されたサイズとモードが統合され、MeasureSpec.makeMeasureSpec メソッドを通じて返されます。最後に、measure に渡されます。これは、前述の widthMeasureSpec と heightMeasureSpec に含まれる 2 つの部分の値です。プロセス全体は、measureChildren->measureChild->getChildMeasureSpec->measure->onMeasure->setMeasuredDimension であるため、measureChildren を通じてサブビューを測定および計算できます。
layout
layoutも同様です。onLayoutメソッドは内部的にコールバックされますが、このメソッドはViewGroup内の抽象メソッドなので、Viewを描画したい場合に使用します。カスタマイズは ViewGroup を継承するため、このメソッドを実装する必要があります。ただし、View を継承する場合は、View に空の実装は必要ありません。サブビューの位置の設定は、計算された左、上、右、下の値をビューのレイアウト メソッドに渡すことであり、これらの値は通常、ビューの幅と高さを使用して計算されます。 View の幅と高さは getMeasureWidth メソッドと GetMeasureHeight メソッドで計算できます。これら 2 つのメソッドで取得された値は、上記の onMeasure の setMeasuredDimension によって渡された値、つまりサブビューによって測定された幅と高さです。
getWidth, getHeight と getMeasureWidth, getMeasureHeight は異なります。前者は、onLayout の後にのみ取得できる値であり、後者は onMeasure の後にのみ取得できる値です。ただし、これら 2 つのメソッドで取得される値は一般に同じであるため、呼び出しのタイミングに注意してください。
以下は、親ビューの四隅にサブビューを配置するViewの定義例です。
public static int getChildMeasureSpec(int spec, int padding, int childDimension) {
        int specMode = MeasureSpec.getMode(spec);
        int specSize = MeasureSpec.getSize(spec);

        int size = Math.max(0, specSize - padding);

        int resultSize = 0;
        int resultMode = 0;

        switch (specMode) {
        // Parent has imposed an exact size on us
        case MeasureSpec.EXACTLY:
            if (childDimension >= 0) {
                resultSize = childDimension;
                resultMode = MeasureSpec.EXACTLY;
            } else if (childDimension == LayoutParams.MATCH_PARENT) {
                // Child wants to be our size. So be it.
                resultSize = size;
                resultMode = MeasureSpec.EXACTLY;
            } else if (childDimension == LayoutParams.WRAP_CONTENT) {
                // Child wants to determine its own size. It can't be
                // bigger than us.
                resultSize = size;
                resultMode = MeasureSpec.AT_MOST;
            }
            break;

        // Parent has imposed a maximum size on us
        case MeasureSpec.AT_MOST:
            if (childDimension >= 0) {
                // Child wants a specific size... so be it
                resultSize = childDimension;
                resultMode = MeasureSpec.EXACTLY;
            } else if (childDimension == LayoutParams.MATCH_PARENT) {
                // Child wants to be our size, but our size is not fixed.
                // Constrain child to not be bigger than us.
                resultSize = size;
                resultMode = MeasureSpec.AT_MOST;
            } else if (childDimension == LayoutParams.WRAP_CONTENT) {
                // Child wants to determine its own size. It can't be
                // bigger than us.
                resultSize = size;
                resultMode = MeasureSpec.AT_MOST;
            }
            break;

        // Parent asked to see how big we want to be
        case MeasureSpec.UNSPECIFIED:
            if (childDimension >= 0) {
                // Child wants a specific size... let him have it
                resultSize = childDimension;
                resultMode = MeasureSpec.EXACTLY;
            } else if (childDimension == LayoutParams.MATCH_PARENT) {
                // Child wants to be our size... find out how big it should
                // be
                resultSize = View.sUseZeroUnspecifiedMeasureSpec ? 0 : size;
                resultMode = MeasureSpec.UNSPECIFIED;
            } else if (childDimension == LayoutParams.WRAP_CONTENT) {
                // Child wants to determine its own size.... find out how
                // big it should be
                resultSize = View.sUseZeroUnspecifiedMeasureSpec ? 0 : size;
                resultMode = MeasureSpec.UNSPECIFIED;
            }
            break;
        }
        //noinspection ResourceType
        return MeasureSpec.makeMeasureSpec(resultSize, resultMode);
}onMeasureの実装ソースコードについては、後でリンクしますので、レンダリングを見たい方はご覧ください。前の確認コードも同様に後で投稿します
draw
draw是由dispatchDraw发动的,dispatchDraw是ViewGroup中的方法,在View是空实现。自定义View时不需要去管理该方法。而draw方法只在View中存在,ViewGoup做的只是在dispatchDraw中调用drawChild方法,而drawChild中调用的就是View的draw方法。那么我们来看下draw的源码:
public void draw(Canvas canvas) {
        final int privateFlags = mPrivateFlags;
        final boolean dirtyOpaque = (privateFlags & PFLAG_DIRTY_MASK) == PFLAG_DIRTY_OPAQUE &&
                (mAttachInfo == null || !mAttachInfo.mIgnoreDirtyState);
        mPrivateFlags = (privateFlags & ~PFLAG_DIRTY_MASK) | PFLAG_DRAWN;

        /*
         * Draw traversal performs several drawing steps which must be executed
         * in the appropriate order:
         *
         *      1. Draw the background
         *      2. If necessary, save the canvas' layers to prepare for fading
         *      3. Draw view's content
         *      4. Draw children
         *      5. If necessary, draw the fading edges and restore layers
         *      6. Draw decorations (scrollbars for instance)
         */

        // Step 1, draw the background, if needed
        int saveCount;

        if (!dirtyOpaque) {
            drawBackground(canvas);
        }

        // skip step 2 & 5 if possible (common case)
        final int viewFlags = mViewFlags;
        boolean horizontalEdges = (viewFlags & FADING_EDGE_HORIZONTAL) != 0;
        boolean verticalEdges = (viewFlags & FADING_EDGE_VERTICAL) != 0;
        if (!verticalEdges && !horizontalEdges) {
            // Step 3, draw the content
            if (!dirtyOpaque) onDraw(canvas);

            // Step 4, draw the children
            dispatchDraw(canvas);

            // Overlay is part of the content and draws beneath Foreground
            if (mOverlay != null && !mOverlay.isEmpty()) {
                            mOverlay.getOverlayView().dispatchDraw(canvas);
            }

            // Step 6, draw decorations (foreground, scrollbars)
            onDrawForeground(canvas);

            // we're done...
            return;
        }
        //省略2&5的情况
        ....
}源码已经非常清晰了draw总共分为6步;
绘制背景
如果需要的话,保存layers
绘制自身文本
绘制子视图
如果需要的话,绘制fading edges
绘制scrollbars
其中 第2步与第5步不是必须的。在第3步调用了onDraw方法来绘制自身的内容,在View中是空实现,这就是我们为什么在自定义View时必须要重写该方法。而第4步调用了dispatchDraw对子视图进行绘制。还是以验证码为例:
@Override
    protected void onDraw(Canvas canvas) {
        //绘制背景
        mPaint.setColor(getResources().getColor(R.color.autoCodeBg));
        canvas.drawRect(0, 0, getMeasuredWidth(), getMeasuredHeight(), mPaint);

        mPaint.getTextBounds(autoText, 0, autoText.length(), bounds);
        //绘制文本
        for (int i = 0; i < autoText.length(); i++) {
             mPaint.setColor(getResources().getColor(colorRes[random.nextInt(6)]));
            canvas.drawText(autoText, i, i + 1, getWidth() / 2 - bounds.width() / 2 + i * bounds.width() / autoNum
                    , bounds.height() + random.nextInt(getHeight() - bounds.height())
                    , mPaint);
        }

        //绘制干扰点
        for (int j = 0; j < 250; j++) {
             canvas.drawPoint(random.nextInt(getWidth()), random.nextInt(getHeight()), pointPaint);
        }

        //绘制干扰线
        for (int k = 0; k < 20; k++) {
            int startX = random.nextInt(getWidth());
            int startY = random.nextInt(getHeight());
            int stopX = startX + random.nextInt(getWidth() - startX);
            int stopY = startY + random.nextInt(getHeight() - startY);
             linePaint.setColor(getResources().getColor(colorRes[random.nextInt(6)]));
            canvas.drawLine(startX, startY, stopX, stopY, linePaint);
        }
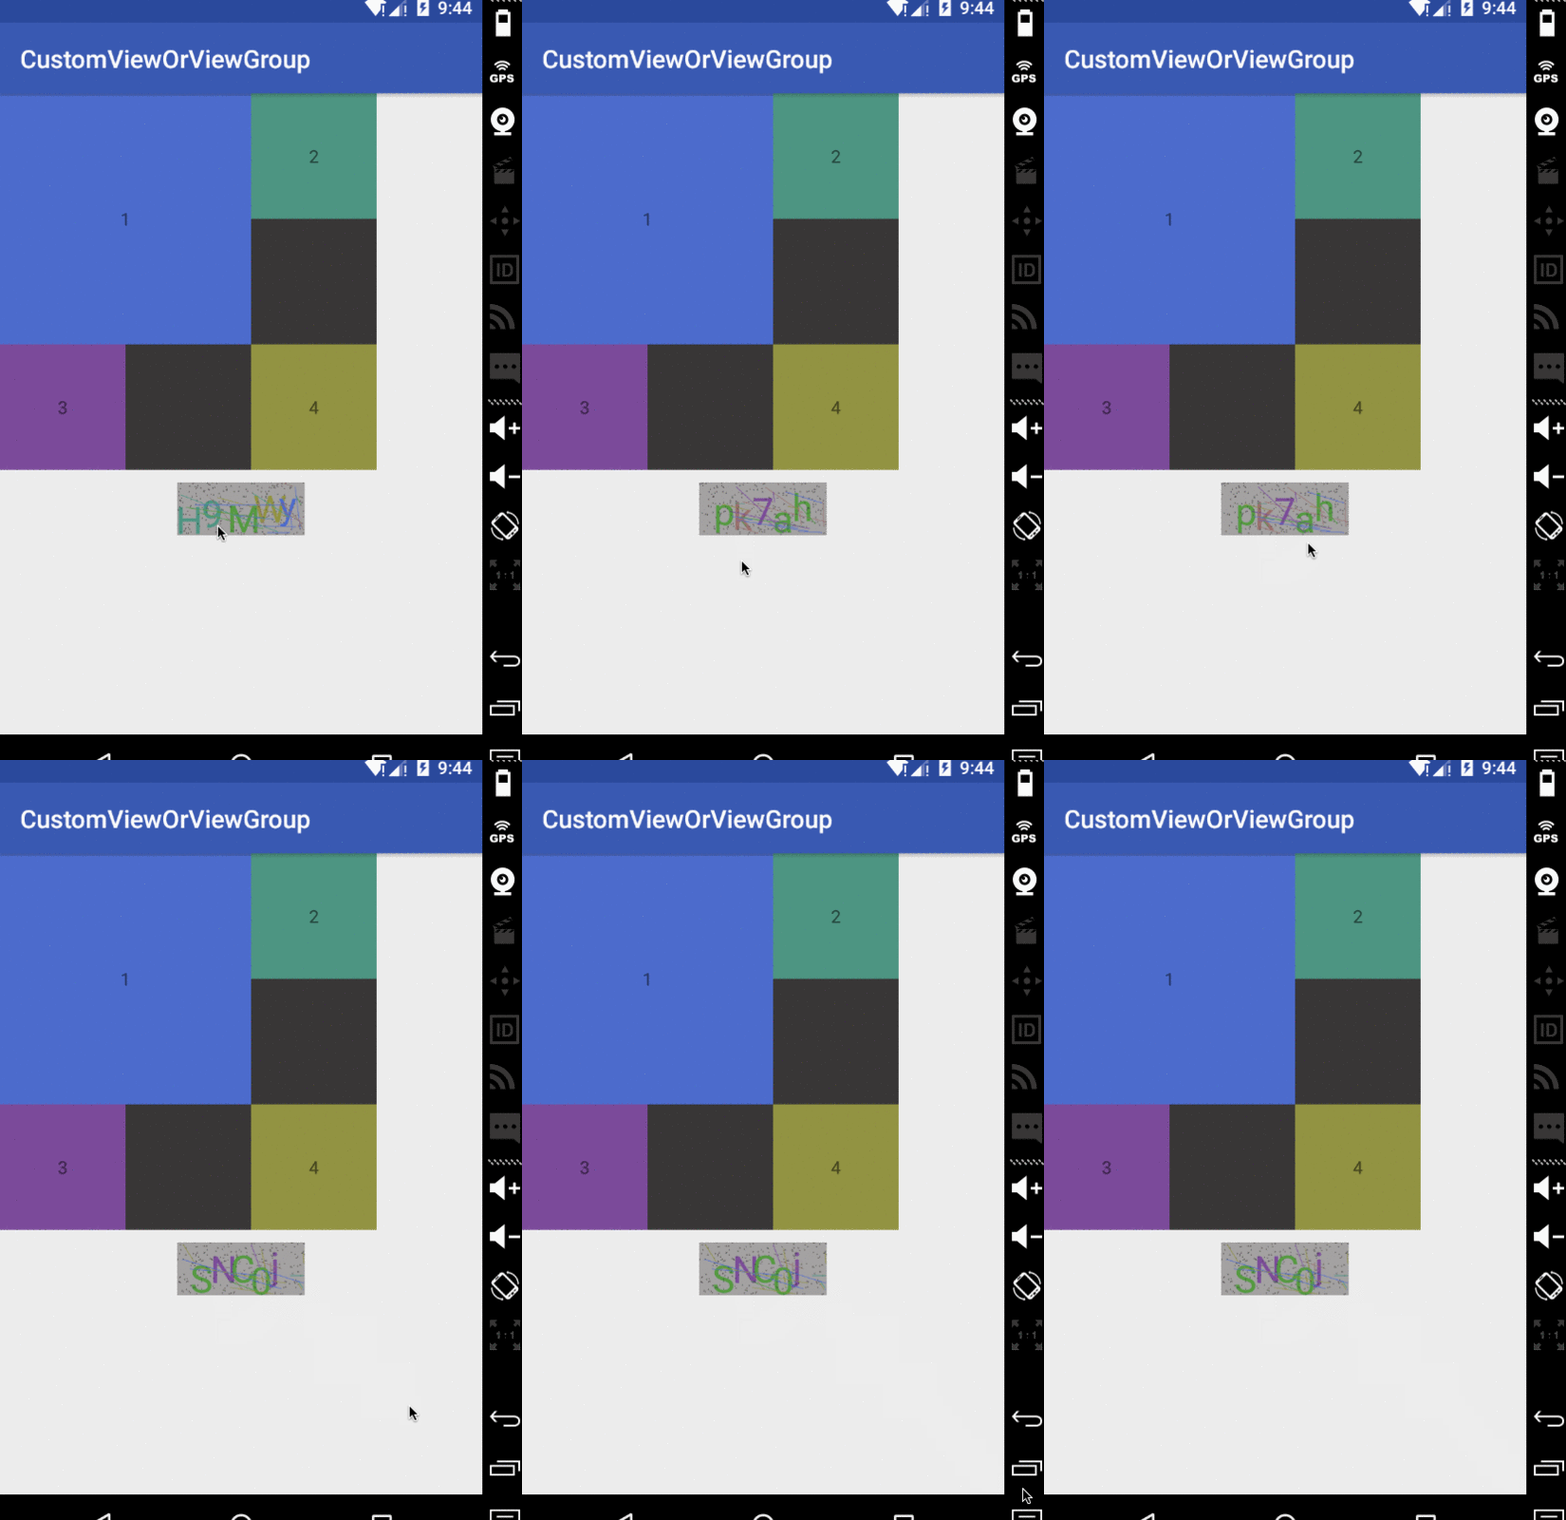
}图,与源码链接
示例图


人気の記事

人気の記事

ホットな記事タグ

メモ帳++7.3.1
使いやすく無料のコードエディター

SublimeText3 中国語版
中国語版、とても使いやすい

ゼンドスタジオ 13.0.1
強力な PHP 統合開発環境

ドリームウィーバー CS6
ビジュアル Web 開発ツール

SublimeText3 Mac版
神レベルのコード編集ソフト(SublimeText3)

ホットトピック
 7286
7286
 9
9
 1622
1622
 14
14
 1342
1342
 46
46
 1259
1259
 25
25
 1206
1206
 29
29
 Javaのクラスロードメカニズムは、さまざまなクラスローダーやその委任モデルを含むどのように機能しますか?
Mar 17, 2025 pm 05:35 PM
Javaのクラスロードメカニズムは、さまざまなクラスローダーやその委任モデルを含むどのように機能しますか?
 2025年のトップ4 JavaScriptフレームワーク:React、Angular、Vue、Svelte
Mar 07, 2025 pm 06:09 PM
2025年のトップ4 JavaScriptフレームワーク:React、Angular、Vue、Svelte
 キャッシュや怠zyなロードなどの高度な機能を備えたオブジェクトリレーショナルマッピングにJPA(Java Persistence API)を使用するにはどうすればよいですか?
Mar 17, 2025 pm 05:43 PM
キャッシュや怠zyなロードなどの高度な機能を備えたオブジェクトリレーショナルマッピングにJPA(Java Persistence API)を使用するにはどうすればよいですか?
 高度なJavaプロジェクト管理、自動化の構築、依存関係の解像度にMavenまたはGradleを使用するにはどうすればよいですか?
Mar 17, 2025 pm 05:46 PM
高度なJavaプロジェクト管理、自動化の構築、依存関係の解像度にMavenまたはGradleを使用するにはどうすればよいですか?
 カフェインやグアバキャッシュなどのライブラリを使用して、Javaアプリケーションにマルチレベルキャッシュを実装するにはどうすればよいですか?
Mar 17, 2025 pm 05:44 PM
カフェインやグアバキャッシュなどのライブラリを使用して、Javaアプリケーションにマルチレベルキャッシュを実装するにはどうすればよいですか?
 Spring Boot Snakeyaml 2.0 CVE-2022-1471問題修正
Mar 07, 2025 pm 05:52 PM
Spring Boot Snakeyaml 2.0 CVE-2022-1471問題修正


