Flex での TitleWindow 値転送のアイデアと実装
1. デザインのアイデア
(1) 新しい DataGrid を作成し、最後の列に追加、変更、削除の 3 つのボタンを追加します
(2) 新しいボタンをクリックしてテーブルに新しい行を追加します。 3) [変更] ボタンをクリックしてテーブルの行の一部の属性を変更します
(4) [削除] ボタンをクリックしてテーブルの行を削除します。
2. 実装手順
(1) 新しいアプリケーション DataGrid.mxml を作成します
DataGrid.mxml:
<?xml version="1.0" encoding="utf-8"?>
<s:Application xmlns:fx="http://ns.adobe.com/mxml/2009"
xmlns:s="library://ns.adobe.com/flex/spark"
xmlns:mx="library://ns.adobe.com/flex/mx" minWidth="955" minHeight="600">
<s:layout>
<s:BasicLayout/>
</s:layout>
<fx:Declarations>
<!-- 将非可视元素(例如服务、值对象)放在此处 -->
</fx:Declarations>

<fx:Script>
<![CDATA[
import mx.collections.ArrayCollection;

[Bindable]
//表格数据源绑定
private var grid:ArrayCollection = new ArrayCollection([
{number:"2014010101",name:"张三",sex:"男",age:"19"},
{number:"2014010102",name:"李思",sex:"女",age:"20"},
{number:"2014010103",name:"蔡华",sex:"男",age:"21"},
{number:"2014010104",name:"牛耳",sex:"女",age:"22"},
{number:"2014010105",name:"兆司",sex:"男",age:"18"},
{number:"2014010106",name:"胡柳",sex:"女",age:"19"},
{number:"2014010107",name:"刘斯",sex:"男",age:"20"},
{number:"2014010108",name:"孙阳",sex:"女",age:"22"},
{number:"2014010109",name:"郑武",sex:"男",age:"21"},
{number:"2014010110",name:"王雪",sex:"女",age:"20"},
{number:"2014010111",name:"胡柳",sex:"女",age:"19"},
{number:"2014010112",name:"刘斯",sex:"男",age:"20"},
{number:"2014010113",name:"孙阳",sex:"女",age:"22"},
{number:"2014010114",name:"郑武",sex:"男",age:"21"},
{number:"2014010115",name:"王雪",sex:"女",age:"20"}
]);
]]>
</fx:Script>

<mx:VBox width="100%" height="100%" paddingBottom="100" paddingLeft="100" paddingRight="100" paddingTop="100">
<mx:DataGrid id="dataGrid" dataProvider="{grid}" rowCount="{grid.length+1}" width="100%" textAlign="center">
<mx:columns>
<mx:DataGridColumn headerText="学号" dataField="number" id="stuNumber"/>
<mx:DataGridColumn headerText="姓名" dataField="name"/>
<mx:DataGridColumn headerText="性别" dataField="sex"/>
<mx:DataGridColumn headerText="年龄" dataField="age"/>
<mx:DataGridColumn headerText="操作">
<mx:itemRenderer>
<fx:Component>
<mx:HBox width="100%" paddingLeft="40">

<fx:Script>
<![CDATA[
import mx.managers.PopUpManager;

/*添加按钮事件函数*/
protected function addHandler(event:MouseEvent):void
{
var childWindow:ChildWindow = ChildWindow(PopUpManager.createPopUp(this,ChildWindow,true));
var point:Point = new Point(100,100);
childWindow.x = point.x + 400;
childWindow.y = point.y + 50;
}

/*修改按钮事件函数*/
protected function updateHandler(event:MouseEvent):void
{
var updateWindow:UpdateWindow = UpdateWindow(PopUpManager.createPopUp(this,UpdateWindow,true));
var point:Point = new Point(100,100);
updateWindow.x = point.x + 400;
updateWindow.y = point.y + 50;
updateWindow.stuNo = event.currentTarget.selectedItem.content;
}

]]>
</fx:Script>

<mx:LinkButton label="新增" click="addHandler(event)"/>
<s:Label width="10"/>
<mx:LinkButton label="修改" click="updateHandler(event)"/>
<s:Label width="10"/>
<mx:LinkButton label="删除"/>
</mx:HBox>
</fx:Component>
</mx:itemRenderer>
</mx:DataGridColumn>
</mx:columns>
</mx:DataGrid>

</mx:VBox>
</s:Application>
ログイン後にコピー
(2) 新しいウィンドウコンポーネント ChildWindow.mxml を作成します
ChildWindow.mxml:
<?xml version="1.0" encoding="utf-8"?>
<s:TitleWindow xmlns:fx="http://ns.adobe.com/mxml/2009"
xmlns:s="library://ns.adobe.com/flex/spark"
xmlns:mx="library://ns.adobe.com/flex/mx" width="400" height="300"
close="closeHandler(event)" title="新增窗口">
<s:layout>
<s:BasicLayout/>
</s:layout>
<fx:Script>
<![CDATA[
import mx.events.CloseEvent;
import mx.managers.PopUpManager;

/*关闭按钮函数*/
protected function closeHandler(event:CloseEvent):void
{
PopUpManager.removePopUp(this);
}

/*取消按钮函数*/
protected function cancelHandler(event:MouseEvent):void
{
PopUpManager.removePopUp(this);
}

]]>
</fx:Script>
<fx:Declarations>
<!-- 将非可视元素(例如服务、值对象)放在此处 -->
</fx:Declarations>

<mx:VBox width="100%" height="100%" horizontalAlign="center">
<mx:Form borderStyle="solid" borderColor="#CCCCCC" width="100%">
<mx:FormHeading label="新增界面" fontSize="14"/>
<mx:FormItem label="学号:">
<s:TextInput id="stuNo" width="200"/>
</mx:FormItem>
<mx:FormItem label="姓名:">
<s:TextInput id="stuName" width="200"/>
</mx:FormItem>
<mx:FormItem label="性别:">
<s:TextInput id="stuSex" width="200"/>
</mx:FormItem>
<mx:FormItem label="年龄:">
<s:TextInput id="stuAge" width="200"/>
</mx:FormItem>
</mx:Form>
<mx:HBox width="100%" height="25">
<s:Label width="60"/>
<s:Button label="新增"/>
<s:Label width="48"/>
<s:Button label="取消" click="cancelHandler(event)"/>
</mx:HBox>
</mx:VBox>
</s:TitleWindow>
ログイン後にコピー
( 3) 新しい変更インターフェイス コンポーネント UpdateWindow.mxml を作成します
UpdateWindow.mxml:
<?xml version="1.0" encoding="utf-8"?>
<s:TitleWindow xmlns:fx="http://ns.adobe.com/mxml/2009"
xmlns:s="library://ns.adobe.com/flex/spark"
xmlns:mx="library://ns.adobe.com/flex/mx" width="400" height="300"
close="closeHandler(event)" title="修改窗口">
<s:layout>
<s:BasicLayout/>
</s:layout>
<fx:Script>
<![CDATA[
import mx.events.CloseEvent;
import mx.managers.PopUpManager;

/*关闭按钮函数*/
protected function closeHandler(event:CloseEvent):void
{
PopUpManager.removePopUp(this);
}

/*取消按钮函数*/
protected function cancelHandler(event:MouseEvent):void
{
PopUpManager.removePopUp(this);
}

]]>
</fx:Script>
<fx:Declarations>
<!-- 将非可视元素(例如服务、值对象)放在此处 -->
</fx:Declarations>

<mx:VBox width="100%" height="100%" horizontalAlign="center">
<mx:Form borderStyle="solid" borderColor="#CCCCCC" width="100%">
<mx:FormHeading label="修改界面" fontSize="14"/>
<mx:FormItem label="学号:">
<s:TextInput id="stuNo" width="200"/>
</mx:FormItem>
<mx:FormItem label="姓名:">
<s:TextInput id="stuName" width="200"/>
</mx:FormItem>
<mx:FormItem label="性别:">
<s:TextInput id="stuSex" width="200"/>
</mx:FormItem>
<mx:FormItem label="年龄:">
<s:TextInput id="stuAge" width="200"/>
</mx:FormItem>
</mx:Form>
<mx:HBox width="100%" height="25">
<s:Label width="60"/>
<s:Button label="修改"/>
<s:Label width="48"/>
<s:Button label="取消" click="cancelHandler(event)"/>
</mx:HBox>
</mx:VBox>
</s:TitleWindow>
ログイン後にコピー
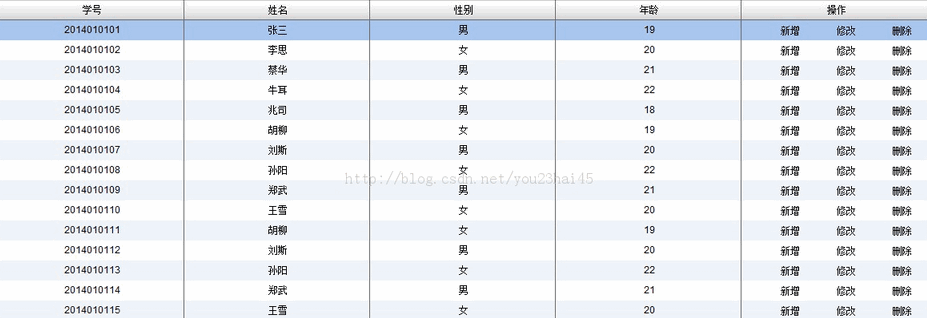
3. 設計結果
(1) 初期化中
 TitleWindow の値を渡すアイデアと Flex での実装に関するその他の記事はこちら、PHP 中国語 Web サイトをフォローしてください。
このウェブサイトの声明
この記事の内容はネチズンが自主的に寄稿したものであり、著作権は原著者に帰属します。このサイトは、それに相当する法的責任を負いません。盗作または侵害の疑いのあるコンテンツを見つけた場合は、admin@php.cn までご連絡ください。

ホットAIツール

Undresser.AI Undress
リアルなヌード写真を作成する AI 搭載アプリ

AI Clothes Remover
写真から衣服を削除するオンライン AI ツール。

Undress AI Tool
脱衣画像を無料で

Clothoff.io
AI衣類リムーバー

AI Hentai Generator
AIヘンタイを無料で生成します。

人気の記事
R.E.P.O.説明されたエネルギー結晶と彼らが何をするか(黄色のクリスタル)
3週間前
By 尊渡假赌尊渡假赌尊渡假赌
R.E.P.O.最高のグラフィック設定
3週間前
By 尊渡假赌尊渡假赌尊渡假赌
アサシンのクリードシャドウズ:シーシェルリドルソリューション
2週間前
By DDD
R.E.P.O.誰も聞こえない場合はオーディオを修正する方法
3週間前
By 尊渡假赌尊渡假赌尊渡假赌
WWE 2K25:Myriseのすべてのロックを解除する方法
4週間前
By 尊渡假赌尊渡假赌尊渡假赌

ホットツール

メモ帳++7.3.1
使いやすく無料のコードエディター

SublimeText3 中国語版
中国語版、とても使いやすい

ゼンドスタジオ 13.0.1
強力な PHP 統合開発環境

ドリームウィーバー CS6
ビジュアル Web 開発ツール

SublimeText3 Mac版
神レベルのコード編集ソフト(SublimeText3)

ホットトピック
Gmailメールのログイン入り口はどこですか?
 7471
7471
 15
15
 7471
7471
 15
15
CakePHP チュートリアル
 1377
1377
 52
52
 1377
1377
 52
52
Steamのアカウント名の形式は何ですか
 77
77
 11
11
 77
77
 11
11
NYTの接続はヒントと回答です
 19
19
 30
30
 19
19
 30
30


