PHP 学習が正式に出発します (6)
それでは、php のエラー処理について説明しましょう
<?php
$file=fopen("1.txt","r");
?> ファイルが存在しない場合、システムは直接エラーを報告します
die を使用してエラー メッセージを自分で書くことができます。Die は死を意味し、エラーを意味します
ユーザーが上記のようなエラー メッセージを受け取るのを防ぐため、ファイルにアクセスする前にファイルが存在するかどうかを確認します
<?php
if(!file_exists("1.txt"))
{
die("File not found");
}
else
{
$file=fopen("1.txt","r");
}
?>ファイルが存在しない場合は、システムからのエラーの代わりに「ファイルが見つかりません」と表示されます
実際、PHP のエラー処理はこれよりもはるかに多く、後で例外が発生するなどです。
それについては後ほど説明します
それではメインイベントを開始し、最後に PHP を使用して mysql データベースを操作します
まず、データベースに接続します
<?php
$link = mysql_connect('localhost','root','');
if (!$link) {
die('Could not connect to MySQL: ' . mysql_error());
}
echo 'Connection OK'; mysql_close($link);
?>$link これはデータベース接続ステータスを示す別のリソース変数です。印刷してみて、何が起こるかを確認できます。mysql_connect 関数は、サーバー アドレス、データベース ユーザー名、データベース ユーザー パスワードの 3 つの関数があります。 mysql_error 関数は、データベース接続を閉じるために、まずデータベースを作成します
それからテーブルを作成します
phpmyadmin と入力してください。見てください

次に、mysqlデータベースに接続し、次にmysqlデータベースの1つにデータを挿入する必要があります
<?php
$link = mysql_connect('localhost','root','');
if (!$link) {
die('Could not connect to MySQL: ' . mysql_error());
}
mysql_select_db('test',$link);
mysql_query("insert into user (name,age) values ('harry',15)",$link);
mysql_close($link);
?> mysql_select_dbはデータベースを選択する関数mysql_queryはSQL文を実行する関数です。データベースとテーブルを作成する2つの関数を含む任意のSQLを実行できます
2番目のパラメータは省略可能です mysql_select_db('test');
2 番目のパラメーターで接続識別子が指定されていない場合は、最後に開かれた接続が使用されます。開いている接続がない場合、mysql_connect() がパラメーターなしで呼び出され、接続を開いて使用しようとします
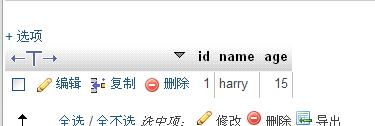
それでは、挿入が成功したかどうかを見てみましょう
ok 挿入されました
今、フォームを使用しますデータを挿入するには
<html>
<body> <form action="" method="post">
Name: <input type="text" name="name" />
Age: <input type="text" name="age" />
<input type="submit" />
</form> </body>
</html>
<?php
$name=$_POST['name'];
$age=$_POST['age'];
if(isset($name)&&isset($age))
{
$link = mysql_connect('localhost','root','');
if (!$link) {
die('Could not connect to MySQL: ' . mysql_error());
}
mysql_select_db('test');
$sql="insert into user (name,age) values ('$name',$age)";
if(mysql_query($sql))
echo "Insert Success!";
else
echo "Insert Fail!".mysql_error();
mysql_close($link);
}
?>mysql_query() は SQL ステートメントが正常に実行された場合は TRUE を返し、エラーが発生した場合は FALSE を返します
それではデータを表示してみましょう

<html>
<body> <form action="" method="post">
Name: <input type="text" name="name" />
Age: <input type="text" name="age" />
<input type="submit" />
</form>
<?php
//数据库连接
$link = mysql_connect('localhost','root','');
if (!$link) {
die('Could not connect to MySQL: ' . mysql_error());
}
mysql_select_db('test'); //插入
$name=$_POST['name'];
$age=$_POST['age'];
if(isset($name)&&isset($age))
{ $sql="insert into user (name,age) values ('$name',$age)";
if(mysql_query($sql))
echo "Insert Success!";
else
echo "Insert Fail!".mysql_error(); }
//查询
$sql="select * from user";
$result=mysql_query($sql);
while($row = mysql_fetch_array($result))
{
echo "<table>";
echo "<tr>";
echo "<td>" . $row['id'] . "</td>";
echo "<td>" . $row['name'] . "</td>";
echo "<td>" . $row['age'] . "</td>";
echo "</tr>";
echo "</table>";
} mysql_free_result($result);
mysql_close($link); ?>
</body>
</html>
$result=mysql_query($sql); mysql_query が実行されると、これもリソース変数です。SQL ステートメントをクエリすると、返される結果は true と false ではなくなり、mysql_query クエリの結果が $result と $ にテーブルを返すと想像できます。 result はテーブル (結果セット) です
mysql_fetch_array 関数は結果セットの処理に特化しており、結果セットから行を連想配列または数値配列、あるいはその両方として取得します。mysql_query($sql) 自体が結果です。 set
なぜループする必要があるのでしょうか? mysql_fetch_array は一度に 1 行のデータのみを結果セット (テーブル) からフェッチできるため、このデータ行は 1 次元の連想配列の形式で $row に渡されます。 $row は 1 次元の連想配列であり、実行が完了すると、この関数が再度実行されると、ポインタは自動的に次の行を指します。この行のデータは取得できますが、最後の行までは空を指しているので、$row は常に 1 次元の配列であると考えてはいけません。ループするたびに再代入されるのですが、配列もループ条件として使用できるのではないかと疑問に思う人もいるかもしれません。はい
while($a)
これはループできますが、無限ループです
while括弧内の0以外のものはすべてループできるためです
echo "<td>" . $row[0] . "</td>";
echo "<td>" . $row[1] . "</td>";
echo "<td>" . $row[2] . "</td>";
mysql_free_resultはリソースを解放するためのものです
これを使用する必要はなく、大きな結果セットを返すときにどれだけのメモリが占有されるかを考慮する場合にのみ呼び出す必要があります。関連付けられたメモリはすべて、スクリプト終了後に自動的に解放されます
さらに、mysql_fetch_row は結果をクエリすることもできますが、mysql_fetch_array と比較すると、ここではそのようなものの紹介にすぎません。 。 。
//クエリ
$sql="select * from user";
$result=mysql_query($sql);
while($row = mysql_fetch_row($result))
{
echo "mysql_fetch_row() 从和指定的结果标识关联的结果集中取得一行数据并作为数组返回。每个结果的列储存在一个数组的单元中
则row不再是关联数组而是普通数组,所以只能用数组下标
下面说说几个常用的数据显示函数
int mysql_num_rows ( resource $result )
mysql_num_rows() 返回结果集中行的数目。此命令仅对 SELECT 语句有效
int mysql_num_fields ( resource $result )
mysql_num_fields() 返回结果集中字段的数目
int mysql_insert_id ([ resource $link_identifier ] )
mysql_insert_id() 返回给定的 link_identifier 中上一步 INSERT 查询中产生的 AUTO_INCREMENT 的 ID 号
重新写下
"; echo "
"; echo "每行".mysql_num_fields($result)."字段"; mysql_free_result($result); mysql_close($link); ?>
header("Content-Type:text/html;charset=gbk"); 这个是表明文件编码格式,显示中文需要这样
error_reporting(0); 屏蔽一切系统提示的注意,警告,和错误
现在完成 修改和删除部分
<?php
header("Content-Type:text/html;charset=gbk");
error_reporting(0);
?> <html>
<body> <form action="" method="post">
Name: <input type="text" name="name" />
Age: <input type="text" name="age" />
<input type="submit" />
</form> <?php
//数据库连接
$link = mysql_connect('localhost','root','');
if (!$link) {
die('Could not connect to MySQL: ' . mysql_error());
}
mysql_select_db('test');
//插入
$name=$_POST['name'];
$age=$_POST['age'];
if(isset($name)&&isset($age))
{ $sql="insert into user (name,age) values ('$name',$age)";
if(mysql_query($sql))
echo "Insert Success!";
else
echo "Insert Fail!".mysql_error(); } /
/查询
$sql="select * from user";
$result=mysql_query($sql);
while($row = mysql_fetch_array($result))
{
?>
<form action="" method="post">
ID: <?=$row['id']?>
Name: <input type="text" name="_name" value="<?=$row['name']?>"/>
Age: <input type="text" name="_age" value="<?=$row['age']?>" />
<input type="hidden" name="id" value="<?=$row['id']?>" />
<input type="submit" value="修改"/>
<a href="index.php?uid=<?=$row['id']?>">删除</a>
</form> <?php
} echo "总共".mysql_num_rows($result)."记录<br/>";
echo "每行".mysql_num_fields($result)."字段";
//修改
$name=$_POST['_name'];
$age=$_POST['_age'];
$id=$_POST['id'];
if(isset($name)&&isset($age)&&isset($id))
{ $sql="update user set name='$name',age='$age' where id=$id";
if(mysql_query($sql))
header("location:index.php");
else
echo "Update Fail!".mysql_error(); }
//删除
$uid=$_GET['uid'];
if(isset($uid))
{ $sql="delete from user where id=$uid";
if(mysql_query($sql))
header("location:index.php");
else
echo "Delete Fail!".mysql_error(); }
mysql_close($link); ?>
</body>
</html>
至此,php对mysql数据库的增删改查操作就全在这一个页面了,灰常的简单
加了个简单的分页,超简单的。。。。暂时就不讲解怎么个来的了,加了简单的注释,大家应该能看懂代码
<?php
header("Content-Type:text/html;charset=gbk");
error_reporting(0);
?> <html>
<body> <form action="" method="post">
Name: <input type="text" name="name" />
Age: <input type="text" name="age" />
<input type="submit" />
</form> <?php
//数据库连接
$link = mysql_connect('localhost','root','');
if (!$link) {
die('Could not connect to MySQL: ' . mysql_error());
}
mysql_select_db('test'); //插入
$name=$_POST['name'];
$age=$_POST['age'];
if(isset($name)&&isset($age))
{ $sql="insert into user (name,age) values ('$name',$age)";
if(mysql_query($sql))
echo "Insert Success!";
else
echo "Insert Fail!".mysql_error(); } //分页查询
if(isset($_GET['pager']))
$pager=($_GET['pager']-1)*5;
else
$pager=0; $sql="select * from user";
$result=mysql_query($sql);
$num=mysql_num_rows($result); //总共记录数
$page=ceil($num/5); //总共多少页 这里每页5条记录 ceil函数四舍五入的。。
for($i=1;$i<=$page;$i++)
echo "<a href='index.php?pager=".$i."'>".$i."</a>"; $
sql="select * from user limit $pager,5";
$result=mysql_query($sql);
while($row = mysql_fetch_array($result))
{
?>
<form action="" method="post">
ID: <?=$row['id']?>
Name: <input type="text" name="_name" value="<?=$row['name']?>"/>
Age: <input type="text" name="_age" value="<?=$row['age']?>" />
<input type="hidden" name="id" value="<?=$row['id']?>" />
<input type="submit" value="修改"/>
<a href="index.php?uid=<?=$row['id']?>">删除</a>
</form> <?php
} echo "总共".$num."记录<br/>";
echo "每行".mysql_num_fields($result)."字段"; //修改
$name=$_POST['_name'];
$age=$_POST['_age'];
$id=$_POST['id'];
if(isset($name)&&isset($age)&&isset($id))
{ $sql="update user set name='$name',age='$age' where id=$id";
if(mysql_query($sql))
header("location:index.php");
else
echo "Update Fail!".mysql_error(); }
//删除
$uid=$_GET['uid'];
if(isset($uid))
{ $sql="delete from user where id=$uid";
if(mysql_query($sql))
header("location:index.php");
else
echo "Delete Fail!".mysql_error(); }
mysql_close($link); ?>
</body>
</html>暂时先到这里了
php后面内容还有很多,还有对象等知识,光数据操作就还有面向对象的
以上就是php学习正式起航(6)的内容,更多相关内容请关注PHP中文网(www.php.cn)!

ホットAIツール

Undresser.AI Undress
リアルなヌード写真を作成する AI 搭載アプリ

AI Clothes Remover
写真から衣服を削除するオンライン AI ツール。

Undress AI Tool
脱衣画像を無料で

Clothoff.io
AI衣類リムーバー

AI Hentai Generator
AIヘンタイを無料で生成します。

人気の記事

ホットツール

メモ帳++7.3.1
使いやすく無料のコードエディター

SublimeText3 中国語版
中国語版、とても使いやすい

ゼンドスタジオ 13.0.1
強力な PHP 統合開発環境

ドリームウィーバー CS6
ビジュアル Web 開発ツール

SublimeText3 Mac版
神レベルのコード編集ソフト(SublimeText3)

ホットトピック
 7467
7467
 15
15
 1376
1376
 52
52
 77
77
 11
11
 18
18
 19
19
 Ubuntu および Debian 用の PHP 8.4 インストールおよびアップグレード ガイド
Dec 24, 2024 pm 04:42 PM
PHP 8.4 では、いくつかの新機能、セキュリティの改善、パフォーマンスの改善が行われ、かなりの量の機能の非推奨と削除が行われています。 このガイドでは、Ubuntu、Debian、またはその派生版に PHP 8.4 をインストールする方法、または PHP 8.4 にアップグレードする方法について説明します。
 CakePHP ファイルのアップロード
Sep 10, 2024 pm 05:27 PM
ファイルのアップロードを行うには、フォーム ヘルパーを使用します。ここではファイルアップロードの例を示します。
 CakePHP について話し合う
Sep 10, 2024 pm 05:28 PM
CakePHP は、PHP 用のオープンソース フレームワークです。これは、アプリケーションの開発、展開、保守をより簡単にすることを目的としています。 CakePHP は、強力かつ理解しやすい MVC のようなアーキテクチャに基づいています。モデル、ビュー、コントローラー
 CakePHP のロギング
Sep 10, 2024 pm 05:26 PM
CakePHP へのログインは非常に簡単な作業です。使用する関数は 1 つだけです。 cronjob などのバックグラウンド プロセスのエラー、例外、ユーザー アクティビティ、ユーザーが実行したアクションをログに記録できます。 CakePHP でのデータのログ記録は簡単です。 log()関数が提供されています
 PHP 開発用に Visual Studio Code (VS Code) をセットアップする方法
Dec 20, 2024 am 11:31 AM
Visual Studio Code (VS Code とも呼ばれる) は、すべての主要なオペレーティング システムで利用できる無料のソース コード エディター (統合開発環境 (IDE)) です。 多くのプログラミング言語の拡張機能の大規模なコレクションを備えた VS Code は、
 CakePHP クイックガイド
Sep 10, 2024 pm 05:27 PM
CakePHP はオープンソースの MVC フレームワークです。これにより、アプリケーションの開発、展開、保守がはるかに簡単になります。 CakePHP には、最も一般的なタスクの過負荷を軽減するためのライブラリが多数あります。


