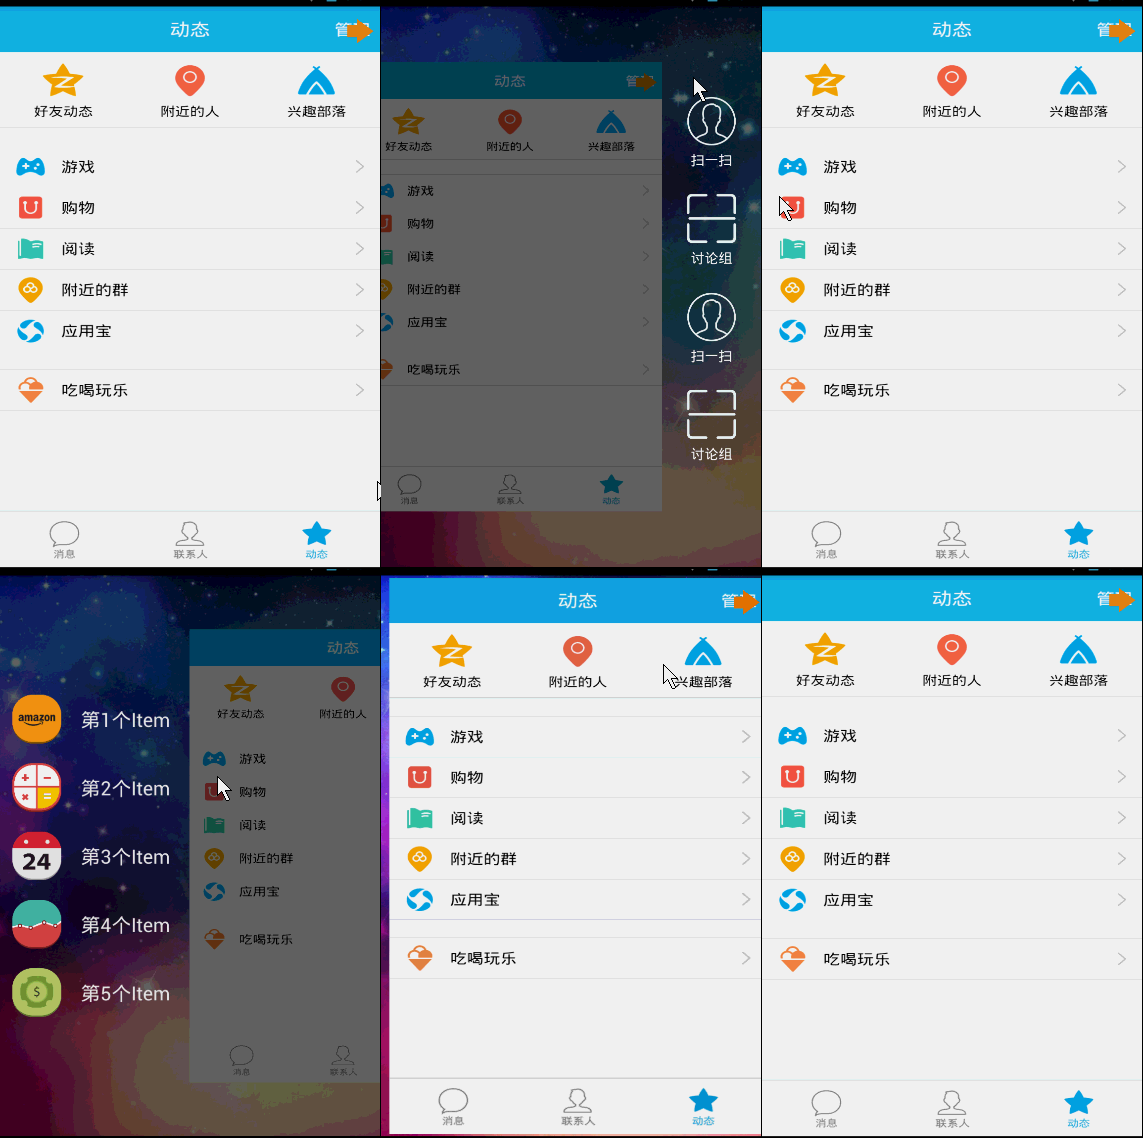
Android は DrawerLayout を使用して QQ のような双方向スライド メニューを実装します
1. 概要
私は以前、Android QQ5.0 の模倣性の高い横スライド メニュー効果のカスタム コントロールを作成しましたが、それは偶然にも DrawerLayout を参照したときに QQ5.2 で右側のメニューを追加したものでした。一方では、公式のほうが興味があるのですが、一方で、これは本当に使いやすいので、QQ5.2 の双方向サイド スライドのデモを作成して共有しました。みんなとともに。
まずレンダリングを見てみましょう:

DrawerLayoutはとても便利です。使い方を見てみましょう~
2. DrawerLayoutの使用
最初のレイアウトとしてDrawerLayoutを使用します。その中の 1 つのビューはコンテンツ領域、2 番目のビューは左側のメニュー、3 番目のビューは右側のスライド メニューです。 現在、3 番目のビューはオプションです。
最初のビューの幅と高さは match_parent に設定する必要があります。これは当然のことです。
2 番目と 3 番目のビューは、android:layout_gravity="left" と android:layout_gravity="right" を設定する必要があり、高さは match_parent に設定され、幅は固定値 (側面の幅) になります。スライドメニュー。
上記のようにレイアウト ファイルを作成し、それをアクティビティに設定して、左右のスライドを追加します。非常に簡単ですよね~~~
たとえば、レイアウト ファイル:
<android.support.v4.widget.DrawerLayout xmlns:android="http://schemas.android.com/apk/res/android"
  xmlns:tools="http://schemas.android.com/tools"
  android:id="@+id/id_drawerLayout"
  android:layout_width="match_parent"
  android:layout_height="match_parent"
  android:background="@drawable/img_frame_background" >

  <RelativeLayout
    android:layout_width="match_parent"
    android:layout_height="match_parent"
    android:background="@drawable/qq" >

    <Button
      android:layout_width="40dp"
      android:layout_height="30dp"
       android:layout_marginTop="10dp"
      android:layout_alignParentRight="true"
      android:background="@drawable/youce"
      android:onClick="OpenRightMenu" />
  </RelativeLayout>

  <fragment
    android:id="@+id/id_left_menu"
    android:name="com.zhy.demo_zhy_17_drawerlayout.MenuLeftFragment"
    android:layout_width="200dp"
    android:layout_height="match_parent"
    android:layout_gravity="left"
    android:tag="LEFT" />

  <fragment
    android:id="@+id/id_right_menu"
    android:name="com.zhy.demo_zhy_17_drawerlayout.MenuRightFragment"
    android:layout_width="100dp"
    android:layout_height="match_parent"
    android:layout_gravity="right"
    android:tag="RIGHT" />

</android.support.v4.widget.DrawerLayout>ここにメイン コンテンツがあります。エリアは RelativeLayout です
メニューに使用される 2 つのフラグメントは、左側が 200 dp、右側が 100 dp です
さて、レイアウト ファイルを確認した後、詳細なコードを見てみましょう。
3. コードは最良の教師です
1. MenuLeftFragment
package com.zhy.demo_zhy_17_drawerlayout;

import android.os.Bundle;
import android.support.v4.app.Fragment;
import android.view.LayoutInflater;
import android.view.View;
import android.view.ViewGroup;

public class MenuLeftFragment extends Fragment
{

  @Override
  public View onCreateView(LayoutInflater inflater, ViewGroup container,
      Bundle savedInstanceState)
  {
    return inflater.inflate(R.layout.layout_menu, container, false);
  }
}の対応するレイアウトファイル:
<?xml version="1.0" encoding="utf-8"?>
<RelativeLayout xmlns:android="http://schemas.android.com/apk/res/android"
  android:layout_width="match_parent"
  android:layout_height="match_parent"
  android:background="#00000000" >

  <LinearLayout
    android:layout_width="match_parent"
    android:layout_height="wrap_content"
    android:layout_centerVertical="true"
    android:orientation="vertical" >

    <RelativeLayout
      android:layout_width="match_parent"
      android:layout_height="wrap_content" >

      <ImageView
        android:id="@+id/one"
        android:layout_width="50dp"
        android:layout_height="50dp"
        android:layout_centerVertical="true"
        android:layout_marginLeft="20dp"
        android:layout_marginTop="20dp"
        android:src="@drawable/img_1" />

      <TextView
        android:layout_width="fill_parent"
        android:layout_height="wrap_content"
        android:layout_centerVertical="true"
        android:layout_marginLeft="20dp"
        android:layout_toRightOf="@id/one"
        android:text="第1个Item"
        android:textColor="#f0f0f0"
        android:textSize="20sp" />
    </RelativeLayout>

    <RelativeLayout
      android:layout_width="match_parent"
      android:layout_height="wrap_content" >

      <ImageView
        android:id="@+id/two"
        android:layout_width="50dp"
        android:layout_height="50dp"
        android:layout_centerVertical="true"
        android:layout_marginLeft="20dp"
        android:layout_marginTop="20dp"
        android:src="@drawable/img_2" />

      <TextView
        android:layout_width="fill_parent"
        android:layout_height="wrap_content"
        android:layout_centerVertical="true"
        android:layout_marginLeft="20dp"
        android:layout_toRightOf="@id/two"
        android:text="第2个Item"
        android:textColor="#f0f0f0"
        android:textSize="20sp" />
    </RelativeLayout>

    <RelativeLayout
      android:layout_width="match_parent"
      android:layout_height="wrap_content" >

      <ImageView
        android:id="@+id/three"
        android:layout_width="50dp"
        android:layout_height="50dp"
        android:layout_centerVertical="true"
        android:layout_marginLeft="20dp"
        android:layout_marginTop="20dp"
        android:src="@drawable/img_3" />

      <TextView
        android:layout_width="fill_parent"
        android:layout_height="wrap_content"
        android:layout_centerVertical="true"
        android:layout_marginLeft="20dp"
        android:layout_toRightOf="@id/three"
        android:text="第3个Item"
        android:textColor="#f0f0f0"
        android:textSize="20sp" />
    </RelativeLayout>

    <RelativeLayout
      android:layout_width="match_parent"
      android:layout_height="wrap_content" >

      <ImageView
        android:id="@+id/four"
        android:layout_width="50dp"
        android:layout_height="50dp"
        android:layout_centerVertical="true"
        android:layout_marginLeft="20dp"
        android:layout_marginTop="20dp"
        android:src="@drawable/img_4" />

      <TextView
        android:layout_width="fill_parent"
        android:layout_height="wrap_content"
        android:layout_centerVertical="true"
        android:layout_marginLeft="20dp"
        android:layout_toRightOf="@id/four"
        android:text="第4个Item"
        android:textColor="#f0f0f0"
        android:textSize="20sp" />
    </RelativeLayout>

    <RelativeLayout
      android:layout_width="match_parent"
      android:layout_height="wrap_content" >

      <ImageView
        android:id="@+id/five"
        android:layout_width="50dp"
        android:layout_height="50dp"
        android:layout_centerVertical="true"
        android:layout_marginLeft="20dp"
        android:layout_marginTop="20dp"
        android:src="@drawable/img_5" />

      <TextView
        android:layout_width="fill_parent"
        android:layout_height="wrap_content"
        android:layout_centerVertical="true"
        android:layout_marginLeft="20dp"
        android:layout_toRightOf="@id/five"
        android:text="第5个Item"
        android:textColor="#f0f0f0"
        android:textSize="20sp" />
    </RelativeLayout>
  </LinearLayout>

</RelativeLayout>は実際には積み上げられたレイアウトです~~楽しいです~
2. MenuRightFragment
package com.zhy.demo_zhy_17_drawerlayout;

import android.os.Bundle;
import android.support.v4.app.Fragment;
import android.view.LayoutInflater;
import android.view.View;
import android.view.ViewGroup;

public class MenuRightFragment extends Fragment
{

  @Override
  public View onCreateView(LayoutInflater inflater, ViewGroup container,
      Bundle savedInstanceState)
  {
    return inflater.inflate(R.layout.menu_layout_right, container, false);
  }
}:
<?xml version="1.0" encoding="utf-8"?>
<LinearLayout xmlns:android="http://schemas.android.com/apk/res/android"
  android:layout_width="match_parent"
  android:layout_height="match_parent"
  android:gravity="center_vertical"
  android:orientation="vertical" >

  <LinearLayout
    android:layout_width="match_parent"
    android:layout_height="wrap_content"
    android:layout_centerVertical="true"
    android:layout_gravity="center_vertical"
    android:layout_marginBottom="20dp"
    android:orientation="vertical" >

    <ImageView
      android:layout_width="60dp"
      android:layout_height="60dp"
      android:layout_gravity="center"
      android:src="@drawable/wode" />

    <TextView
      android:layout_width="fill_parent"
      android:layout_height="wrap_content"
      android:gravity="center"
      android:text="扫一扫"
      android:textColor="#ffffff" />
  </LinearLayout>

  <LinearLayout
    android:layout_width="match_parent"
    android:layout_height="wrap_content"
    android:layout_centerVertical="true"
    android:layout_gravity="center_vertical"
    android:layout_marginBottom="20dp"
    android:orientation="vertical" >

    <ImageView
      android:layout_width="60dp"
      android:layout_height="60dp"
      android:layout_gravity="center"
      android:src="@drawable/saoma" />

    <TextView
      android:layout_width="fill_parent"
      android:layout_height="wrap_content"
      android:gravity="center"
      android:text="讨论组"
      android:textColor="#ffffff" />
  </LinearLayout>

  <LinearLayout
    android:layout_width="match_parent"
    android:layout_height="wrap_content"
    android:layout_centerVertical="true"
    android:layout_gravity="center_vertical"
    android:layout_marginBottom="20dp"
    android:orientation="vertical" >

    <ImageView
      android:layout_width="60dp"
      android:layout_height="60dp"
      android:layout_gravity="center"
      android:src="@drawable/wode" />

    <TextView
      android:layout_width="fill_parent"
      android:layout_height="wrap_content"
      android:gravity="center"
      android:text="扫一扫"
      android:textColor="#ffffff" />
  </LinearLayout>

  <LinearLayout
    android:layout_width="match_parent"
    android:layout_height="wrap_content"
    android:layout_centerVertical="true"
    android:layout_gravity="center_vertical"
    android:layout_marginBottom="20dp"
    android:orientation="vertical" >

    <ImageView
      android:layout_width="60dp"
      android:layout_height="60dp"
      android:layout_gravity="center"
      android:src="@drawable/saoma" />

    <TextView
      android:layout_width="fill_parent"
      android:layout_height="wrap_content"
      android:gravity="center"
      android:text="讨论组"
      android:textColor="#ffffff" />
  </LinearLayout>

</LinearLayout>アイコンが見つけにくいことを除けば、とてもシンプルです~~
3. MainActivity
MainActivityのレイアウトファイルが投稿されました~~
package com.zhy.demo_zhy_17_drawerlayout;

import android.os.Bundle;
import android.support.v4.app.FragmentActivity;
import android.support.v4.widget.DrawerLayout;
import android.support.v4.widget.DrawerLayout.DrawerListener;
import android.view.Gravity;
import android.view.View;
import android.view.Window;

import com.nineoldandroids.view.ViewHelper;

public class MainActivity extends FragmentActivity
{

  private DrawerLayout mDrawerLayout;

  @Override
  protected void onCreate(Bundle savedInstanceState)
  {
    super.onCreate(savedInstanceState);
    requestWindowFeature(Window.FEATURE_NO_TITLE);
    setContentView(R.layout.activity_main);

    initView();
    initEvents();

  }

  public void OpenRightMenu(View view)
  {
    mDrawerLayout.openDrawer(Gravity.RIGHT);
    mDrawerLayout.setDrawerLockMode(DrawerLayout.LOCK_MODE_UNLOCKED,
        Gravity.RIGHT);
  }

  private void initEvents()
  {
    mDrawerLayout.setDrawerListener(new DrawerListener()
    {
      @Override
      public void onDrawerStateChanged(int newState)
      {
      }

      @Override
      public void onDrawerSlide(View drawerView, float slideOffset)
      {
        View mContent = mDrawerLayout.getChildAt(0);
        View mMenu = drawerView;
        float scale = 1 - slideOffset;
        float rightScale = 0.8f + scale * 0.2f;

        if (drawerView.getTag().equals("LEFT"))
        {

          float leftScale = 1 - 0.3f * scale;

          ViewHelper.setScaleX(mMenu, leftScale);
          ViewHelper.setScaleY(mMenu, leftScale);
          ViewHelper.setAlpha(mMenu, 0.6f + 0.4f * (1 - scale));
          ViewHelper.setTranslationX(mContent,
              mMenu.getMeasuredWidth() * (1 - scale));
          ViewHelper.setPivotX(mContent, 0);
          ViewHelper.setPivotY(mContent,
              mContent.getMeasuredHeight() / 2);
          mContent.invalidate();
          ViewHelper.setScaleX(mContent, rightScale);
          ViewHelper.setScaleY(mContent, rightScale);
        } else
        {
          ViewHelper.setTranslationX(mContent,
              -mMenu.getMeasuredWidth() * slideOffset);
          ViewHelper.setPivotX(mContent, mContent.getMeasuredWidth());
          ViewHelper.setPivotY(mContent,
              mContent.getMeasuredHeight() / 2);
          mContent.invalidate();
          ViewHelper.setScaleX(mContent, rightScale);
          ViewHelper.setScaleY(mContent, rightScale);
        }

      }

      @Override
      public void onDrawerOpened(View drawerView)
      {
      }

      @Override
      public void onDrawerClosed(View drawerView)
      {
        mDrawerLayout.setDrawerLockMode(
            DrawerLayout.LOCK_MODE_LOCKED_CLOSED, Gravity.RIGHT);
      }
    });
  }

  private void initView()
  {
    mDrawerLayout = (DrawerLayout) findViewById(R.id.id_drawerLayout);
    mDrawerLayout.setDrawerLockMode(DrawerLayout.LOCK_MODE_LOCKED_CLOSED,
        Gravity.RIGHT);
  }

}まあ、コードには基本的にコメントはありません~~ ~ビザはどこですか?それは本当にコメントするものが何もないからです。
いくつかのポイント:
1. QQ の右側のメニューをクリックして表示する必要があるため、DrawerLayout を初期化するときに、mDrawerLayout.setDrawerLockMode(DrawerLayout.LOCK_MODE_LOCKED_CLOSED,Gravity.RIGHT); はプログラミングのみで実行できることを意味します。それが浮かび上がります。
次に、ポップアップした後、ジェスチャをスライドして戻すことができる必要があるので、OpenRightMenu に次のように書きました:
mDrawerLayout.setDrawerLockMode(DrawerLayout.LOCK_MODE_UNLOCKED,Gravity.RIGHT);
最後に、onDrawerClosed コールバックで mDrawerLayout.setDrawerLockMode(DrawerLayout.LOCK_MODE_LOCKED_CLOSED, Gravity.RIGHT); の設定を続けます
アニメーションは、nineoldandroids のさまざまなオフセットとスケーリング率の計算を参照してください。 Android の模倣度の高い QQ5.0 のサイドスライド メニュー効果のカスタム コントロールは、基本的に同じです。唯一の違いは、ViewHelper.setTranslationX(mContent, mMenu.getMeasuredWidth() * (1 -scale)); が設定されていることです。コンテンツ: デフォルトではコンテンツはメニューの右側にあり、メニューはメニューの上にあるため、メニューによって描画される距離に基づいてコンテンツの X 方向のオフセットを設定します。
これで、基本的にどのようなサイドスライド メニュー効果も作成できるようになりました。興味があれば、DrawerLayout を使用して、このブログのすべての効果を実現できます。Android では、さまざまなフォームの双方向の横スライド メニューが実装される予定です。
3. setDrawerListener
setDrawerListener を使用して、メニューの開閉などを監視することもできます。ここで、現在の操作がどのメニューであるかの判断は、重力を使って判断することもできると思います~~
まあ、それ以上ではありません。DrawerLayoutはデフォルトでは境界線からしかメニューを描画できませんが、QQは描画します。メニューのジェスチャ領域は比較的広いので、興味がある場合は、ActivityのonTouchEventを書き換えて、左右のスライドジェスチャが素晴らしい場合は、メニューをポップアップするのは面倒ではないはずです。 ~~
その他 Android は DrawerLayout を使用して QQ 模倣を実装します 双方向スライド メニューに関連する記事については、PHP 中国語 Web サイトに注目してください。

ホットAIツール

Undresser.AI Undress
リアルなヌード写真を作成する AI 搭載アプリ

AI Clothes Remover
写真から衣服を削除するオンライン AI ツール。

Undress AI Tool
脱衣画像を無料で

Clothoff.io
AI衣類リムーバー

Video Face Swap
完全無料の AI 顔交換ツールを使用して、あらゆるビデオの顔を簡単に交換できます。

人気の記事

ホットツール

メモ帳++7.3.1
使いやすく無料のコードエディター

SublimeText3 中国語版
中国語版、とても使いやすい

ゼンドスタジオ 13.0.1
強力な PHP 統合開発環境

ドリームウィーバー CS6
ビジュアル Web 開発ツール

SublimeText3 Mac版
神レベルのコード編集ソフト(SublimeText3)

ホットトピック
 7677
7677
 15
15
 1393
1393
 52
52
 1207
1207
 24
24
 91
91
 11
11
 会社のセキュリティソフトウェアはアプリケーションの実行に失敗していますか?それをトラブルシューティングと解決する方法は?
Apr 19, 2025 pm 04:51 PM
一部のアプリケーションが適切に機能しないようにする会社のセキュリティソフトウェアのトラブルシューティングとソリューション。多くの企業は、内部ネットワークセキュリティを確保するためにセキュリティソフトウェアを展開します。 ...
 MapsTructを使用したシステムドッキングのフィールドマッピングの問題を簡素化する方法は?
Apr 19, 2025 pm 06:21 PM
システムドッキングでのフィールドマッピング処理は、システムドッキングを実行する際に難しい問題に遭遇することがよくあります。システムのインターフェイスフィールドを効果的にマッピングする方法A ...
 エンティティクラス変数名をエレガントに取得して、データベースクエリ条件を構築する方法は?
Apr 19, 2025 pm 11:42 PM
データベース操作にMyBatis-Plusまたはその他のORMフレームワークを使用する場合、エンティティクラスの属性名に基づいてクエリ条件を構築する必要があることがよくあります。あなたが毎回手動で...
 Intellijのアイデアは、ログを出力せずにSpring Bootプロジェクトのポート番号をどのように識別しますか?
Apr 19, 2025 pm 11:45 PM
intellijideaultimatiateバージョンを使用してスプリングを開始します...
 名前を数値に変換してソートを実装し、グループの一貫性を維持するにはどうすればよいですか?
Apr 19, 2025 pm 11:30 PM
多くのアプリケーションシナリオでソートを実装するために名前を数値に変換するソリューションでは、ユーザーはグループ、特に1つでソートする必要がある場合があります...
 Javaオブジェクトを配列に安全に変換する方法は?
Apr 19, 2025 pm 11:33 PM
Javaオブジェクトと配列の変換:リスクの詳細な議論と鋳造タイプ変換の正しい方法多くのJava初心者は、オブジェクトのアレイへの変換に遭遇します...
 データベースクエリにTKMYBATISを使用するときに、エンティティクラスの変数名の構築クエリ条件をエレガントに取得する方法は?
Apr 19, 2025 pm 09:51 PM
データベースクエリにTKMYBATISを使用する場合、クエリ条件を構築するためにエンティティクラスの変数名を優雅に取得する方法は一般的な問題です。この記事はピン留めします...
 Redisキャッシュソリューションを使用して、製品ランキングリストの要件を効率的に実現する方法は?
Apr 19, 2025 pm 11:36 PM
Redisキャッシュソリューションは、製品ランキングリストの要件をどのように実現しますか?開発プロセス中に、多くの場合、ランキングの要件に対処する必要があります。


