Android リストビューを上下にプルしてタブを更新するスライド切り替え機能
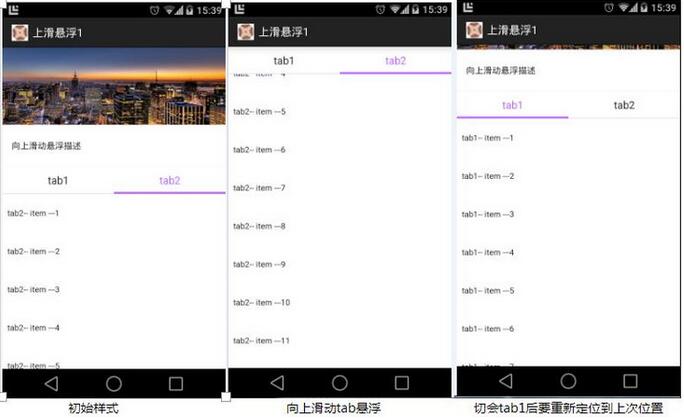
最近、2つのタブ切り替えのあるページを作成しようとしています。両方のタブはリストビューであり、中央にタブ切り替えエリアがあります。ページを上にスライドさせると、タブ領域が一番上に達すると移動が停止します。最初に同じスタイルの画像を見てみましょう。

全体の要件は、おおよそ上の図に示されているとおりです。プルアップ更新とプルダウン更新のスクリーンショットはありません。この効果を実現するために、オープン ソース コントロールの PullToRefreshListView が使用されます。
1. 一般的な考え方は、簡素化のために、多くのジェスチャの問題を監視したくないため、次の方法を採用して便宜的に実装します。
a. ページ全体がリストビューであり、パブリックです。エリアをリストビューのヘッダーとして追加し、2 つの切り替えタブもヘッダーとして追加します
b. ページをレイアウトするときに、リストビューの上にレイヤーを追加し、その中にタブ レイアウトを配置します。リストビューのヘッダーと同じレイアウトです。
c. 次に、リストビューがスライドすると、onScroll 関数がページのタブ レイアウトの表示と非表示を処理します。リストビューのタブ レイアウトが画面の上部に達すると、タブ レイアウトが表示されます。下にスライドするとタブ全体が表示される場合のシャドウインターフェースのタブレイアウトです
d. tab1とtab2のデータが異なるため、タブを切り替える際に3つのデータソースが使用されます。 、タブをクリックするとデータが前後に切り替わり、現在表示されているタブの位置とオフセットが記憶されます(位置決め中にずれは発生します)
デモの一般的なプロセスは次のとおりです。これは、更新処理を追加せずに実行されます。実際のプロジェクトではさらに多くのロジックが処理されますが、デモはあまり複雑になりたくありません (主に誰も読まないため、自分で読むだけです)。
2. ここまで言っても、まだ理解できない人もいるかもしれないので、コードを見てみましょう
a 最初は、2 つの保護層があり、下部にリストビュー、上部にタブ レイアウトがあります。 b. タブ レイアウト、up_float_tab_layout.xml、テキストはすべてセレクターを使用しているため、選択時に強調表示されます
<?xml version="1.0" encoding="utf-8"?>
<FrameLayout xmlns:android="http://schemas.android.com/apk/res/android"
  android:layout_width="fill_parent"
  android:layout_height="fill_parent"
  android:background="@color/white_color" >

  <com.example.toolbox.upFloat.PullToRefreshListView
    xmlns:ptr="http://schemas.android.com/apk/res-auto"
    android:id="@+id/up_float_listview"
    android:layout_width="fill_parent"
    android:layout_height="fill_parent"
    android:cacheColorHint="@color/white_color"
    android:divider="@color/transpant"
    android:dividerHeight="0dip"
    android:fadingEdge="none"
    android:fastScrollEnabled="false"
    android:listSelector="@color/transpant"
    android:smoothScrollbar="true"
    android:visibility="visible"
    ptr:ptrHeaderTextColor="@color/color_333333"
    ptr:ptrMode="both" />

  <include
    layout="@layout/up_float_tab_layout"
    android:visibility="gone" />

</FrameLayout>c. パブリック パーツ レイアウト up_float_common_layout.xml
<?xml version="1.0" encoding="utf-8"?>
<LinearLayout xmlns:android="http://schemas.android.com/apk/res/android"
  android:id="@+id/up_float_tab_root"
  android:layout_width="fill_parent"
  android:layout_height="wrap_content"
  android:background="@color/white_color"
  android:minHeight="44dip"
  android:orientation="vertical" >

  <LinearLayout
    android:layout_width="fill_parent"
    android:layout_height="44dip"
    android:minHeight="44dip"
    android:orientation="horizontal" >

    <TextView
      android:id="@+id/up_fload_tab1"
      android:layout_width="0dip"
      android:layout_height="match_parent"
      android:layout_weight="1"
      android:background="@drawable/show_event_detail_tab_selector"
      android:gravity="center"
      android:text="@string/up_float_tab1"
      android:textColor="@color/show_event_detail_tab_text_selector"
      android:textSize="17sp" />

    <TextView
      android:id="@+id/up_float_tab2"
      android:layout_width="0dip"
      android:layout_height="match_parent"
      android:layout_weight="1"
      android:background="@drawable/show_event_detail_tab_selector"
      android:gravity="center"
      android:text="@string/up_float_tab2"
      android:textColor="@color/show_event_detail_tab_text_selector"
      android:textSize="17sp" />
  </LinearLayout>

  <View
    android:layout_width="match_parent"
    android:layout_height="@dimen/split_one_pixels"
    android:background="@color/color_purple_bd6aff" />

</LinearLayout>d. 次に、メイン ページのコードです
<?xml version="1.0" encoding="utf-8"?>
<LinearLayout xmlns:android="http://schemas.android.com/apk/res/android"
  android:layout_width="fill_parent"
  android:layout_height="wrap_content"
  android:background="@color/white_color"
  android:orientation="vertical" >

  <ImageView
    android:id="@+id/show_event_detail_bg"
    android:layout_width="fill_parent"
    android:layout_height="125dip"
    android:contentDescription="@string/empty"
    android:scaleType="fitXY"
    android:src="@drawable/pic1" />

  <TextView
    android:id="@+id/show_event_detail_desc"
    android:layout_width="wrap_content"
    android:layout_height="wrap_content"
    android:layout_marginBottom="24dip"
    android:layout_marginLeft="15dip"
    android:layout_marginRight="15dip"
    android:layout_marginTop="24dip"
    android:text="@string/up_float_desc"
    android:textColor="@color/color_black_333333"
    android:textSize="14sp" />

  <View style="@style/horizontal_gray_divider" />

  <View style="@style/horizontal_gray_divider" />

</LinearLayout>要約、
a 上記のデモでは、上にスライドする効果しか得られません。実際には、2 つのタブの項目のレイアウトが一貫している必要があります。第二に、2 つのタブを左右にスライドすることはできません b 上記は、制御する必要がある変数の状態が多いほど、より多くの変数の状態を作成するのが簡単です。また、リフレッシュの効果は上記には含まれていません。データが返された場合、単にアイテムに追加するだけではなく、リフレッシュタブが現在のものと同じであるかどうかを判断する必要があります。タブ。
c 他のオープンソース プロジェクトを読んだ後、時間があれば、実際に複数のタブを作成し、左右に切り替えることができるデモを作成します。
上記がこの記事の全内容です。Android ソフトウェア プログラミングを学習している皆様のお役に立てれば幸いです。
Android リストビューのプルアップおよびダウン更新タブのスライド切り替え機能に関連するその他の記事については、PHP 中国語 Web サイトに注目してください。

ホットAIツール

Undresser.AI Undress
リアルなヌード写真を作成する AI 搭載アプリ

AI Clothes Remover
写真から衣服を削除するオンライン AI ツール。

Undress AI Tool
脱衣画像を無料で

Clothoff.io
AI衣類リムーバー

AI Hentai Generator
AIヘンタイを無料で生成します。

人気の記事

ホットツール

メモ帳++7.3.1
使いやすく無料のコードエディター

SublimeText3 中国語版
中国語版、とても使いやすい

ゼンドスタジオ 13.0.1
強力な PHP 統合開発環境

ドリームウィーバー CS6
ビジュアル Web 開発ツール

SublimeText3 Mac版
神レベルのコード編集ソフト(SublimeText3)

ホットトピック
 7530
7530
 15
15
 1379
1379
 52
52
 82
82
 11
11
 21
21
 76
76
 Javaのクラスロードメカニズムは、さまざまなクラスローダーやその委任モデルを含むどのように機能しますか?
Mar 17, 2025 pm 05:35 PM
Javaのクラスロードには、ブートストラップ、拡張機能、およびアプリケーションクラスローダーを備えた階層システムを使用して、クラスの読み込み、リンク、および初期化が含まれます。親の委任モデルは、コアクラスが最初にロードされ、カスタムクラスのLOAに影響を与えることを保証します
 カフェインやグアバキャッシュなどのライブラリを使用して、Javaアプリケーションにマルチレベルキャッシュを実装するにはどうすればよいですか?
Mar 17, 2025 pm 05:44 PM
この記事では、カフェインとグアバキャッシュを使用してJavaでマルチレベルキャッシュを実装してアプリケーションのパフォーマンスを向上させています。セットアップ、統合、パフォーマンスの利点をカバーし、構成と立ち退きポリシー管理Best Pra
 キャッシュや怠zyなロードなどの高度な機能を備えたオブジェクトリレーショナルマッピングにJPA(Java Persistence API)を使用するにはどうすればよいですか?
Mar 17, 2025 pm 05:43 PM
この記事では、キャッシュや怠zyなロードなどの高度な機能を備えたオブジェクトリレーショナルマッピングにJPAを使用することについて説明します。潜在的な落とし穴を強調しながら、パフォーマンスを最適化するためのセットアップ、エンティティマッピング、およびベストプラクティスをカバーしています。[159文字]
 高度なJavaプロジェクト管理、自動化の構築、依存関係の解像度にMavenまたはGradleを使用するにはどうすればよいですか?
Mar 17, 2025 pm 05:46 PM
この記事では、Javaプロジェクト管理、自動化の構築、依存関係の解像度にMavenとGradleを使用して、アプローチと最適化戦略を比較して説明します。
 適切なバージョン化と依存関係管理を備えたカスタムJavaライブラリ(JARファイル)を作成および使用するにはどうすればよいですか?
Mar 17, 2025 pm 05:45 PM
この記事では、MavenやGradleなどのツールを使用して、適切なバージョン化と依存関係管理を使用して、カスタムJavaライブラリ(JARファイル)の作成と使用について説明します。


