AndroidカスタムViewGroupの実装方法
LinearLayout、Relativeayout、FrameLayout など、いくつかの一般的な ViewGroup 実装が Android で提供されています。これらの ViewGroup は一般的な開発ニーズを満たすことができますが、複雑なインターフェイス要件の場合、これらのレイアウトでは不十分です。したがって、私たちがこれまで接してきたアプリケーションには、カスタム ViewGroup が数多く存在します。
カスタム ViewGroup を実装するには、最初のステップはカスタム属性を学習することです。これらのカスタム属性により、レイアウト ファイルを構成する際の柔軟性が高まります。カスタム属性は、value ディレクトリ内の attrs.xml ファイルで宣言されます。
<?xml version="1.0" encoding="utf-8"?>
<resources>
 <declare-styleable name="CascadeViewGroup">
  <attr name="verticalspacing" format="dimension"/>
  <attr name="horizontalspacing" format="dimension"/>
 </declare-styleable>

 <declare-styleable name="CascadeViewGroup_LayoutParams">
  <attr name="layout_paddingleft" format="dimension"/>
  <attr name="layout_paddinTop" format="dimension"/>
 </declare-styleable>
</resources>
ここでは、CascadeViewGroup のプロパティ セットをカスタム CascadeViewGroup コンポーネントに設定します。これらのプロパティは、レイアウト ファイルの
コードを記述する前に、CascadeLayout が使用するデフォルトの幅と高さも設定します。これら 2 つのプロパティは dimens.xml で定義されています。
<?xml version="1.0" encoding="utf-8"?>
<resources>
  <dimen name="default_horizontal_spacing">10dp</dimen>
 <dimen name="default_vertical_spacing">10dp</dimen>
</resources>
カスタム コンポーネント CascadeLayout を書き始めましょう。
package com.app.CustomViewMotion;

import android.content.Context;
import android.content.res.TypedArray;
import android.util.AttributeSet;
import android.view.View;
import android.view.ViewGroup;

/**
 * Created by charles on 2015/8/13.
 */
public class CascadeViewGroup extends ViewGroup {

 //自定义布局中设置的宽度和高度
 private int mHoriztonalSpacing;
 private int mVerticalSpacing;

 public CascadeViewGroup(Context context) {
  this(context, null);
 }

 public CascadeViewGroup(Context context, AttributeSet attrs) {
  this(context, attrs, 0);
 }

 public CascadeViewGroup(Context context, AttributeSet attrs, int defStyle) {
  super(context, attrs, defStyle);
  TypedArray a = context.obtainStyledAttributes(attrs, R.styleable.CascadeViewGroup);
  try {
   //获取设置的宽度
   mHoriztonalSpacing = a.getDimensionPixelSize(R.styleable.CascadeViewGroup_horizontalspacing,
     this.getResources().getDimensionPixelSize(R.dimen.default_horizontal_spacing));
   //获取设置的高度
   mVerticalSpacing = a.getDimensionPixelSize(R.styleable.CascadeViewGroup_verticalspacing,
     this.getResources().getDimensionPixelSize(R.dimen.default_vertical_spacing));

  } catch (Exception e) {
   e.printStackTrace();

  } finally {
   a.recycle();
  }
 }

 @Override
 protected void onMeasure(int widthMeasureSpec, int heightMeasureSpec) {
  final int count = this.getChildCount();
  int width = this.getPaddingLeft();
  int height = this.getPaddingTop();
  for (int i = 0; i < count; i++) {
   final View currentView = this.getChildAt(i);
   this.measureChild(currentView, widthMeasureSpec, heightMeasureSpec);
   CascadeViewGroup.LayoutParams lp = (CascadeViewGroup.LayoutParams) currentView.getLayoutParams();
   if(lp.mSettingPaddingLeft != 0){
    width +=lp.mSettingPaddingLeft;
   }
   if(lp.mSettingPaddingTop != 0){
    height +=lp.mSettingPaddingTop;
   }
   lp.x = width;
   lp.y = height;
   width += mHoriztonalSpacing;
   height += mVerticalSpacing;
  }
  width +=getChildAt(this.getChildCount() - 1).getMeasuredWidth() + this.getPaddingRight();
  height += getChildAt(this.getChildCount() - 1).getMeasuredHeight() + this.getPaddingBottom();
  this.setMeasuredDimension(resolveSize(width, widthMeasureSpec), resolveSize(height, heightMeasureSpec));

 }

 @Override
 protected void onLayout(boolean b, int l, int i1, int i2, int i3) {
  final int count = this.getChildCount();
  for (int i = 0; i < count; i++) {
   final View currentView = this.getChildAt(i);
   CascadeViewGroup.LayoutParams lp = (CascadeViewGroup.LayoutParams) currentView.getLayoutParams();
   currentView.layout(lp.x, lp.y, lp.x + currentView.getMeasuredWidth(),
     lp.y + currentView.getMeasuredHeight());
  }


 }

 public static class LayoutParams extends ViewGroup.LayoutParams {
  int x;
  int y;
  int mSettingPaddingLeft;
  int mSettingPaddingTop;

  public LayoutParams(Context c, AttributeSet attrs) {
   super(c, attrs);
   TypedArray a = c.obtainStyledAttributes(attrs, R.styleable.CascadeViewGroup_LayoutParams);
   mSettingPaddingLeft = a.getDimensionPixelSize(R.styleable.CascadeViewGroup_LayoutParams_layout_paddingleft, 0);
   mSettingPaddingTop = a.getDimensionPixelSize(R.styleable.CascadeViewGroup_LayoutParams_layout_paddinTop, 0);
   a.recycle();
  }

  public LayoutParams(int width, int height) {
   super(width, height);
  }

  public LayoutParams(ViewGroup.LayoutParams source) {
   super(source);
  }
 }

 @Override
 protected ViewGroup.LayoutParams generateDefaultLayoutParams() {
  return new LayoutParams(LayoutParams.WRAP_CONTENT, LayoutParams.WRAP_CONTENT);
 }

 @Override
 protected ViewGroup.LayoutParams generateLayoutParams(ViewGroup.LayoutParams p) {
  return new LayoutParams(p);
 }

 @Override
 public ViewGroup.LayoutParams generateLayoutParams(AttributeSet attrs) {
  return new LayoutParams(this.getContext(), attrs);
 }
}コードは少し長くなりますが、構造は依然として非常に明確です。
1) コンストラクターまたは XML ファイル内の構成属性の値。 TypedArray のメソッドを通じてレイアウトに設定したプロパティを取得し、メンバー変数に保存します。
2) カスタム内部クラス LayoutParams を構築します。この内部クラスを構築すると、レイアウト ステージでレイアウトのサブビューを測定するときに、その属性値を保存できるようになります。
3)generateLayoutParams()、generateDefaultParams()およびその他のメソッド。これらのメソッドでカスタムのlayoutParamsを返します。これらのメソッドをオーバーライドする必要がある理由は、ViewGroup クラスの addView() メソッドを見れば明らかです。
4) 測定段階。測定フェーズでは、独自のサイズとサブビューのサイズを測定し、サブビューの情報を LayoutParams に保存します。
5) レイアウト段階。各サブビューの情報に基づいて位置を配置します。
最後にレイアウトファイルを追加します。
<?xml version="1.0" encoding="utf-8"?>
<!--添加自定义属性给viewGroup-->
<!--新添加的命名空间的后缀必须保持和.xml中声明的包名一致-->
<com.app.CustomViewMotion.CascadeViewGroup
  xmlns:android="http://schemas.android.com/apk/res/android"
  xmlns:ts="http://schemas.android.com/apk/res/com.app.CustomViewMotion"
  android:layout_width="match_parent"
  android:layout_height="match_parent"
  ts:horizontalspacing="15dp"
  ts:verticalspacing="15dp">

 <TextView android:layout_width="100dp"
    android:layout_height="100dp"
    android:gravity="center"
    android:text="text1"
    android:background="#668B8B"/>

 <TextView android:layout_width="100dp"
    android:layout_height="100dp"
    android:gravity="center"
    android:text="text2"
    android:background="#FFDAB9"/>

 <TextView android:layout_width="100dp"
    android:layout_height="100dp"
    android:gravity="center"
    android:text="text3"
    android:background="#43CD80"/>

<!--这个子view中添加自定义子view属性-->
 <TextView android:layout_width="100dp"
    android:layout_height="100dp"
    android:gravity="center"
    android:text="text4"
    ts:layout_paddingleft="100dp"
    ts:layout_paddinTop="100dp"
    android:background="#00CED1"/>
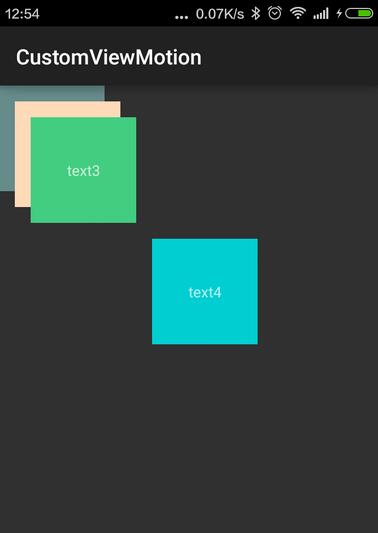
</com.app.CustomViewMotion.CascadeViewGroup>によって得られる効果は次のとおりです:

以上が皆様の参考になれば幸いです。また、皆様にも PHP 中国語 Web サイトをサポートしていただければ幸いです。
Android カスタム ViewGroup の実装方法に関連するその他の記事については、PHP 中国語 Web サイトに注目してください。

ホットAIツール

Undresser.AI Undress
リアルなヌード写真を作成する AI 搭載アプリ

AI Clothes Remover
写真から衣服を削除するオンライン AI ツール。

Undress AI Tool
脱衣画像を無料で

Clothoff.io
AI衣類リムーバー

AI Hentai Generator
AIヘンタイを無料で生成します。

人気の記事

ホットツール

メモ帳++7.3.1
使いやすく無料のコードエディター

SublimeText3 中国語版
中国語版、とても使いやすい

ゼンドスタジオ 13.0.1
強力な PHP 統合開発環境

ドリームウィーバー CS6
ビジュアル Web 開発ツール

SublimeText3 Mac版
神レベルのコード編集ソフト(SublimeText3)

ホットトピック
 7563
7563
 15
15
 1385
1385
 52
52
 84
84
 11
11
 28
28
 99
99


