Android UI コントロール シリーズ: ギャラリー (ギャラリー ビュー)
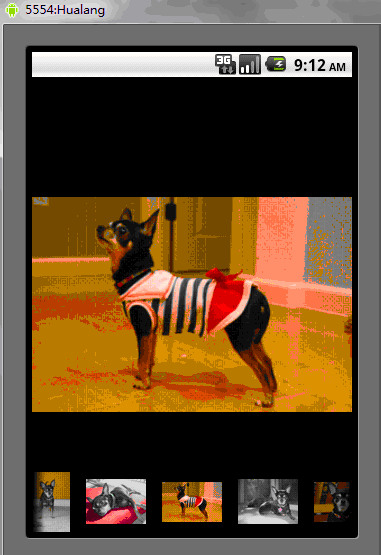
ギャラリーはコンテンツを水平に表示でき、通常は写真を閲覧するために使用されます。選択されたオプションは中央にあり、イベントに応じて情報が表示されます。 ImageSwitcher コンポーネントを組み合わせて、サムネイルで画像を閲覧するプログラムを実装しましょう。具体的な手順は次のとおりです。
ステップ 1:
Andorid プロジェクト「GalleryTest」を作成します。プロジェクトのエントリ ポイントは、GalleryTest を継承するアクティビティ クラスです。アクティビティと OnItemSelectedListener および ViewFactory インターフェイスを実装して、画像とビューの作成を実現します
package org.hualang.Gallery;

import android.app.Activity;
import android.os.Bundle;
import android.view.View;
import android.widget.AdapterView;
import android.widget.AdapterView.OnItemSelectedListener;
import android.widget.ViewSwitcher.ViewFactory;
//继承Activity,实现onItemSelectedListener和ViewFactory接口
public class GalleryTest extends Activity implements OnItemSelectedListener,ViewFactory{
    /** Called when the activity is first created. */
    @Override
    public void onCreate(Bundle savedInstanceState) {
        super.onCreate(savedInstanceState);
        setContentView(R.layout.main);
    }

        @Override
        public View makeView() {
                // TODO Auto-generated method stub
                return null;
        }

        @Override
        public void onItemSelected(AdapterView<?> arg0, View arg1, int arg2,
                        long arg3) {
                // TODO Auto-generated method stub

        }

        @Override
        public void onNothingSelected(AdapterView<?> arg0) {
                // TODO Auto-generated method stub

        }
}ステップ 2:
プロジェクトの再描画可能なディレクトリに 7 枚の画像と対応するサムネイルを追加します
ステップ 3:
再レイアウトでレイアウト ファイルを作成しますプロジェクト main.xml のディレクトリに、Gallery コンポーネントと ImageSwitcher コンポーネントを追加し、対応するプロパティを設定します
<?xml version="1.0" encoding="utf-8"?>
<LinearLayout xmlns:android="http://schemas.android.com/apk/res/android"
    android:orientation="vertical"
    android:layout_width="fill_parent"
    android:layout_height="fill_parent"
    >
<ImageSwitcher android:id="@+id/switcher"
        android:layout_width="fill_parent"
        android:layout_height="fill_parent"
        android:layout_alignParentTop="true"
        android:layout_alignParentLeft="true"
    />

    <Gallery android:id="@+id/gallery"
        android:background="#55000000"
        android:layout_width="fill_parent"
        android:layout_height="60dp"
        android:layout_alignParentBottom="true"
        android:layout_alignParentLeft="true"
        android:gravity="center_vertical"
        android:spacing="16dp"
    />
</LinearLayout>ステップ 4: 使用する ImageSwitcher インスタンスの画像リソースを GalleryTest の先頭で整数配列を宣言します
public class GalleryTest extends Activity implements OnItemSelectedListener,ViewFactory{
    /** Called when the activity is first created. */
        //声明ImageSwitcher
        private ImageSwitcher switcher;
        //缩略图片id数组
        private Integer[] thumbids={
                        R.drawable.thumb0,
                        R.drawable.thumb1,
                        R.drawable.thumb2,
                        R.drawable.thumb3,
                        R.drawable.thumb4,
                        R.drawable.thumb5,
                        R.drawable.thumb6,
                        R.drawable.thumb7
        };
        //图片id数组
        private Integer[] imgids={
                        R.drawable.img0,
                        R.drawable.img1,
                        R.drawable.img2,
                        R.drawable.img3,
                        R.drawable.img4,
                        R.drawable.img5,
                        R.drawable.img6,
                        R.drawable.img7
};ステップ 5 :
GalleryTest の onCreate() メソッドで、ウィンドウ スタイルを無題に設定し、現在のレイアウト ビューを設定し、ImageSwitcher インスタンスを取得し、フェードアウト アニメーションを設定して Gallery インスタンスを取得します
public void onCreate(Bundle savedInstanceState) {
        super.onCreate(savedInstanceState);
        //设置窗口特征无标题
        requestWindowFeature(Window.FEATURE_NO_TITLE);
        setContentView(R.layout.main);
        //通过findViewById方法获得ImageSwitcher对象
        switcher=(ImageSwitcher)findViewById(R.id.switcher);
        //为ImageSwitcher设置工厂
        switcher.setFactory(this);
        //设置动画渐入效果
        switcher.setInAnimation(AnimationUtils.loadAnimation(this, android.R.anim.fade_in));
        //设置动画渐出效果
        switcher.setOutAnimation(AnimationUtils.loadAnimation(this, android.R.anim.fade_out));
        //通过findViewById方法获得Gallery对象
        Gallery g=(Gallery)findViewById(R.id.gallery);
}ステップ 6:
内部クラス ImageAdapter を作成します。このクラスは BaseAdapter を継承し、ギャラリーのアダプター インスタンスを設定します
public class ImageAdapter extends BaseAdapter {
            //构造方法
                public ImageAdapter(Context c) {
                        mContext = c;
                }
                //获得数量
                public int getCount() {
                        return thumbids.length;
                }
                //获得当前选项
                public Object getItem(int position) {
                        return position;
                }
                //获得当前选项ID
                public long getItemId(int position) {
                        return position;
                }
                //获得View对象
                public View getView(int position, View convertView, ViewGroup parent) {
                        //实例化ImageView对象
                        ImageView i = new ImageView(mContext);
                        //设置缩略图片资源
                        i.setImageResource(thumbids[position]);
                        //设置边界对齐
                        i.setAdjustViewBounds(true);
                        //设置布局参数
                        i.setLayoutParams(new Gallery.LayoutParams(
                                        LayoutParams.WRAP_CONTENT, LayoutParams.WRAP_CONTENT));
                        //设置背景资源
                        i.setBackgroundResource(R.drawable.picturefrom);
                        return i;
                }
                private Context mContext;
}ステップ 7:
onItemSelected() メソッドを実装し、画像を変更します
@Override
        public void onItemSelected(AdapterView<?> adapter, View v, int position,
                        long id) {
                switcher.setImageResource(imgids[position]);
}ステップ 8:
makeView() メソッドを実装しますImageView のレイアウト形式を設定します
@Override
        public View makeView() {
                // TODO Auto-generated method stub
                //创建ImageView
                ImageView i=new ImageView(this);
                //设置背景颜色
                i.setBackgroundColor(0xFF000000);
                //设置精度类型
                i.setScaleType(ImageView.ScaleType.FIT_CENTER);
                //设置布局参数
                i.setLayoutParams(new ImageSwitcher.LayoutParams(
                                LayoutParams.FILL_PARENT,LayoutParams.FILL_PARENT));
                return i;
}ステップ 9:
ギャラリーにアダプターを追加し、OnItemSelectedListener リスナーを追加します
g.setAdapter(new ImageAdapter(this));
g.setOnItemSelectedListener(this);これですべては終了です。実行結果は次のとおりです

完全なソース コード:
package org.hualang.Gallery;<br><br>import android.app.Activity;<br>import android.content.Context;<br>import android.os.Bundle;<br>import android.view.View;
<br>import android.view.ViewGroup;<br>import android.view.Window;<br>import android.view.animation.AnimationUtils;<br>import android.widget.AdapterView;<br>
import android.widget.BaseAdapter;<br>import android.widget.Gallery;<br>import android.widget.ImageSwitcher;<br>import android.widget.ImageView;<br>
import android.widget.AdapterView.OnItemSelectedListener;<br>import android.widget.Gallery.LayoutParams;<br>import android.widget.ViewSwitcher.ViewFactory;<br><br>
public class GalleryTest extends Activity implements OnItemSelectedListener,<br>                ViewFactory {<br><br>
private ImageSwitcher mSwitcher;<br><br>        private Integer[] mThumbIds = { R.drawable.thumb0,<br>                        R.drawable.thumb1, R.drawable.thumb2,
<br>                        R.drawable.thumb3, R.drawable.thumb4,<br>                        R.drawable.thumb5, R.drawable.thumb6,<br>
R.drawable.thumb7 };<br><br>        private Integer[] mImageIds = { R.drawable.img0, R.drawable.img1,<br>                        R.drawable.img2, R.drawable.img3,
 R.drawable.img4,<br>                        R.drawable.img5, R.drawable.img6, R.drawable.img7 };<br><br>        @Override<br>
 public void onCreate(Bundle savedInstanceState) {<br>                super.onCreate(savedInstanceState);<br><br>
 requestWindowFeature(Window.FEATURE_NO_TITLE);<br>                setContentView(R.layout.main);<br>
 mSwitcher = (ImageSwitcher) findViewById(R.id.switcher);<br>                mSwitcher.setFactory(this);<br>
 mSwitcher.setInAnimation(AnimationUtils.loadAnimation(this,<br>                                android.R.anim.fade_in));<br>
 mSwitcher.setOutAnimation(AnimationUtils.loadAnimation(this,<br>                                android.R.anim.fade_out));<br><br>
 Gallery g = (Gallery) findViewById(R.id.gallery);<br><br>                g.setAdapter(new ImageAdapter(this));
                g.setOnItemSelectedListener(this);<br><br>        }<br><br>        public class ImageAdapter extends BaseAdapter {<br>
                public ImageAdapter(Context c) {<br>                        mContext = c;<br>                }<br>                public int getCount() {
                <br>                        return mThumbIds.length;<br>                }<br>                public Object getItem(int position) {
                <br>                        return position;<br>                }<br>                public long getItemId(int position) {
                <br>                        return position;<br>                }<br>                public View getView(int position, View convertView, ViewGroup
                parent) {<br>                        ImageView i = new ImageView(mContext);<br><br>                        i.setImageResource(mThumbIds[position]);
                <br>                        i.setAdjustViewBounds(true);<br>
                i.setLayoutParams(new Gallery.LayoutParams(<br>                                        LayoutParams.WRAP_CONTENT, LayoutParams.WRAP_CONTENT));
                <br>                        i.setBackgroundResource(R.drawable.picturefrom);<br>                        return i;<br>
                }<br>                private Context mContext;<br>        }<br><br>        @Override<br>        public void onItemSelected(AdapterView<?> adapter,
                View v, int position,<br>                        long id) {<br>                mSwitcher.setImageResource(mImageIds[position]);<br>        }<br>
                <br>        @Override<br>        public void onNothingSelected(AdapterView<?> arg0) {<br><br>        }<br><br>        @Override<br>
                public View makeView() {<br>                ImageView i = new ImageView(this);<br>                i.setBackgroundColor(0xFF000000);
                <br>                i.setScaleType(ImageView.ScaleType.FIT_CENTER);<br>                i.setLayoutParams(new ImageSwitcher.LayoutParams(<br>
LayoutParams.FILL_PARENT, LayoutParams.FILL_PARENT));<br> return i;<br> }<br>}上記は Android UI コントロール シリーズ: ギャラリー (ギャラリー ビュー) コンテンツです。その他の関連コンテンツについては、PHP 中国語 Web サイト (www.php.cn) にご注意ください。

ホットAIツール

Undresser.AI Undress
リアルなヌード写真を作成する AI 搭載アプリ

AI Clothes Remover
写真から衣服を削除するオンライン AI ツール。

Undress AI Tool
脱衣画像を無料で

Clothoff.io
AI衣類リムーバー

AI Hentai Generator
AIヘンタイを無料で生成します。

人気の記事

ホットツール

メモ帳++7.3.1
使いやすく無料のコードエディター

SublimeText3 中国語版
中国語版、とても使いやすい

ゼンドスタジオ 13.0.1
強力な PHP 統合開発環境

ドリームウィーバー CS6
ビジュアル Web 開発ツール

SublimeText3 Mac版
神レベルのコード編集ソフト(SublimeText3)

ホットトピック
 7514
7514
 15
15
 1378
1378
 52
52
 79
79
 11
11
 19
19
 64
64
 新しいレポートは、噂のSamsung Galaxy S25、Galaxy S25 Plus、Galaxy S25 Ultraのカメラアップグレードのひどい評価を提供します
Sep 12, 2024 pm 12:23 PM
ここ数日、Ice Universeは、サムスンの次期主力スマートフォンであると広く信じられているGalaxy S25 Ultraの詳細を着実に明らかにしている。とりわけ、リーカーはサムスンがカメラのアップグレードを1つだけ計画していると主張した
 Samsung Galaxy S25 Ultraの最初のレンダリング画像がリークされ、噂のデザイン変更が明らかに
Sep 11, 2024 am 06:37 AM
OnLeaks は、X (旧 Twitter) のフォロワーから 4,000 ドル以上を集めようとして失敗した数日後、Android Headlines と提携して Galaxy S25 Ultra のファーストルックを提供しました。コンテキストとして、h の下に埋め込まれたレンダリング イメージ
 IFA 2024 | TCLのNXTPAPER 14は、パフォーマンスではGalaxy Tab S10 Ultraに匹敵しませんが、サイズではほぼ匹敵します
Sep 07, 2024 am 06:35 AM
TCLは、2つの新しいスマートフォンの発表に加えて、NXTPAPER 14と呼ばれる新しいAndroidタブレットも発表しました。その巨大な画面サイズはセールスポイントの1つです。 NXTPAPER 14 は、TCL の代表的なブランドであるマット LCD パネルのバージョン 3.0 を搭載しています。
 Samsung Galaxy S24 FEは、4色と2つのメモリオプションで予想よりも低価格で発売されると請求されています
Sep 12, 2024 pm 09:21 PM
サムスンは、ファンエディション(FE)スマートフォンシリーズをいつアップデートするかについて、まだ何のヒントも提供していない。現時点では、Galaxy S23 FE は 2023 年 10 月初めに発表された同社の最新版のままです。
 Vivo Y300 Pro は、7.69 mm のスリムなボディに 6,500 mAh のバッテリーを搭載
Sep 07, 2024 am 06:39 AM
Vivo Y300 Pro は完全に公開されたばかりで、大容量バッテリーを備えた最もスリムなミッドレンジ Android スマートフォンの 1 つです。正確に言うと、このスマートフォンの厚さはわずか 7.69 mm ですが、6,500 mAh のバッテリーを搭載しています。これは最近発売されたものと同じ容量です
 新しいレポートは、噂のSamsung Galaxy S25、Galaxy S25 Plus、Galaxy S25 Ultraのカメラアップグレードのひどい評価を提供します
Sep 12, 2024 pm 12:22 PM
ここ数日、Ice Universeは、サムスンの次期主力スマートフォンであると広く信じられているGalaxy S25 Ultraの詳細を着実に明らかにしている。とりわけ、リーカーはサムスンがカメラのアップグレードを1つだけ計画していると主張した
 Xiaomi Redmi Note 14 Pro Plusは、Light Hunter 800カメラを搭載した初のQualcomm Snapdragon 7s Gen 3スマートフォンとして登場します
Sep 27, 2024 am 06:23 AM
Redmi Note 14 Pro Plusは、昨年のRedmi Note 13 Pro Plus(Amazonで現在375ドル)の直接の後継者として正式に発表されました。予想通り、Redmi Note 14 Pro Plusは、Redmi Note 14およびRedmi Note 14 Proと並んでRedmi Note 14シリーズをリードします。李
 iQOO Z9 Turbo Plus: 強化されたシリーズフラッグシップの予約開始
Sep 10, 2024 am 06:45 AM
OnePlus の姉妹ブランドである iQOO の製品サイクルは 2023 年から 4 年で、ほぼ終わりに近づいている可能性があります。それにもかかわらず、ブランドはまだZ9シリーズの開発を終えていないと宣言しました。その最終、そしておそらく最高エンドとなる Turbo+ バリアントが、予測どおりに発表されました。 T


