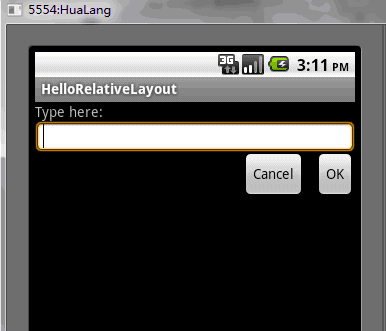
RelativeLayout は、子 View 要素を相対的な位置で表示する VeiwGroup です。ビューの位置は、兄弟要素 (指定された親の左または下など) を基準とした相対位置、または RelativeLayout 領域を基準とした位置で指定できます (たとえば、 、下に揃え、残りの中央)
RelativeLayout は、ネストされたビュー グループ ViewGroup を排除できるため、ユーザー インターフェイスのレイアウトを設定するための非常に強力な用途です。複数のネストされた LinearLayout グループを使用していることがわかった場合は、次のことができます。別の RelativeLayout に置き換えます
1. HelloRelativeLayout という名前の新しいプロジェクトを開始します
2. res/layout/main.xml ファイルを開き、次の情報を挿入します
<?xml version="1.0" encoding="utf-8"?>
<RelativeLayout xmlns:android="http://schemas.android.com/apk/res/android"
    android:orientation="vertical"
    android:layout_width="fill_parent"
    android:layout_height="fill_parent"
    >
        <TextView
                android:id="@+id/label"
            android:layout_width="fill_parent"
            android:layout_height="wrap_content"
            android:text="Type here:"
    />
           <EditText
                   android:id="@+id/entry"
                   android:layout_width="fill_parent"
                   android:layout_height="wrap_content"
                   android:background="@android:drawable/editbox_background"
                   android:layout_below="@id/label"
    />
    <Button
            android:id="@+id/ok"
            android:layout_width="wrap_content"
            android:layout_height="wrap_content"
            android:layout_below="@id/entry"
            android:layout_alignParentRight="true"
            android:layout_marginLeft="10dip"
            android:text="OK"
    />
    <Button
            android:layout_width="wrap_content"
            android:layout_height="wrap_content"
            android:layout_toLeftOf="@id/ok"
            android:layout_alignTop="@id/ok"
            android:text="Cancel"
    />
</RelativeLayout>3. Layout_below、layout_alignParentRightRight、layout_toLeftOf など、RelativeLayout を使用する場合、これらの属性を使用して、必要な各ビューの位置を定義できます。一部のプロパティはピアのリソース ID を使用します。ビューを使用して相対位置を定義します。たとえば、最後のボタンは、ID ok で定義されたビューの左と上に配置されるように定義されており、すべてのレイアウト属性は RelativeLayout.LayoutParams
4 で定義されています。次に、HelloLinearLayout.java を開いて、それがすでに存在していることを確認します。 onCreate res/layout/main.xml レイアウト ファイルが () メソッドで読み込まれます
public void onCreate(Bundle savedInstanceState) {
        super.onCreate(savedInstanceState);
setContentView(R.layout.main);5. 以下のレイアウトが確認できます

上記は Android UI コントロール シリーズの内容です: RelativeLayout (相対レイアウト) )、その他の関連コンテンツについては、PHP 中国語 Web サイト (www.php.cn) にご注意ください。