0から独学C#11 -- マルチスレッドの作成方法とメリット・デメリットまとめ
基本概念
1. プロセス
プロセスは Windows システムの基本概念であり、プログラムの実行に必要なリソースが含まれています。プロセスは比較的独立しています。あるプロセスが別のプロセスのデータに直接アクセスすることはできません (分散コンピューティングが使用されていない限り)。Windows システムは、プロセスを使用して作業を複数の独立した領域に分割します。 。プロセスは、プログラムの基本的な境界として理解できます。
2. アプリケーション ドメイン
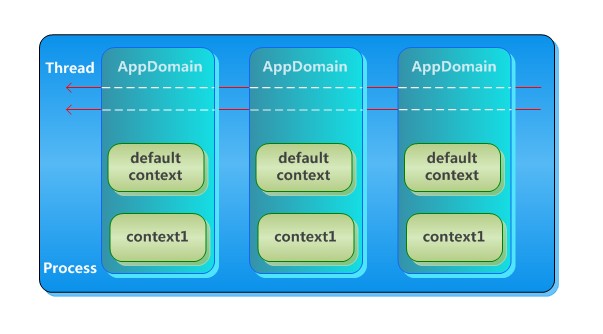
.NET を使用して作成された実行可能プログラム *.exe は、プロセス内で直接ホストされず、アプリケーション ドメイン (AppDomain) でホストされます。アプリケーション ドメインは、.NET によって導入された新しい概念であり、プロセスよりも占有するリソースが少なく、軽量のプロセスとみなすことができます。
プロセスには複数のアプリケーション ドメインを含めることができ、1 つのアプリケーション ドメインに実行可能プログラム (.exe) または複数のアセンブリ (.dll) を読み込むことができます。これにより、アプリケーション ドメイン間の高度な分離が可能になり、プロセス中に 1 つのアプリケーション ドメインでエラーが発生した場合でも、他のアプリケーション ドメインの正常な動作には影響しません。
アセンブリが複数のアプリケーション ドメインによって同時に呼び出される場合、次の 2 つの状況が発生します。
最初の状況: CLR は、このアセンブリを異なるアプリケーション ドメインに対してそれぞれ読み込みます。
2 番目のケース: CLR はこのアセンブリをすべてのアプリケーション ドメインの外に読み込み、アセンブリ共有を実装します。このケースは非常に特殊で、ドメイン ニュートラルと呼ばれます。
3. スレッド
スレッドはプロセスの基本的な実行単位であり、プログラム実行フローの最小単位です。プロセスのエントリ時に実行される最初のスレッドは、プロセスのメイン スレッドとみなされます。 .NET アプリケーションでは、Main() メソッドがエントリ ポイントとして使用され、このメソッドが呼び出されると、システムはメイン スレッドを自動的に作成します。
スレッドは主に、CPU レジスタ、呼び出しスタック、スレッド ローカル ストレージ (スレッド ローカル ストレージ、TLS) で構成されます。 CPU レジスタは主に現在実行中のスレッドのステータスを記録し、コール スタックは主にスレッドによって呼び出されるメモリとデータを維持するために使用され、TLS は主にスレッドのステータス情報を保存するために使用されます。
4. 3 つの関係
プロセス、アプリケーション ドメイン、スレッドの関係は次のようになります。プロセスには複数のアプリケーション ドメインが含まれ、複数のスレッドは複数のアプリケーション ドメイン間を行き来することもできます。しかし同時に、スレッドは 1 つのアプリケーション ドメイン内にのみ存在します。
作成方法
1. 乗車券システムを利用してマルチスレッドの作成方法を紹介します。
まず、新しいコンソール プログラム プロジェクトを作成し、電車のチケット クラスと人間 (Ticket と Person) を作成します。
class Ticket
{    private int count =100;    public int Count
    {        get
        {            return this.count;
        }
    }    public string GetTicket()
    {        //while (true)
        //{
            this.count++;
            Thread.Sleep(50);            this.count--;        //}
        return "G" + this.count--;
    }
}

class Person
{    private string name, id;    private int age;    public string Name
    {        get
        {            return this.name;
        }        set
        {            if (value.Length > 0 && value.Length < 8)
            {                this.name = value;
            }            else
            {                throw new IndexOutOfRangeException("Length of name is out of 0~8.");
            }
        }
    }    public int Age
    {        get
        {            return this.age;
        }        set
        {            if (value > 0)
            {                this.age = value;
            }            else
            {                throw new IndexOutOfRangeException("Age must be more than 0.");
            }
        }
    }    public string ID//身份证
    {        get
        {            return this.id;
        }        set
        {            if (value.Length == 18)
            {                this.id = value;
            }            else
            {                throw new IndexOutOfRangeException("Lengh of ID must be 16.");
            }
        }
    }    public Person(string nameOfPerson, int ageOfPerson, string idOfPerson)
    {        this.name = nameOfPerson;        this.age = ageOfPerson;        this.id = idOfPerson;
    }
}次に、Program クラスで、後でマルチスレッド メソッドを作成するときに呼び出されるパブリック静的メソッドを作成します。
class Program
{    static void BuyTicket(object state)
    {
        Ticket newTic = (Ticket)state;
        BuyTicket(newTic);
    }    static string BuyTicket(Ticket newTic)
    {        lock (newTic)
        {
            ThreadMessage("Async Thread start:");
            Console.WriteLine("Async thread do work!");            string message = newTic.GetTicket();
            Console.WriteLine(message + "\n");            return message;
        }
    }    static void ThreadMessage(string data)
    {        string message = string.Format("{0}\nCurrentThreadId is {1}", data, Thread.CurrentThread.ManagedThreadId);
        Console.WriteLine(message);
    }
}2. Thread クラスを通じて作成されます
スレッドを作成および制御し、優先順位を設定し、そのステータスを取得できます。 ThreadStart を使用して新しいスレッドを作成するのが最も直接的な方法なので、ここでは紹介しません。 ParameterizedThreadStart デリゲートは ThreadStart デリゲートとよく似ていますが、ParameterizedThreadStart デリゲートはパラメーターを持つメソッド用です。 ParameterizedThreadStart の対応するメソッドのパラメータはオブジェクトであることに注意してください。このパラメータは値オブジェクトまたはカスタム オブジェクトである可能性があります。
ここでは、ParameterizedThreadStart による作成を紹介します。
①コード
static void Main(string[] args)
{
    Ticket tic = new Ticket();
    Person[] person = new Person[10]
        {            new Person("Nicholas", 21, "000000000000000000"),
new Person("Nate", 38, "111111111111111111"),
new Person("Vincent", 21, "222222222222222222"),
new Person("Niki", 51, "333333333333333333"),
new Person("Gary", 28, "444444444444444444"),
new Person("Charles", 49, "555555555555555555"),
new Person("Karl ", 55, "666666666666666666"),
new Person("Katharine", 19, "777777777777777777"),
new Person("Lee", 25, "888888888888888888"),
new Person("Ann", 34, "99999999999999999"),
        };

    ThreadMessage("MainThread start");
    Console.WriteLine();
    Thread[] t = new Thread[person.Length];    for (int i = 0; i < person.Length; i++)
    {
        t[i] = new Thread(new ParameterizedThreadStart(BuyTicket));
        t[i].Start(tic);
    }    for (int i = 0; i < 3; i++)
    {
        Console.WriteLine("Main thread do work!");
        Thread.Sleep(200);
    }

    Console.ReadKey();
}②実行結果
MainThread startCurrentThreadId is 8Async Thread start:
CurrentThreadId is 9Async thread do work!
Main thread do work!
G100

Async Thread start:
CurrentThreadId is 10Async thread do work!
G99

Async Thread start:
CurrentThreadId is 11Async thread do work!
G98

Async Thread start:
CurrentThreadId is 12Async thread do work!
G97

Async Thread start:
CurrentThreadId is 13Async thread do work!
Main thread do work!
G96

Async Thread start:
CurrentThreadId is 14Async thread do work!
G95

Async Thread start:
CurrentThreadId is 15Async thread do work!
G94

Async Thread start:
CurrentThreadId is 16Async thread do work!
G93

Async Thread start:
CurrentThreadId is 17Async thread do work!
Main thread do work!
G92

Async Thread start:
CurrentThreadId is 18Async thread do work!
G91
③結論
合計11個のスレッドが作成されました。
ThreadStart と ParameterizedThreadStart を使用して新しいスレッドを作成するのは非常に簡単ですが、この方法で作成されたスレッドは管理が難しく、作成されるスレッドが多すぎるとシステムのパフォーマンスに影響します。スレッドが開始されると、新しいプライベート ローカル変数スタックなどの追加リソースの準備に数百ミリ秒が費やされます。各スレッドは (デフォルトで) 1MB のメモリを消費します。これを考慮して、.NET では CLR スレッド プールの概念が導入されました。
3. スレッド プールを使用する
スレッド プールは、スレッドを共有およびリサイクルすることでこれらのオーバーヘッドを軽減し、パフォーマンスを損なうことなく非常に小さな粒度でマルチスレッド アプリケーションを実行できるようにします。 CLR スレッド プールは、CLR が初期化されてもすぐにはスレッドを作成しません。代わりに、アプリケーションがタスクを実行するためにスレッドを作成する必要があるときにスレッド プールを初期化します。スレッドの初期化は他のスレッドと同じです。
在完成任务以后,该线程不会自行销毁,而是以挂起的状态返回到线程池。直到应用程序再次向线程池发出请求时,线程池里挂起的线程就会再度激活执行任务。这样既节省了建立线程所造成的性能损耗,也可以让多个任务反复重用同一线程,从而在应用程序生存期内节约大量开销。
CLR线程池分为工作者线程(workerThreads)与I/O线程 (completionPortThreads) 两种,工作者线程是主要用作管理CLR内部对象的运作,I/O(Input/Output) 线程顾名思义是用于与外部系统交换信息。
3.1 通过QueueUserWorkItem使用线程池
①代码
static void Main(string[] args)
{
    Ticket tic = new Ticket();
    Person[] person = new Person[10]
        {
new Person("Nicholas", 21, "000000000000000000"),
new Person("Nate", 38, "111111111111111111"),
new Person("Vincent", 21, "222222222222222222"),
new Person("Niki", 51, "333333333333333333"),
new Person("Gary", 28, "444444444444444444"),
new Person("Charles", 49, "555555555555555555"),
new Person("Karl ", 55, "666666666666666666"),
new Person("Katharine", 19, "777777777777777777"),
new Person("Lee", 25, "888888888888888888"),
new Person("Ann", 34, "99999999999999999"),
        };

    ThreadPool.SetMaxThreads(1000, 1000);
    ThreadPool.SetMinThreads(2, 2);

    ThreadMessage("MainThread start");
    Console.WriteLine();    foreach(Person someone in person)
    {
        ThreadPool.QueueUserWorkItem(new WaitCallback(BuyTicket), tic);
    }    for (int i = 0; i < 3; i++)
    {
        Console.WriteLine("Main thread do work!");
        Thread.Sleep(200);
    }

    Console.ReadKey();
}②运行结果
MainThread startCurrentThreadId is 8Main thread do work!
Async Thread start:
CurrentThreadId is 11Async thread do work!
G100

Async Thread start:
CurrentThreadId is 10Async thread do work!
G99

Async Thread start:
CurrentThreadId is 9Async thread do work!
G98

Async Thread start:
CurrentThreadId is 12Async thread do work!
Main thread do work!
G97

Async Thread start:
CurrentThreadId is 11Async thread do work!
G96

Async Thread start:
CurrentThreadId is 10Async thread do work!
G95

Async Thread start:
CurrentThreadId is 9Async thread do work!
G94

Async Thread start:
CurrentThreadId is 12Async thread do work!
Main thread do work!
G93

Async Thread start:
CurrentThreadId is 11Async thread do work!
G92

Async Thread start:
CurrentThreadId is 10Async thread do work!
G91
③结论
一共创建了5个线程,小于Thread类的10。
通过ThreadPool.QueueUserWorkItem启动工作者线程虽然是方便,但WaitCallback委托指向的必须是一个带有Object参数的无返回值方法,这无疑是一种限制。若方法需要有返回值,或者带有多个参数,这将多费周折。有见及此,.NET提供了另一种方式去建立工作者线程,那就是委托。
3.2 通过委托使用线程池
①代码
delegate string MyDelegate(Ticket tic);//可以带多个参数static void Main(string[] args)
{
    Ticket tic = new Ticket();
    Person[] person = new Person[10]
        {
        new Person("Nicholas", 21, "000000000000000000"),
new Person("Nate", 38, "111111111111111111"),
new Person("Vincent", 21, "222222222222222222"),
new Person("Niki", 51, "333333333333333333"),
new Person("Gary", 28, "444444444444444444"),
new Person("Charles", 49, "555555555555555555"),
new Person("Karl ", 55, "666666666666666666"),
new Person("Katharine", 19, "777777777777777777"),
new Person("Lee", 25, "888888888888888888"),
new Person("Ann", 34, "99999999999999999"),
        };
    ThreadPool.SetMaxThreads(1000, 1000);
    ThreadPool.SetMinThreads(2, 2);

    ThreadMessage("MainThread start");
    Console.WriteLine();    foreach (Person someone in person)
    {
        MyDelegate myDelegate = new MyDelegate(BuyTicket);
        myDelegate.BeginInvoke(tic, new AsyncCallback(Completed), someone);
    }    for (int i = 0; i < 3; i++)
    {
        Console.WriteLine("Main thread do work!");
        Thread.Sleep(200);
    }

    Console.ReadKey();
}static void Completed(IAsyncResult result)
{
    Console.WriteLine();
    ThreadMessage("Async Completed");    //获取委托对象,调用EndInvoke方法获取运行结果
    AsyncResult _result = (AsyncResult)result;
    MyDelegate myDelegate = (MyDelegate)_result.AsyncDelegate;    string data = myDelegate.EndInvoke(_result);    //获取Person对象
    Person person = (Person)result.AsyncState;
    Console.WriteLine("Person name is " + person.Name);
    Console.WriteLine("Person age is " + person.Age);
    Console.WriteLine("Person ID is " + person.ID);
    Console.WriteLine("Tick ID is "+ data);
    Console.WriteLine();
}②运行结果
MainThread start
CurrentThreadId is 8Main thread do work!Async Thread start:
CurrentThreadId is 10Async thread do work!
G100Async Thread start:
CurrentThreadId is 9Async thread do work!Async Completed
CurrentThreadId is 10Person name is Nicholas
Person age is 21Person ID is 000000000000000000Tick ID is G100

G99Async Thread start:
CurrentThreadId is 11Async thread do work!Async Completed
CurrentThreadId is 9Person name is Nate
Person age is 38Person ID is 111111111111111111Tick ID is G99

G98Async Completed
CurrentThreadId is 11Person name is Niki
Person age is 51Person ID is 333333333333333333Tick ID is G98Async Thread start:
CurrentThreadId is 12Async thread do work!

Main thread do work!
G97Async Thread start:
CurrentThreadId is 10Async thread do work!Async Completed
CurrentThreadId is 12Person name is Vincent
Person age is 21Person ID is 222222222222222222Tick ID is G97

G96Async Thread start:
CurrentThreadId is 9Async thread do work!Async Completed
CurrentThreadId is 10Person name is Gary
Person age is 28Person ID is 444444444444444444Tick ID is G96

G95Async Thread start:
CurrentThreadId is 11Async thread do work!Async Completed
CurrentThreadId is 9Person name is Charles
Person age is 49Person ID is 555555555555555555Tick ID is G95

G94Async Thread start:
CurrentThreadId is 12Async Completed
CurrentThreadId is 11Person name is Karl
Person age is 55Async thread do work!
Person ID is 666666666666666666Tick ID is G94

Main thread do work!
G93Async Thread start:
CurrentThreadId is 10Async thread do work!Async Completed
CurrentThreadId is 12Person name is Katharine
Person age is 19Person ID is 777777777777777777Tick ID is G93

G92Async Thread start:
CurrentThreadId is 9Async thread do work!Async Completed
CurrentThreadId is 10Person name is Lee
Person age is 25Person ID is 888888888888888888Tick ID is G92

G91Async Completed
CurrentThreadId is 9Person name is Ann
Person age is 34Person ID is 99999999999999999Tick ID is G91
③结论
一共创建了5个线程。
4. 通过TPL创建
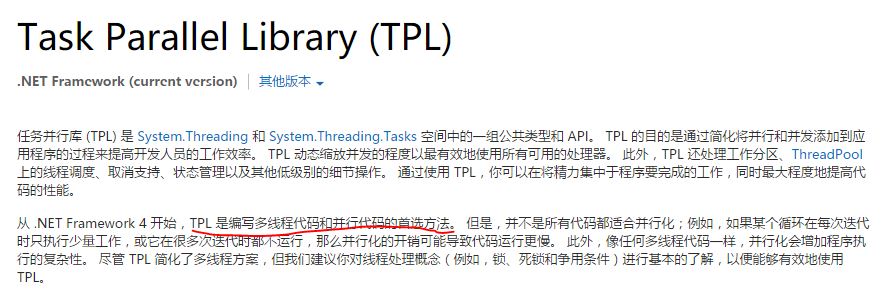
从 .NET Framework 4 开始,TPL 是编写多线程代码和并行代码的首选方法。我们先看下MSDN的解释。
对于多线程,我们经常使用的是Thread。在我们了解Task之前,如果我们要使用多核的功能可能就会自己来开线程,然而这种线程模型在.net 4.0之后被一种称为基于“任务的编程模型”所冲击,因为task会比thread具有更小的性能开销,不过大家肯定会有疑惑,任务和线程到底有什么区别呢?
任务和线程的区别:
①任务是架构在线程之上的,也就是说任务最终还是要抛给线程去执行。
②任务跟线程不是一对一的关系,比如开10个任务并不是说会开10个线程,这一点任务有点类似线程池,但是任务相比线程池有很小的开销和精确的控制。
4.1 通过Parallel类创建
①代码
static void Main(string[] args)
{
    Ticket tic = new Ticket();
    Person[] person = new Person[10]
        {
        new Person("Nicholas", 21, "000000000000000000"),
new Person("Nate", 38, "111111111111111111"),
new Person("Vincent", 21, "222222222222222222"),
new Person("Niki", 51, "333333333333333333"),
new Person("Gary", 28, "444444444444444444"),
new Person("Charles", 49, "555555555555555555"),
new Person("Karl ", 55, "666666666666666666"),
new Person("Katharine", 19, "777777777777777777"),
new Person("Lee", 25, "888888888888888888"),
new Person("Ann", 34, "99999999999999999"),
        };
    Stopwatch watch = new Stopwatch();

    ThreadMessage("MainThread start");
    Console.WriteLine();

    watch.Start();
    Parallel.For(0, person.Length, item =>
        {
            BuyTicket(tic);
        });
    watch.Stop();
    Console.WriteLine("Parallel running need " + watch.ElapsedMilliseconds + " ms.");

    for (int i = 0; i < 3; i++)
    {
        Console.WriteLine("Main thread do work!");
        Thread.Sleep(200);
    }

    Console.ReadKey();
}②运行结果
MainThread startCurrentThreadId is 9Async Thread start:
CurrentThreadId is 9Async thread do work!
G100

Async Thread start:
CurrentThreadId is 6Async thread do work!
G99

Async Thread start:
CurrentThreadId is 10Async thread do work!
G98

Async Thread start:
CurrentThreadId is 11Async thread do work!
G97

Async Thread start:
CurrentThreadId is 12Async thread do work!
G96

Async Thread start:
CurrentThreadId is 9Async thread do work!
G95

Async Thread start:
CurrentThreadId is 6Async thread do work!
G94

Async Thread start:
CurrentThreadId is 10Async thread do work!
G93

Async Thread start:
CurrentThreadId is 11Async thread do work!
G92

Async Thread start:
CurrentThreadId is 12Async thread do work!
G91

Parallel running need 534 ms.
Main thread do work!
Main thread do work!
Main thread do work!
③结论
一共创建了5个线程。耗时534ms。
4.2 通过Task类创建
创建Task的方法有两种,一种是直接创建——new一个出来,一种是通过工厂创建。下面介绍工厂创建方法。
static void Main(string[] args)
{
    Ticket tic = new Ticket();
    Person[] person = new Person[10]
        {            new Person("Nicholas", 21, "000000000000000000"),
new Person("Nate", 38, "111111111111111111"),
new Person("Vincent", 21, "222222222222222222"),
new Person("Niki", 51, "333333333333333333"),
new Person("Gary", 28, "444444444444444444"),
new Person("Charles", 49, "555555555555555555"),
new Person("Karl ", 55, "666666666666666666"),
new Person("Katharine", 19, "777777777777777777"),
new Person("Lee", 25, "888888888888888888"),
new Person("Ann", 34, "99999999999999999"),
        };
    Stopwatch watch = new Stopwatch();

    ThreadPool.SetMaxThreads(1000, 1000);
    ThreadPool.SetMinThreads(2, 2);
    ThreadMessage("MainThread start");
    Console.WriteLine();
    Dictionary<Person, string> result = new Dictionary<Person, string>();
    Task<string>[] tasks = new Task<string>[person.Length];

    watch.Start();    for (int i = 0; i < person.Length; i++)
    {
        tasks[i] = Task.Factory.StartNew<string>(() => (BuyTicket(tic)));
    }    Task.WaitAll(tasks, 5000);//设置超时5s
    watch.Stop();    Console.WriteLine("Tasks running need " + watch.ElapsedMilliseconds + " ms." + "\n");

    for (int i = 0; i < tasks.Length; i++)
    {
        //超时处理        if (tasks[i].Status != TaskStatus.RanToCompletion)
        {            Console.WriteLine("Task {0} Error!", i + 1);
        }        else
        {
            //save result
            result.Add(person[i], tasks[i].Result);
Console.WriteLine("Person name is " + person[i].Name);
Console.WriteLine("Person age is " + person[i].Age);
Console.WriteLine("Person ID is " + person[i].ID);
Console.WriteLine("Tick ID is " + tasks[i].Result);
Console.WriteLine();
        }
    }    for (int i = 0; i < 3; i++)
    {        Console.WriteLine("Main thread do work!");
Thread.Sleep(200);
    }    Console.ReadKey();
}②运行结果
MainThread startCurrentThreadId is 10Async Thread start:
CurrentThreadId is 6Async thread do work!
G100

Async Thread start:
CurrentThreadId is 11Async thread do work!
G99

Async Thread start:
CurrentThreadId is 12Async thread do work!
G98

Async Thread start:
CurrentThreadId is 13Async thread do work!
G97

Async Thread start:
CurrentThreadId is 6Async thread do work!
G96

Async Thread start:
CurrentThreadId is 11Async thread do work!
G95

Async Thread start:
CurrentThreadId is 12Async thread do work!
G94

Async Thread start:
CurrentThreadId is 13Async thread do work!
G93

Async Thread start:
CurrentThreadId is 6Async thread do work!
G92

Async Thread start:
CurrentThreadId is 11Async thread do work!
G91

Tasks running need 528 ms.

Person name is Nicholas
Person age is 21Person ID is 000000000000000000Tick ID is G100

Person name is Nate
Person age is 38Person ID is 111111111111111111Tick ID is G99

Person name is Vincent
Person age is 21Person ID is 222222222222222222Tick ID is G97

Person name is Niki
Person age is 51Person ID is 333333333333333333Tick ID is G98

Person name is Gary
Person age is 28Person ID is 444444444444444444Tick ID is G96

Person name is Charles
Person age is 49Person ID is 555555555555555555Tick ID is G95

Person name is Karl
Person age is 55Person ID is 666666666666666666Tick ID is G94

Person name is Katharine
Person age is 19Person ID is 777777777777777777Tick ID is G93

Person name is Lee
Person age is 25Person ID is 888888888888888888Tick ID is G92

Person name is Ann
Person age is 34Person ID is 99999999999999999Tick ID is G91

Main thread do work!
Main thread do work!
Main thread do work!
③结论
一共创建了5个线程。耗时528ms。
Task最吸引人的地方就是他的任务控制了,你可以很好的控制task的执行顺序,让多个task有序的工作。下面大概说一下:
Task.Wait:就是等待任务执行完成。
Task.WaitAll:就是等待所有的任务都执行完成。
Task.WaitAny:这个用法同Task.WaitAll,就是等待任何一个任务完成就继续向下执行。
Task.ContinueWith:就是在第一个Task完成后自动启动下一个Task,实现Task的延续。
Task的取消:通过cancellation的tokens来取消一个Task。
Task和线程池之间的抉择
1. 线程池
这里简要的分析下CLR线程池,其实线程池中有一个叫做“全局队列”的概念,每一次我们使用QueueUserWorkItem的使用都会产生一个“工作项”,然后“工作项”进入“全局队列”进行排队,最后线程池中的的工作线程以FIFO(First Input First Output)的形式取出,这里值得一提的是在.net 4.0之后“全局队列”采用了无锁算法,相比以前版本锁定“全局队列”带来的性能瓶颈有了很大的改观。
那么任务委托的线程池不光有“全局队列”,而且每一个工作线程都有”局部队列“。我们的第一反应肯定就是“局部队列“有什么好处呢?这里暂且不说,我们先来看一下线程池中的任务分配,如下图:
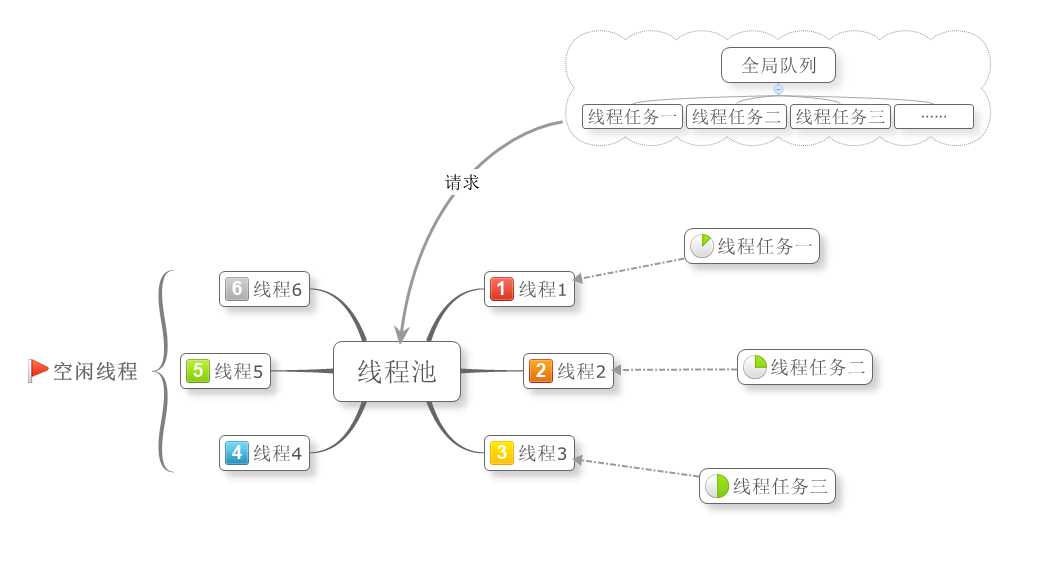
线程池的工作方式大致如下,线程池的最小线程数是6,线程1~3正在执行任务1~3,当有新的任务时,就会向线程池请求新的线程,线程池会将空闲线程分配出去,当线程不足时,线程池就会创建新的线程来执行任务,直到线程池达到最大线程数(线程池满)。总的来说,只有有任务就会分配一个线程去执行,当FIFO十分频繁时,会造成很大的线程管理开销。
2. Task
当我们new一个task的时候“工作项”就会进去”全局队列”,如果我们的task执行的非常快,那么“全局队列“就会FIFO的非常频繁,那么有什么办法缓解呢?
当我们的task在嵌套(见附录)的场景下,“局部队列”就要产生效果了,比如我们一个task里面有3个task,那么这3个task就会存在于“局部队列”中,如下图的任务一,里面有三个任务要执行,也就是产生了所谓的”局部队列”,当任务三的线程执行完成时,就会从任务一种的队列中以FIFO的形式”窃取”任务执行,从而减少了线程管理的开销。
这就相当于,有两个人,一个人干完了分配给自己的所有活,而另一个人却还有很多的活,闲的人应该接手点忙的人的活,一起快速完成。

从上面种种情况我们看到,这些分流和负载都是普通ThreadPool.QueueUserWorkItem所不能办到的,所以说在.net 4.0之后,我们尽可能的使用TPL,抛弃ThreadPool。
附录 Task的嵌套
1. 非关联嵌套
Task中的嵌套分为两种,关联嵌套和非关联嵌套,就是说内层的Task和外层的Task是否有联系,下面我们编写代码先来看一下非关联嵌套,及内层Task和外层Task没有任何关系,还是在控制台程序下面,代码如下:
static void Main(string[] args)
      {         var pTask = Task.Factory.StartNew(() =>
         {            var cTask = Task.Factory.StartNew(() =>
            {
               System.Threading.Thread.Sleep(2000);
               Console.WriteLine("Childen task finished!");
            });
            Console.WriteLine("Parent task finished!");
         });         pTask.Wait();         Console.WriteLine("Flag");         Console.Read();
}运行后,输出以下信息:
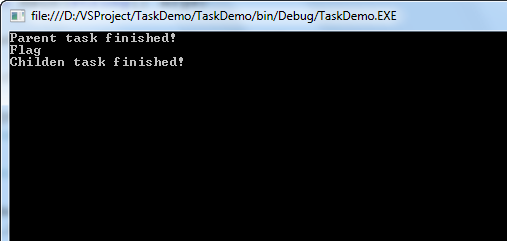
从图中我们可以看到,外层的pTask运行完后,并不会等待内层的cTask,直接向下走先输出了Flag。这种嵌套有时候相当于我们创建两个Task,但是嵌套在一起的话,在Task比较多时会方便查找和管理,并且还可以在一个Task中途加入多个Task,让进度并行前进。
2. 关联嵌套
下面我们来看一下如何创建关联嵌套,就是创建有父子关系的Task,修改上面代码如下:
static void Main(string[] args)
      {         var pTask = Task.Factory.StartNew(() =>
         {            var cTask = Task.Factory.StartNew(() =>
            {
               System.Threading.Thread.Sleep(2000);
               Console.WriteLine("Childen task finished!");
            },TaskCreationOptions.AttachedToParent);
            Console.WriteLine("Parent task finished!");
         });         pTask.Wait();         Console.WriteLine("Flag");         Console.Read();
}可以看到,我们在创建cTask时,加入了以参数,TaskCreationOptions.AttachedToParent,这个时候,cTask和pTask就会建立关联,cTask就会成为pTask的一部分,运行代码,看下结果:
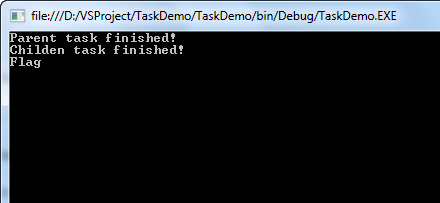
可以看到,tTask会等待cTask执行完成。省得我们写Task.WaitAll了,外层的Task会自动等待所有的子Task完成才向下走。
3. 综合
下面我们来写一个Task综合使用的例子,来看一下多任务是如何协作的。假设有如下任务,如图:

任务2和任务3要等待任务1完成后,取得任务1的结果,然后开始执行。任务4要等待任务2完成,取得其结果才能执行,最终任务3和任务4都完成了,合并结果,任务完成。图中已经说的很明白了。下面来看一下代码:
using System;
using System.Collections.Generic;
using System.Linq;
using System.Text;
using System.Threading.Tasks;

namespace TaskDemo
{    class Program
    {
        static void Main(string[] args)
        {
            Task.Factory.StartNew(() =>
            {                var t1 = Task.Factory.StartNew<int>(() =>
                {
                    Console.WriteLine("Task 1 running...");                    return 1;
                });
                t1.Wait(); //等待任务一完成                var t3 = Task.Factory.StartNew<int>(() =>
                {
                    Console.WriteLine("Task 3 running...");                    return t1.Result + 3;
                });                var t4 = Task.Factory.StartNew<int>(() =>
                {
                    Console.WriteLine("Task 2 running...");                    return t1.Result + 2;
                }).ContinueWith<int>(task =>
                {
                    Console.WriteLine("Task 4 running...");                    return task.Result + 4;
                });
                Task.WaitAll(t3, t4);  //等待任务三和任务四完成                var result = Task.Factory.StartNew(() =>
                {
                    Console.WriteLine("Task Finished! The result is {0}",t3.Result + t4.Result);
                });
            });            Console.Read();
        }
    }
}任务2和任务4可以用ContinueWith连接执行,最终运行结果如图:
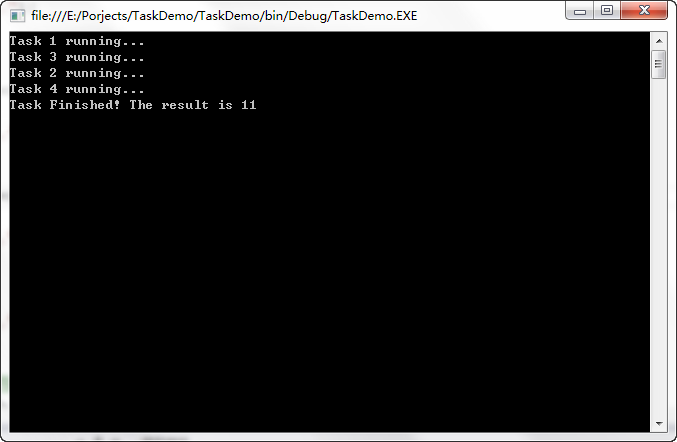
可以看到所有的任务都执行了,我们也得到了正确的结果11.
以上就是从0自学C#11--多线程创建方法汇总以及优缺点的内容,更多相关内容请关注PHP中文网(www.php.cn)!

ホットAIツール

Undresser.AI Undress
リアルなヌード写真を作成する AI 搭載アプリ

AI Clothes Remover
写真から衣服を削除するオンライン AI ツール。

Undress AI Tool
脱衣画像を無料で

Clothoff.io
AI衣類リムーバー

Video Face Swap
完全無料の AI 顔交換ツールを使用して、あらゆるビデオの顔を簡単に交換できます。

人気の記事

ホットツール

メモ帳++7.3.1
使いやすく無料のコードエディター

SublimeText3 中国語版
中国語版、とても使いやすい

ゼンドスタジオ 13.0.1
強力な PHP 統合開発環境

ドリームウィーバー CS6
ビジュアル Web 開発ツール

SublimeText3 Mac版
神レベルのコード編集ソフト(SublimeText3)

ホットトピック
 7700
7700
 15
15
 1640
1640
 14
14
 1393
1393
 52
52
 1287
1287
 25
25
 1230
1230
 29
29
 C# を使用した Active Directory
Sep 03, 2024 pm 03:33 PM
C# を使用した Active Directory のガイド。ここでは、Active Directory の概要と、C# での動作方法について、構文と例とともに説明します。
 C# データ グリッド ビュー
Sep 03, 2024 pm 03:32 PM
C# データ グリッド ビューのガイド。ここでは、SQL データベースまたは Excel ファイルからデータ グリッド ビューをロードおよびエクスポートする方法の例について説明します。
 マルチスレッドと非同期C#の違い
Apr 03, 2025 pm 02:57 PM
マルチスレッドと非同期の違いは、マルチスレッドが複数のスレッドを同時に実行し、現在のスレッドをブロックせずに非同期に操作を実行することです。マルチスレッドは計算集約型タスクに使用されますが、非同期はユーザーインタラクションに使用されます。マルチスレッドの利点は、コンピューティングのパフォーマンスを改善することですが、非同期の利点はUIスレッドをブロックしないことです。マルチスレッドまたは非同期を選択することは、タスクの性質に依存します。計算集約型タスクマルチスレッド、外部リソースと相互作用し、UIの応答性を非同期に使用する必要があるタスクを使用します。


