

Android が DOM を使用して XML を解析する方法 + 絵文字ポップアップ ボックスを作成する方法

レンダリング:

次の XML を解析する方法:
<?xml version="1.0" encoding="UTF-8"?>
<!DOCTYPE plist PUBLIC "-//Apple//DTD PLIST 1.0//EN" "http://www.apple.com/DTDs/PropertyList-1.0.dtd">
<array>
	<string>(#大笑)</string>
	<string>(#微笑)</string>
	<string>(#亲亲)</string>
	<string>(#抱抱)</string>
	<string>(#色色)</string>
	<string>(#好失望哟)</string>
</array>
次のように解析します:
public class MessageFaceModel {

	/** single instance of this class */
	private static MessageFaceModel instance = null;

	/** context */
	private boolean mInitialized = false;

	private HashMap<String,Bitmap> mFaceMap = new HashMap<String,Bitmap>();

	private ArrayList<String> mFaceStrings = new ArrayList<String>();

	private ArrayList<Bitmap> mFaceIcons = new ArrayList<Bitmap>();

	/**
	 * constructor
	 */
	private MessageFaceModel(){

	}

	/**
	 * Factory method
	 */
	public static synchronized MessageFaceModel getInstance(){
		if(instance == null){
			instance = new MessageFaceModel();
		}
		return instance;
	}

	/**
	 * initialize face data
	 */
	public void init(Context context){
		if(mInitialized){
			//initialize only once
			return;
		}

		mFaceMap.clear();
		mFaceStrings.clear();
		mFaceIcons.clear();

		AssetManager assetManager = context.getAssets();
		ArrayList<String> faces = new ArrayList<String>();
		DocumentBuilderFactory docBuilderFactory = null;
		DocumentBuilder docBuilder = null;
		Document doc = null;
		try {
			docBuilderFactory = DocumentBuilderFactory.newInstance();
			docBuilder = docBuilderFactory.newDocumentBuilder();
			doc = docBuilder.parse(assetManager.open("MessageFace.xml"));
			Element root = doc.getDocumentElement();
			NodeList nodeList = root.getElementsByTagName("string");
			for(int i =0;i< nodeList.getLength();i++)
			{
				Node node = nodeList.item(i);
				String s = "";
				NodeList list = node.getChildNodes();
				if(list != null){
					for(int j = 0; j < list.getLength(); j++){
						s += list.item(j).getNodeValue();
					}
				}
				faces.add(s);
			}

		} catch (Exception e) {
			// TODO Auto-generated catch block
			e.printStackTrace();
		} finally{
			doc = null;
			docBuilder = null;
			docBuilderFactory = null;

		}

		int i;
		for(i = 0; i < faces.size(); ++i){
			int index = i + 1;
			int id = context.getResources().getIdentifier(
                    "msgface_" + index,
                    "drawable", "com.example.tianqitongtest");
			try {
				Bitmap bm =  BitmapFactory.decodeResource(context.getResources(),id);
				mFaceMap.put(faces.get(i), bm);
				mFaceStrings.add(faces.get(i));
				mFaceIcons.add(bm);
			} catch (Exception e) {
				// TODO Auto-generated catch block
				e.printStackTrace();
			}
		}

		mInitialized = true;

	}

	public ArrayList<Bitmap> getFaceIcons(){
		return mFaceIcons;
	}

	public ArrayList<String> getFaceStrings(){
		return mFaceStrings;
	}

	public Bitmap getFaceIcon(String face){
		if(mFaceMap != null){
			return mFaceMap.get(face);
		}else{
			return null;
		}
	}

	public void clear() {
		mInitialized = false;
		mFaceMap.clear();
		mFaceStrings.clear();
		mFaceIcons.clear();
	}
}
次に、このダイアログ スタイル アクティビティを作成します:
  <activity android:name=".InputFaceActivity"
   		 	 android:theme="@android:style/Theme.Dialog"
   			 android:configChanges="keyboardHidden|orientation">
   		 </activity>
レイアウトは:
<?xml version="1.0" encoding="utf-8"?>
<RelativeLayout
  xmlns:android="http://schemas.android.com/apk/res/android"
  android:layout_width="fill_parent"
  android:layout_height="300dp"
  android:minHeight="100dp"
  android:background="#EFEFEF">
  <GridView
	  xmlns:android="http://schemas.android.com/apk/res/android"
	  android:id="@+id/input_face_gridview"
	  android:layout_width="fill_parent"
	  android:layout_height="wrap_content"
	  android:layout_marginLeft="18dp"
	  android:layout_marginRight="10dp"
	  android:layout_marginTop = "18dp"
	  android:layout_marginBottom = "30dp"
	  android:numColumns="auto_fit"
	  android:horizontalSpacing="10dp"
	  android:verticalSpacing="15dp"
	  android:columnWidth="50dp"
	  android:stretchMode="columnWidth"
	  android:gravity="center"
	  android:layout_weight="1.0">
  </GridView>

  <LinearLayout
	  xmlns:android="http://schemas.android.com/apk/res/android"
	  android:layout_width="fill_parent"
	  android:layout_height="wrap_content">
	  <Button
	  	  android:id="@+id/input_face_cancel_button"
		  android:layout_width="wrap_content"
		  android:layout_height="wrap_content"
		  android:background="@drawable/cancel_button_style">
	  </Button>
  </LinearLayout>
</RelativeLayout>
public class InputFaceActivity extends Activity{

    private MessageFaceModel mMessageFaceModel = MessageFaceModel.getInstance();
	public static final int SELECT_STATE_FACE_ICON = 209;
	public static final int SELECT_MESSAGE_FACE_ICON = 109;
	private int mWidth = 0;


	@Override
	protected void onCreate(Bundle savedInstanceState) {
		// TODO Auto-generated method stub
		super.onCreate(savedInstanceState);
		requestWindowFeature(Window.FEATURE_NO_TITLE);
		mWidth = this.getResources().getDimensionPixelSize(R.dimen.image_width);
		getWindow().setFlags(WindowManager.LayoutParams.FLAG_ALT_FOCUSABLE_IM,
							 WindowManager.LayoutParams.FLAG_ALT_FOCUSABLE_IM);
		setContentView(R.layout.input_face_activity);
		GridView gridView = (GridView) findViewById(R.id.input_face_gridview);
		gridView.setAdapter(new FaceListAdapter());
		gridView.setOnItemClickListener(new FaceListOnItemClickListener());

		Button cancelButton = (Button)findViewById(R.id.input_face_cancel_button);
		cancelButton.setOnClickListener(new OnClickListener(){

			@Override
			public void onClick(View arg0) {
				finish();
			}

		});

	}

	private class FaceListAdapter extends BaseAdapter {

		public int getCount() {
			if(mMessageFaceModel.getFaceIcons() != null){
				return mMessageFaceModel.getFaceIcons().size();
			}else{
			return 0;
			}
		}

		public Object getItem(int arg0) {
			return arg0;
		}

		public long getItemId(int arg0) {
			return arg0;
		}

		public View getView(int position, View convertView, ViewGroup parent) {

			ImageView view = new ImageView(InputFaceActivity.this);
			view.setImageBitmap(mMessageFaceModel.getFaceIcons().get(position));

			view.setLayoutParams(new GridView.LayoutParams(mWidth, mWidth));
			view.setScaleType(ScaleType.CENTER);
			return view;
		}

	}

} 上記は、Android が DOM を使用して XML + 絵文字ポップアップ ボックスのコンテンツを解析する方法です。その他の関連コンテンツについては、注意してください。 PHP 中国語 Web サイト (www.php.cn) にアクセスしてください。

ホットAIツール

Undresser.AI Undress
リアルなヌード写真を作成する AI 搭載アプリ

AI Clothes Remover
写真から衣服を削除するオンライン AI ツール。

Undress AI Tool
脱衣画像を無料で

Clothoff.io
AI衣類リムーバー

AI Hentai Generator
AIヘンタイを無料で生成します。

人気の記事
ホットツール

メモ帳++7.3.1
使いやすく無料のコードエディター

SublimeText3 中国語版
中国語版、とても使いやすい

ゼンドスタジオ 13.0.1
強力な PHP 統合開発環境

ドリームウィーバー CS6
ビジュアル Web 開発ツール

SublimeText3 Mac版
神レベルのコード編集ソフト(SublimeText3)
ホットトピック
 7518
7518
 15
1378
52
80
11
21
67
15
1378
52
80
11
21
67

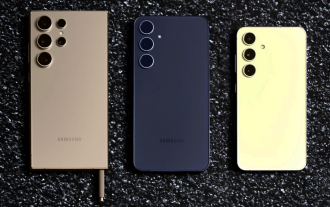
 新しいレポートは、噂のSamsung Galaxy S25、Galaxy S25 Plus、Galaxy S25 Ultraのカメラアップグレードのひどい評価を提供します
Sep 12, 2024 pm 12:23 PM
新しいレポートは、噂のSamsung Galaxy S25、Galaxy S25 Plus、Galaxy S25 Ultraのカメラアップグレードのひどい評価を提供します
Sep 12, 2024 pm 12:23 PM
ここ数日、Ice Universeは、サムスンの次期主力スマートフォンであると広く信じられているGalaxy S25 Ultraの詳細を着実に明らかにしている。とりわけ、リーカーはサムスンがカメラのアップグレードを1つだけ計画していると主張した
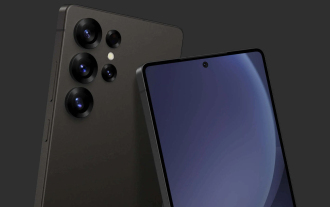 Samsung Galaxy S25 Ultraの最初のレンダリング画像がリークされ、噂のデザイン変更が明らかに
Sep 11, 2024 am 06:37 AM
Samsung Galaxy S25 Ultraの最初のレンダリング画像がリークされ、噂のデザイン変更が明らかに
Sep 11, 2024 am 06:37 AM
OnLeaks は、X (旧 Twitter) のフォロワーから 4,000 ドル以上を集めようとして失敗した数日後、Android Headlines と提携して Galaxy S25 Ultra のファーストルックを提供しました。コンテキストとして、h の下に埋め込まれたレンダリング イメージ
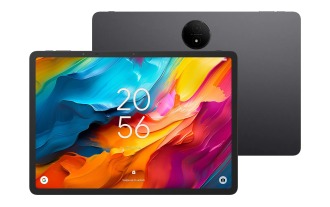 IFA 2024 | TCLのNXTPAPER 14は、パフォーマンスではGalaxy Tab S10 Ultraに匹敵しませんが、サイズではほぼ匹敵します
Sep 07, 2024 am 06:35 AM
IFA 2024 | TCLのNXTPAPER 14は、パフォーマンスではGalaxy Tab S10 Ultraに匹敵しませんが、サイズではほぼ匹敵します
Sep 07, 2024 am 06:35 AM
TCLは、2つの新しいスマートフォンの発表に加えて、NXTPAPER 14と呼ばれる新しいAndroidタブレットも発表しました。その巨大な画面サイズはセールスポイントの1つです。 NXTPAPER 14 は、TCL の代表的なブランドであるマット LCD パネルのバージョン 3.0 を搭載しています。
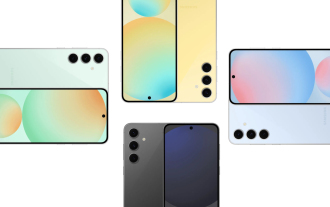 Samsung Galaxy S24 FEは、4色と2つのメモリオプションで予想よりも低価格で発売されると請求されています
Sep 12, 2024 pm 09:21 PM
Samsung Galaxy S24 FEは、4色と2つのメモリオプションで予想よりも低価格で発売されると請求されています
Sep 12, 2024 pm 09:21 PM
サムスンは、ファンエディション(FE)スマートフォンシリーズをいつアップデートするかについて、まだ何のヒントも提供していない。現時点では、Galaxy S23 FE は 2023 年 10 月初めに発表された同社の最新版のままです。
 Vivo Y300 Pro は、7.69 mm のスリムなボディに 6,500 mAh のバッテリーを搭載
Sep 07, 2024 am 06:39 AM
Vivo Y300 Pro は、7.69 mm のスリムなボディに 6,500 mAh のバッテリーを搭載
Sep 07, 2024 am 06:39 AM
Vivo Y300 Pro は完全に公開されたばかりで、大容量バッテリーを備えた最もスリムなミッドレンジ Android スマートフォンの 1 つです。正確に言うと、このスマートフォンの厚さはわずか 7.69 mm ですが、6,500 mAh のバッテリーを搭載しています。これは最近発売されたものと同じ容量です
 新しいレポートは、噂のSamsung Galaxy S25、Galaxy S25 Plus、Galaxy S25 Ultraのカメラアップグレードのひどい評価を提供します
Sep 12, 2024 pm 12:22 PM
新しいレポートは、噂のSamsung Galaxy S25、Galaxy S25 Plus、Galaxy S25 Ultraのカメラアップグレードのひどい評価を提供します
Sep 12, 2024 pm 12:22 PM
ここ数日、Ice Universeは、サムスンの次期主力スマートフォンであると広く信じられているGalaxy S25 Ultraの詳細を着実に明らかにしている。とりわけ、リーカーはサムスンがカメラのアップグレードを1つだけ計画していると主張した
 Xiaomi Redmi Note 14 Pro Plusは、Light Hunter 800カメラを搭載した初のQualcomm Snapdragon 7s Gen 3スマートフォンとして登場します
Sep 27, 2024 am 06:23 AM
Xiaomi Redmi Note 14 Pro Plusは、Light Hunter 800カメラを搭載した初のQualcomm Snapdragon 7s Gen 3スマートフォンとして登場します
Sep 27, 2024 am 06:23 AM
Redmi Note 14 Pro Plusは、昨年のRedmi Note 13 Pro Plus(Amazonで現在375ドル)の直接の後継者として正式に発表されました。予想通り、Redmi Note 14 Pro Plusは、Redmi Note 14およびRedmi Note 14 Proと並んでRedmi Note 14シリーズをリードします。李
 iQOO Z9 Turbo Plus: 強化されたシリーズフラッグシップの予約開始
Sep 10, 2024 am 06:45 AM
iQOO Z9 Turbo Plus: 強化されたシリーズフラッグシップの予約開始
Sep 10, 2024 am 06:45 AM
OnePlus の姉妹ブランドである iQOO の製品サイクルは 2023 年から 4 年で、ほぼ終わりに近づいている可能性があります。それにもかかわらず、ブランドはまだZ9シリーズの開発を終えていないと宣言しました。その最終、そしておそらく最高エンドとなる Turbo+ バリアントが、予測どおりに発表されました。 T
