XML 解析 (グラフィックスとテキスト) の詳細な紹介
このチュートリアルでは、NSXMLParser object を使用して XML ファイルを解析します。解析結果はTable Viewで表示されます。このチュートリアルは、Xcode 7.3.1 上の iOS 9.3 上に構築されています。
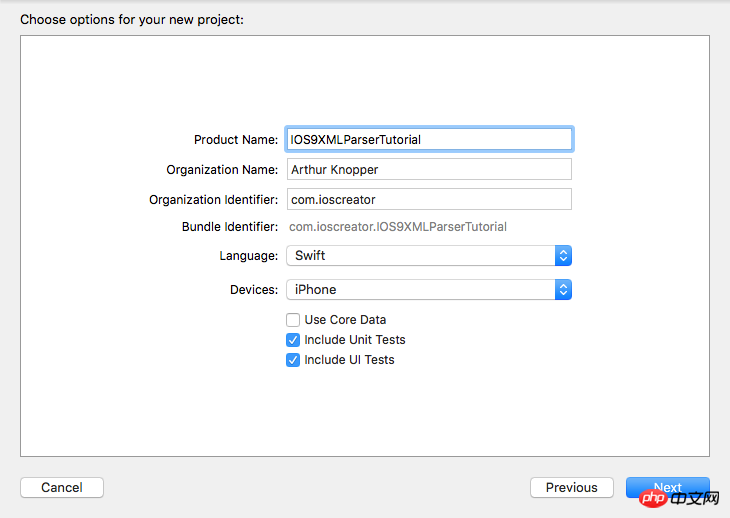
Xcode を開いて、新しい単一ウィンドウ アプリケーションを作成します。名前はIOS9XMLParserTutorialで、組織名と組織ロゴは自分で決めます。言語として Swift を選択し、デバイスとして iPhone を選択します。
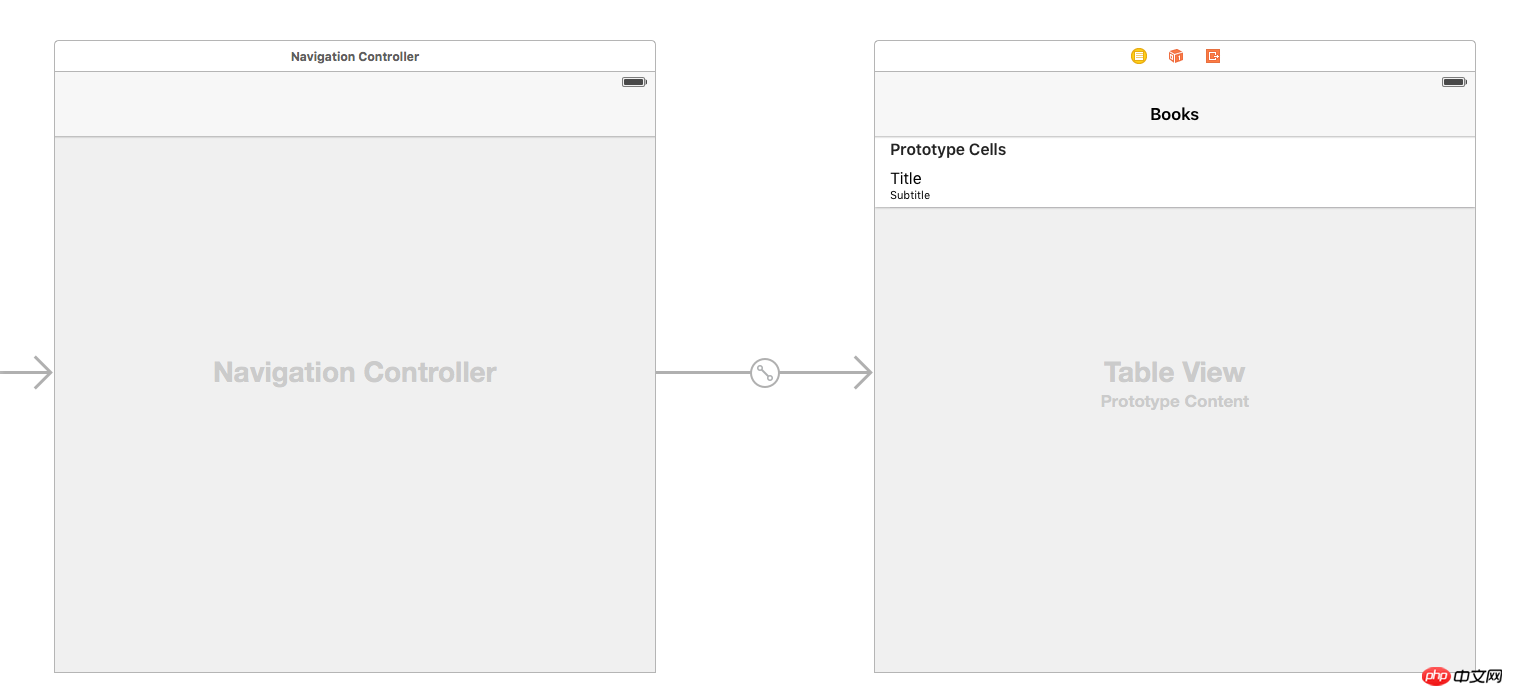
ビュー コントローラーをストーリーボードから削除し、ナビゲーション コントローラーを空のアートボードにドラッグします。このナビゲーション コントローラーには、自動的にテーブル ビュー コントローラーが組み込まれます。最初の View Controller を 削除すると、対応するストーリーボードの開始点 も削除されます。そのため、最初に新しく追加したナビゲーション コントローラーを選択し、新しいストーリーボードの開始点として属性インスペクターで [初期ビュー コントローラーである] チェックボックス
にチェックを入れます。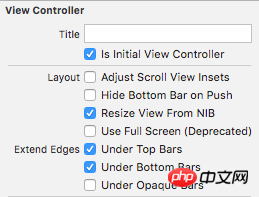
有効な View Controller のタイトル バーをダブルクリックして、「Books」に設定します。テーブルビューセルを選択し、属性インスペクターでそのスタイルプロパティ
をSubtitleに設定します。
初期のViewControllerを削除したので、ViewController.swiftも一緒に削除できます。 iOS -> ソース -> Cocoa Touch Class
を選択し、新しいファイルを追加し、TableViewController という名前を付け、UITableViewController のサブクラスとして設定します。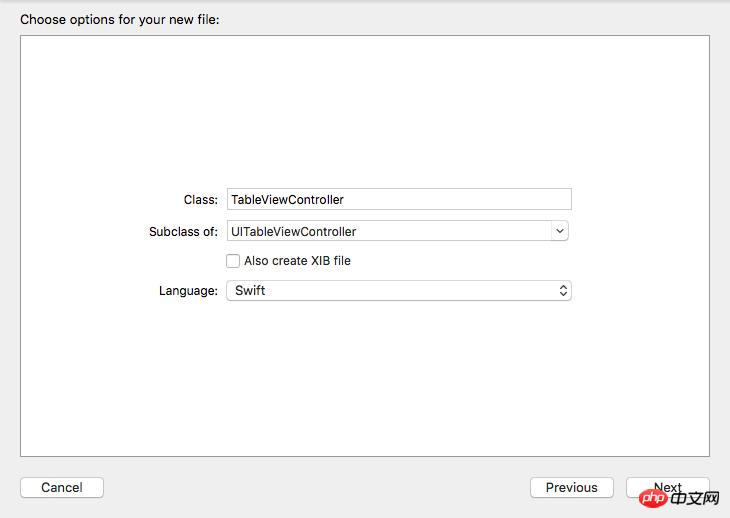

iOS -> ソース -> Swift ファイル
を選択し、新しいファイルを追加します。 Books.xml という名前を付けます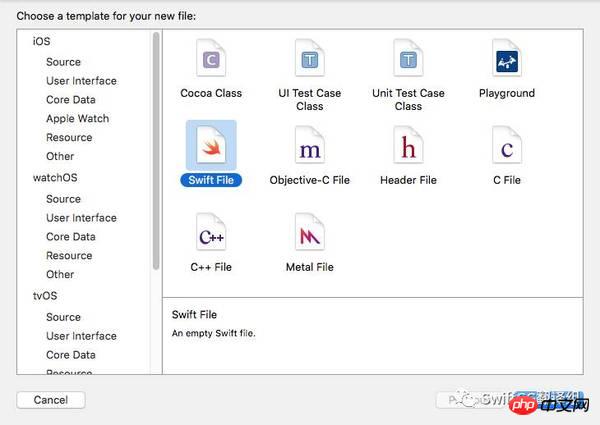
<?xml version="1.0"?>
<catalog>
    <book id="1">
        <title>To Kill a Mockingbird</title>
        <author>Harper Lee</author>
    </book>
    <book id="2">
        <title>1984</title>
        <author>George Orwell</author>
    </book>
    <book id="3">
        <title>The Lord of the Rings</title>
        <author>J.R.R Tolkien</author>
    </book>
    <book id="4">
        <title>The Catcher in the Rye</title>
        <author>J.D. Salinger</author>
    </book>
    <book id="5">
        <title>The Great Gatsby</title>
        <author>F. Scott Fitzgerald</author>
    </book>
</catalog>import Foundation
class Book {
var bookTitle: String = String()
var bookAuthor: String = String()
}var books: [Book] = [] var eName: String = String() var bookTitle = String() var bookAuthor = String()
override func viewDidLoad() {
    super.viewDidLoad()

    if let path = NSBundle.mainBundle().URLForResource("books", withExtension: "xml") {
        if let parser = NSXMLParser(contentsOfURL: path) {
            parser.delegate = self
            parser.parse()
        }
    }
}override func numberOfSectionsInTableView(tableView: UITableView) -> Int {
return 1
}
override func tableView(tableView: UITableView, numberOfRowsInSection section: Int) -> Int {
return books.count
}
override func tableView(tableView: UITableView, cellForRowAtIndexPath indexPath: NSIndexPath) -> UITableViewCell {
let cell = tableView.dequeueReusableCellWithIdentifier("Cell", forIndexPath: indexPath)
let book = books[indexPath.row]
cell.textLabel?.text = book.bookTitle
cell.detailTextLabel?.text = book.bookAuthor
return cell
}-
このメソッドは、解析オブジェクトが「
」の開始タグに遭遇するとトリガーされます -
このメソッドは、解析オブジェクトが「
」の終了タグに遭遇するとトリガーされます -
ここで実際に解析処理が実行されます。タイトルと著者のタグが解析され、対応する変数が初期化されます。
// 1
func parser(parser: NSXMLParser, didStartElement elementName: String, namespaceURI: String?,
qualifiedName qName: String?, attributes attributeDict: [String : String]) {
    eName = elementName
    if elementName == "book" {
        bookTitle = String()
        bookAuthor = String()
    }
}

// 2
func parser(parser: NSXMLParser, didEndElement elementName: String, namespaceURI: String?, qualifiedName qName: String?) {
    if elementName == "book" {

    let book = Book()
    book.bookTitle = bookTitle
    book.bookAuthor = bookAuthor

    books.append(book)
    }
}

// 3
func parser(parser: NSXMLParser, foundCharacters string: String) {
    let data = string.stringByTrimmingCharactersInSet(NSCharacterSet.whitespaceAndNewlineCharacterSet())

    if (!data.isEmpty) {
        if eName == "title" {
            bookTitle += data
        } else if eName == "author" {
            bookAuthor += data
        }
    }
}
プロジェクトをビルドして実行します。 TableViewController ですべての書籍のタイトルと著者を確認できます。 
以上がXML 解析 (グラフィックスとテキスト) の詳細な紹介の詳細内容です。詳細については、PHP 中国語 Web サイトの他の関連記事を参照してください。

ホットAIツール

Undresser.AI Undress
リアルなヌード写真を作成する AI 搭載アプリ

AI Clothes Remover
写真から衣服を削除するオンライン AI ツール。

Undress AI Tool
脱衣画像を無料で

Clothoff.io
AI衣類リムーバー

AI Hentai Generator
AIヘンタイを無料で生成します。

人気の記事

ホットツール

メモ帳++7.3.1
使いやすく無料のコードエディター

SublimeText3 中国語版
中国語版、とても使いやすい

ゼンドスタジオ 13.0.1
強力な PHP 統合開発環境

ドリームウィーバー CS6
ビジュアル Web 開発ツール

SublimeText3 Mac版
神レベルのコード編集ソフト(SublimeText3)

ホットトピック
 7564
7564
 15
15
 1386
1386
 52
52
 87
87
 11
11
 28
28
 100
100
 携帯電話でXMLをPDFに変換するとき、変換速度は高速ですか?
Apr 02, 2025 pm 10:09 PM
Mobile XMLからPDFへの速度は、次の要因に依存します。XML構造の複雑さです。モバイルハードウェア構成変換方法(ライブラリ、アルゴリズム)コードの品質最適化方法(効率的なライブラリ、アルゴリズムの最適化、キャッシュデータ、およびマルチスレッドの利用)。全体として、絶対的な答えはなく、特定の状況に従って最適化する必要があります。
 携帯電話のXMLファイルをPDFに変換する方法は?
Apr 02, 2025 pm 10:12 PM
単一のアプリケーションで携帯電話でXMLからPDF変換を直接完了することは不可能です。クラウドサービスを使用する必要があります。クラウドサービスは、2つのステップで達成できます。1。XMLをクラウド内のPDFに変換し、2。携帯電話の変換されたPDFファイルにアクセスまたはダウンロードします。
 携帯電話でXMLをPDFに変換する方法は?
Apr 02, 2025 pm 10:18 PM
携帯電話でXMLをPDFに直接変換するのは簡単ではありませんが、クラウドサービスの助けを借りて実現できます。軽量モバイルアプリを使用してXMLファイルをアップロードし、生成されたPDFを受信し、クラウドAPIで変換することをお勧めします。クラウドAPIはサーバーレスコンピューティングサービスを使用し、適切なプラットフォームを選択することが重要です。 XMLの解析とPDF生成を処理する際には、複雑さ、エラー処理、セキュリティ、および最適化戦略を考慮する必要があります。プロセス全体では、フロントエンドアプリとバックエンドAPIが連携する必要があり、さまざまなテクノロジーをある程度理解する必要があります。
 XMLをPDFに変換できるモバイルアプリはありますか?
Apr 02, 2025 pm 08:54 PM
XMLをPDFに直接変換するアプリケーションは、2つの根本的に異なる形式であるため、見つかりません。 XMLはデータの保存に使用され、PDFはドキュメントを表示するために使用されます。変換を完了するには、PythonやReportLabなどのプログラミング言語とライブラリを使用して、XMLデータを解析してPDFドキュメントを生成できます。
 推奨されるXMLフォーマットツール
Apr 02, 2025 pm 09:03 PM
XMLフォーマットツールは、読みやすさと理解を向上させるために、ルールに従ってコードを入力できます。ツールを選択するときは、カスタマイズ機能、特別な状況の処理、パフォーマンス、使いやすさに注意してください。一般的に使用されるツールタイプには、オンラインツール、IDEプラグイン、コマンドラインツールが含まれます。
 web.xmlを開く方法
Apr 03, 2025 am 06:51 AM
web.xmlファイルを開くには、次の方法を使用できます。テキストエディター(メモ帳やテキストエディットなど)を使用して、統合開発環境(EclipseやNetBeansなど)を使用してコマンドを編集できます(Windows:Notepad web.xml; Mac/Linux:Open -A Textedit Web.xml)
 XML形式を開く方法
Apr 02, 2025 pm 09:00 PM
ほとんどのテキストエディターを使用して、XMLファイルを開きます。より直感的なツリーディスプレイが必要な場合は、酸素XMLエディターやXMLSPYなどのXMLエディターを使用できます。プログラムでXMLデータを処理する場合、プログラミング言語(Pythonなど)やXMLライブラリ(XML.ETREE.ELEMENTTREEなど)を使用して解析する必要があります。
 XMLでPDFをエクスポートする方法
Apr 03, 2025 am 06:45 AM
XMLをPDFにエクスポートするには、XSLTを使用し、XMLデータバインディングライブラリを使用する方法は2つあります。 XSLT:XSLT StyleSheetを作成し、XSLTプロセッサを使用してXMLデータを変換するPDF形式を指定します。 XMLデータバインディングライブラリ:XMLデータバインディングライブラリのインポートPDFドキュメントオブジェクトの作成XMLデータエクスポートPDFファイル。 PDFファイルに適している方法は、要件に依存します。 XSLTは柔軟性を提供しますが、データバインディングライブラリは簡単に実装できます。単純な変換のために、データバインディングライブラリの方が優れており、複雑な変換の場合、XSLTがより適しています。


