

美しいステップバイステップの登録およびログイン フォームを実装するための HTML5/CSS3 サンプル コードの共有

主にユーザー エクスペリエンスを向上させるために、段階的なログインおよび登録フォームが追加され、ユーザーが多数のフォームを見て躊躇することがないよう、対応するフォーム情報を選択して入力できるようになりました。今日皆さんに共有するのは、HTML5 と CSS3 に基づいたステップバイステップの登録およびログイン フォームです。言うまでもなく、非常に美しく見えます。 DEMOを見ればすぐにわかります。
次に、実装プロセスを見ていきます。コードは少し複雑で、主に HTML コード、CSS3 コード、Javascript コードで構成されています。
HTML コード:
<form id="msform">
<!-- progressbar -->
<ul id="progressbar">
<li>Account Setup</li>
<li>Social Profiles</li>
<li>Personal Details</li>
</ul>
<!-- fieldsets -->
<fieldset>
<h2 id="Create-nbsp-your-nbsp-account">Create your account</h2>
<h3 id="This-nbsp-is-nbsp-step-nbsp">This is step 1</h3>
<input type="text" name="email" placeholder="Email" />
<input type="password" name="pass" placeholder="Password" />
<input type="password" name="cpass" placeholder="Confirm Password" />
<input type="button" name="next" value="Next" />
</fieldset>
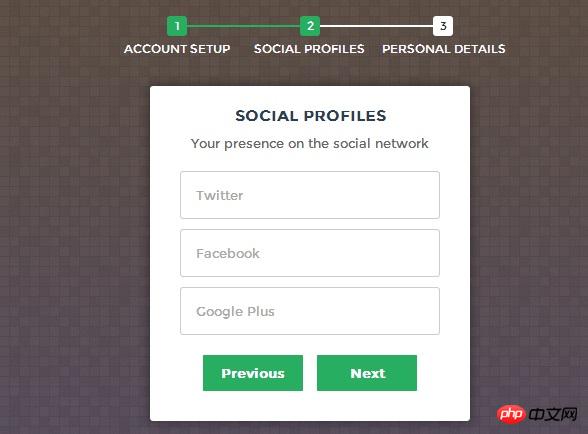
<fieldset>
<h2 id="Social-nbsp-Profiles">Social Profiles</h2>
<h3 id="Your-nbsp-presence-nbsp-on-nbsp-the-nbsp-social-nbsp-network">Your presence on the social network</h3>
<input type="text" name="twitter" placeholder="Twitter" />
<input type="text" name="facebook" placeholder="Facebook" />
<input type="text" name="gplus" placeholder="Google Plus" />
<input type="button" name="previous" value="Previous" />
<input type="button" name="next" value="Next" />
</fieldset>
<fieldset>
<h2 id="Personal-nbsp-Details">Personal Details</h2>
<h3 id="We-nbsp-will-nbsp-never-nbsp-sell-nbsp-it">We will never sell it</h3>
<input type="text" name="fname" placeholder="First Name" />
<input type="text" name="lname" placeholder="Last Name" />
<input type="text" name="phone" placeholder="Phone" />
<textarea name="address" placeholder="Address"></textarea>
<input type="button" name="previous" value="Previous" />
<input type="submit" name="submit" value="Submit" />
</fieldset></form>HTML コードはたくさんあるように見えますが、非常に単純で、主にフォームを記述しています。
CSS コード:
/*form styles*/#msform {
    width: 400px;
    margin: 50px auto;
    text-align: center;
    position: relative;
}#msform fieldset {
    background: white;
    border: 0 none;
    border-radius: 3px;
    box-shadow: 0 0 15px 1px rgba(0, 0, 0, 0.4);
    padding: 20px 30px;

    box-sizing: border-box;
    width: 80%;
    margin: 0 10%;    /*stacking fieldsets above each other*/
    position: absolute;
}/*Hide all except first fieldset*/#msform fieldset:not(:first-of-type) {
    display: none;
}/*inputs*/#msform input, #msform textarea {
    padding: 15px;
    border: 1px solid #ccc;
    border-radius: 3px;
    margin-bottom: 10px;
    width: 100%;
    box-sizing: border-box;
    font-family: montserrat;
    color: #2C3E50;
    font-size: 13px;
}/*buttons*/#msform .action-button {
    width: 100px;
    background: #27AE60;
    font-weight: bold;
    color: white;
    border: 0 none;
    border-radius: 1px;
    cursor: pointer;
    padding: 10px 5px;
    margin: 10px 5px;
}#msform .action-button:hover, #msform .action-button:focus {
    box-shadow: 0 0 0 2px white, 0 0 0 3px #27AE60;
}/*headings*/.fs-title {
    font-size: 15px;
    text-transform: uppercase;
    color: #2C3E50;
    margin-bottom: 10px;
}.fs-subtitle {
    font-weight: normal;
    font-size: 13px;
    color: #666;
    margin-bottom: 20px;
}/*progressbar*/#progressbar {
    margin-bottom: 30px;
    overflow: hidden;    /*CSS counters to number the steps*/
    counter-reset: step;
}#progressbar li {
    list-style-type: none;
    color: white;
    text-transform: uppercase;
    font-size: 9px;
    width: 33.33%;
    float: left;
    position: relative;
}#progressbar li:before {
    content: counter(step);
    counter-increment: step;
    width: 20px;
    line-height: 20px;
    display: block;
    font-size: 10px;
    color: #333;
    background: white;
    border-radius: 3px;
    margin: 0 auto 5px auto;
}/*progressbar connectors*/#progressbar li:after {
    content: '';
    width: 100%;
    height: 2px;
    background: white;
    position: absolute;
    left: -50%;
    top: 9px;
    z-index: -1;
    /*put it behind the numbers*/}
    #progressbar li:first-child:after {
    /*connector not needed before the first step*/
    content: none;
}
/*marking active/completed steps green*/
/*The number of the step and the connector before it = green*/
#progressbar li.active:before,
#progressbar li.active:after{
    background: #27AE60;
    color: white;
}ここでは、フォームをレンダリングするための CSS コードを投稿しました。これにより、フォームが非常に新鮮で自然に見えます。もう 1 つの注意点は、ここでは CSS3 の :before 属性 を使用していることです。
最後は、登録フォームのステップジャンプを実現できるJavaScriptコードです。
Javascript コード:
var current_fs, next_fs, previous_fs; //fieldsets
var left, opacity, scale; //fieldset properties which we will animate
var animating; //flag to prevent quick multi-click glitches

$(".next").click(function(){
    if(animating) return false;
    animating = true;

    current_fs = $(this).parent();
    next_fs = $(this).parent().next();

    //activate next step on progressbar using the index of next_fs
    $("#progressbar li").eq($("fieldset").index(next_fs)).addClass("active");

    //show the next fieldset
    next_fs.show();
    //hide the current fieldset with style
    current_fs.animate({opacity: 0}, {
        step: function(now, mx) {
            //as the opacity of current_fs reduces to 0 - stored in "now"
            //1. scale current_fs down to 80%
            scale = 1 - (1 - now) * 0.2;
            //2. bring next_fs from the right(50%)
            left = (now * 50)+"%";
            //3. increase opacity of next_fs to 1 as it moves in
            opacity = 1 - now;
            current_fs.css({'transform': 'scale('+scale+')'});
            next_fs.css({'left': left, 'opacity': opacity});
        },
        duration: 800,
        complete: function(){
            current_fs.hide();
            animating = false;
        },
        //this comes from the custom easing plugin
        easing: 'easeInOutBack'
    });
});

$(".previous").click(function(){
    if(animating) return false;
    animating = true;

    current_fs = $(this).parent();
    previous_fs = $(this).parent().prev();

    //de-activate current step on progressbar
    $("#progressbar li").eq($("fieldset").index(current_fs)).removeClass("active");

    //show the previous fieldset
    previous_fs.show();
    //hide the current fieldset with style
    current_fs.animate({opacity: 0}, {
        step: function(now, mx) {
            //as the opacity of current_fs reduces to 0 - stored in "now"
            //1. scale previous_fs from 80% to 100%
            scale = 0.8 + (1 - now) * 0.2;
            //2. take current_fs to the right(50%) - from 0%
            left = ((1-now) * 50)+"%";
            //3. increase opacity of previous_fs to 1 as it moves in
            opacity = 1 - now;
            current_fs.css({'left': left});
            previous_fs.css({'transform': 'scale('+scale+')', 'opacity': opacity});
        },
        duration: 800,
        complete: function(){
            current_fs.hide();
            animating = false;
        },
        //this comes from the custom easing plugin
        easing: 'easeInOutBack'
    });
});

$(".submit").click(function(){
    return false;
})ここでは、jQuery コードの使用が非常に簡単になっていることがわかります。主に次、前、送信の 3 つのイベントがあり、同時に jQuery を使用して、次と前でフェードインとフェードアウトのアニメーション効果を実現します。最後に、ソースコードをダウンロードすることもできます。
以上が美しいステップバイステップの登録およびログイン フォームを実装するための HTML5/CSS3 サンプル コードの共有の詳細内容です。詳細については、PHP 中国語 Web サイトの他の関連記事を参照してください。

ホットAIツール

Undresser.AI Undress
リアルなヌード写真を作成する AI 搭載アプリ

AI Clothes Remover
写真から衣服を削除するオンライン AI ツール。

Undress AI Tool
脱衣画像を無料で

Clothoff.io
AI衣類リムーバー

Video Face Swap
完全無料の AI 顔交換ツールを使用して、あらゆるビデオの顔を簡単に交換できます。

人気の記事
ホットツール

メモ帳++7.3.1
使いやすく無料のコードエディター

SublimeText3 中国語版
中国語版、とても使いやすい

ゼンドスタジオ 13.0.1
強力な PHP 統合開発環境

ドリームウィーバー CS6
ビジュアル Web 開発ツール

SublimeText3 Mac版
神レベルのコード編集ソフト(SublimeText3)
ホットトピック
 7638
7638
 15
1391
52
90
11
32
150
15
1391
52
90
11
32
150

 HTMLの表の境界線
Sep 04, 2024 pm 04:49 PM
HTMLの表の境界線
Sep 04, 2024 pm 04:49 PM
HTML の表の境界線に関するガイド。ここでは、HTML でのテーブルの境界線の例を示しながら、テーブル境界線を定義する複数の方法について説明します。
 HTML のネストされたテーブル
Sep 04, 2024 pm 04:49 PM
HTML のネストされたテーブル
Sep 04, 2024 pm 04:49 PM
これは、HTML でのネストされたテーブルのガイドです。ここでは、テーブル内にテーブルを作成する方法をそれぞれの例とともに説明します。
 HTML 左マージン
Sep 04, 2024 pm 04:48 PM
HTML 左マージン
Sep 04, 2024 pm 04:48 PM
HTML マージン左のガイド。ここでは、HTML margin-left の概要とその例、およびそのコード実装について説明します。
 HTML テーブルのレイアウト
Sep 04, 2024 pm 04:54 PM
HTML テーブルのレイアウト
Sep 04, 2024 pm 04:54 PM
HTML テーブル レイアウトのガイド。ここでは、HTML テーブル レイアウトの値と例および出力について詳しく説明します。
 HTML入力プレースホルダー
Sep 04, 2024 pm 04:54 PM
HTML入力プレースホルダー
Sep 04, 2024 pm 04:54 PM
HTML 入力プレースホルダーのガイド。ここでは、コードと出力とともに HTML 入力プレースホルダーの例について説明します。
 HTML 内のテキストの移動
Sep 04, 2024 pm 04:45 PM
HTML 内のテキストの移動
Sep 04, 2024 pm 04:45 PM
HTML でのテキストの移動に関するガイド。ここでは、概要、マーキー タグが構文でどのように機能するか、および実装例について説明します。

 HTML の onclick ボタン
Sep 04, 2024 pm 04:49 PM
HTML の onclick ボタン
Sep 04, 2024 pm 04:49 PM
HTML オンクリック ボタンのガイド。ここでは、それらの紹介、動作、例、およびさまざまなイベントでの onclick イベントについてそれぞれ説明します。
