
 バックエンド開発
PHPチュートリアル
CentOS7 で Nginx と PHP7-FPM を使用して Nextcloud をインストールする方法に関する詳細なグラフィック チュートリアル
バックエンド開発
PHPチュートリアル
CentOS7 で Nginx と PHP7-FPM を使用して Nextcloud をインストールする方法に関する詳細なグラフィック チュートリアル
CentOS7 で Nginx と PHP7-FPM を使用して Nextcloud をインストールする方法に関する詳細なグラフィック チュートリアル

この記事では主に、CentOS7にNginxとPHP7-FPMを使用してNextcloudをインストールする方法を詳しく紹介します。NginxとPHP7-FPMを通じてNextcloudを実行し、データベースシステムとしてMariaDBを使用します。
Nextcloud は、ownCloud ブランチから進化した、無料 (オープンソース) Dropbox のようなソフトウェアです。 PHP と Javascript で書かれており、MySQL/MariaDB、PostgreSQL、Oracle Database、SQLite などの複数のデータベース システムをサポートしています。 Nextcloud は、デスクトップ システムとクラウド サーバー内のファイルを同期した状態に保つことができ、Windows、Linux、Mac、Android、Apple 携帯電話のクライアント サポートを提供します。 Nextcloud は単なる Dropbox クローンではなく、カレンダー、連絡先、スケジュールされたタスク、ストリーミング メディア Ampache などの多くの追加機能も提供します。
この記事では、CentOS 7 サーバーに最新バージョンの Nextcloud 10 をインストールして構成する方法を説明します。 Nginx と PHP7-FPM を通じて Nextcloud を実行し、データベース システムとして MariaDB を使用します。
前提条件
64 ビット CentOS 7
サーバーへの root アクセス
ステップ 1 - CentOS 7 に Nginx と PHP7-FPM をインストールする
Nginx および php7 より前のインストール - fpm では、最初に EPEL パッケージのウェアハウス ソースを追加する必要もあります。次のコマンドを使用します:
yum -y install epel-release
次に、EPEL リポジトリから Nginx のインストールを開始します:
yum -y install nginx
次に、php7-fpm 用の別のリポジトリを追加する必要があります。インターネット上には PHP 7 シリーズ パッケージを提供するリモート リポジトリが多数ありますが、ここでは webtatic を使用します。
PHP7-FPM Webtatic リポジトリを追加します:
rpm -Uvh https://mirror.webtatic.com/yum/el7/webtatic-release.rpm
次に、PHP7-FPM と Nextcloud に必要ないくつかのパッケージをインストールします。
コードは次のとおりです:
yum -y install php70w-fpm php70w-cli php70w-gd php70w-mcrypt php70w-mysql php70w-pear
php70w-xml php70w-mbstring php70w-pdo php70w-json php70w-pecl-apcu php70w-pecl-apcu-devel
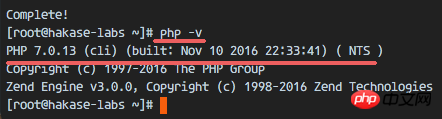
最後に、サーバー端末から PHP のバージョン番号を確認して、PHP が正しくインストールされているかどうかを確認します。
php -v
ステップ 2 - PHP7-FPM を構成する
このステップでは、Nginx と連携して実行するように php-fpm を構成します。 Php7-fpm は nginx ユーザーとして実行され、9000 ポートでリッスンします。 nginx 用户来运行,并监听 9000 端口。
使用 vim 编辑默认的 php7-fpm 配置文件。
vim /etc/php-fpm.d/www.conf
在第 8 行和第 10行,user 和 group 赋值为 nginx。
user = nginx
group = nginx
在第 22 行,确保 php-fpm 运行在指定端口。
listen = 127.0.0.1:9000
取消第 366-370 行的注释,启用 php-fpm 的系统环境变量。
env[HOSTNAME] = $HOSTNAME
env[PATH] = /usr/local/bin:/usr/bin:/bin
env[TMP] = /tmp
env[TMPDIR] = /tmp
env[TEMP] = /tmp
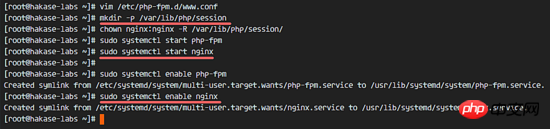
下一步,就是在 /var/lib/ 目录下创建一个新的文件夹 <a href="http://www.php.cn/php/php-tp-session.html" target="_blank">session</a>,并将其拥有者变更为 nginx 用户。
mkdir -p /var/lib/php/session
chown nginx:nginx -R /var/lib/php/session/
然后启动 php-fpm 和 Nginx,并且将它们设置为随开机启动的服务。
sudo systemctl start php-fpm
sudo systemctl start nginx
sudo systemctl enable php-fpm
sudo systemctl enable nginx
PHP7-FPM 配置完成
步骤 3 - 安装和配置 MariaDB
我这里使用 MariaDB 作为 Nextcloud 的数据库。可以直接使用 yum 命令从 CentOS 默认远程仓库中安装 mariadb-server 包。
yum -y install mariadb mariadb-server
启动 MariaDB,并将其添加到随系统启动的服务中去。
systemctl start mariadb
systemctl enable mariadb
现在开始配置 MariaDB 的 root 用户密码。
mysql_secure_installation
键入 Y ,然后设置 MariaDB 的 root 密码。
Set root password? [Y/n] Y
New password:
Re-enter new password:
Remove anonymous users? [Y/n] Y
Disallow root login remotely? [Y/n] Y
Remove test database and access to it? [Y/n] Y
Reload privilege tables now? [Y/n] Y
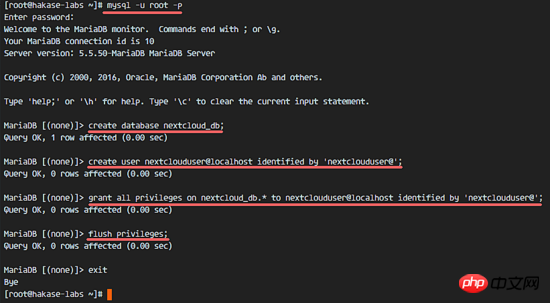
这样就设置好了密码,现在登录到 mysql shell 并为 Nextcloud 创建一个新的数据库和用户。这里我创建名为 nextcloud_db 的数据库以及名为 nextclouduser 的用户,用户密码为 nextclouduser@ 。当然了,要给你自己的系统选用一个更安全的密码。
mysql -u root -p
输入 MariaDB 的 root 密码,即可登录 mysql shell。
输入以下 mysql 查询语句来创建新的数据库和用户。
create database nextcloud_db;
create user nextclouduser@localhost identified by 'nextclouduser@';
grant all privileges on nextcloud_db.* to nextclouduser@localhost identified by 'nextclouduser@';
flush privileges;
nextcloud_db 数据库和 nextclouduser
mkdir -p /etc/nginx/cert/
user と group に nginx の値が割り当てられています。 🎜openssl req -new -x509 -days 365 -nodes -out /etc/nginx/cert/nextcloud.crt -keyout /etc/nginx/cert/nextcloud.key
chmod 700 /etc/nginx/cert
chmod 600 /etc/nginx/cert/*
yum -y install wget unzip
/var/lib/ ディレクトリの下に新しいフォルダー <a href="http://www.php.cn/php/php-tp" を作成することです - session.html" target="_blank">セッション🎜 を開き、その所有者を nginx ユーザーに変更します。 🎜cd /tmp wget https://download.nextcloud.com/server/releases/nextcloud-10.0.2.zip
unzip nextcloud-10.0.2.zip mv nextcloud/ /usr/share/nginx/html/
🎜🎜🎜PHP7-FPM の設定が完了しました🎜🎜🎜ステップ 3 - MariaDBのインストールと設定🎜🎜🎜🎜 NextcloudのデータベースとしてMariaDBを使用しています。 yum コマンドを直接使用して、CentOS のデフォルトのリモート リポジトリから mariadb-server パッケージをインストールできます。 🎜cd /usr/share/nginx/html/ mkdir -p nextcloud/data/
chown nginx:nginx -R nextcloud/
cd /etc/nginx/conf.d/ vim nextcloud.conf
Y 」と入力し、MariaDB の root パスワードを設定します。 🎜upstream php-handler {
server 127.0.0.1:9000;
#server unix:/var/run/php5-fpm.sock;
}
server {
listen 80;
server_name cloud.nextcloud.co;
# enforce https
return 301 https://$server_name$request_uri;
}
server {
listen 443 ssl;
server_name cloud.nextcloud.co;
ssl_certificate /etc/nginx/cert/nextcloud.crt;
ssl_certificate_key /etc/nginx/cert/nextcloud.key;
# Add headers to serve security related headers
# Before enabling Strict-Transport-Security headers please read into this
# topic first.
add_header Strict-Transport-Security "max-age=15768000;
includeSubDomains; preload;";
add_header X-Content-Type-Options nosniff;
add_header X-Frame-Options "SAMEORIGIN";
add_header X-XSS-Protection "1; mode=block";
add_header X-Robots-Tag none;
add_header X-Download-Options noopen;
add_header X-Permitted-Cross-Domain-Policies none;
# Path to the root of your installation
root /usr/share/nginx/html/nextcloud/;
location = /robots.txt {
allow all;
log_not_found off;
access_log off;
}
# The following 2 rules are only needed for the user_webfinger app.
# Uncomment it if you're planning to use this app.
#rewrite ^/.well-known/host-meta /public.php?service=host-meta last;
#rewrite ^/.well-known/host-meta.json /public.php?service=host-meta-json
# last;
location = /.well-known/carddav {
return 301 $scheme://$host/remote.php/dav;
}
location = /.well-known/caldav {
return 301 $scheme://$host/remote.php/dav;
}
# set max upload size
client_max_body_size 512M;
fastcgi_buffers 64 4K;
# Disable gzip to avoid the removal of the ETag header
gzip off;
# Uncomment if your server is build with the ngx_pagespeed module
# This module is currently not supported.
#pagespeed off;
error_page 403 /core/templates/403.php;
error_page 404 /core/templates/404.php;
location / {
rewrite ^ /index.php$uri;
}
location ~ ^/(?:build|tests|config|lib|3rdparty|templates|data)/ {
deny all;
}
location ~ ^/(?:\.|autotest|occ|issue|indie|db_|console) {
deny all;
}
location ~ ^/(?:index|remote|public|cron|core/ajax/update|status|ocs/v[12]|updater/.+|ocs-provider/.+|core/templates/40[34])\.php(?:$|/) {
include fastcgi_params;
fastcgi_split_path_info ^(.+\.php)(/.*)$;
fastcgi_param script_FILENAME $document_root$fastcgi_script_name;
fastcgi_param PATH_INFO $fastcgi_path_info;
fastcgi_param HTTPS on;
#Avoid sending the security headers twice
fastcgi_param modHeadersAvailable true;
fastcgi_param front_controller_active true;
fastcgi_pass php-handler;
fastcgi_intercept_errors on;
fastcgi_request_buffering off;
}
location ~ ^/(?:updater|ocs-provider)(?:$|/) {
try_files $uri/ =404;
index index.php;
}
# Adding the cache control header for js and css files
# Make sure it is BELOW the PHP block
location ~* \.(?:css|js)$ {
try_files $uri /index.php$uri$is_args$args;
add_header Cache-Control "public, max-age=7200";
# Add headers to serve security related headers (It is intended to
# have those duplicated to the ones above)
# Before enabling Strict-Transport-Security headers please read into
# this topic first.
add_header Strict-Transport-Security "max-age=15768000;
includeSubDomains; preload;";
add_header X-Content-Type-Options nosniff;
add_header X-Frame-Options "SAMEORIGIN";
add_header X-XSS-Protection "1; mode=block";
add_header X-Robots-Tag none;
add_header X-Download-Options noopen;
add_header X-Permitted-Cross-Domain-Policies none;
# Optional: Don't log access to assets
access_log off;
}
location ~* \.(?:svg|gif|png|html|ttf|woff|ico|jpg|jpeg)$ {
try_files $uri /index.php$uri$is_args$args;
# Optional: Don't log access to other assets
access_log off;
}
}nextcloud_db という名前のデータベースと nextclouduser という名前のユーザーを、ユーザー パスワード nextclouduser@ で作成します。もちろん、システムにはより安全なパスワードを選択してください。 🎜nginx -t systemctl restart nginx
yum -y install policycoreutils-python
🎜🎜🎜nextcloud_db データベースと< code>nextclouduser データベースユーザーが作成されました🎜步骤 4 - 为 Nextcloud 生成一个自签名 SSL 证书
在教程中,我会让客户端以 https 连接来运行 Nextcloud。你可以使用诸如 let's encrypt 等免费 SSL 证书,或者是自己创建自签名 (self signed) SSL 证书。这里我使用 OpenSSL 来创建自己的自签名 SSL 证书。
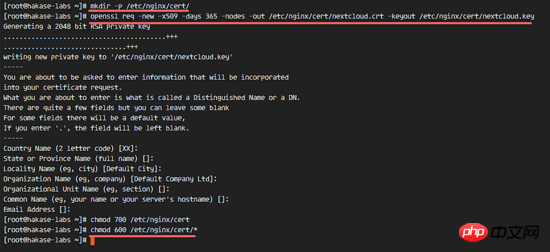
为 SSL 文件创建新目录:
mkdir -p /etc/nginx/cert/
如下,使用 openssl 生成一个新的 SSL 证书。
代码如下:
openssl req -new -x509 -days 365 -nodes -out /etc/nginx/cert/nextcloud.crt -keyout /etc/nginx/cert/nextcloud.key
最后使用 chmod 命令将所有证书文件的权限设置为 600。
chmod 700 /etc/nginx/cert chmod 600 /etc/nginx/cert/*
步骤 5 - 下载和安装 Nextcloud
我直接使用 wget 命令下载 Nextcloud 到服务器上,因此需要先行安装 wget。此外,还需要安装 unzip 来进行解压。使用 yum 命令来安装这两个程序。
yum -y install wget unzip
先进入 /tmp 目录,然后使用 wget 从官网下载最新的 Nextcloud 10。
cd /tmp
wget https://download.nextcloud.com/server/releases/nextcloud-10.0.2.zip
解压 Nextcloud,并将其移动到 /usr/share/nginx/html/ 目录。
unzip nextcloud-10.0.2.zip
mv nextcloud/ /usr/share/nginx/html/
下一步,转到 Nginx 的 web 根目录为 Nextcloud 创建一个 data 文件夹。
cd /usr/share/nginx/html/
mkdir -p nextcloud/data/
变更 nextcloud 目录的拥有者为 nginx 用户和组。
chown nginx:nginx -R nextcloud/
步骤 6 - 在 Nginx 中为 Nextcloud 配置虚拟主机
在步骤 5 我们已经下载好了 Nextcloud 源码,并配置好了让它运行于 Nginx 服务器中,但我们还需要为它配置一个虚拟主机。在 Nginx 的 conf.d 目录下创建一个新的虚拟主机配置文件 nextcloud.conf。
cd /etc/nginx/conf.d/
vim nextcloud.conf
将以下内容粘贴到虚拟主机配置文件中:
upstream php-handler {
  server 127.0.0.1:9000;
  #server unix:/var/run/php5-fpm.sock;
}
server {
  listen 80;
  server_name cloud.nextcloud.co;
  # enforce https
  return 301 https://$server_name$request_uri;
}
server {
  listen 443 ssl;
  server_name cloud.nextcloud.co;
  ssl_certificate /etc/nginx/cert/nextcloud.crt;
  ssl_certificate_key /etc/nginx/cert/nextcloud.key;
  # Add headers to serve security related headers
  # Before enabling Strict-Transport-Security headers please read into this
  # topic first.
  add_header Strict-Transport-Security "max-age=15768000;
  includeSubDomains; preload;";
  add_header X-Content-Type-Options nosniff;
  add_header X-Frame-Options "SAMEORIGIN";
  add_header X-XSS-Protection "1; mode=block";
  add_header X-Robots-Tag none;
  add_header X-Download-Options noopen;
  add_header X-Permitted-Cross-Domain-Policies none;
  # Path to the root of your installation
  root /usr/share/nginx/html/nextcloud/;
  location = /robots.txt {
    allow all;
    log_not_found off;
    access_log off;
  }
  # The following 2 rules are only needed for the user_webfinger app.
  # Uncomment it if you're planning to use this app.
  #rewrite ^/.well-known/host-meta /public.php?service=host-meta last;
  #rewrite ^/.well-known/host-meta.json /public.php?service=host-meta-json
  # last;
  location = /.well-known/carddav {
   return 301 $scheme://$host/remote.php/dav;
  }
  location = /.well-known/caldav {
   return 301 $scheme://$host/remote.php/dav;
  }
  # set max upload size
  client_max_body_size 512M;
  fastcgi_buffers 64 4K;
  # Disable gzip to avoid the removal of the ETag header
  gzip off;
  # Uncomment if your server is build with the ngx_pagespeed module
  # This module is currently not supported.
  #pagespeed off;
  error_page 403 /core/templates/403.php;
  error_page 404 /core/templates/404.php;
  location / {
    rewrite ^ /index.php$uri;
  }
  location ~ ^/(?:build|tests|config|lib|3rdparty|templates|data)/ {
    deny all;
  }
  location ~ ^/(?:\.|autotest|occ|issue|indie|db_|console) {
    deny all;
  }
  location ~ ^/(?:index|remote|public|cron|core/ajax/update|status|ocs/v[12]|updater/.+|ocs-provider/.+|core/templates/40[34])\.php(?:$|/) {
    include fastcgi_params;
    fastcgi_split_path_info ^(.+\.php)(/.*)$;
    fastcgi_param script_FILENAME $document_root$fastcgi_script_name;
    fastcgi_param PATH_INFO $fastcgi_path_info;
    fastcgi_param HTTPS on;
    #Avoid sending the security headers twice
    fastcgi_param modHeadersAvailable true;
    fastcgi_param front_controller_active true;
    fastcgi_pass php-handler;
    fastcgi_intercept_errors on;
    fastcgi_request_buffering off;
  }
  location ~ ^/(?:updater|ocs-provider)(?:$|/) {
    try_files $uri/ =404;
    index index.php;
  }
  # Adding the cache control header for js and css files
  # Make sure it is BELOW the PHP block
  location ~* \.(?:css|js)$ {
    try_files $uri /index.php$uri$is_args$args;
    add_header Cache-Control "public, max-age=7200";
    # Add headers to serve security related headers (It is intended to
    # have those duplicated to the ones above)
    # Before enabling Strict-Transport-Security headers please read into
    # this topic first.
    add_header Strict-Transport-Security "max-age=15768000;
    includeSubDomains; preload;";
    add_header X-Content-Type-Options nosniff;
    add_header X-Frame-Options "SAMEORIGIN";
    add_header X-XSS-Protection "1; mode=block";
    add_header X-Robots-Tag none;
    add_header X-Download-Options noopen;
    add_header X-Permitted-Cross-Domain-Policies none;
    # Optional: Don't log access to assets
    access_log off;
  }
  location ~* \.(?:svg|gif|png|html|ttf|woff|ico|jpg|jpeg)$ {
    try_files $uri /index.php$uri$is_args$args;
    # Optional: Don't log access to other assets
    access_log off;
  }
}保存文件并退出 vim。
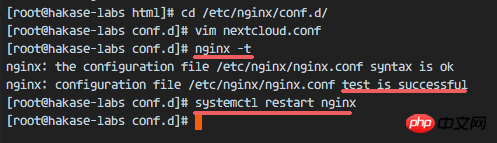
下载测试以下该 Nginx 配置文件是否有错误,没有的话就可以重启服务了。
nginx -t
systemctl restart nginx
步骤 7 - 为 Nextcloud 配置 SELinux 和 FirewallD 规则
本教程中,我们将以强制模式运行 SELinux,因此需要一个 SELinux 管理工具来为 Nextcloud 配置 SELinux。
使用以下命令安装 SELinux 管理工具。
yum -y install policycoreutils-python
然后以 root 用户来运行以下命令,以便让 Nextcloud 运行于 SELinux 环境之下。如果你是用的其他名称的目录,记得将 nextcloud 替换掉。
semanage fcontext -a -t httpd_sys_rw_content_t '/usr/share/nginx/html/nextcloud/data(/.*)?'
semanage fcontext -a -t httpd_sys_rw_content_t '/usr/share/nginx/html/nextcloud/config(/.*)?'
semanage fcontext -a -t httpd_sys_rw_content_t '/usr/share/nginx/html/nextcloud/apps(/.*)?'
semanage fcontext -a -t httpd_sys_rw_content_t '/usr/share/nginx/html/nextcloud/assets(/.*)?'
semanage fcontext -a -t httpd_sys_rw_content_t '/usr/share/nginx/html/nextcloud/.htaccess'
semanage fcontext -a -t httpd_sys_rw_content_t '/usr/share/nginx/html/nextcloud/.user.ini'
restorecon -Rv '/usr/share/nginx/html/nextcloud/'
接下来,我们要启用 firewalld 服务,同时为 Nextcloud 开启 http 和 https 端口。
启动 firewalld 并设置随系统启动。
systemctl start firewalld
systemctl enable firewalld
现在使用 firewall-cmd 命令来开启 http 和 https 端口,然后重新加载防火墙。
firewall-cmd --permanent --add-service=http
firewall-cmd --permanent --add-service=https
firewall-cmd --reload
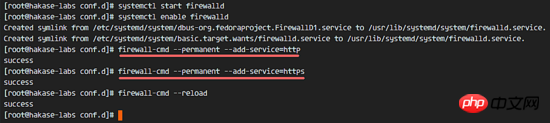
至此,服务器配置完成。
步骤 8 - Nextcloud 安装
打开你的 Web 浏览器,输入你为 Nextcloud 设置的域名,我这里设置为 cloud.nextcloud.co,然后会重定向到安全性更好的 https 连接。
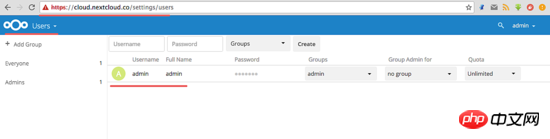
设置你的管理员用户名和密码,然后输入数据验证信息,点击 '完成安装 (Finish Setup)'。
Nextcloud 安装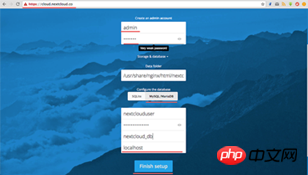
Nextcloud 管理面板大致如下:
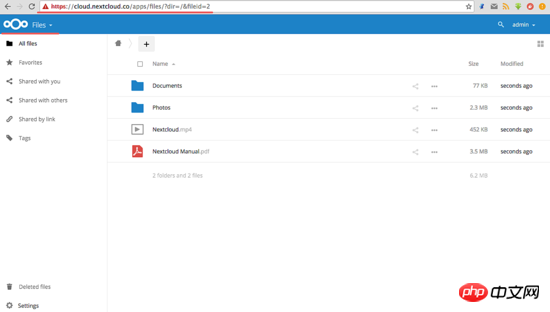
Nextcloud 用户设置:
管理设置:
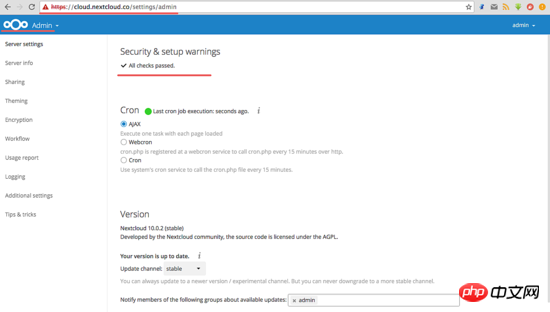
至此,我们在 CentOS 7 服务器上通过使用 Nginx、PHP7-FPM、MariaDB 完成了 Nextcloud 的安装。希望对大家的学习有所帮助,也希望大家多多支持脚本之家。
以上がCentOS7 で Nginx と PHP7-FPM を使用して Nextcloud をインストールする方法に関する詳細なグラフィック チュートリアルの詳細内容です。詳細については、PHP 中国語 Web サイトの他の関連記事を参照してください。

ホットAIツール

Undresser.AI Undress
リアルなヌード写真を作成する AI 搭載アプリ

AI Clothes Remover
写真から衣服を削除するオンライン AI ツール。

Undress AI Tool
脱衣画像を無料で

Clothoff.io
AI衣類リムーバー

AI Hentai Generator
AIヘンタイを無料で生成します。

人気の記事
ホットツール

メモ帳++7.3.1
使いやすく無料のコードエディター

SublimeText3 中国語版
中国語版、とても使いやすい

ゼンドスタジオ 13.0.1
強力な PHP 統合開発環境

ドリームウィーバー CS6
ビジュアル Web 開発ツール

SublimeText3 Mac版
神レベルのコード編集ソフト(SublimeText3)
ホットトピック
 7513
7513
 15
1378
52
78
11
19
64
15
1378
52
78
11
19
64

 Windowsでnginxを構成する方法
Apr 14, 2025 pm 12:57 PM
Windowsでnginxを構成する方法
Apr 14, 2025 pm 12:57 PM
Windowsでnginxを構成する方法は? nginxをインストールし、仮想ホスト構成を作成します。メイン構成ファイルを変更し、仮想ホスト構成を含めます。 nginxを起動またはリロードします。構成をテストし、Webサイトを表示します。 SSLを選択的に有効にし、SSL証明書を構成します。ファイアウォールを選択的に設定して、ポート80および443のトラフィックを許可します。
 Nginxが起動されているかどうかを確認する方法は?
Apr 14, 2025 pm 12:48 PM
Nginxが起動されているかどうかを確認する方法は?
Apr 14, 2025 pm 12:48 PM
Linuxでは、次のコマンドを使用して、nginxが起動されるかどうかを確認します。SystemCTLステータスNGINXコマンド出力に基づいて、「アクティブ:アクティブ(実行)」が表示された場合、NGINXが開始されます。 「アクティブ:非アクティブ(dead)」が表示されると、nginxが停止します。
 Nginxが開始されるかどうかを確認する方法
Apr 14, 2025 pm 01:03 PM
Nginxが開始されるかどうかを確認する方法
Apr 14, 2025 pm 01:03 PM
nginxが開始されるかどうかを確認する方法:1。コマンドラインを使用します:SystemCTLステータスnginx(Linux/unix)、netstat -ano | FindStr 80(Windows); 2。ポート80が開いているかどうかを確認します。 3.システムログのnginx起動メッセージを確認します。 4. Nagios、Zabbix、Icingaなどのサードパーティツールを使用します。
 nginx403を解く方法
Apr 14, 2025 am 10:33 AM
nginx403を解く方法
Apr 14, 2025 am 10:33 AM
Nginx 403禁止エラーを修正する方法は?ファイルまたはディレクトリの許可を確認します。 2。HTACCESSファイルを確認します。 3. nginx構成ファイルを確認します。 4。nginxを再起動します。他の考えられる原因には、ファイアウォールルール、Selinux設定、またはアプリケーションの問題が含まれます。
 Linuxでnginxを開始する方法
Apr 14, 2025 pm 12:51 PM
Linuxでnginxを開始する方法
Apr 14, 2025 pm 12:51 PM
Linuxでnginxを開始する手順:nginxがインストールされているかどうかを確認します。 systemctlを使用して、nginxを開始してnginxサービスを開始します。 SystemCTLを使用して、NGINXがシステムスタートアップでNGINXの自動起動を有効にすることができます。 SystemCTLステータスNGINXを使用して、スタートアップが成功していることを確認します。 Webブラウザのhttp:// localhostにアクセスして、デフォルトのウェルカムページを表示します。
 nginx403エラーを解く方法
Apr 14, 2025 pm 12:54 PM
nginx403エラーを解く方法
Apr 14, 2025 pm 12:54 PM
サーバーには、要求されたリソースにアクセスする許可がなく、NGINX 403エラーが発生します。ソリューションには以下が含まれます。ファイル許可を確認します。 .htaccess構成を確認してください。 nginx構成を確認してください。 SELINUXアクセス許可を構成します。ファイアウォールルールを確認してください。ブラウザの問題、サーバーの障害、その他の可能なエラーなど、他の原因をトラブルシューティングします。
 Nginxクロスドメインの問題を解決する方法
Apr 14, 2025 am 10:15 AM
Nginxクロスドメインの問題を解決する方法
Apr 14, 2025 am 10:15 AM
Nginxクロスドメインの問題を解決するには2つの方法があります。クロスドメイン応答ヘッダーの変更:ディレクティブを追加して、クロスドメイン要求を許可し、許可されたメソッドとヘッダーを指定し、キャッシュ時間を設定します。 CORSモジュールを使用します。モジュールを有効にし、CORSルールを構成して、ドメインクロスリクエスト、メソッド、ヘッダー、キャッシュ時間を許可します。
 nginx304エラーを解く方法
Apr 14, 2025 pm 12:45 PM
nginx304エラーを解く方法
Apr 14, 2025 pm 12:45 PM
質問への回答:304変更されていないエラーは、ブラウザがクライアントリクエストの最新リソースバージョンをキャッシュしたことを示しています。解決策:1。ブラウザのキャッシュをクリアします。 2.ブラウザキャッシュを無効にします。 3.クライアントキャッシュを許可するようにnginxを構成します。 4.ファイル許可を確認します。 5.ファイルハッシュを確認します。 6. CDNまたは逆プロキシキャッシュを無効にします。 7。nginxを再起動します。
