WeChat ミニ プログラム ユーザー データの復号化 (コレクション)
この記事は主にWeChatミニプログラムのユーザーデータ復号化の詳細な導入に関する関連情報を紹介します。必要な友人は
WeChatミニプログラムのユーザーデータ復号化
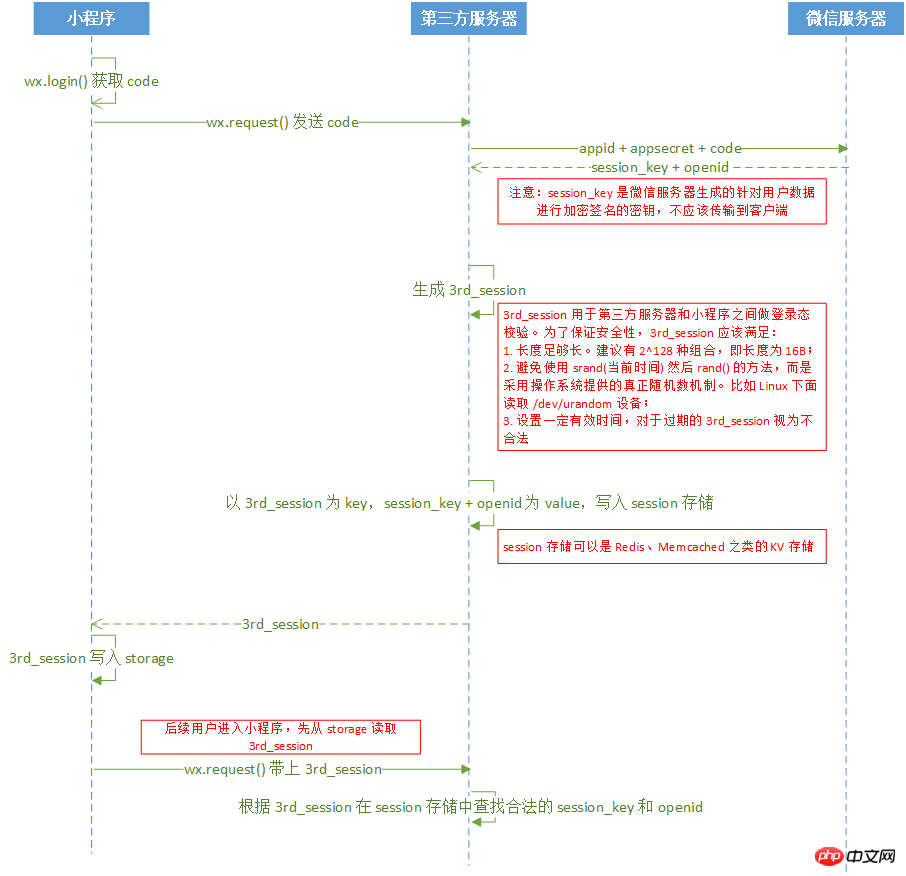
公式ガイドマップ:

ガイドを参照してください。ステップバイステップの操作
1. コードを取得します
onLoad: function (options) {
  // 页面初始化 options为页面跳转所带来的参数
  let that = this
  wx.login({
   success: function (res) {
    // success
    let code = res.code
    that.setData({ code: code })
    wx.getUserInfo({
     success: function (res) {
      // success
      that.setData({ userInfo: res.userInfo })
      that.setData({ iv: res.iv })
      that.setData({ encryptedData: res.encryptedData })
      that.get3rdSession()
     }
    })
   }
 })
}2. コードをサードパーティサーバーに送信し、3rd_session を取得します
get3rdSession:function(){
  let that = this
  wx.request({
   url: 'https://localhost:8443/get3rdSession',
   data: {
    code: this.data.code
   },
   method: 'GET', // OPTIONS, GET, HEAD, POST, PUT, DELETE, TRACE, CONNECT
   // header: {}, // 设置请求的 header
   success: function (res) {
    // success
    var sessionId = res.data.session;
    that.setData({ sessionId: sessionId })
    wx.setStorageSync('sessionId', sessionId)
    that.decodeUserInfo()
   }
  })
}3. session_key と引き換えにサードパーティサーバーを WeChat サーバーに送信し、openid
ここでは JFinal によって構築されたサーバーを使用します
Redis 構成
public void configPlugin(Plugins me) {
  //用于缓存userinfo模块的redis服务
  RedisPlugin userInfoRedis = new RedisPlugin("userInfo","localhost");
  me.add(userInfoRedis);
}サードパーティセッションを取得します
public void get3rdSession() {
  //获取名为userInfo的Redis Cache对象
  Cache userInfoCache = Redis.use("userInfo");
  String sessionId = "";
  JSONObject json = new JSONObject();
  String code = getPara("code");
  String url = "https://api.weixin.qq.com/sns/jscode2session?appid=wx7560b8008e2c445d&secret=f1af3312b7038513fd17dd9cbc3b357c&js_code=" + code + "&grant_type=authorization_code";
  //执行命令生成3rd_session
  String session = ExecLinuxCMDUtil.instance.exec("cat /dev/urandom |od -x | tr -d ' '| head -n 1").toString();
  json.put("session", session);
  //创建默认的httpClient实例
  CloseableHttpClient httpClient = getHttpClient();
  try {
    //用get方法发送http请求
    HttpGet get = new HttpGet(url);
    System.out.println("执行get请求:...." + get.getURI());
    CloseableHttpResponse httpResponse = null;
    //发送get请求
    httpResponse = httpClient.execute(get);
    try {
      //response实体
      HttpEntity entity = httpResponse.getEntity();
      if (null != entity) {
        String result = EntityUtils.toString(entity);
        System.out.println(result);
        JSONObject resultJson = JSONObject.fromObject(result);
        String session_key = resultJson.getString("session_key");
        String openid = resultJson.getString("openid");
        //session存储
        userInfoCache.set(session,session_key+","+openid);
        }
      } finally {
        httpResponse.close();
      }
    } catch (Exception e) {
      e.printStackTrace();
    } finally {
      try {
        closeHttpClient(httpClient);
      } catch (IOException e) {
        e.printStackTrace();
      }
    }
    renderJson(json);
}
private CloseableHttpClient getHttpClient() {
  return HttpClients.createDefault();
}

private void closeHttpClient(CloseableHttpClient client) throws IOException {
  if (client != null) {
    client.close();
  }
}ExecLinuxCMDUtil.Java
import java.io.InputStreamReader;
import java.io.LineNumberReader;

/**
 * java在linux环境下执行linux命令,然后返回命令返回值。
 * Created by LJaer on 16/12/22.
 */
public class ExecLinuxCMDUtil {
  public static final ExecLinuxCMDUtil instance = new ExecLinuxCMDUtil();

  public static Object exec(String cmd) {
    try {
      String[] cmdA = { "/bin/sh", "-c", cmd };
      Process process = Runtime.getRuntime().exec(cmdA);
      LineNumberReader br = new LineNumberReader(new InputStreamReader(
          process.getInputStream()));
      StringBuffer sb = new StringBuffer();
      String line;
      while ((line = br.readLine()) != null) {
        System.out.println(line);
        sb.append(line).append("\n");
      }
      return sb.toString();
    } catch (Exception e) {
      e.printStackTrace();
    }
    return null;
  }
}4. ユーザーデータを復号化します
バックエンド復号化コード

decodeUserInfo:function(){
  let that = this
  wx.request({
   url: 'https://localhost:8443/decodeUserInfo',
   data: {
    encryptedData: that.data.encryptedData,
    iv: that.data.iv,
    session: wx.getStorageSync('sessionId')
   },
   method: 'GET', // OPTIONS, GET, HEAD, POST, PUT, DELETE, TRACE, CONNECT
   // header: {}, // 设置请求的 header
   success: function (res) {
    // success
    console.log(res)
   }
  })
}AESUtil.java
/**
 * 解密用户敏感数据
 */
public void decodeUserInfo(){
  String encryptedData = getPara("encryptedData");
  String iv = getPara("iv");
  String session = getPara("session");
  //从缓存中获取session_key
  //获取名称为userInfo的Redis Cache对象
  Cache userInfoRedis = Redis.use("userInfo");
  Object wxSessionObj = userInfoRedis.get(session);
  if(null==wxSessionObj){
    renderNull();
  }
  String wxSessionStr = (String)wxSessionObj;
  String session_key = wxSessionStr.split(",")[0];


  try {
    byte[] resultByte = AESUtil.instance.decrypt(Base64.decodeBase64(encryptedData), Base64.decodeBase64(session_key), Base64.decodeBase64(iv));
    if(null != resultByte && resultByte.length > 0){
      String userInfo = new String(resultByte, "UTF-8");
      System.out.println(userInfo);
      JSONObject json = JSONObject.fromObject(userInfo); //将字符串{“id”:1}
      renderJson(json);
    }
  } catch (InvalidAlgorithmParameterException e) {
    e.printStackTrace();
  } catch (UnsupportedEncodingException e) {
    e.printStackTrace();
  }
}読んでいただきありがとうございます、よろしくお願いしますこのサイトを応援していただきありがとうございます!
以上がWeChat ミニ プログラム ユーザー データの復号化 (コレクション)の詳細内容です。詳細については、PHP 中国語 Web サイトの他の関連記事を参照してください。

ホットAIツール

Undresser.AI Undress
リアルなヌード写真を作成する AI 搭載アプリ

AI Clothes Remover
写真から衣服を削除するオンライン AI ツール。

Undress AI Tool
脱衣画像を無料で

Clothoff.io
AI衣類リムーバー

AI Hentai Generator
AIヘンタイを無料で生成します。

人気の記事

ホットツール

メモ帳++7.3.1
使いやすく無料のコードエディター

SublimeText3 中国語版
中国語版、とても使いやすい

ゼンドスタジオ 13.0.1
強力な PHP 統合開発環境

ドリームウィーバー CS6
ビジュアル Web 開発ツール

SublimeText3 Mac版
神レベルのコード編集ソフト(SublimeText3)

ホットトピック
 Xianyu WeChat ミニプログラムが正式に開始
Feb 10, 2024 pm 10:39 PM
Xianyu の公式 WeChat ミニ プログラムが静かに開始されました。ミニ プログラムでは、プライベート メッセージを投稿して購入者/販売者とコミュニケーションしたり、個人情報や注文を表示したり、商品を検索したりすることができます。プログラム、見てみましょう。 Xianyu WeChat アプレットの名前は何ですか? 回答: Xianyu、アイドル取引、中古品販売、評価、リサイクル。 1. ミニ プログラムでは、アイドル メッセージの投稿、プライベート メッセージを介した購入者/販売者とのコミュニケーション、個人情報と注文の表示、指定された商品の検索などができます。 2. ミニ プログラム ページには、ホームページ、近くに、アイドル投稿、メッセージ投稿、私の投稿 5つの機能; 3. 使用したい場合は、購入する前に WeChat 支払いを有効にする必要があります。
 WeChatアプレットは画像アップロード機能を実装
Nov 21, 2023 am 09:08 AM
WeChat アプレットが画像アップロード機能を実装 モバイル インターネットの発展に伴い、WeChat アプレットは人々の生活に欠かせないものになりました。 WeChat ミニ プログラムは、豊富なアプリケーション シナリオを提供するだけでなく、画像アップロード機能などの開発者定義の機能もサポートします。この記事では、WeChat アプレットに画像アップロード機能を実装する方法と具体的なコード例を紹介します。 1. 準備作業 コードを書き始める前に、WeChat 開発者ツールをダウンロードしてインストールし、WeChat 開発者として登録する必要があります。同時に、WeChat についても理解する必要があります。
 WeChat アプレットにドロップダウン メニュー効果を実装する
Nov 21, 2023 pm 03:03 PM
WeChat ミニ プログラムでドロップダウン メニュー効果を実装するには、特定のコード サンプルが必要です。モバイル インターネットの普及に伴い、WeChat ミニ プログラムはインターネット開発の重要な部分となり、ますます多くの人が注目し始めています。 WeChat ミニ プログラムを使用します。 WeChat ミニ プログラムの開発は、従来の APP 開発よりも簡単かつ迅速ですが、特定の開発スキルを習得する必要もあります。 WeChat ミニ プログラムの開発では、ドロップダウン メニューが一般的な UI コンポーネントであり、より良いユーザー エクスペリエンスを実現します。この記事では、WeChat アプレットにドロップダウン メニュー効果を実装し、実用的な機能を提供する方法を詳しく紹介します。
 WeChat アプレットを使用してカルーセル切り替え効果を実現する
Nov 21, 2023 pm 05:59 PM
WeChat アプレットを使用してカルーセル スイッチング効果を実現する WeChat アプレットは、シンプルで効率的な開発と使用特性を備えた軽量のアプリケーションです。 WeChat ミニ プログラムでは、カルーセル スイッチング効果を実現することが一般的な要件です。この記事では、WeChat アプレットを使用してカルーセル切り替え効果を実現する方法と、具体的なコード例を紹介します。まず、カルーセル コンポーネントを WeChat アプレットのページ ファイルに追加します。たとえば、<swiper> タグを使用すると、カルーセルの切り替え効果を実現できます。このコンポーネントでは、 b を渡すことができます。
 WeChat ミニ プログラムに画像フィルター効果を実装する
Nov 21, 2023 pm 06:22 PM
WeChat ミニ プログラムでの画像フィルター効果の実装 ソーシャル メディア アプリケーションの人気に伴い、人々は写真にフィルター効果を適用して、写真の芸術的効果や魅力を高めることがますます好まれています。画像フィルター効果は WeChat ミニ プログラムにも実装でき、より興味深く創造的な写真編集機能をユーザーに提供します。この記事では、WeChat ミニ プログラムに画像フィルター効果を実装する方法を紹介し、具体的なコード例を示します。まず、WeChat アプレットのキャンバス コンポーネントを使用して画像を読み込み、編集する必要があります。 Canvasコンポーネントはページ上で使用できます
 Xianyu WeChat アプレットの名前は何ですか?
Feb 27, 2024 pm 01:11 PM
Xianyu の公式 WeChat ミニ プログラムが静かに開始され、アイドルアイテムを簡単に公開および交換できる便利なプラットフォームをユーザーに提供します。ミニ プログラムでは、プライベート メッセージを介して購入者または販売者とコミュニケーションしたり、個人情報や注文を表示したり、欲しい商品を検索したりできます。では、WeChat ミニ プログラムでは Xianyu とはいったい何と呼ばれているのでしょうか? このチュートリアル ガイドで詳しくご紹介しますので、知りたいユーザーは、この記事に従って読み続けてください。 Xianyu WeChat アプレットの名前は何ですか? 回答: Xianyu、アイドル取引、中古品販売、評価、リサイクル。 1. ミニ プログラムでは、アイドル メッセージの投稿、プライベート メッセージを介した購入者/販売者とのコミュニケーション、個人情報と注文の表示、指定された商品の検索などができます。 2. ミニ プログラム ページには、ホームページ、近くに、アイドル投稿、メッセージ投稿、マイ投稿の5つの機能、3.
 PHPを使用してWeChatアプレットの中古取引機能を開発するにはどうすればよいですか?
Oct 27, 2023 pm 05:15 PM
PHPを使用してWeChatアプレットの中古取引機能を開発するにはどうすればよいですか?人気のモバイル アプリケーション開発プラットフォームとして、WeChat アプレットはますます多くの開発者によって使用されています。 WeChat ミニ プログラムでは、中古取引が一般的な機能要件です。この記事では、PHP を使用して WeChat アプレットの中古取引機能を開発する方法と、具体的なコード例を紹介します。 1. 準備作業 開発を開始する前に、以下の条件が満たされていることを確認する必要があります。ミニ プログラムの AppID の登録やミニ プログラムのバックグラウンドでの設定など、WeChat ミニ プログラムの開発環境がセットアップされていること。
 WeChat アプレットに画像回転効果を実装する
Nov 21, 2023 am 08:26 AM
WeChat ミニ プログラムで画像回転効果を実装するには、特定のコード サンプルが必要です。WeChat ミニ プログラムは、ユーザーに豊富な機能と優れたユーザー エクスペリエンスを提供する軽量のアプリケーションです。ミニ プログラムでは、開発者はさまざまなコンポーネントと API を使用して、さまざまな効果を実現できます。その中で、画像回転効果は、ミニプログラムに興味と視覚効果を加えることができる一般的なアニメーション効果です。 WeChat ミニ プログラムで画像の回転効果を実現するには、ミニ プログラムが提供するアニメーション API を使用する必要があります。以下は、その方法を示す具体的なコード例です。


