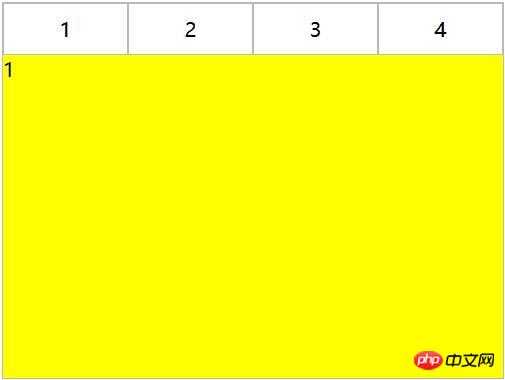
以下のエディターは、CSS を使用してタブ レイアウトを実装する簡単な例を示します (必読)。編集者はこれが非常に良いものだと思ったので、皆さんの参考として今から共有します。エディターと一緒に見に来てください
1. レイアウト方法
1. コンテンツとタブが分離されています
<p class="container">
   <p class="tab-content">
     <p id="item1" class="item">内容1</p>
     <p id="item2" class="item">内容2</p>
     <p id="item3" class="item">内容3</p>
     <p id="item4" class="item">内容4</p>
   </p>
   <p class="tab-control">
     <ul>
        <li><a href="#item1">内容1</a></li>
        <li><a href="#item2">内容2</a></li>
        <li><a href="#item3">内容3</a></li>
        <li><a href="#item4">内容4</a></li>
     </ul>
   </p>
</p>
rreee
2. コンテンツとタブは統合されています
ul,li{
  margin:0;
  padding:0;
  list-style:none;
}
.container{
  width:400px;
  height:300px;
  background-color:silver;
}
.tab-content{
  width:100%;
  height:80%;
  overflow:hidden;
}
.tab-content .item{
  width:100%;
  height:100%;
}
.tab-control{
  width:100%;
  height:20%;
}
.tab-control ul{
  height:100%;
}
.tab-control li{
  width:25%;
  height:100%;
  float:left;
  border:1px solid silver;
  box-sizing:border-box;
  background-color:white;
  cursor: pointer;
}
.tab-control li:hover{
  background-color:#7b7474
}
.tab-control a{
  display:inline-block;
  width:100%;
  height:100%;
  line-height:100%;
  text-align:center;
  text-decoration: none;
}
.tab-control a::after{
  content:"";
  display:inline-block;
  height:100%;
  vertical-align:middle;
}
.tab-content .item:target{
  background:yellow;
}<p class="container">
<ul>
<li class="item active">
<p class="title">1</p>
<p class="content">1</p>
</li>
<li class="item">
<p class="title">2</p>
<p class="content ml1">2</p>
</li>
<li class="item">
<p class="title">3</p>
<p class="content ml2">3</p>
</li>
<li class="item">
<p class="title">4</p>
<p class="content ml3">4</p>
</li>
</ul>
</p>
負のマージンを使用してコンテンツ領域を位置合わせし、コンテンツに背景色を追加して、異なるタブに対応する領域のパースペクティブの重なりを回避します。
2. CSS インタラクション
1. アンカー 実装 (ターゲット)
(1) レイアウト 1 の場合: 項目は上から下に配置され、親要素はタブになります-content overflow:hidden を追加します。アンカーポイントを使用して、別のタグをクリックすると、対応する ID を持つ項目がタブコンテンツの ビュー に切り替わり、ホバーを使用してタブ ボタン に切り替えスタイルを追加します。
ul,li,p{
margin:0;
padding:0;
list-style:none;
}
.container{
width:400px;
height:300px;
background-color:silver;
border:1px solid silver;
}
.container ul{
width:100%;
height:100%;
overflow:hidden;
}
.container .item{
float:left;
width:25%;
height:100%;
background-color:white;
}
.container .item .title{
line-height:40px;
border:1px solid silver;
box-sizing:border-box;
text-align:center;
cursor:pointer;
}
.container .item .content{
width:400%;
height:100%;
background-color:yellow;
}
.ml1{
margin-left:-100%;
}
.ml2{
margin-left:-200%;
}
.ml3{
margin-left:-300%;
}
.active{
position:relative;
z-index:1
}
.container .item:hover{
position:relative;
z-index:1
}
.container .item:hover .title{
border-bottom:none;
background-color:yellow;
}<p class="container">
<p class="tab-content">
<p id="item1" class="item">内容1</p>
<p id="item2" class="item">内容2</p>
<p id="item3" class="item">内容3</p>
<p id="item4" class="item">内容4</p>
</p>
<p class="tab-control">
<ul>
<li><a href="#item1">内容1</a></li>
<li><a href="#item2">内容2</a></li>
<li><a href="#item3">内容3</a></li>
<li><a href="#item4">内容4</a></li>
</ul>
</p>
</p>上記の方法はアンカーポイントの切り替えのみを使用し、target を使用しません。
絶対位置を使用して CSS
(2) レイアウト 2 の場合:
ul,li{
margin:0;
padding:0;
list-style:none;
}
.container{
width:400px;
height:300px;
background-color:silver;
}
.tab-content{
position:relative;
width:100%;
height:80%;
overflow:hidden;
}
.tab-content .item{
position:absolute;
left:0;
top:0;
width:100%;
height:100%;
}
.tab-control{
width:100%;
height:20%;
}
.tab-control ul{
height:100%;
}
.tab-control li{
width:25%;
height:100%;
float:left;
border:1px solid silver;
box-sizing:border-box;
background-color:white;
cursor: pointer;
}
.tab-control li:hover{
background-color:#7b7474
}
.tab-control a{
display:inline-block;
width:100%;
height:100%;
line-height:100%;
text-align:center;
text-decoration: none;
}
.tab-control a::after{
content:"";
display:inline-block;
height:100%;
vertical-align:middle;
}
.tab-content .item:target{
z-index:1;
background-color:yellow;
}
<p class="container">
<ul>
<li class="item active" id="item1">
<p class="title"><a href="#item1">1</a></p>
<p class="content">1</p>
</li>
<li class="item" id="item2">
<p class="title"><a href="#item2">2</a></p>
<p class="content ml1">2</p>
</li>
<li class="item" id="item3">
<p class="title"><a href="#item3">3</a></p>
<p class="content ml2">3</p>
</li>
<li class="item" id="item4">
<p class="title"><a href="#item4">4</a></p>
<p class="content ml3">4</p>
</li>
</ul>
</p>2.
(1)レイアウト 1 の場合:
単純に CSS を渡すことはできません
(2) レイアウト 2 の場合:
ul,
li,
p {
margin: 0;
padding: 0;
list-style: none;
}
.container {
width: 400px;
height: 300px;
background-color: silver;
border: 1px solid silver;
}
.container ul {
width: 100%;
height: 100%;
overflow: hidden;
}
.container .item {
float: left;
width: 25%;
height: 100%;
background-color: white;
}
.container .item .title {
line-height: 40px;
border: 1px solid silver;
box-sizing: border-box;
text-align: center;
cursor: pointer;
}
.container .item a {
display:inline-block;
width:100%;
height:100%;
text-decoration: none;
}
.container .item .content {
width: 400%;
height: 100%;
background-color: yellow;
}
.ml1 {
margin-left: -100%;
}
.ml2 {
margin-left: -200%;
}
.ml3 {
margin-left: -300%;
}
.active {
position: relative;
z-index: 1
}
.container .item:target {
position: relative;
z-index: 1
}
.container .item:target .title {
border-bottom: none;
background-color: yellow;
}
<p class="container">
   <ul>
     <li class="item active">
       <p class="title">1</p>
       <p class="content">1</p>
     </li>
     <li class="item">
       <p class="title">2</p>
       <p class="content ml1">2</p>
     </li>
     <li class="item">
       <p class="title">3</p>
       <p class="content ml2">3</p>
     </li>
     <li class="item">
       <p class="title">4</p>
       <p class="content ml3">4</p>
     </li>
   </ul>
</p>3. ラベルと: チェック済み実装
(1) レイアウト 1 の場合:
ul,li,p{
  margin:0;
  padding:0;
  list-style:none;
}
.container{
  width:400px;
  height:300px;
  background-color:silver;
  border:1px solid silver;
}
.container ul{
  width:100%;
  height:100%;
  overflow:hidden;
}
.container .item{
  float:left;
  width:25%;
  height:100%;
  background-color:white;
}
.container .item .title{
  line-height:40px;
  border:1px solid silver;
  box-sizing:border-box;
  text-align:center;
  cursor:pointer;
}
.container .item .content{
  width:400%;
  height:100%;
  background-color:yellow;
}
.ml1{
  margin-left:-100%;
}
.ml2{
  margin-left:-200%;
}
.ml3{
  margin-left:-300%;
}
.active{
  position:relative;
  z-index:1
}
.container .item:hover{
  position:relative;
  z-index:1
}
.container .item:hover .title{
  border-bottom:none;
  background-color:yellow;
}<p class="container">
<p class="tab-content">
<input type="radio" name="item" class="radio-item" id="item1" checked/>
<p class="item">内容1</p>
<input type="radio" name="item" class="radio-item" id="item2" />
<p class="item">内容2</p>
<input type="radio" name="item" class="radio-item" id="item3" />
<p class="item">内容3</p>
<input type="radio" name="item" class="radio-item" id="item4" />
<p class="item">内容4</p>
</p>
<p class="tab-control">
<ul>
<li><label for="item1">内容1</label></li>
<li><label for="item2">内容2</label></li>
<li><label for="item3">内容3</label></li>
<li><label for="item4">内容4</label></li>
</ul>
</p>
</p>css :checked と + を使用します (別の要素の直後の要素を選択し、両方とも同じです)親要素) セレクター。
(2) レイアウト 2 の場合:
ul,
li {
  margin: 0;
  padding: 0;
  list-style: none;
}

.container {
  width: 400px;
  height: 300px;
  background-color: silver;
}

.tab-content {
  position: relative;
  width: 100%;
  height: 80%;
  overflow: hidden;
}

input {
  margin: 0;
  width: 0;
}

.tab-content .item {
  position: absolute;
  left: 0;
  top: 0;
  width: 100%;
  height: 100%;
}

.tab-control {
  width: 100%;
  height: 20%;
}

.tab-control ul {
  height: 100%;
}

.tab-control li {
  width: 25%;
  height: 100%;
  float: left;
  border: 1px solid silver;
  box-sizing: border-box;
  background-color: white;
}

.tab-control li:hover {
  background-color: #7b7474
}

.tab-control label {
  display: inline-block;
  width: 100%;
  height: 100%;
  line-height: 100%;
  text-align: center;
  text-decoration: none;
  cursor: pointer;
}

.tab-control label::after {
  content: "";
  display: inline-block;
  height: 100%;
  vertical-align: middle;
}
.tab-content .radio-item{
  display:none;
}
.tab-content .radio-item:checked+.item {
  z-index: 1;
  background-color: yellow;
}
<p class="container">
   <ul>
     <li class="item active">
       <input type="radio" name="item" class="radio-item" id="item1" checked/>
       <label class="title" for="item1">1</label>
       <p class="content">1</p>
     </li>
     <li class="item">
       <input type="radio" name="item" class="radio-item" id="item2" />
       <label class="title" for="item2">2</label>
       <p class="content ml1">2</p>
     </li>
     <li class="item">
       <input type="radio" name="item" class="radio-item" id="item3" />
       <label class="title" for="item3">3</label>
       <p class="content ml2">3</p>
     </li>
     <li class="item">
       <input type="radio" name="item" class="radio-item" id="item4" />
       <label class="title" for="item4">4</label>
       <p class="content ml3">4</p>
     </li>
   </ul>
</p>以上がタブ レイアウトの CSS 実装のサンプル コード共有 (写真)の詳細内容です。詳細については、PHP 中国語 Web サイトの他の関連記事を参照してください。