

WeChatが開発したspringmvc mybatisプロジェクト構造のJavaコードの詳細説明

この記事では、主に WeChat 開発準備の 2 番目のステップである springmvc と mybatis プロジェクト構造の構築について詳しく紹介します。興味のある方は参考にしてください。
前回の記事では、MyEclipse To での MyEclipse の使用方法について説明しました。で Maven プロジェクトをビルドします。ここでは、ビルドされた基本的な Maven プロジェクトに一般的に使用される JavaWeb フレームワーク SpringMVC を導入する方法を引き続き紹介します。
①確立された Maven プロジェクトの pom.xml ファイルに依存関係を導入します。コードは次のとおりです。
<project xmlns="http://maven.apache.org/POM/4.0.0" xmlns:xsi="http://www.w3.org/2001/XMLSchema-instance"
 xsi:schemaLocation="http://maven.apache.org/POM/4.0.0 http://maven.apache.org/maven-v4_0_0.xsd">
 <modelVersion>4.0.0</modelVersion>
 <groupId>wechat.cuiyongzhi.com</groupId>
 <artifactId>wechat</artifactId>
 <packaging>war</packaging>
 <version>0.0.1-SNAPSHOT</version>
 <name>wechat</name>
 <url>http://maven.apache.org</url>
 <dependencies>
  <!-- spring -->
  <dependency>
   <groupId>org.springframework</groupId>
   <artifactId>spring-test</artifactId>
   <version>3.2.0.RELEASE</version>
  </dependency>
  <dependency>
   <groupId>org.springframework</groupId>
   <artifactId>spring-webmvc</artifactId>
   <version>3.2.0.RELEASE</version>
  </dependency>
  <dependency>
   <groupId>org.springframework</groupId>
   <artifactId>spring-core</artifactId>
   <version>3.2.0.RELEASE</version>
  </dependency>

  <!-- mybatis -->
  <dependency>
   <groupId>org.mybatis</groupId>
   <artifactId>mybatis</artifactId>
   <version>3.1.1</version>
  </dependency>
  <dependency>
   <groupId>org.mybatis</groupId>
   <artifactId>mybatis-spring</artifactId>
   <version>1.1.1</version>
  </dependency>

  <!-- mysql -->
  <dependency>
   <groupId>mysql</groupId>
   <artifactId>mysql-connector-java</artifactId>
   <version>5.1.21</version>
  </dependency>

  <!-- junit测试 -->
  <dependency>
   <groupId>junit</groupId>
   <artifactId>junit</artifactId>
   <version>4.11</version>
   <scope>test</scope>
  </dependency>

  <!-- mysql阿里连接池druid -->
  <dependency>
   <groupId>com.alibaba</groupId>
   <artifactId>druid</artifactId>
   <version>0.2.9</version>
  </dependency>

  <!-- spring aop包 -->
  <dependency>
   <groupId>org.aspectj</groupId>
   <artifactId>aspectjweaver</artifactId>
   <version>1.7.1</version>
  </dependency>

  <!-- json包 -->
  <dependency>
   <groupId>com.alibaba</groupId>
   <artifactId>fastjson</artifactId>
   <version>1.2.7</version>
  </dependency>

  <!-- 文件上传包 -->
  <dependency>
   <groupId>commons-fileupload</groupId>
   <artifactId>commons-fileupload</artifactId>
   <version>1.2.2</version>
  </dependency>

  <!--servlet包 -->
  <dependency>
   <groupId>javax.servlet</groupId>
   <artifactId>servlet-api</artifactId>
   <version>3.0-alpha-1</version>
  </dependency>

  <dependency>
   <groupId>javax.servlet.jsp</groupId>
   <artifactId>jsp-api</artifactId>
   <version>2.1</version>
   <scope>provided</scope>
  </dependency>

  <dependency>
   <groupId>javax.servlet</groupId>
   <artifactId>jstl</artifactId>
   <version>1.2</version>
  </dependency>

  <!-- 日志包 -->
  <dependency>
   <groupId>log4j</groupId>
   <artifactId>log4j</artifactId>
   <version>1.2.17</version>
  </dependency>
 </dependencies>
 <build>
  <finalName>wechat</finalName>
 </build>
</project>
②プロジェクト パスの下にある web.xml ファイルを次のように変更します。
<?xml version="1.0" encoding="UTF-8"?>
<web-app xmlns:xsi="http://www.w3.org/2001/XMLSchema-instance"
 xmlns:web="http://java.sun.com/xml/ns/javaee" xmlns="http://java.sun.com/xml/ns/javaee"
 xsi:schemaLocation="http://java.sun.com/xml/ns/javaee http://java.sun.com/xml/ns/javaee/web-app_3_0.xsd
 http://www.springframework.org/schema/websocket http://www.springframework.org/schema/websocket/spring-websocket.xsd"
 id="WebApp_ID" version="3.0">
 <display-name>com.cuiyongzhi.wechat</display-name>
 <context-param>
  <param-name>contextConfigLocation</param-name>
  <param-value>classpath:spring.xml,classpath:spring-mybatis.xml</param-value>
  <!-- ,classpath:spring-quartz.xml 用于做任务调度 任务定时都可以 -->
 </context-param>
 <context-param>
  <param-name>log4jConfigLocation</param-name>
  <param-value>classpath:log4j.properties</param-value>
 </context-param>
 <listener>
  <listener-class>org.springframework.web.util.Log4jConfigListener</listener-class>
 </listener>
 <context-param>
  <param-name>spring.profiles.active</param-name>
  <param-value>dev</param-value>
 </context-param>
 <context-param>
  <param-name>spring.profiles.default</param-name>
  <param-value>dev</param-value>
 </context-param>
 <context-param>
  <param-name>spring.liveBeansView.mbeanDomain</param-name>
  <param-value>dev</param-value>
 </context-param>
 <filter>
  <filter-name>encodingFilter</filter-name>
  <filter-class>org.springframework.web.filter.CharacterEncodingFilter</filter-class>
  <init-param>
   <param-name>encoding</param-name>
   <param-value>UTF-8</param-value>
  </init-param>
  <init-param>
   <param-name>forceEncoding</param-name>
   <param-value>true</param-value>
  </init-param>
 </filter>
 <listener>
  <description>spring监听器</description>
  <listener-class>org.springframework.web.context.ContextLoaderListener</listener-class>
 </listener>
 <!-- 防止内存溢出 -->
 <listener>
  <listener-class>org.springframework.web.util.IntrospectorCleanupListener</listener-class>
 </listener>
 <servlet>
  <description>spring mvc servlet</description>
  <servlet-name>springMvc</servlet-name>
  <servlet-class>org.springframework.web.servlet.DispatcherServlet</servlet-class>
  <init-param>
   <description>spring mvc 配置文件</description>
   <param-name>contextConfigLocation</param-name>
   <param-value>classpath:spring-mvc.xml</param-value>
  </init-param>
  <load-on-startup>1</load-on-startup>
 </servlet>
 <servlet>
  <servlet-name>interface_url-init_servlet</servlet-name>
  <servlet-class>com.cuiyongzhi.web.start.InterfaceUrlIntiServlet</servlet-class>
  <load-on-startup>1</load-on-startup>
 </servlet>
 <servlet-mapping>
  <servlet-name>springMvc</servlet-name>
  <url-pattern>/</url-pattern>
 </servlet-mapping>

 <welcome-file-list>
  <welcome-file>/index.jsp</welcome-file>
 </welcome-file-list>
 <session-config>
  <session-timeout>300</session-timeout>
 </session-config>

 <error-page>
  <error-code>404</error-code>
  <location>/WEB-INF/error/error.jsp</location>
 </error-page>

 <error-page>
  <error-code>500</error-code>
  <location>/WEB-INF/error/error.jsp</location>
 </error-page>

 <servlet-mapping>
  <servlet-name>default</servlet-name>
  <url-pattern>*.css</url-pattern>
 </servlet-mapping>

 <servlet-mapping>
  <servlet-name>default</servlet-name>
  <url-pattern>*.gif</url-pattern>
 </servlet-mapping>

 <servlet-mapping>
  <servlet-name>default</servlet-name>
  <url-pattern>*.jpg</url-pattern>
 </servlet-mapping>

 <servlet-mapping>
  <servlet-name>default</servlet-name>
  <url-pattern>*.js</url-pattern>
 </servlet-mapping>

 <servlet-mapping>
  <servlet-name>default</servlet-name>
  <url-pattern>*.xhtml</url-pattern>
 </servlet-mapping>

 <servlet-mapping>
  <servlet-name>default</servlet-name>
  <url-pattern>*.html</url-pattern>
 </servlet-mapping>

 <filter>
  <filter-name>DruidWebStatFilter</filter-name>
  <filter-class>com.alibaba.druid.support.http.WebStatFilter</filter-class>
  <init-param>
   <param-name>exclusions</param-name>
   <param-value>*.js,*.gif,*.jpg,*.png,*.css,*.ico,/druid/*</param-value>
  </init-param>
 </filter>
 <filter-mapping>
  <filter-name>DruidWebStatFilter</filter-name>
  <url-pattern>/*</url-pattern>
 </filter-mapping>
 <servlet>
  <servlet-name>DruidStatView</servlet-name>
  <servlet-class>com.alibaba.druid.support.http.StatViewServlet</servlet-class>
  <init-param>
   <!-- 允许清空统计数据 -->
   <param-name>resetEnable</param-name>
   <param-value>true</param-value>
  </init-param>
  <init-param>
   <!-- 用户名 -->
   <param-name>loginUsername</param-name>
   <param-value>cuiyongzhi</param-value>
  </init-param>
  <init-param>
   <!-- 密码 -->
   <param-name>loginPassword</param-name>
   <param-value>123456</param-value>
  </init-param>
 </servlet>
 <servlet-mapping>
  <servlet-name>DruidStatView</servlet-name>
  <url-pattern>/druid/*</url-pattern>
 </servlet-mapping>
 <!-- 访问监控页面:http://ip:port/projectName/druid/index.html -->

 <jsp-config>
  <jsp-property-group>
   <display-name>jspConfiguration</display-name>
   <url-pattern>*.jsp</url-pattern>
   <el-ignored>false</el-ignored>
   <scripting-invalid>false</scripting-invalid>
   <include-prelude>/WEB-INF/common/head.jsp</include-prelude>
  </jsp-property-group>
 </jsp-config>

</web-app>
③データベース構成情報を追加します。プロジェクトの設定 データベースは MySQL です。 config.properties 設定ファイルをリソースの下に新規作成し、次のように設定します。
validationQuery=SELECT 1
jdbc_url=jdbc:mysql://127.0.0.1:3306/wechat?useUnicode=true&characterEncoding=UTF-8&zeroDateTimeBehavior=convertToNull
jdbc_username=root
jdbc_password=123456789
④ リソースの下に spring.xml 設定ファイルを新規作成し、次のように設定します。
<?xml version="1.0" encoding="UTF-8"?>
<beans xmlns="http://www.springframework.org/schema/beans" xmlns:xsi="http://www.w3.org/2001/XMLSchema-instance" xmlns:context="http://www.springframework.org/schema/context" xsi:schemaLocation="
http://www.springframework.org/schema/beans
http://www.springframework.org/schema/beans/spring-beans-3.0.xsd
http://www.springframework.org/schema/context
http://www.springframework.org/schema/context/spring-context-3.0.xsd">
 <!-- 引入属性文件 -->
 <context:property-placeholder location="classpath:config.properties" />
 <!-- 自动扫描(自动注入) -->
 <context:component-scan base-package="com.cuiyongzhi.web.service" />
 <context:component-scan base-package="com.cuiyongzhi.wechat.*" />

</beans>
⑤ 新規作成リソース配下に spring-mvc.xml 設定ファイルを作成します。 設定は以下の通りです:
<?xml version="1.0" encoding="UTF-8"?>
<beans xmlns="http://www.springframework.org/schema/beans" xmlns:mvc="http://www.springframework.org/schema/mvc" xmlns:xsi="http://www.w3.org/2001/XMLSchema-instance" xmlns:p="http://www.springframework.org/schema/p" xmlns:context="http://www.springframework.org/schema/context" xsi:schemaLocation="http://www.springframework.org/schema/beans
http://www.springframework.org/schema/beans/spring-beans-4.0.xsd
http://www.springframework.org/schema/context
http://www.springframework.org/schema/context/spring-context-4.0.xsd
http://www.springframework.org/schema/mvc
http://www.springframework.org/schema/mvc/spring-mvc-4.0.xsd">

 <!-- 自动扫描controller包下的所有类,使其认为spring mvc的控制器 -->
 <context:component-scan base-package="com.cuiyongzhi.web.controller" />

 <!-- 避免IE执行AJAX时,返回JSON出现下载文件 -->
 <bean id="mappingJacksonHttpMessageConverter" class="org.springframework.http.converter.json.MappingJacksonHttpMessageConverter">
  <property name="supportedMediaTypes">
   <list>
    <value>text/html;charset=UTF-8</value>
   </list>
  </property>
 </bean>

 <!-- 启动Spring MVC的注解功能,完成请求和注解POJO的映射 -->
 <bean class="org.springframework.web.servlet.mvc.annotation.AnnotationMethodHandlerAdapter">
  <property name="messageConverters">
   <list>
    <ref bean="mappingJacksonHttpMessageConverter" /><!-- json转换器 -->
   </list>
  </property>
 </bean>

 <!-- 对模型视图名称的解析,即在模型视图名称添加前后缀 -->
 <bean class="org.springframework.web.servlet.view.InternalResourceViewResolver" p:prefix="/WEB-INF/views/" p:suffix=".jsp" />

 <bean id="multipartResolver" class="org.springframework.web.multipart.commons.CommonsMultipartResolver">
  <property name="defaultEncoding">
   <value>UTF-8</value>
  </property>
  <property name="maxUploadSize">
   <value>32505856</value><!-- 上传文件大小限制为31M,31*1024*1024 -->
  </property>
  <property name="maxInMemorySize">
   <value>4096</value>
  </property>
 </bean>

</beans>⑥ リソース配下に新しい spring-mybatis.xml 設定ファイルを作成し、次のように設定します:
<?xml version="1.0" encoding="UTF-8"?>
<beans xmlns="http://www.springframework.org/schema/beans" xmlns:xsi="http://www.w3.org/2001/XMLSchema-instance" xmlns:tx="http://www.springframework.org/schema/tx" xmlns:aop="http://www.springframework.org/schema/aop" xsi:schemaLocation="
http://www.springframework.org/schema/beans
http://www.springframework.org/schema/beans/spring-beans-3.0.xsd
http://www.springframework.org/schema/tx
http://www.springframework.org/schema/tx/spring-tx-3.0.xsd
http://www.springframework.org/schema/aop
http://www.springframework.org/schema/aop/spring-aop-3.0.xsd
">

 <!-- 配置数据源 -->
 <bean name="dataSource" class="com.alibaba.druid.pool.DruidDataSource" init-method="init" destroy-method="close">
  <property name="url" value="${jdbc_url}" />
  <property name="username" value="${jdbc_username}" />
  <property name="password" value="${jdbc_password}" />

  <!-- 初始化连接大小 -->
  <property name="initialSize" value="5" />
  <!-- 连接池最大使用连接数量 -->
  <property name="maxActive" value="100" />
  <!-- 连接池最大空闲 -->
  <property name="maxIdle" value="10" />
  <!-- 连接池最小空闲 -->
  <property name="minIdle" value="0" />
  <!-- 获取连接最大等待时间 -->
  <property name="maxWait" value="60000" />

  <property name="poolPreparedStatements" value="true" />
  <property name="maxPoolPreparedStatementPerConnectionSize" value="33" />

  <property name="validationQuery" value="${validationQuery}" />
  <property name="testOnBorrow" value="false" />
  <property name="testOnReturn" value="false" />
  <property name="testWhileIdle" value="true" />

  <!-- 配置间隔多久才进行一次检测,检测需要关闭的空闲连接,单位是毫秒 -->
  <property name="timeBetweenEvictionRunsMillis" value="60000" />
  <!-- 配置一个连接在池中最小生存的时间,单位是毫秒 -->
  <property name="minEvictableIdleTimeMillis" value="25200000" />

  <!-- 打开removeAbandoned功能 -->
  <property name="removeAbandoned" value="true" />
  <!-- 1800秒,也就是30分钟 -->
  <property name="removeAbandonedTimeout" value="1800" />
  <!-- 关闭abanded连接时输出错误日志 -->
  <property name="logAbandoned" value="true" />

  <!-- 监控数据库 -->
  <!-- <property name="filters" value="stat" /> -->
  <property name="filters" value="mergeStat" />
 </bean>

 <!-- myBatis文件 -->
 <bean id="sqlSessionFactory" class="org.mybatis.spring.SqlSessionFactoryBean">
  <property name="dataSource" ref="dataSource" />
  <!-- 自动扫描entity目录, 省掉Configuration.xml里的手工配置 -->
  <property name="mapperLocations" value="classpath:com/cuiyongzhi/web/mapping/*.xml" />
 </bean>

 <bean class="org.mybatis.spring.mapper.MapperScannerConfigurer">
  <property name="basePackage" value="com.cuiyongzhi.web.dao" />
  <property name="sqlSessionFactoryBeanName" value="sqlSessionFactory" />
 </bean>

 <!-- 配置事务管理器 -->
 <bean id="transactionManager" class="org.springframework.jdbc.datasource.DataSourceTransactionManager">
  <property name="dataSource" ref="dataSource" />
 </bean>

 <!-- 注解方式配置事物 -->
 <!-- <tx:annotation-driven transaction-manager="transactionManager" /> -->

 <!-- 拦截器方式配置事物 -->
 <tx:advice id="transactionAdvice" transaction-manager="transactionManager">
  <tx:attributes>
   <tx:method name="add*" propagation="REQUIRED" />
   <tx:method name="append*" propagation="REQUIRED" />
   <tx:method name="insert*" propagation="REQUIRED" />
   <tx:method name="save*" propagation="REQUIRED" />
   <tx:method name="update*" propagation="REQUIRED" />
   <tx:method name="modify*" propagation="REQUIRED" />
   <tx:method name="edit*" propagation="REQUIRED" />
   <tx:method name="delete*" propagation="REQUIRED" />
   <tx:method name="remove*" propagation="REQUIRED" />
   <tx:method name="repair" propagation="REQUIRED" />
   <tx:method name="delAndRepair" propagation="REQUIRED" />
   <tx:method name="get*" propagation="SUPPORTS" />
   <tx:method name="find*" propagation="SUPPORTS" />
   <tx:method name="load*" propagation="SUPPORTS" />
   <tx:method name="search*" propagation="SUPPORTS" />
   <tx:method name="datagrid*" propagation="SUPPORTS" />
   <tx:method name="*" propagation="SUPPORTS" />
  </tx:attributes>
 </tx:advice>
 <aop:config>
  <aop:pointcut id="transactionPointcut" expression="execution(* com.cuiyongzhi.web.service..*Impl.*(..))" />
  <aop:advisor pointcut-ref="transactionPointcut" advice-ref="transactionAdvice" />
 </aop:config>


 <!-- 配置druid监控spring jdbc -->
 <bean id="druid-stat-interceptor" class="com.alibaba.druid.support.spring.stat.DruidStatInterceptor">
 </bean>
 <bean id="druid-stat-pointcut" class="org.springframework.aop.support.JdkRegexpMethodPointcut" scope="prototype">
  <property name="patterns">
   <list>
    <value>com.cuiyongzhi.web.service.*</value>
   </list>
  </property>
 </bean>
 <aop:config>
  <aop:advisor advice-ref="druid-stat-interceptor" pointcut-ref="druid-stat-pointcut" />
 </aop:config>
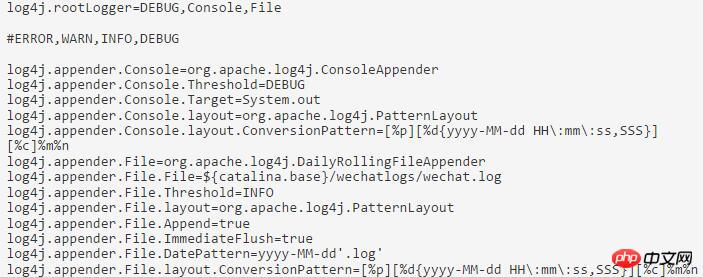
</beans>⑦ 新しい log4j.properties 設定を作成します。ログの出力レベルと出力場所を設定するためのファイルをリソースの下に作成します。 設定は次のとおりです。
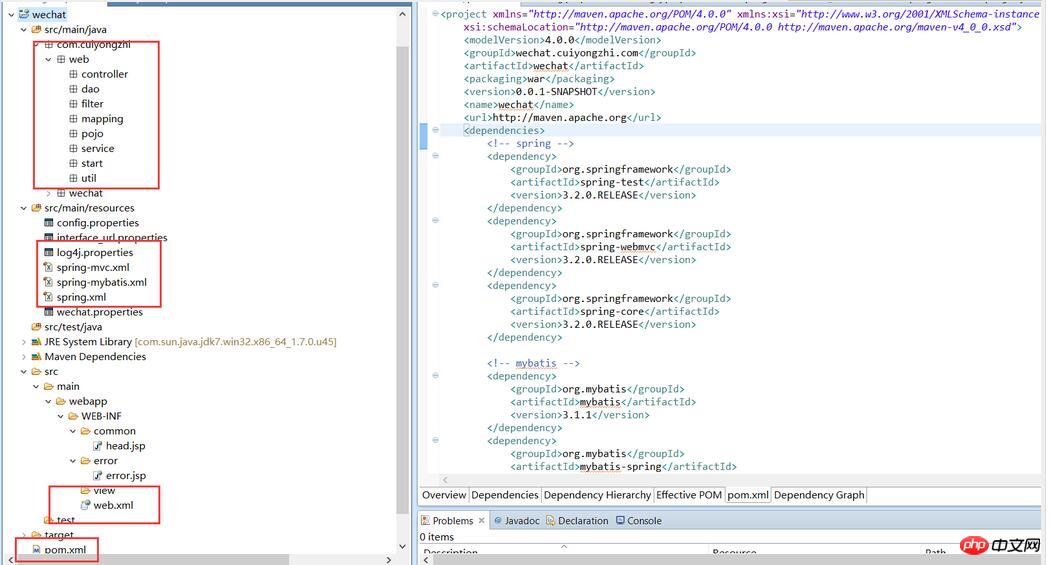
ここで springmvc+mybatis の基本的な設定ファイルが完成します。 大まかなプロジェクト構造は次のとおりです。 :
この記事では、主にコード例に焦点を当てています。次へ この記事では、このフレームワークに基づくいくつかの簡単なアプリケーションについて簡単に説明します。議論できるよ!
以上がWeChatが開発したspringmvc mybatisプロジェクト構造のJavaコードの詳細説明の詳細内容です。詳細については、PHP 中国語 Web サイトの他の関連記事を参照してください。

ホットAIツール

Undresser.AI Undress
リアルなヌード写真を作成する AI 搭載アプリ

AI Clothes Remover
写真から衣服を削除するオンライン AI ツール。

Undress AI Tool
脱衣画像を無料で

Clothoff.io
AI衣類リムーバー

Video Face Swap
完全無料の AI 顔交換ツールを使用して、あらゆるビデオの顔を簡単に交換できます。

人気の記事
ホットツール

メモ帳++7.3.1
使いやすく無料のコードエディター

SublimeText3 中国語版
中国語版、とても使いやすい

ゼンドスタジオ 13.0.1
強力な PHP 統合開発環境

ドリームウィーバー CS6
ビジュアル Web 開発ツール

SublimeText3 Mac版
神レベルのコード編集ソフト(SublimeText3)
ホットトピック
 7681
7681
 15
1393
52
1209
24
91
11
15
1393
52
1209
24
91
11

 OUYI Exchange App国内ダウンロードチュートリアル
Mar 21, 2025 pm 05:42 PM
OUYI Exchange App国内ダウンロードチュートリアル
Mar 21, 2025 pm 05:42 PM
この記事では、中国のOUYI OKXアプリの安全なダウンロードに関する詳細なガイドを提供します。国内のアプリストアの制限により、ユーザーはOUYI OKXの公式Webサイトからアプリをダウンロードするか、公式Webサイトが提供するQRコードを使用してスキャンおよびダウンロードすることをお勧めします。ダウンロードプロセス中に、公式Webサイトのアドレスを確認し、アプリケーションの許可を確認し、インストール後にセキュリティスキャンを実行し、2要素の検証を有効にしてください。 使用中は、地方の法律や規制を遵守し、安全なネットワーク環境を使用し、アカウントのセキュリティを保護し、詐欺に対して警戒し、合理的に投資してください。 この記事は参照のみであり、投資のアドバイスを構成していません。
 H5とミニプログラムとアプリの違い
Apr 06, 2025 am 10:42 AM
H5とミニプログラムとアプリの違い
Apr 06, 2025 am 10:42 AM
H5。ミニプログラムとアプリの主な違いは次のとおりです。技術アーキテクチャ:H5はWebテクノロジーに基づいており、ミニプログラムとアプリは独立したアプリケーションです。経験と機能:H5は軽量で使いやすく、機能が限られています。ミニプログラムは軽量で、インタラクティブが良好です。アプリは強力で、スムーズな経験があります。互換性:H5はクロスプラットフォーム互換性があり、アプレットとアプリはプラットフォームによって制限されています。開発コスト:H5には、開発コストが低く、中程度のミニプログラム、最高のアプリがあります。適用可能なシナリオ:H5は情報表示に適しており、アプレットは軽量アプリケーションに適しており、アプリは複雑な機能に適しています。
 Gateio Exchangeアプリ古いバージョンGateio Exchangeアプリ古いバージョンダウンロードチャネル
Mar 04, 2025 pm 11:36 PM
Gateio Exchangeアプリ古いバージョンGateio Exchangeアプリ古いバージョンダウンロードチャネル
Mar 04, 2025 pm 11:36 PM
Gateio Exchangeアプリは、公式のサードパーティのアプリケーション市場、フォーラムコミュニティ、その他のチャネルをカバーする古いバージョン用のチャネルをダウンロードします。また、古いバージョンを簡単に取得し、新しいバージョンやデバイスの互換性を使用する際の不快感を解決するのに役立ちます。
 会社のセキュリティソフトウェアがアプリケーションと競合する場合はどうすればよいですか? HUESセキュリティソフトウェアをトラブルシューティングする方法は、一般的なソフトウェアを開きませんか?
Apr 01, 2025 pm 10:48 PM
会社のセキュリティソフトウェアがアプリケーションと競合する場合はどうすればよいですか? HUESセキュリティソフトウェアをトラブルシューティングする方法は、一般的なソフトウェアを開きませんか?
Apr 01, 2025 pm 10:48 PM
互換性の問題と企業のセキュリティソフトウェアとアプリケーションのトラブルシューティング方法。多くの企業は、イントラネットセキュリティを確保するためにセキュリティソフトウェアをインストールします。ただし、セキュリティソフトウェアが時々...
 H5ページの生産とWeChatアプレットの違いは何ですか
Apr 05, 2025 pm 11:51 PM
H5ページの生産とWeChatアプレットの違いは何ですか
Apr 05, 2025 pm 11:51 PM
H5はより柔軟でカスタマイズ可能ですが、熟練したテクノロジーが必要です。ミニプログラムはすぐに開始でき、メンテナンスが簡単ですが、WeChatフレームワークによって制限されています。
 H5とアプレットを選択する方法
Apr 06, 2025 am 10:51 AM
H5とアプレットを選択する方法
Apr 06, 2025 am 10:51 AM
H5とアプレットの選択は、要件に依存します。クロスプラットフォーム、迅速な発達、高いスケーラビリティを備えたアプリケーションの場合は、H5を選択します。ネイティブエクスペリエンス、リッチな機能、プラットフォームの依存関係を持つアプリケーションについては、アプレットを選択します。
 Binance Virtual Currencyの売買方法に関する詳細なチュートリアル
Mar 18, 2025 pm 01:36 PM
Binance Virtual Currencyの売買方法に関する詳細なチュートリアル
Mar 18, 2025 pm 01:36 PM
この記事では、2025年に更新されたBinance Virtual Currencyの売買に関する簡単なガイドを提供し、Binanceプラットフォームでの仮想通貨取引の操作手順を詳細に説明します。このガイドは、フィアット通貨購入USDT、他の通貨の通貨取引購入(BTCなど)、および市場取引や制限取引を含む販売業務をカバーしています。 さらに、このガイドは、Fiat Currency取引の支払いセキュリティやネットワーク選択などの重要なリスクを特に思い出させ、ユーザーが安全かつ効率的にバイナンストランザクションを実施するのに役立ちます。 この記事を通して、Binanceプラットフォームで仮想通貨を売買するスキルをすばやく習得し、トランザクションリスクを減らすことができます。
 国内で最初のデュアルコア文化および観光デジタルヒト科! Tencent CloudはHuaguoshanの風光明媚なエリアがDeepseekに接続し、「Sage Monkey King」をより賢く暖かくするのを助けます
Mar 12, 2025 pm 12:57 PM
国内で最初のデュアルコア文化および観光デジタルヒト科! Tencent CloudはHuaguoshanの風光明媚なエリアがDeepseekに接続し、「Sage Monkey King」をより賢く暖かくするのを助けます
Mar 12, 2025 pm 12:57 PM
Lianyungang Huaguoshanの風光明媚なエリアは、Tencent Cloudと手をつないで、文化および観光産業で最初の「デュアルコアの脳」デジタルホモサピエンスを立ち上げました - モンキーキング! 3月1日、風光明媚なスポットはモンキーキングをディープシェクプラットフォームに正式に接続し、テンセントフナユアンとディープシークの2つのAIモデル機能を備えており、観光客により賢くて考慮されたサービスエクスペリエンスをもたらしました。 Huaguoshanシーニックエリアは、Tencent Hunyuanモデルに基づいて、Digital Homo SapiensのMonkey Kingを以前に発売しました。今回、Tencent Cloudはさらに、Big Model Knowledge Engineなどのテクノロジーを利用してDeepSeekに接続して「デュアルコア」アップグレードを実現します。これにより、モンキーキングのインタラクティブな能力により、より高いレベル、応答速度が高まり、理解が強くなり、より暖かさが高くなります。モンキーキングには強力な自然言語処理能力があり、観光客から質問するさまざまな方法を理解できます。
