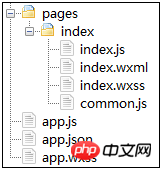
この記事では、WeChat アプレットを使用して 天気予報 機能を開発する方法を紹介します。

app.json ファイルを使用して WeChat ミニ プログラムをグローバルに構成し、ページ ファイルのパス、ウィンドウ パフォーマンス、ネットワークのタイムアウトや複数のタブの設定などを設定します。
{  "pages":[    "pages/index/index"
  ],  "window":{    "backgroundTextStyle":"light",    "navigationBarBackgroundColor": "#fff",    "navigationBarTitleText": "天气预报",    "navigationBarTextStyle":"black"
  },  "networkTimeout": {    "request": 10000
}, "debug": true}プロジェクトには 1 ページしかないため、下部のタブは必要ありません。また、ネットワークリクエスト時間を 10 秒に設定し、デバッグモードを有効にします。
まず、common.js でユーザーの現在の地理的位置を取得するインターフェイスを使用してユーザーの座標アドレスを取得し、座標タイプとして gcj02 を選択します。 //
現在位置の取得座標
function getLocation(callback) {
    wx.getLocation({
        type: 'gcj02',
        success: function(res) {
            callback(true, res.latitude, res.longitude);
        },
        fail: function() {
            callback(false);
        }
    })
}関数に座標情報を返します。失敗した場合は、コールバック関数に false を渡します。 座標を取得したら、Baidu インターフェース
を使用して天気をクエリします。対応するクエリコードを以下に示します。
function getWeather(latitude, longitude, callback) {    var ak = "";//换成自己的ak,不要用方倍工作室的
    var url = "https://api.map.baidu.com/telematics/v3/weather?location=" + longitude + "," + latitude + "&output=json&ak=" + ak;
    wx.request({
        url: url,
        success: function(res){
            console.log(res);
            callback(res.data);
        }
    });
}次に、上記のインターフェースを組み合わせてアプリケーション層のインターフェースを形成します。対応するコードは次のとおりです。
function loadWeatherData(callback) {
    getLocation(function(success, latitude, longitude){
        getWeather(latitude, longitude, function(weatherData){
            callback(weatherData);
        });
    });
}module.exports = {
loadWeatherData: loadWeatherData
}requireを使用して公開コードを導入します。コードを以下に示します。
//index.jsvar common = require('common.js')

Page({
    data: {
        weather: {}
    },
    onLoad: function () {        var that = this;
        common.loadWeatherData(function(data){
            that.setData({
                weather: data
            });
        });
    }
})ページのインターフェース実装では、対応するコードは次のとおりです。
<!--index.wxml--><view class="container">
  <view class="header">
      <view class="title">{{weather.results[0].currentCity}}</view>
      <view class="desc">{{weather.date}}</view>
  </view>

  <view class="menu-list">
      <view class="menu-item" wx:for="{{weather.results[0].weather_data}}" wx:key="*this">
        <view class="menu-item-main">
          <text class="menu-item-name">{{item.date}} {{item.weather}} {{item.wind}} {{item.temperature}}</text>
          <image class="menu-item-arrow" src="{{item.dayPictureUrl}}"></image>
        </view>
      </view>
</view></view>ページのスタイルシート実装は以下の通りです。
.header {
  padding: 30rpx;
  line-height: 1;
}.title {
  font-size: 52rpx;
}.desc {
  margin-top: 10rpx;
  color: #888888;
  font-size: 28rpx;
}.menu-list {
  display: flex;
  flex-direction: column;
  background-color: #fbf9fe;
  margin-top: 10rpx;
}.menu-item {
  color: #000000;
  display: flex;
  background-color: #fff;
  margin: 10rpx 30rpx;
  flex-direction: column;
}.menu-item-main {
  display: flex;
  padding: 40rpx;
  border-radius: 10rpx;
  align-items: center;
  font-size: 32rpx;
  justify-content: space-between;
}.menu-item-arrow {
  width: 96rpx;
  height: 96rpx;
  transition: 400ms;
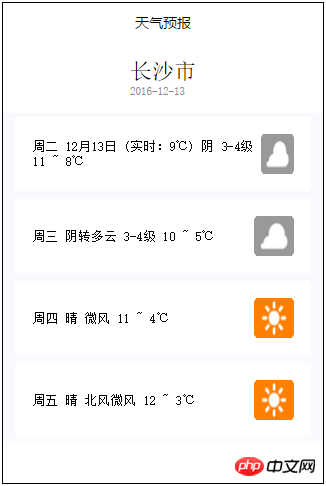
}天気予報アプレットの最終的な効果を図に示します。

WeChatミニプログラムの完全なソースコードのダウンロード
2.WeChatミニプログラムのデモ:Guokuと新しいバージョン
以上がミニプログラム開発天気予報の詳細内容です。詳細については、PHP 中国語 Web サイトの他の関連記事を参照してください。