非同期プロキシとプロキシプールのPythonコードの詳細説明
この記事では、主に非同期プロキシ クローラーとプロキシ プールを実装するための Python の関連知識を紹介します。非常に参考になります。
Python asyncio を使用して非同期プロキシ プールを実装してみましょう。 Web サイト上の無料プロキシは、プロキシの数が定期的に拡張され、プール内のプロキシの有効性がチェックされ、無効なプロキシが削除されます。同時に、サーバーは aiohttp を使用して実装され、他のプログラムは対応する URL にアクセスすることでプロキシ プールからプロキシを取得できます。
ソースコード
Github
環境
Python 3.5+
Redis
-
PhantomJS (オプション) )
スーパーバイザー (オプション)
なぜならコードでは、asyncio の async および await 構文が広範囲に使用されています。これらは Python 3.5 でのみ提供されているため、Python 3.6 以降を使用するのが最善です。依存関係
selenium
- Selenium パッケージは主に PhantomJS を操作するために使用されます。
コードについては以下で説明します。
- 1. クローラー部分
コアコード
async def start(self): for rule in self._rules: parser = asyncio.ensure_future(self._parse_page(rule)) # 根据规则解析页面来获取代理 logger.debug('{0} crawler started'.format(rule.rule_name)) if not rule.use_phantomjs: await page_download(ProxyCrawler._url_generator(rule), self._pages, self._stop_flag) # 爬取代理网站的页面 else: await page_download_phantomjs(ProxyCrawler._url_generator(rule), self._pages, rule.phantomjs_load_flag, self._stop_flag) # 使用PhantomJS爬取 await self._pages.join() parser.cancel() logger.debug('{0} crawler finished'.format(rule.rule_name))ログイン後にコピー上記のコアコードは、実際には、asyncio.Queueを使用して実装されたプロダクション/コンシューマモデル
です。以下は、このモデルの簡単な実装です。上記のコードを実行すると、次のような出力が得られます。- ページのクロール
- aiohttp によって実装された Web クローリング
produce 1 produce 2 consume 1 produce 3 produce 4 consume 2 produce 5 consume 3 consume 4 consume 5
ログイン後にコピー 関数
import asyncio
from random import random
async def produce(queue, n):
 for x in range(1, n + 1):
 print('produce ', x)
 await asyncio.sleep(random())
 await queue.put(x) # 向queue中放入item
async def consume(queue):
 while 1:
 item = await queue.get() # 等待从queue中获取item
 print('consume ', item)
 await asyncio.sleep(random())
 queue.task_done() # 通知queue当前item处理完毕
async def run(n):
 queue = asyncio.Queue()
 consumer = asyncio.ensure_future(consume(queue))
 await produce(queue, n) # 等待生产者结束
 await queue.join() # 阻塞直到queue不为空
 consumer.cancel() # 取消消费者任务,否则它会一直阻塞在get方法处
def aio_queue_run(n):
 loop = asyncio.get_event_loop()
 try:
 loop.run_until_complete(run(n)) # 持续运行event loop直到任务run(n)结束
 finally:
 loop.close()
if name == 'main':
 aio_queue_run(5)
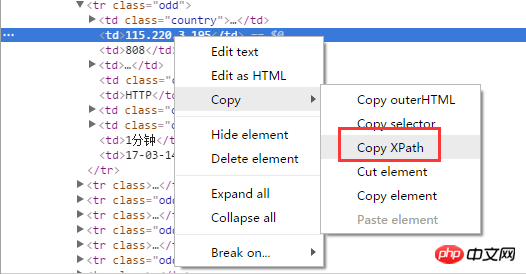
最も簡単な方法は、xpath を使用してプロキシを解析することです。Chrome ブラウザを使用している場合は、右クリックして選択したページ要素の xpath を直接取得できます。
Chrome をインストールします。 拡張機能「XPath Helper」を実行して、ページ上で直接 xpath をデバッグすることができます。これは非常に便利です:
BeautifulSoup は xpath をサポートせず、lxml を使用してページを解析します。 コードは次のとおりです。
async def page_download(urls, pages, flag):
 url_generator = urls
 async with aiohttp.ClientSession() as session:
 for url in url_generator:
  if flag.is_set():
  break
  await asyncio.sleep(uniform(delay - 0.5, delay + 1))
  logger.debug('crawling proxy web page {0}'.format(url))
  try:
  async with session.get(url, headers=headers, timeout=10) as response:
   page = await response.text()
   parsed = html.fromstring(decode_html(page)) # 使用bs4来辅助lxml解码网页:http://lxml.de/elementsoup.html#Using only the encoding detection
   await pages.put(parsed)
   url_generator.send(parsed) # 根据当前页面来获取下一页的地址
  except StopIteration:
  break
  except asyncio.TimeoutError:
  logger.error('crawling {0} timeout'.format(url))
  continue # TODO: use a proxy
  except Exception as e:
logger.error(e)Web サイトのクローリング、プロキシ解析、フィルタリングおよびその他の操作のルールは、各プロキシ Web サイトのルール クラスによって定義され、ルール クラスの管理には基本クラスが使用されます。基本クラスは次のように定義されます:
async def _parse_proxy(self, rule, page):
 ips = page.xpath(rule.ip_xpath) # 根据xpath解析得到list类型的ip地址集合
 ports = page.xpath(rule.port_xpath) # 根据xpath解析得到list类型的ip地址集合
 if not ips or not ports:
 logger.warning('{2} crawler could not get ip(len={0}) or port(len={1}), please check the xpaths or network'.
  format(len(ips), len(ports), rule.rule_name))
 return
 proxies = map(lambda x, y: '{0}:{1}'.format(x.text.strip(), y.text.strip()), ips, ports)
 if rule.filters: # 根据过滤字段来过滤代理,如“高匿”、“透明”等
 filters = []
 for i, ft in enumerate(rule.filters_xpath):
  field = page.xpath(ft)
  if not field:
  logger.warning('{1} crawler could not get {0} field, please check the filter xpath'.
   format(rule.filters[i], rule.rule_name))
  continue
  filters.append(map(lambda x: x.text.strip(), field))
 filters = zip(*filters)
 selector = map(lambda x: x == rule.filters, filters)
 proxies = compress(proxies, selector)
for proxy in proxies:
await self._proxies.put(proxy) # 解析后的代理放入asyncio.Queue中ip_xpath(必須) IP をクロールするための xpath ルール。 port_xpath(必須)
page_count クロールされたページの数。
urls_format urls_format によるページ アドレス 文字列 の形式. format(start_url, n) は、一般的なページ アドレス形式であるページ n のアドレスを生成します。
next_page_xpath、next_page_host xpath ルールを使用して次のページの URL (一般的には相対パス) を取得し、それをホストと組み合わせて、次のページのアドレス: next_page_host + url。
use_phantomjs、 phantomjs_load_flag
use_phantomjs は、Web サイトのクロールに PhantomJS を使用するかどうかを識別するために使用されます。使用する場合は、phantomjs_load_flag (Web ページ上の要素) を定義する必要があります。 , str type ) は、PhantomJS ページがロードされたことを示す記号です。 filtersフィルター フィールド コレクション、反復可能な型。プロキシをフィルタリングするために使用されます。
各フィルター フィールドの xpath ルールをクロールし、フィルター フィールドに順番に対応させます。
メタクラス CrawlerRuleMeta は、ルール クラスの定義を管理するために使用されます。たとえば、use_phantomjs=True が定義されている場合、phantomjs_load_flag が定義されている必要があります。定義されていない場合は、例外がスローされます
。これについてはここでは説明しません。目前已经实现的规则有西刺代理、快代理、360代理、66代理和 秘密代理。新增规则类也很简单,通过继承CrawlerRuleBase来定义新的规则类YourRuleClass,放在proxypool/rules目录下,并在该目录下的init.py中添加from . import YourRuleClass(这样通过CrawlerRuleBase.subclasses()就可以获取全部的规则类了),重启正在运行的proxy pool即可应用新的规则。
2. 检验部分
免费的代理虽然多,但是可用的却不多,所以爬取到代理后需要对其进行检验,有效的代理才能放入代理池中,而代理也是有时效性的,还要定期对池中的代理进行检验,及时移除失效的代理。
这部分就很简单了,使用aiohttp通过代理来访问某个网站,若超时,则说明代理无效。
async def validate(self, proxies):
 logger.debug('validator started')
 while 1:
 proxy = await proxies.get()
 async with aiohttp.ClientSession() as session:
  try:
  real_proxy = 'http://' + proxy
  async with session.get(self.validate_url, proxy=real_proxy, timeout=validate_timeout) as resp:
   self._conn.put(proxy)
  except Exception as e:
  logger.error(e)
 proxies.task_done()
3. server部分
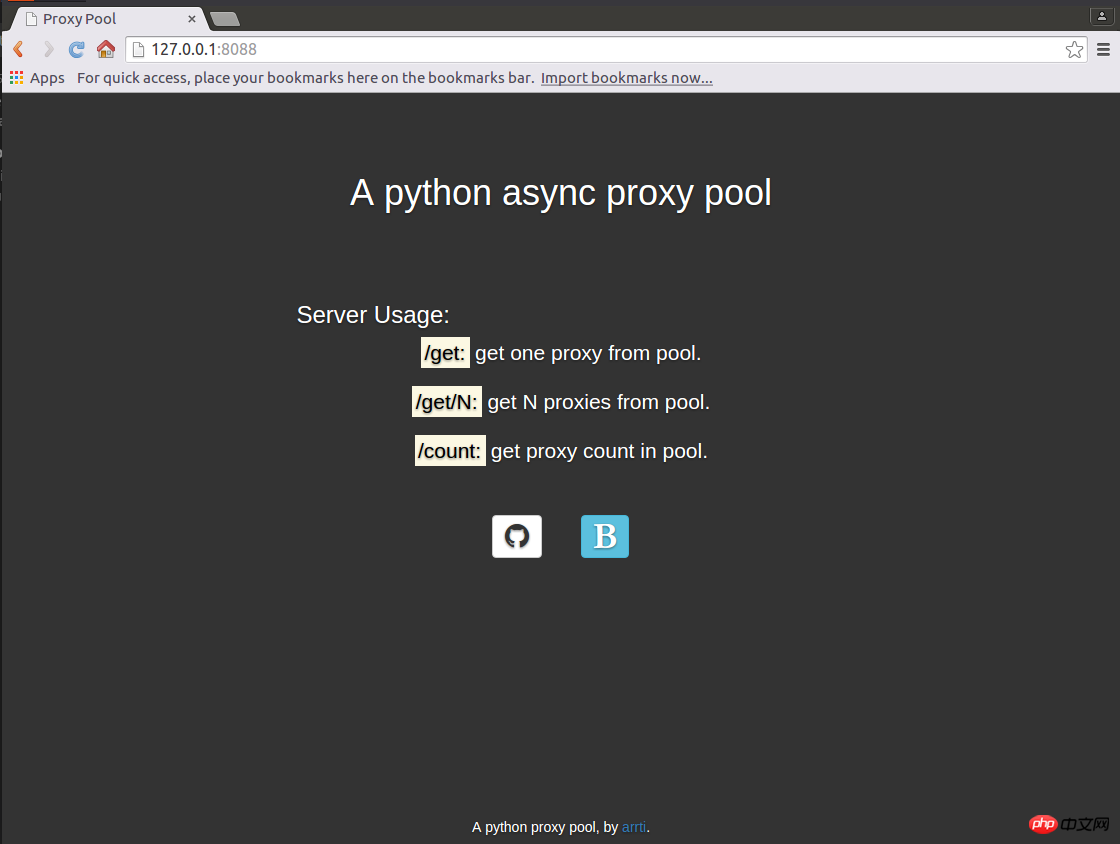
使用aiohttp实现了一个web server,启动后,访问http://host:port即可显示主页:

访问host:port/get来从代理池获取1个代理,如:'127.0.0.1:1080';
访问host:port/get/n来从代理池获取n个代理,如:"['127.0.0.1:1080', '127.0.0.1:443', '127.0.0.1:80']";
访问host:port/count来获取代理池的容量,如:'42'。
因为主页是一个静态的html页面,为避免每来一个访问主页的请求都要打开、读取以及关闭该html文件的开销,将其缓存到了redis中,通过html文件的修改时间来判断其是否被修改过,如果修改时间与redis缓存的修改时间不同,则认为html文件被修改了,则重新读取文件,并更新缓存,否则从redis中获取主页的内容。
返回代理是通过aiohttp.web.Response(text=ip.decode('utf-8'))实现的,text要求str类型,而从redis中获取到的是bytes类型,需要进行转换。返回的多个代理,使用eval即可转换为list类型。
返回主页则不同,是通过aiohttp.web.Response(body=main_page_cache, content_type='text/html') ,这里body要求的是bytes类型,直接将从redis获取的缓存返回即可,conten_type='text/html'必不可少,否则无法通过浏览器加载主页,而是会将主页下载下来——在运行官方文档中的示例代码的时候也要注意这点,那些示例代码基本上都没有设置content_type。
这部分不复杂,注意上面提到的几点,而关于主页使用的静态资源文件的路径,可以参考之前的博客《aiohttp之添加静态资源路径》。
4. 运行
将整个代理池的功能分成了3个独立的部分:
proxypool
定期检查代理池容量,若低于下限则启动代理爬虫并对代理检验,通过检验的爬虫放入代理池,达到规定的数量则停止爬虫。
proxyvalidator
用于定期检验代理池中的代理,移除失效代理。
proxyserver
启动server。
这3个独立的任务通过3个进程来运行,在Linux下可以使用supervisod来=管理这些进程,下面是supervisord的配置文件示例:
; supervisord.conf
[unix_http_server]
file=/tmp/supervisor.sock

[inet_http_server]
port=127.0.0.1:9001

[supervisord]
logfile=/tmp/supervisord.log
logfile_maxbytes=5MB
logfile_backups=10
loglevel=debug
pidfile=/tmp/supervisord.pid
nodaemon=false
minfds=1024
minprocs=200

[rpcinterface:supervisor]
supervisor.rpcinterface_factory = supervisor.rpcinterface:make_main_rpcinterface

[supervisorctl]
serverurl=unix:///tmp/supervisor.sock

[program:proxyPool]
command=python /path/to/ProxyPool/run_proxypool.py
redirect_stderr=true
stdout_logfile=NONE

[program:proxyValidator]
command=python /path/to/ProxyPool/run_proxyvalidator.py
redirect_stderr=true
stdout_logfile=NONE

[program:proxyServer]
command=python /path/to/ProxyPool/run_proxyserver.py
autostart=false
redirect_stderr=true
stdout_logfile=NONE
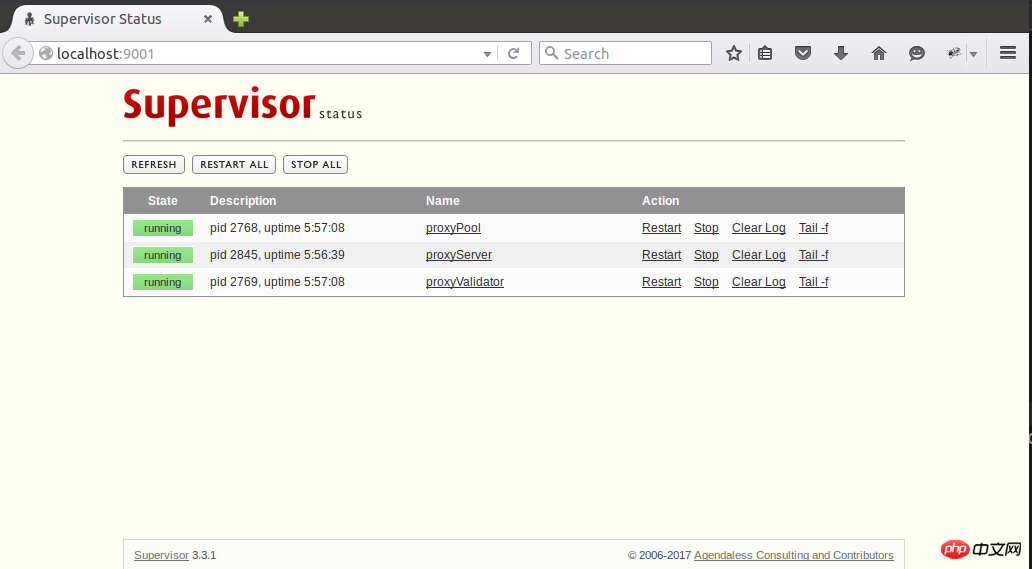
因为项目自身已经配置了日志,所以这里就不需要再用supervisord捕获stdout和stderr了。通过supervisord -c supervisord.conf启动supervisord,proxyPool和proxyServer则会随之自动启动,proxyServer需要手动启动,访问http://127.0.0.1:9001即可通过网页来管理这3个进程了:

supervisod的官方文档说目前(版本3.3.1)不支持python3,但是我在使用过程中没有发现什么问题,可能也是由于我并没有使用supervisord的复杂功能,只是把它当作了一个简单的进程状态监控和启停工具了。
【相关推荐】
1. Python免费视频教程
2. Python meets データ収集ビデオチュートリアル
以上が非同期プロキシとプロキシプールのPythonコードの詳細説明の詳細内容です。詳細については、PHP 中国語 Web サイトの他の関連記事を参照してください。

ホットAIツール

Undresser.AI Undress
リアルなヌード写真を作成する AI 搭載アプリ

AI Clothes Remover
写真から衣服を削除するオンライン AI ツール。

Undress AI Tool
脱衣画像を無料で

Clothoff.io
AI衣類リムーバー

AI Hentai Generator
AIヘンタイを無料で生成します。

人気の記事

ホットツール

メモ帳++7.3.1
使いやすく無料のコードエディター

SublimeText3 中国語版
中国語版、とても使いやすい

ゼンドスタジオ 13.0.1
強力な PHP 統合開発環境

ドリームウィーバー CS6
ビジュアル Web 開発ツール

SublimeText3 Mac版
神レベルのコード編集ソフト(SublimeText3)

ホットトピック
 7507
7507
 15
15
 1378
1378
 52
52
 78
78
 11
11
 19
19
 55
55
 hadidb:pythonの軽量で水平方向にスケーラブルなデータベース
Apr 08, 2025 pm 06:12 PM
hadidb:軽量で高レベルのスケーラブルなPythonデータベースHadIDB(HadIDB)は、Pythonで記述された軽量データベースで、スケーラビリティが高くなっています。 PIPインストールを使用してHADIDBをインストールする:PIPINSTALLHADIDBユーザー管理CREATEユーザー:CREATEUSER()メソッド新しいユーザーを作成します。 Authentication()メソッドは、ユーザーのIDを認証します。 fromhadidb.operationimportuseruser_obj = user( "admin"、 "admin")user_obj。
 Python:主要なアプリケーションの調査
Apr 10, 2025 am 09:41 AM
Pythonは、Web開発、データサイエンス、機械学習、自動化、スクリプトの分野で広く使用されています。 1)Web開発では、DjangoおよびFlask Frameworksが開発プロセスを簡素化します。 2)データサイエンスと機械学習の分野では、Numpy、Pandas、Scikit-Learn、Tensorflowライブラリが強力なサポートを提供します。 3)自動化とスクリプトの観点から、Pythonは自動テストやシステム管理などのタスクに適しています。
 2時間のPython計画:現実的なアプローチ
Apr 11, 2025 am 12:04 AM
2時間以内にPythonの基本的なプログラミングの概念とスキルを学ぶことができます。 1.変数とデータ型、2。マスターコントロールフロー(条件付きステートメントとループ)、3。機能の定義と使用を理解する4。
 MongoDBデータベースパスワードを表示するNAVICATの方法
Apr 08, 2025 pm 09:39 PM
Hash値として保存されているため、Navicatを介してMongoDBパスワードを直接表示することは不可能です。紛失したパスワードを取得する方法:1。パスワードのリセット。 2。構成ファイルを確認します(ハッシュ値が含まれる場合があります)。 3.コードを確認します(パスワードをハードコードできます)。
 Amazon AthenaでAWS接着クローラーの使用方法
Apr 09, 2025 pm 03:09 PM
データの専門家として、さまざまなソースから大量のデータを処理する必要があります。これは、データ管理と分析に課題をもたらす可能性があります。幸いなことに、AWS GlueとAmazon Athenaの2つのAWSサービスが役立ちます。
 Redisでサーバーを開始する方法
Apr 10, 2025 pm 08:12 PM
Redisサーバーを起動する手順には、以下が含まれます。オペレーティングシステムに従ってRedisをインストールします。 Redis-Server(Linux/Macos)またはRedis-Server.exe(Windows)を介してRedisサービスを開始します。 Redis-Cli ping(Linux/macos)またはRedis-Cli.exePing(Windows)コマンドを使用して、サービスステータスを確認します。 Redis-Cli、Python、node.jsなどのRedisクライアントを使用して、サーバーにアクセスします。
 Redisキューの読み方
Apr 10, 2025 pm 10:12 PM
Redisのキューを読むには、キュー名を取得し、LPOPコマンドを使用して要素を読み、空のキューを処理する必要があります。特定の手順は次のとおりです。キュー名を取得します:「キュー:キュー」などの「キュー:」のプレフィックスで名前を付けます。 LPOPコマンドを使用します。キューのヘッドから要素を排出し、LPOP Queue:My-Queueなどの値を返します。空のキューの処理:キューが空の場合、LPOPはnilを返し、要素を読む前にキューが存在するかどうかを確認できます。
 Redisのサーバーバージョンを表示する方法
Apr 10, 2025 pm 01:27 PM
質問:Redisサーバーバージョンを表示する方法は?コマンドラインツールRedis-Cli-versionを使用して、接続されたサーバーのバージョンを表示します。 Info Serverコマンドを使用して、サーバーの内部バージョンを表示し、情報を解析および返信する必要があります。クラスター環境では、各ノードのバージョンの一貫性を確認し、スクリプトを使用して自動的にチェックできます。スクリプトを使用して、Pythonスクリプトとの接続やバージョン情報の印刷など、表示バージョンを自動化します。


