

.propertiesを読み込み、ソースコードをプレースホルダーに置き換える方法の紹介 ${...}

この記事では、.properties ファイルの読み取りとプレースホルダー ${...} 置換ソース コード解析に関する関連知識を主に紹介しており、非常に参考価値があります。以下のエディターで見てみましょう
前書き
Bean の一部のパラメーターは、通常、.プロパティ ファイルを作成し、Bean がインスタンス化されるときに、Spring はプレースホルダー "${}" 置換を使用してこれらの .properties ファイルに設定されたパラメータを読み取り、それらを Bean の対応するパラメータに設定します。
このアプローチの最も典型的な例は、JDBC の構成です。この記事では、.properties ファイルを読み取り、プレースホルダー「${}」を置き換えるソース コードを学習します。まず、コードから始めて、DataSource を定義します。 4 つの JDBC パラメータをシミュレートします:
public class DataSource {

  /**
   * 驱动类
   */
  private String driveClass;

  /**
   * jdbc地址
   */
  private String url;

  /**
   * 用户名
   */
  private String userName;

  /**
   * 密码
   */
  private String password;

  public String getDriveClass() {
    return driveClass;
  }

  public void setDriveClass(String driveClass) {
    this.driveClass = driveClass;
  }

  public String getUrl() {
    return url;
  }

  public void setUrl(String url) {
    this.url = url;
  }

  public String getUserName() {
    return userName;
  }

  public void setUserName(String userName) {
    this.userName = userName;
  }

  public String getPassword() {
    return password;
  }

  public void setPassword(String password) {
    this.password = password;
  }

  @Override
  public String toString() {
    return "DataSource [driveClass=" + driveClass + ", url=" + url + ", userName=" + userName + ", password=" + password + "]";
  }
}db.properties ファイルを定義します:
 driveClass=0
 url=1
 userName=2
 password=3
property.xml ファイルを定義します:
<?xml version="1.0" encoding="UTF-8"?>
<beans xmlns="http://www.springframework.org/schema/beans"
  xmlns:xsi="http://www.w3.org/2001/XMLSchema-instance"
  xmlns:aop="http://www.springframework.org/schema/aop"
  xmlns:tx="http://www.springframework.org/schema/tx"
  xsi:schemaLocation="http://www.springframework.org/schema/beans
    http://www.springframework.org/schema/beans/spring-beans-3.0.xsd
    http://www.springframework.org/schema/aop
    http://www.springframework.org/schema/aop/spring-aop-3.0.xsd">

  <bean class="org.springframework.beans.factory.config.PropertyPlaceholderConfigurer">
    <property name="location" value="properties/db.properties"></property>
  </bean>

  <bean id="dataSource" class="org.xrq.spring.action.properties.DataSource">
    <property name="driveClass" value="${driveClass}" />
    <property name="url" value="${url}" />
    <property name="userName" value="${userName}" />
    <property name="password" value="${password}" />
  </bean>
</beans>テスト コードを作成します:
public class TestProperties {

  @Test
  public void testProperties() {
    ApplicationContext ac = new ClassPathXmlApplicationContext("spring/properties.xml");

    DataSource dataSource = (DataSource)ac.getBean("dataSource");
    System.out.println(dataSource);
  }
}実行結果はポストされないことは明らかです。 Spring は、プロパティ ファイル内の property を読み取り、「${}」プレースホルダーを置き換える方法です。
PropertyPlaceholderConfigurer クラスの分析
property.xml ファイルには、PropertyPlaceholderConfigurer クラスが含まれています。このクラスの継承関係図を見てください。
見てください、この図から分析できる最も重要な点は、PropertyPlaceholderConfigurer が BeanFactoryPostProcessor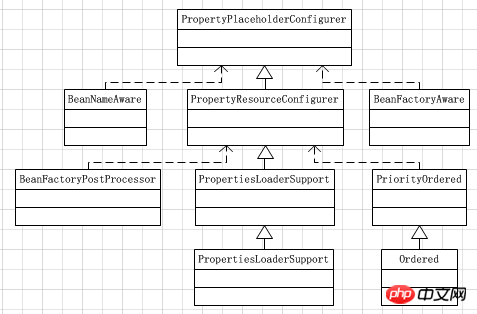 interface
Spring コンテキストは、すべての Bean 定義がロードされた後、Bean の前に postProcessBeanFactory メソッドを 1 回渡す必要があることが予想されます。プレースホルダー「${}」 がインスタンス化されました。 .properties ファイルのソース コード分析を読み取る
postProcessBeanFactory メソッドの実装を見てみましょう:
public void postProcessBeanFactory(ConfigurableListableBeanFactory beanFactory) throws BeansException {
  try {
    Properties mergedProps = mergeProperties();

    // Convert the merged properties, if necessary.
    convertProperties(mergedProps);
    // Let the subclass process the properties.
    processProperties(beanFactory, mergedProps);
  }
  catch (IOException ex) {
    throw new BeanInitializationException("Could not load properties", ex);
  }
}protected Properties mergeProperties() throws IOException {
Properties result = new Properties();
if (this.localOverride) {
// Load properties from file upfront, to let local properties override.
loadProperties(result);
}
if (this.localProperties != null) {
for (Properties localProp : this.localProperties) {
CollectionUtils.mergePropertiesIntoMap(localProp, result);
}
}
if (!this.localOverride) {
// Load properties from file afterwards, to let those properties override.
loadProperties(result);
}
return result;
}protected void loadProperties(Properties props) throws IOException {
if (this.locations != null) {
for (Resource location : this.locations) {
if (logger.isInfoEnabled()) {
logger.info("Loading properties file from " + location);
}
InputStream is = null;
try {
is = location.getInputStream();
String filename = null;
try {
filename = location.getFilename();
} catch (IllegalStateException ex) {
// resource is not file-based. See SPR-7552.
}
if (filename != null && filename.endsWith(XML_FILE_EXTENSION)) {
this.propertiesPersister.loadFromXml(props, is);
}
else {
if (this.fileEncoding != null) {
this.propertiesPersister.load(props, new InputStreamReader(is, this.fileEncoding));
}
else {
this.propertiesPersister.load(props, is);
}
}
}
catch (IOException ex) {
if (this.ignoreResourceNotFound) {
if (logger.isWarnEnabled()) {
logger.warn("Could not load properties from " + location + ": " + ex.getMessage());
}
}
else {
throw ex;
}
}
finally {
if (is != null) {
is.close();
}
}
}
}
}プレースホルダー "${...}" でソース コード分析を置き換えます
上記の .properties ファイルの読み取りプロセスを見てきましたが、その後、"${}" プレースホルダーを置き換えるか、postProcessBeanFactory メソッドに戻る必要があります。 :
public void postProcessBeanFactory(ConfigurableListableBeanFactory beanFactory) throws BeansException {
  try {
    Properties mergedProps = mergeProperties();

    // Convert the merged properties, if necessary.
    convertProperties(mergedProps);
    // Let the subclass process the properties.
    processProperties(beanFactory, mergedProps);
  }
  catch (IOException ex) {
    throw new BeanInitializationException("Could not load properties", ex);
  }
}、Bean 解析プロセスに精通している友人は、これをよく知っているはずです。 9 行目の processProperties メソッドに従います。 protected void processProperties(ConfigurableListableBeanFactory beanFactoryToProcess, Properties props)
throws BeansException {
StringValueResolver valueResolver = new PlaceholderResolvingStringValueResolver(props);
BeanDefinitionVisitor visitor = new BeanDefinitionVisitor(valueResolver);
String[] beanNames = beanFactoryToProcess.getBeanDefinitionNames();
for (String curName : beanNames) {
// Check that we're not parsing our own bean definition,
// to avoid failing on unresolvable placeholders in properties file locations.
if (!(curName.equals(this.beanName) && beanFactoryToProcess.equals(this.beanFactory))) {
BeanDefinition bd = beanFactoryToProcess.getBeanDefinition(curName);
try {
visitor.visitBeanDefinition(bd);
}
catch (Exception ex) {
throw new BeanDefinitionStoreException(bd.getResourceDescription(), curName, ex.getMessage());
}
}
}
// New in Spring 2.5: resolve placeholders in alias target names and aliases as well.
beanFactoryToProcess.resolveAliases(valueResolver);
// New in Spring 3.0: resolve placeholders in embedded values such as annotation attributes.
beanFactoryToProcess.addEmbeddedValueResolver(valueResolver);
}
を解析する必要があります。 行 7 は、BeanFactory を通じてすべての Bean 定義の名前を取得します。 8 行目ですべての Bean 定義の名前のトラバースを開始します。 11 行目の最初の判断に注意してください
"!(curName.equals(this.beanName)" 、this.beanName は PropertyPlaceholderConfigurer を参照します。これは PropertyPlaceholderConfigurer を意味します。プレースホルダー「${...}」は、それ自体では解析されません。着重跟14行的代码,BeanDefinitionVistor的visitBeanDefinition方法,传入BeanDefinition:
public void visitBeanDefinition(BeanDefinition beanDefinition) {
  visitParentName(beanDefinition);
  visitBeanClassName(beanDefinition);
  visitFactoryBeanName(beanDefinition);
  visitFactoryMethodName(beanDefinition);
  visitScope(beanDefinition);
  visitPropertyValues(beanDefinition.getPropertyValues());
  ConstructorArgumentValues cas = beanDefinition.getConstructorArgumentValues();
  visitIndexedArgumentValues(cas.getIndexedArgumentValues());
  visitGenericArgumentValues(cas.getGenericArgumentValues());
}看到这个方法轮番访问
protected void visitPropertyValues(MutablePropertyValues pvs) {
  PropertyValue[] pvArray = pvs.getPropertyValues();
  for (PropertyValue pv : pvArray) {
    Object newVal = resolveValue(pv.getValue());
    if (!ObjectUtils.nullSafeEquals(newVal, pv.getValue())) {
      pvs.add(pv.getName(), newVal);
    }
  }
}获取属性数组进行遍历,第4行的代码对属性值进行解析获取新属性值,第5行判断新属性值与原属性值不等,第6行的代码用新属性值替换原属性值。因此跟一下第4行的resolveValue方法:
protected Object resolveValue(Object value) {
  if (value instanceof BeanDefinition) {
    visitBeanDefinition((BeanDefinition) value);
  }
  else if (value instanceof BeanDefinitionHolder) {
    visitBeanDefinition(((BeanDefinitionHolder) value).getBeanDefinition());
  }
  else if (value instanceof RuntimeBeanReference) {
    RuntimeBeanReference ref = (RuntimeBeanReference) value;
    String newBeanName = resolveStringValue(ref.getBeanName());
    if (!newBeanName.equals(ref.getBeanName())) {
      return new RuntimeBeanReference(newBeanName);
    }
  }
  else if (value instanceof RuntimeBeanNameReference) {
    RuntimeBeanNameReference ref = (RuntimeBeanNameReference) value;
    String newBeanName = resolveStringValue(ref.getBeanName());
    if (!newBeanName.equals(ref.getBeanName())) {
      return new RuntimeBeanNameReference(newBeanName);
    }
  }
  else if (value instanceof Object[]) {
    visitArray((Object[]) value);
  }
  else if (value instanceof List) {
    visitList((List) value);
  }
  else if (value instanceof Set) {
    visitSet((Set) value);
  }
  else if (value instanceof Map) {
    visitMap((Map) value);
  }
  else if (value instanceof TypedStringValue) {
    TypedStringValue typedStringValue = (TypedStringValue) value;
    String stringValue = typedStringValue.getValue();
    if (stringValue != null) {
      String visitedString = resolveStringValue(stringValue);
      typedStringValue.setValue(visitedString);
    }
  }
  else if (value instanceof String) {
    return resolveStringValue((String) value);
  }
  return value;
}这里主要对value类型做一个判断,我们配置文件里面配置的是字符串,因此就看字符串相关代码,即34行的判断进去,其余的差不多,可以自己看一下源码是怎么做的。第35~第36行的代码就是获取属性值,第38行的代码resolveStringValue方法解析字符串:
protected String resolveStringValue(String strVal) {
  if (this.valueResolver == null) {
    throw new IllegalStateException("No StringValueResolver specified - pass a resolver " +
        "object into the constructor or override the 'resolveStringValue' method");
  }
  String resolvedValue = this.valueResolver.resolveStringValue(strVal);
  // Return original String if not modified.
  return (strVal.equals(resolvedValue) ? strVal : resolvedValue);
}继续跟第6行的方法,valueResolver前面说过了,是传入的一个PlaceholderResolvingStringValueResolver,看一下resolveStringValue方法实现:
 public String resolveStringValue(String strVal) throws BeansException {
   String value = this.helper.replacePlaceholders(strVal, this.resolver);
   return (value.equals(nullValue) ? null : value);
}第2行的replacePlaceholders方法顾名思义,替换占位符,它位于PropertyPlaceholderHelper类中,跟一下这个方法:
 public String replacePlaceholders(String value, PlaceholderResolver placeholderResolver) {
   Assert.notNull(value, "Argument 'value' must not be null.");
   return parseStringValue(value, placeholderResolver, new HashSet<String>());
}继续跟第3行的parseStringValue方法,即追踪到了替换占位符的核心代码中:
protected String parseStringValue(
String strVal, PlaceholderResolver placeholderResolver, Set<String> visitedPlaceholders) {
StringBuilder buf = new StringBuilder(strVal);
int startIndex = strVal.indexOf(this.placeholderPrefix);
while (startIndex != -1) {
int endIndex = findPlaceholderEndIndex(buf, startIndex);
if (endIndex != -1) {
String placeholder = buf.substring(startIndex + this.placeholderPrefix.length(), endIndex);
if (!visitedPlaceholders.add(placeholder)) {
throw new IllegalArgumentException(
"Circular placeholder reference '" + placeholder + "' in property definitions");
}
// Recursive invocation, parsing placeholders contained in the placeholder key.
placeholder = parseStringValue(placeholder, placeholderResolver, visitedPlaceholders);
// Now obtain the value for the fully resolved key...
String propVal = placeholderResolver.resolvePlaceholder(placeholder);
if (propVal == null && this.valueSeparator != null) {
int separatorIndex = placeholder.indexOf(this.valueSeparator);
if (separatorIndex != -1) {
String actualPlaceholder = placeholder.substring(0, separatorIndex);
String defaultValue = placeholder.substring(separatorIndex + this.valueSeparator.length());
propVal = placeholderResolver.resolvePlaceholder(actualPlaceholder);
if (propVal == null) {
propVal = defaultValue;
}
}
}
if (propVal != null) {
// Recursive invocation, parsing placeholders contained in the
// previously resolved placeholder value.
propVal = parseStringValue(propVal, placeholderResolver, visitedPlaceholders);
buf.replace(startIndex, endIndex + this.placeholderSuffix.length(), propVal);
if (logger.isTraceEnabled()) {
logger.trace("Resolved placeholder '" + placeholder + "'");
}
startIndex = buf.indexOf(this.placeholderPrefix, startIndex + propVal.length());
}
else if (this.ignoreUnresolvablePlaceholders) {
// Proceed with unprocessed value.
startIndex = buf.indexOf(this.placeholderPrefix, endIndex + this.placeholderSuffix.length());
}
else {
throw new IllegalArgumentException("Could not resolve placeholder '" + placeholder + "'");
}
visitedPlaceholders.remove(placeholder);
}
else {
startIndex = -1;
}
}
return buf.toString();
}过一下此流程:
获取占位符前缀"${"的位置索引startIndex
占位符前缀"${"存在,从"${"后面开始获取占位符后缀"}"的位置索引endIndex
如果占位符前缀位置索引startIndex与占位符后缀的位置索引endIndex都存在,截取中间的部分placeHolder
从Properties中获取placeHolder对应的值propVal
如果propVal不存在,尝试对placeHolder使用":"进行一次分割,如果分割出来有结果,那么前面一部分命名为actualPlaceholder,后面一部分命名为defaultValue,尝试从Properties中获取actualPlaceholder对应的value,如果存在则取此value,如果不存在则取defaultValue,最终赋值给propVal
返回propVal,就是替换之后的值
流程很长,通过这样一整个的流程,将占位符"${...}"中的内容替换为了我们需要的值。
【相关推荐】
1. Java免费视频教程
2. JAVA教程手册
3. 全面解析Java注解
以上が.propertiesを読み込み、ソースコードをプレースホルダーに置き換える方法の紹介 ${...}の詳細内容です。詳細については、PHP 中国語 Web サイトの他の関連記事を参照してください。

ホットAIツール

Undresser.AI Undress
リアルなヌード写真を作成する AI 搭載アプリ

AI Clothes Remover
写真から衣服を削除するオンライン AI ツール。

Undress AI Tool
脱衣画像を無料で

Clothoff.io
AI衣類リムーバー

Video Face Swap
完全無料の AI 顔交換ツールを使用して、あらゆるビデオの顔を簡単に交換できます。

人気の記事
ホットツール

メモ帳++7.3.1
使いやすく無料のコードエディター

SublimeText3 中国語版
中国語版、とても使いやすい

ゼンドスタジオ 13.0.1
強力な PHP 統合開発環境

ドリームウィーバー CS6
ビジュアル Web 開発ツール

SublimeText3 Mac版
神レベルのコード編集ソフト(SublimeText3)
ホットトピック
 7652
7652
 15
1393
52
91
11
37
110
15
1393
52
91
11
37
110


 ジャワのウェカ
Aug 30, 2024 pm 04:28 PM
ジャワのウェカ
Aug 30, 2024 pm 04:28 PM
Java の Weka へのガイド。ここでは、weka java の概要、使い方、プラットフォームの種類、利点について例を交えて説明します。

 Java Springのインタビューの質問
Aug 30, 2024 pm 04:29 PM
Java Springのインタビューの質問
Aug 30, 2024 pm 04:29 PM
この記事では、Java Spring の面接で最もよく聞かれる質問とその詳細な回答をまとめました。面接を突破できるように。
 Java 8 Stream Foreachから休憩または戻ってきますか?
Feb 07, 2025 pm 12:09 PM
Java 8 Stream Foreachから休憩または戻ってきますか?
Feb 07, 2025 pm 12:09 PM
Java 8は、Stream APIを導入し、データ収集を処理する強力で表現力のある方法を提供します。ただし、ストリームを使用する際の一般的な質問は次のとおりです。 従来のループにより、早期の中断やリターンが可能になりますが、StreamのForeachメソッドはこの方法を直接サポートしていません。この記事では、理由を説明し、ストリーム処理システムに早期終了を実装するための代替方法を調査します。 さらに読み取り:JavaストリームAPIの改善 ストリームを理解してください Foreachメソッドは、ストリーム内の各要素で1つの操作を実行する端末操作です。その設計意図はです
 Java での日付までのタイムスタンプ
Aug 30, 2024 pm 04:28 PM
Java での日付までのタイムスタンプ
Aug 30, 2024 pm 04:28 PM
Java での日付までのタイムスタンプに関するガイド。ここでは、Java でタイムスタンプを日付に変換する方法とその概要について、例とともに説明します。
 カプセルの量を見つけるためのJavaプログラム
Feb 07, 2025 am 11:37 AM
カプセルの量を見つけるためのJavaプログラム
Feb 07, 2025 am 11:37 AM
カプセルは3次元の幾何学的図形で、両端にシリンダーと半球で構成されています。カプセルの体積は、シリンダーの体積と両端に半球の体積を追加することで計算できます。このチュートリアルでは、さまざまな方法を使用して、Javaの特定のカプセルの体積を計算する方法について説明します。 カプセルボリュームフォーミュラ カプセルボリュームの式は次のとおりです。 カプセル体積=円筒形の体積2つの半球体積 で、 R:半球の半径。 H:シリンダーの高さ(半球を除く)。 例1 入力 RADIUS = 5ユニット 高さ= 10単位 出力 ボリューム= 1570.8立方ユニット 説明する 式を使用してボリュームを計算します。 ボリューム=π×R2×H(4
 未来を創る: まったくの初心者のための Java プログラミング
Oct 13, 2024 pm 01:32 PM
未来を創る: まったくの初心者のための Java プログラミング
Oct 13, 2024 pm 01:32 PM
Java は、初心者と経験豊富な開発者の両方が学習できる人気のあるプログラミング言語です。このチュートリアルは基本的な概念から始まり、高度なトピックに進みます。 Java Development Kit をインストールしたら、簡単な「Hello, World!」プログラムを作成してプログラミングを練習できます。コードを理解したら、コマンド プロンプトを使用してプログラムをコンパイルして実行すると、コンソールに「Hello, World!」と出力されます。 Java の学習はプログラミングの旅の始まりであり、習熟が深まるにつれて、より複雑なアプリケーションを作成できるようになります。
